The LG Archivist looks like an amazing scanner. I think they responded well to what the market wants. I wish I could afford one. However, I would have to disagree that it is “now a much better scanner than the HDS+ for the money.”
To its advantage, the Archivist comes with a ready-to-use PC. The HDS+ did not. So that’s maybe a $5K to $10K advantage, depending on how you configure the computer. However, what few people mention is that they require you to spend about $7,500 on mandatory training to learn how to use it. Filmfabriek didn’t ask me to spend a dime learning how to use their box. That easily offsets the cost of the PC.
Further, there is no wet gate option. You claim that it would be “not hard to jerry-rig a similar wet gate feature for the Archivist.” Really? Then why didn’t LG simply engineer one for themselves? Time wasted building a solution is money lost. Also: LG claims that its shrunken film tolerance is 5.5%. The HDS+ offers 10% tolerance. Advantage: Filmfabriek.
Those warped fllm gates? They cost extra. I’m sure they make the Archivist a better handler of shrunken film, but they’re not free or cheap. Better for the money? Yes, if they were included in the package. But they’re not.
The HDS+ drops frames? News to me. Do you have experience with an HDS+? Please share your insight. I’d love to learn how to avoid dropping frames during capture. I haven’t experienced it yet, but anything’s possible.
Even if I had my $40K back in my bank account, I still couldn’t afford the Archivist. If it costs the same as the HDS+, but I have to pay $7,500 for training + extra for warped film gates and other accessories + I have to wind my films onto cores (time lost), then I’m not sure it’s such a better value. And it doesn’t have wet gate (which I don’t want to spend time engineering on my own).
The Archivist looks like an outstanding scanner, and it appears that LG is really starting to hit the sweet spot for an affordable sub-$50K scanner. I would LOVE to have one! But to say that it’s a much better scanner than the HDS+ for the money? That doesn’t correspond with the facts that I’m aware of.
A friend of mine has already done it. Why not include it? Well because you either need to use isopropyl which isn’t always safe for film, or you need to use perc which is how proper wetgate systems work.
It has spacers you scan on either cores or reels as you wish. I think you may be quoting the Scanstation training price, like I said everything is cheaper on the Archivist compared to the Scanstation, including training and service. That said it still has an annual service contract, and without it you won’t be getting parts, repairs, or upgrades.
On the Scanstation they aren’t cheap, on the Archivist the same warped gates are less than half the price. Sure you can still call them expensive, but they do an amazing job.
I’ll send you a private message regarding value. The HDS+ is a good scanner though, don’t get me wrong. It may have been the best affordable small format one before the Archivist.
Interesting, although bit hard to classify it as a scanner when it’s more designed as a film inspection device: “The FI-16 was created to inspect and analyze film in order to prep the film for digitization. Therefore, when building FI-16 we were less concerned about resolution and more concerned about getting a digital copy quickly while also finding flaws within the film so that archives could make decisions on what films to digitize professionally first based on film condition.”
I’d expect this means it isn’t intended to transfer films to digital. Some of the flatbed editors also have in-built “scanners” but again intended as a way to more clearly see what you’re doing on the bench rather than as a way to produce a telecine. Even more confusingly a company called “Vintage Cloud Steenbeck” has a product they call a Film Digitizer, not to be confused with Steenbeck film editing tables! €180,000 minimum deposit of ~€21K… I’m not sure who would buy it or need it at that price!
It’s a machine no one needs. Any archive doing proper archival scanning doesn’t need a log of every defect in a film. Just scan it. The logs are for those who adore metadata that they’ll never use. The only possibly use is to analyze film that’s going to be photochemically printed to see if it needs repairs that wouldn’t be needed for scanning.
The Kinetta can do that even if no perforation is available. All real-time, during scanning. User has full control over what is used for a stabilization reference if desired, unlike the LG closed-box approach.
In my past life I’ve seen many instances of a full room of reels that no one knowns what they have. The use case for a high speed inspection with proxy is a valid one, regardless if I agree or disagree with the premise.
That’s a nice idea and is straight out of the kinetta marketing materials. I get the idea and love it, but in practice arcives don’t really work that way.
We know archives who have fast scanners (60fps ScanStations) who simply don’t scan everything, only select stuff because no matter what it’s a lot of work to do a scan and it’s a massive amount of data to deal with, something most film archives aren’t prepared to handle.
However, we have worked with other archives to make them overscanned lowish resolution (720p) scans with metadata burn-ins, cheap. The idea is that they come back to us when they’re ready for high res scans, but in the mean time they get to see what they have (many don’t know), what condition it’s in (many don’t know), and they get files that are more accessible to researchers who are usually the ones who end up paying for a high res scan. One archive we work with has a collection that someone captured digitized years ago, but messed up all the file names, so nothing matches their digital reference files.
Yep, although many would just use a cheap scanner like the Cintel or a XENA to do preview scans if the image quality isn’t essential, so I personally don’t see the use in the “Filmic FI-16” I reckon it’d be better to just use a Cintel if the quality isn’t essential. The Cintel also has the advantages of being cheap going straight to Prores and doing a really good job of audio - its optical audio reader is better than the sound heads in the more expensive scanners so that’s part of the job already done if using it to make previews for potential later scans and you have sound film.
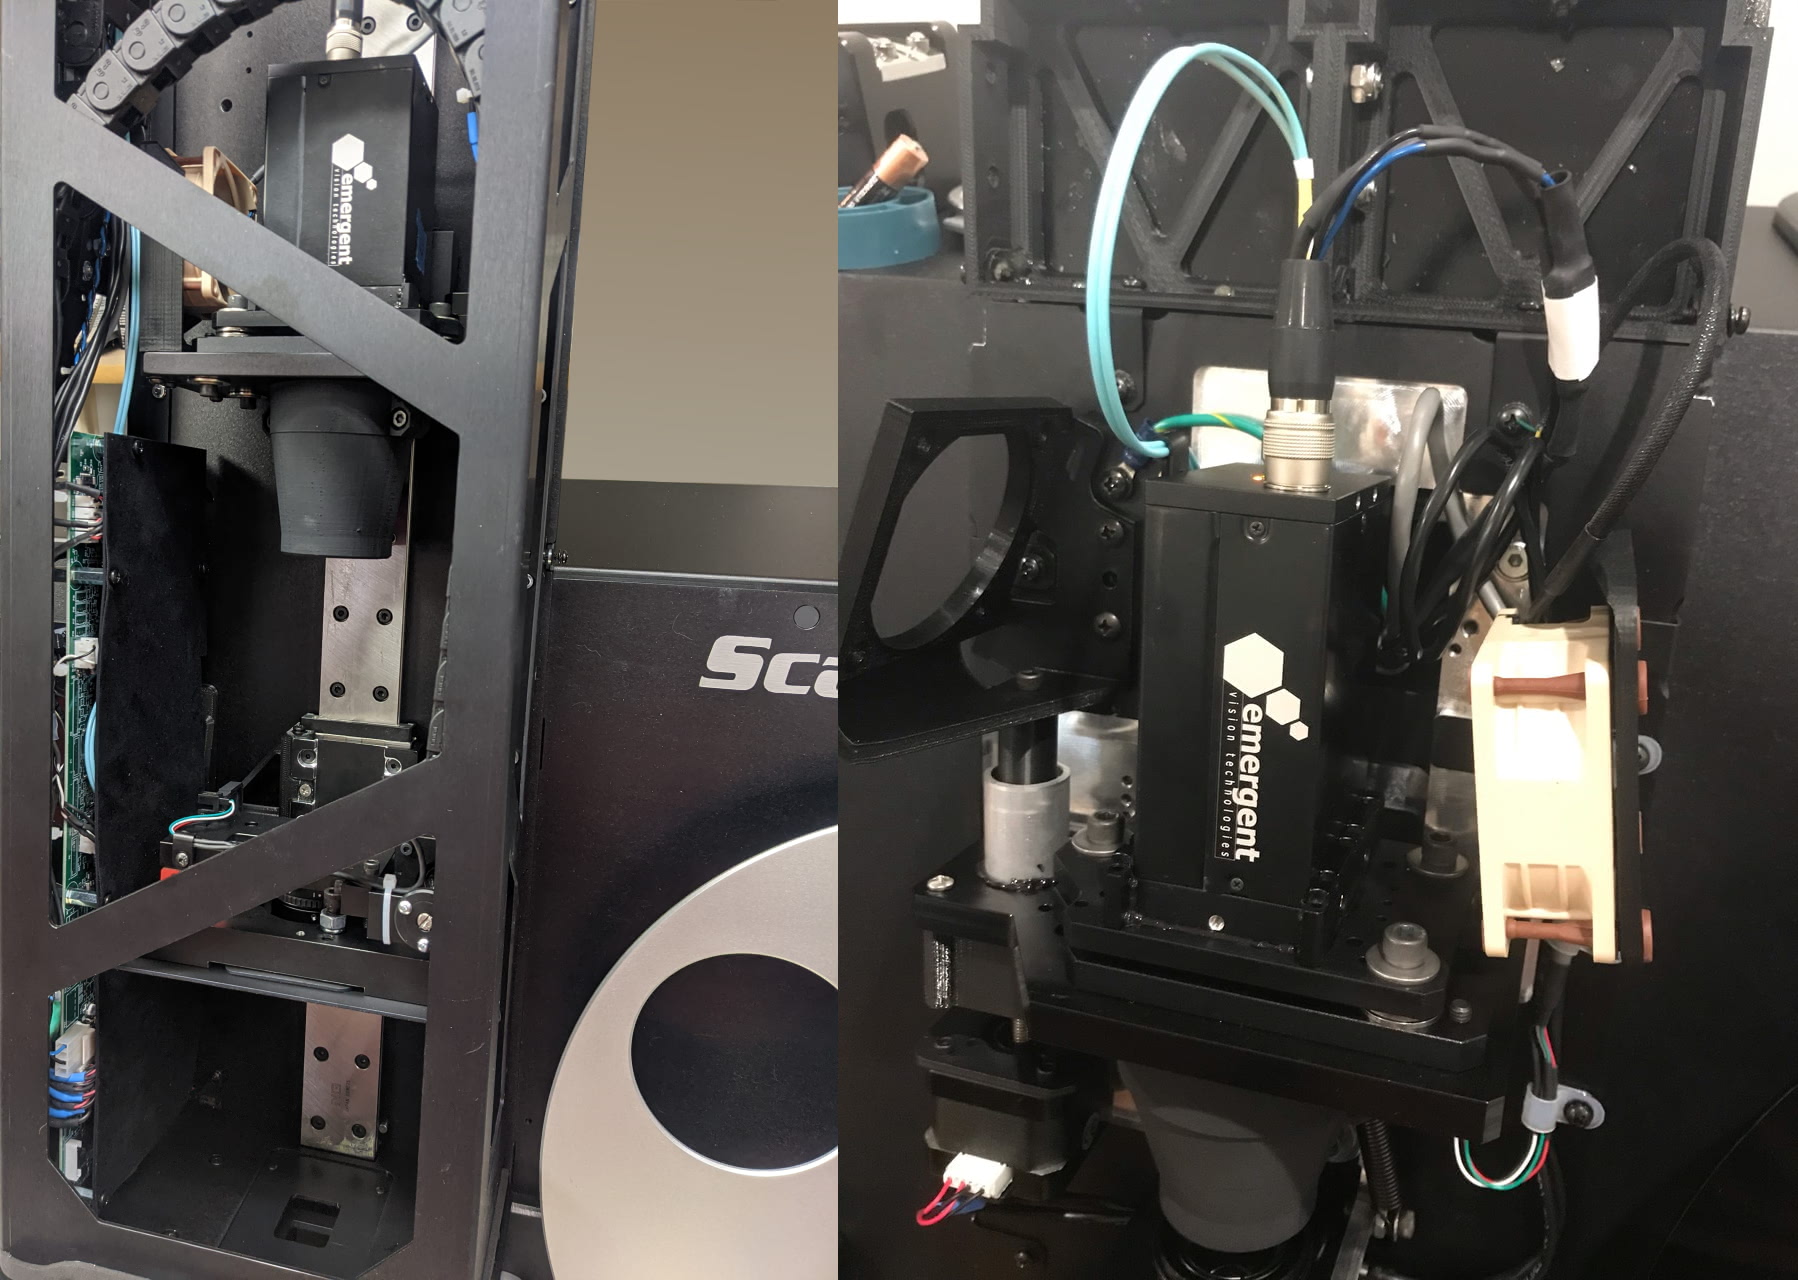
On the left is the Scanstation, the right the Archivist. These are current model machines. You can see they have an Emergent camera like this with a Sony sensor.
In the Scanstation the optics are a Schneider-Kreuznach Makro-Symmar, and in the Archivist they use a RodagonD1x.
There’s a fan on the camera to cool it and eliminate sensor noise. Interestingly there’s a mount ready to go for a second fan in the photo of the Archivist. Of course this is not the most efficient way to add external cooling to the camera, so if you have a different camera with the same sensor then it may be that you need to attach a heatsink to it to dissipate the heat.
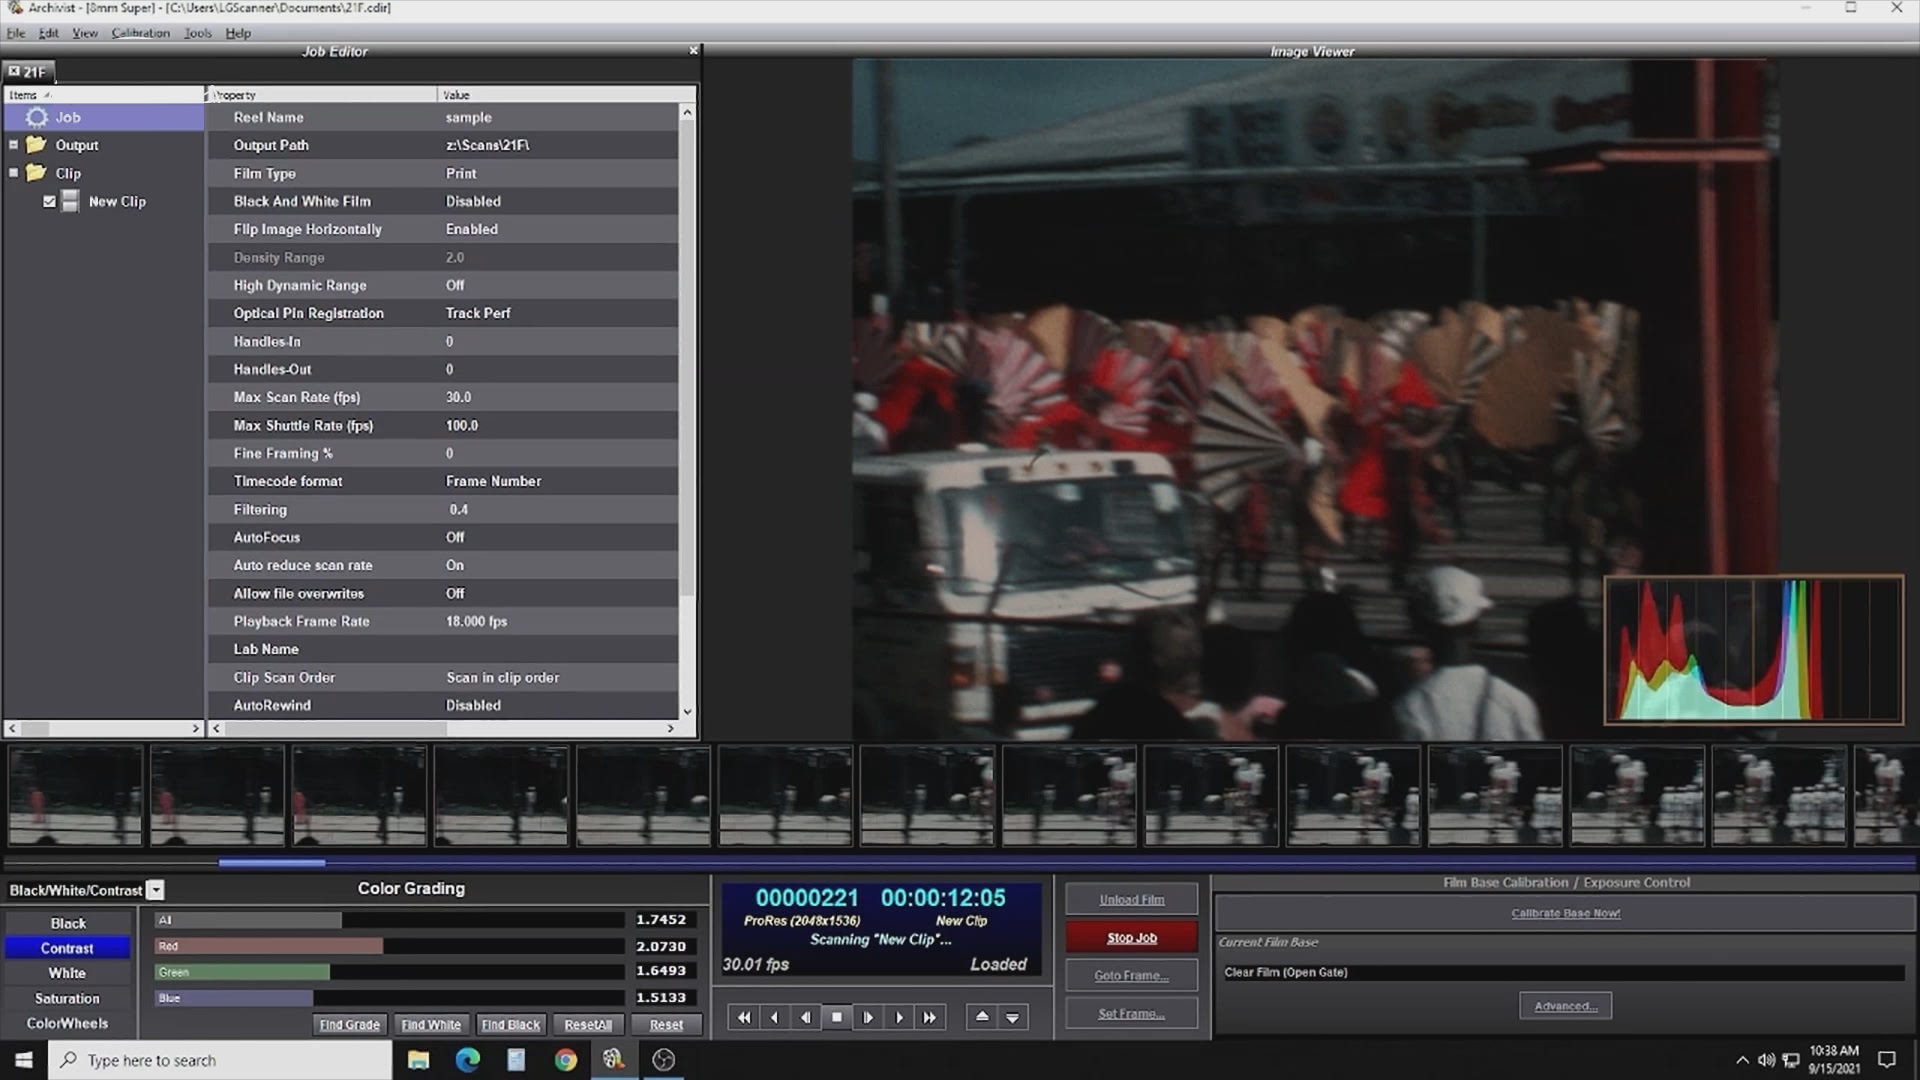
I’ve removed the company’s logo to reduce identification of the source since I don’t want to be shaming them, but this actually shows how most users use these machines. In the settings you will notice “Filtering 0.4” that is the default setting for these machines, it artificially sharpens the scan. Professional users switch this off since it degrades the quality of the scan. This one also has the HDR license which you can tell because it’s not greyed out, but they’re not using it for this scan. Again this is the default setting you have to switch it on to make it do 2-flash HDR and most of the time you won’t notice a huge difference in quality. Finally they’re doing colour grading using the in-built grading tool in the scanning software, this is also not advised as it can degrade the quality of the scan, it’s better to use a professional tool like Resolve to do the grading afterwards. A little bit of an RGB tweak is OK and doesn’t hurt, but you really want to do your own tests first before you ever do that for restoration.
As for the default settings, one of my friends puts it this way: “The Scanstation comes with stupid default settings.” If you don’t want to have to adjust all the settings every time you set up a scan what you basically have to do is make a bunch of project files, fix all the settings, and then label each project file accordingly to the settings. Then when you do a scan you just open the appropriate project file (e.g. “6.5K 16mm Optical”) and then save-as a new project.
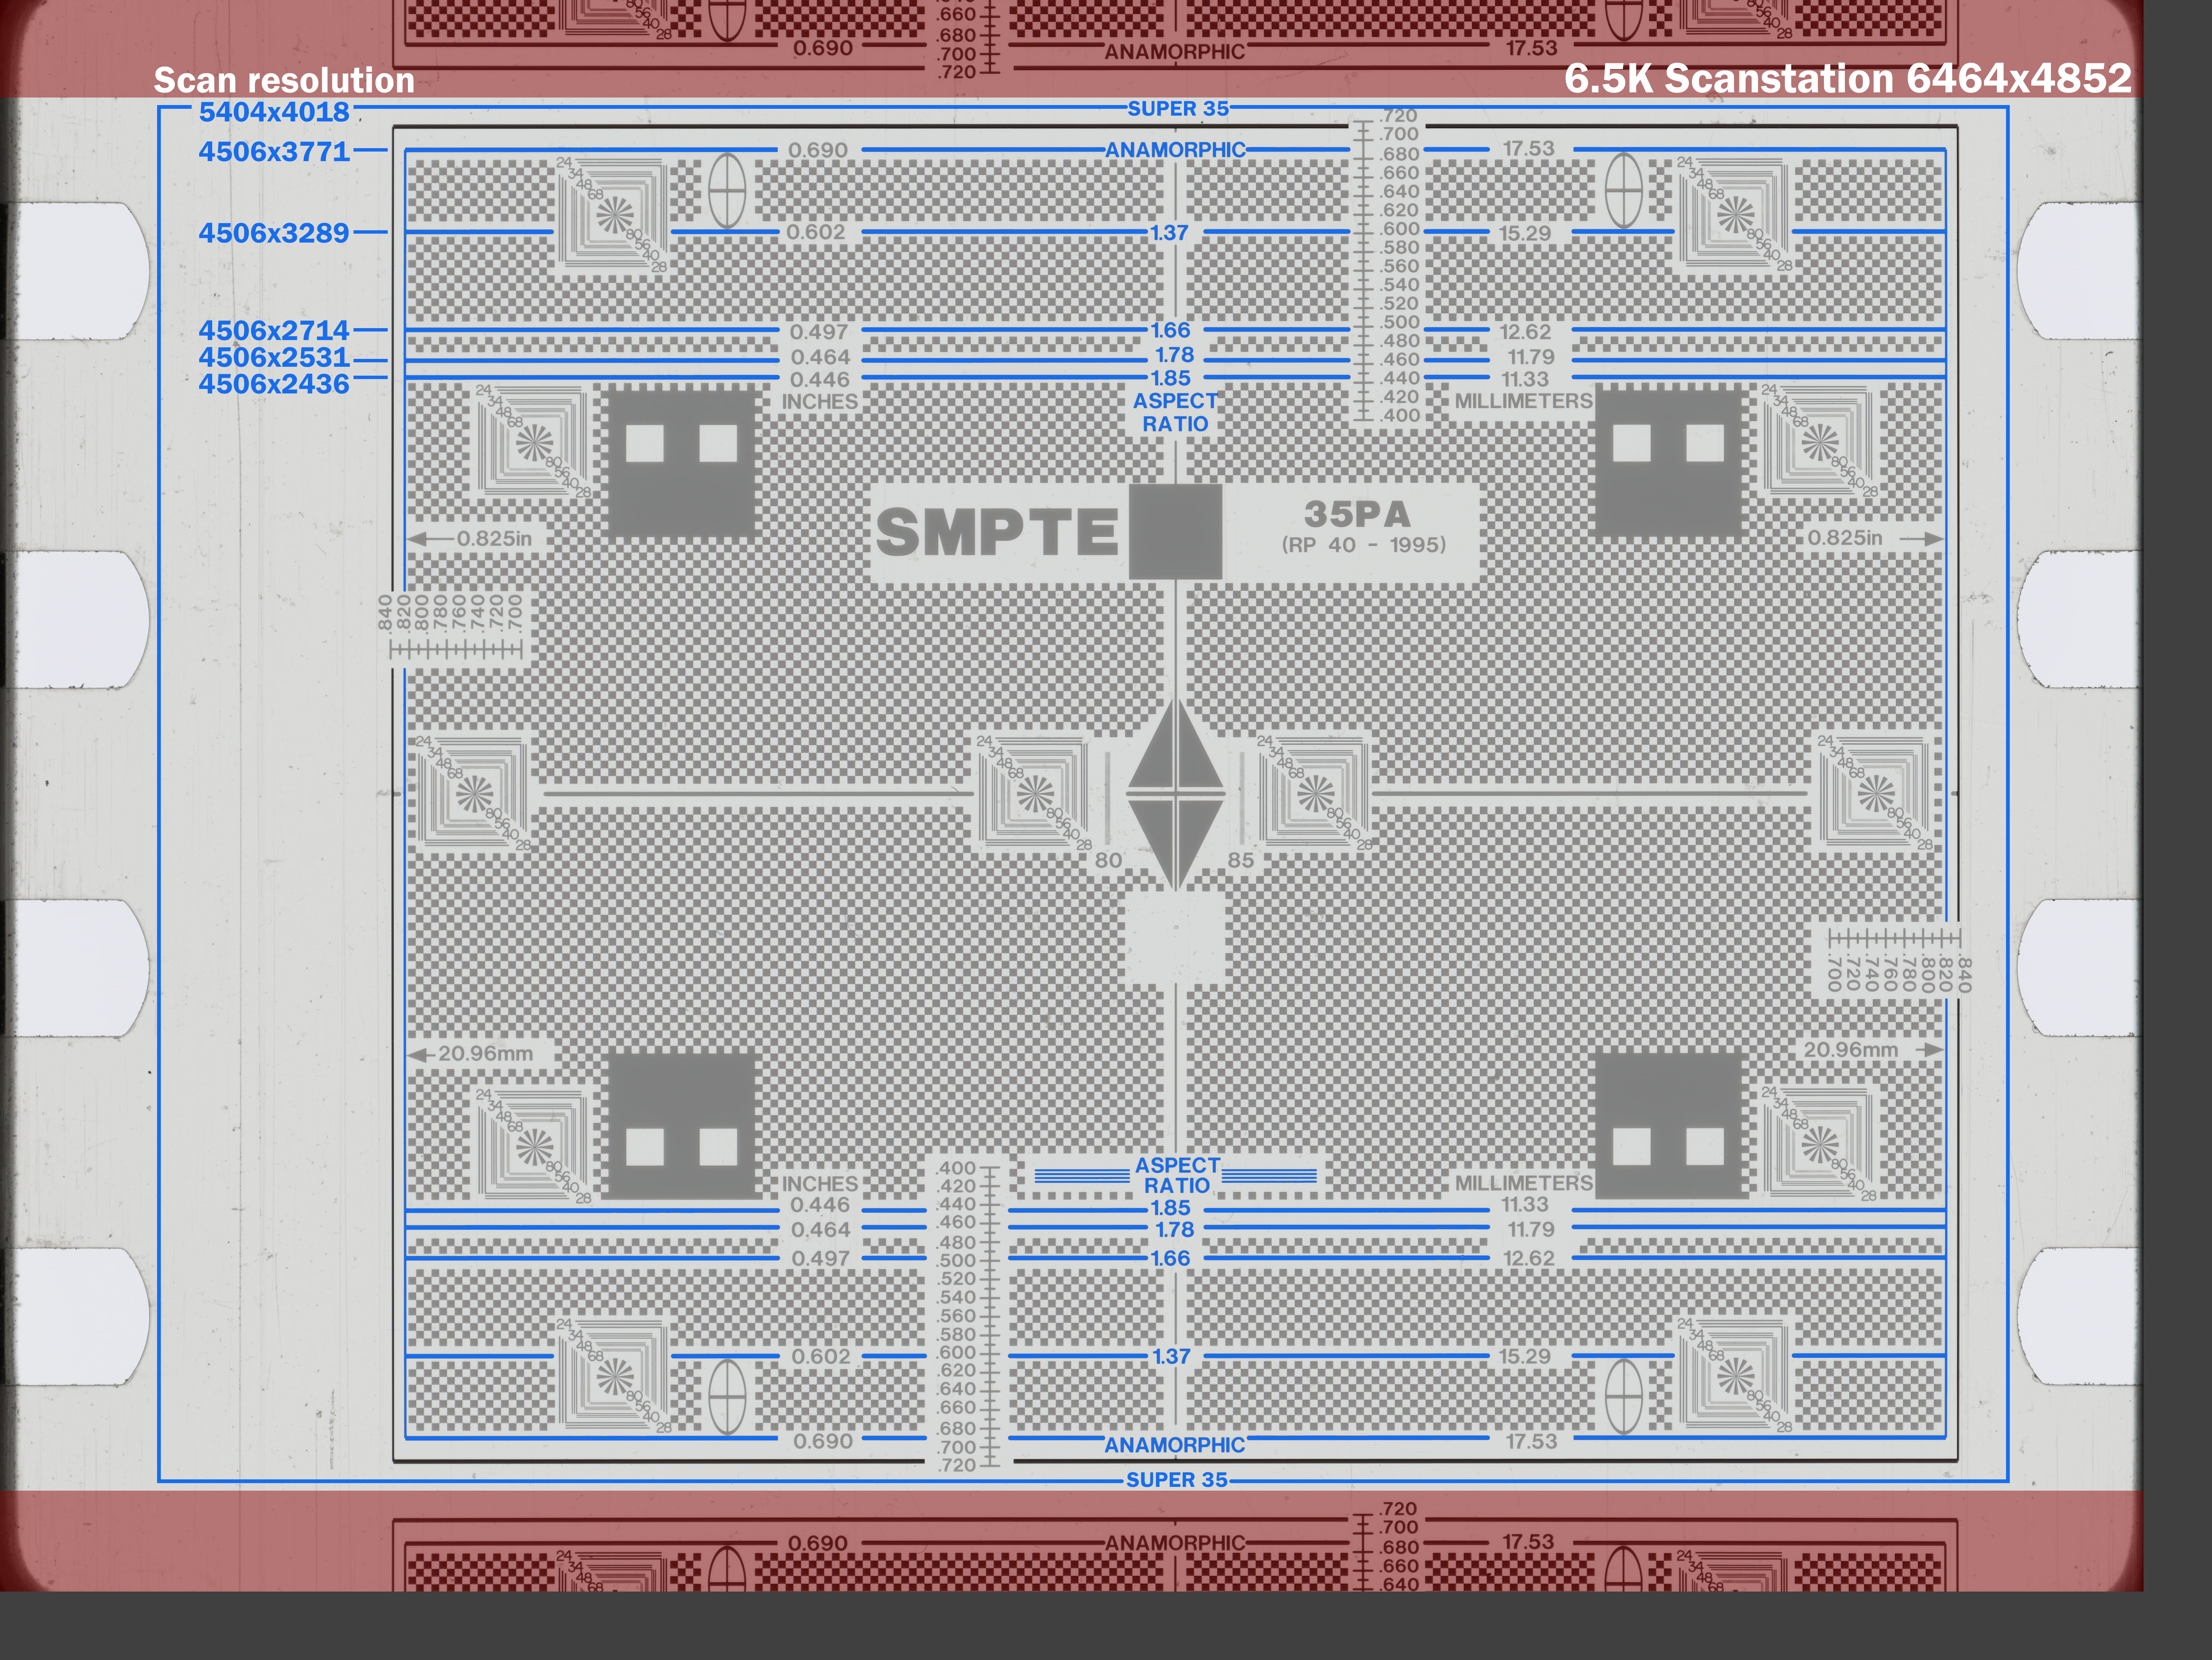
This is from a major scanning company off a Scanstation. This also shows they’re using the artificial sharpening to do their scans (this is even more obvious if you’ve seen raw frames of their scans). We have the same chart and I’ll show you how this should look with professional restoration settings off a Scanstation when we have a chance.
As you can see with the large amount of overscan you really get about 4.5K resolution with most 35mm formats (aside from Super 35 where you get 5.4K), with debayering the true-resolution will be about 3.4K at best and a hair below full 4K for Super 35.
Here we are this is cropped pixel-accurate to the frame-line:
That’s scanned at 6.5K with HDR in colour mode with no artificial sharpening or other adjustments. That’s the native resolution of the scanner. Massive shout-out and thanks to my friend who gave us the calibration film.
Here’s the link/archive to what I quoted there, it’s still active but it’s from their old website. One of my friends randomly emailed me the link to this “scanner” today haha.
I watched the video:
This scanner is just making basic access copies/inspection copies and that’s it. The build quality looks good which is wonderful, however the new website does promote the scanner as being more capable than it actually is. It has a capstan, it’s got plastic rollers, there are no gates, and the light looks like it’s terrible. The biggest improvement they could make to it is building/engineering a better light, but even then it just be suitable to make the copies to “inspect and analyze” before actual scanning.
I’m quite interested in the idea of mass digitization due to the sheer volume of films I have (~1400). I checked the specs on the EZ16 and the digitizing speed tops out at 36 fps which is pretty good considering the ease of loading and it may be left, for the most part, unattended. So for a 400’ roll of 16mm the running time at 24fps is 11.11 min, the time to digitize it would be 7.4 min at 36fps. Therefore, provided the film was on a core (actually if it accepted reels - woo hoo!), and once you build up a rhythm you could theoretically be transferring one 400’ reel every 10-12 min which is 5 - 6 reels/hr.
Normally, just loading a film up on split reels and winding it up on the rewinds and Moviscop takes time and I need to wind through the titles to painstakingly enter key info like title, director, producer, dates, etc into my notes. After that I wind to the tail since very often there is sparse info or nothing at all at the head. In my case I have not yet even catalogued my full collection (yeah, I don’t even fully know what I have…! Half the time the can label doesn’t even match what’s inside). What I would love is to be able to do my logging and catalogueing from my computer at home rather than at the workshop 30 minutes away from home. With a mass digitization scanner I could do and intense amount of digitization over a period of weeks then sit with that data at home - I would save months of work. Further I’d have reference for my whole collection. The nice thing about the Filmic Scanner is that you also get a condition report on shrinkage, edge damage, various metadata, and even odour. That is certainly more than you could get from a pair of rewinds and a Moviscop!
How crazy is it to imagine building a mass digitization scanner that converts later to a proper 2K or 4K scanner…
Once all my mass scanning is completed (something I never believed would ever happen with all my ~1400 films) I just tear down the mass scanner and reuse as much as possible to build the proper 2K or 4K scanner. Meantime I have a complete record of all my films. Additionally, by doing an initial build I would learn about motors, Arduino, the optics, LED light etc and when it comes time for the REAL party (ie. building a nice 4K scanner) I would be battle-hardened and could actually understand and relate to what is being discussed in the forum!
Quite honestly, I have loads of films with VS and another hot, humid summer is just around the corner. The old VS clock is ticking - if I don’t transfer some of these films soon they will be lost. Realistically, due to the volume of my collection and how long it would take to do proper scans one-by-one it would take me years to transfer it all (+ the number of years it will take to see the first Kinograph v.2…)