Cleaning Super-8 Film

I want to start a topic for which I do not have any good answer.

Super-8 film which sometimes is 50 years or older might have experienced very strange storage conditions. For testing purposes, I purchased such an old film from ebay, and I found at least two interesting things with this material.

First, some parts of the movie have some fungous(?) patches. Here’s an example:

Most interestingly, other parts of the same reel are perfectly fine.

So here’s my question: Are there any ideas/approaches/suggestions how to clean film before scanning? What is your approach? Are you using post-processing to get rid of such stuff? I’d be interested to get some feedback from the community.

By the way, here’s another unexpected discovery from the same real:

That poor bug has probaly been sitting there for tens of years…

(I know how to clean this part of the film… :wink:

That bug is a keeper! Haha.

Those white blotches look like mold. Not much you can do there except to use film restoration software to eliminate those blotches in your digital scans. There is an app called Neat Video that can do some restoration, but I only use it for removing noise from images. (I’ve observed that its dustbusting tools can introduce artifacts into the film that didn’t exist before.)

Another post-production tool that you might consider is HS-Art’s Dustbuster+. It’s a standalone Windows or Mac app that can do automatic/manual dustbusting and manual image repair. But watch for sticker shock. They will sell you a license and dongle for about $1500. They provide support for about 1 year. The tool is good if you have time and patience to clean up images yourself. (DustBuster+ is about the cheapest professional tool I could find for dustbusting film. The next cheapest tool is a few of the Phoenix/DVO tools from Digital Vision at about $10,000. And you need a beefy PC workstation to run them.

As for physically cleaning the film, you can use pads and cleaner. I’m on other forums that have discussed how to clean films from time to time. The top pros recommend an ultrasonic clean by a machine that uses sound waves to shake literally shake the dirt out and off of the film.

A more affordable way is to manually clean the film with chemicals. And here’s where nobody can agree with 100% certainty on what works best. Some people use a chemical called Film Renew. I use VitaFilm. There is a chemical called FilmGuard, which is said to fill in the scratches on a film’s emulsion so that you can transfer it without transferring the scratches. (I haven’t tried that yet personally, but it might work.)

One thing that I would NOT use is isopropyl alcohol. Isopropyl could really dry out a film print.

There are many film cleaners on the market. Those I mentioned above are just a few.

Good luck! -----Todd Ruel

PS: I agree with drcushing. Ya gotta keep the bug! :smile:

Bugs do love film. I usually find little spiders nest on the film I’ve rescued from sheds and garages.

Winding the film through a soft, lint-free cloth is a good place to start with a dusty film. Just use light pressure and move to clean surfaces of the cloth as it gets dirty.

If you want to spot clean the film the easiest thing to use is 99% Isopropyl Alcohol, it will not dry out the film. Make sure it’s the 99% (anything below about 91% contains too much water and will damage the emulsion) and it will be perfectly safe to use on any type of film. I use PEC Pad’s to do spot cleaning with some alcohol on them with light pressure so you don’t scratch the film. It will evaporate quickly but make sure you don’t wind the film onto itself while it’s still wet.

Kodak has recommended cleaning solvents if your curious.

Thanks for all the suggestions. I will first try to see what Isopropyl Alcohol is able to achieve with this film. The film use adhesive pads and some of the adhesive has spilled out and attracted dust - it will be interesting to see what happens here. Hopefully, the alcohol does not desolve the adhesive?

As a side note: I do not know how old this film really is, but in the areas covered by the adhesive pads, the colors have changed towards a bluish tone. Have not seen this with other old film stock.

As I am quite familiar with image processing algorithms, I will see in a second step (if the first step, manual cleaning, did not solve the mold problem) to see what can be done in post production. The basic algorithm I know is to detect local image variations which occur only in a single frame, and fill in data from previous or following frames (normally after appropriately correcting the movements in the frames analyzed). However, I hope I can avoid such software development.

Finally, I found this nice overview (Conservation Treatment | NFSA) about various approaches to film cleaning. Might be of interest to someone.

The adhesive has reacted with the emulsion and degraded it, causing that colour shift.

What are the adhesive pads for?

Well, the adhesive pads were for splicing parts of the Super-8 film together. A quite usual approach in the old days. Technically, I think they are called “Super 8 Splice Tabs” or “uper 8 Splice Tape”. I own an old Würker film splicer which can work with the standard size, covering 4 consecutive frames, as well as a special type which only is applied to one frame before the cut and one frame after the cut. There were also special variants which left the stereo soundtrack uncovered. You can still get them today from a few manufacturers.

Here’s a side-by-side comparision of the color shift I mentioned above:


On the right half you see the frame immediately after the cut. This one is covered by one of the splicing tabs. On the left half, the frame immediately following the tabbed region is shown. Clearly, the colors change monentarily for the frames covered with the splicing tab, obtaining some blue tint. Nothing serious which can’t be corrected in the post, but interesting.

Just a short update. Cleaning with 99% Isopropyl Alcohol and a soft tissue did help with a lot of the issues of the example film described above.

However, as predicted by ToddRuel, the mold parts were not at all reduced or changed by my cleaning efforts with Isopropyl. Here’s a new image of this film (already cleaned with Isopropyl)


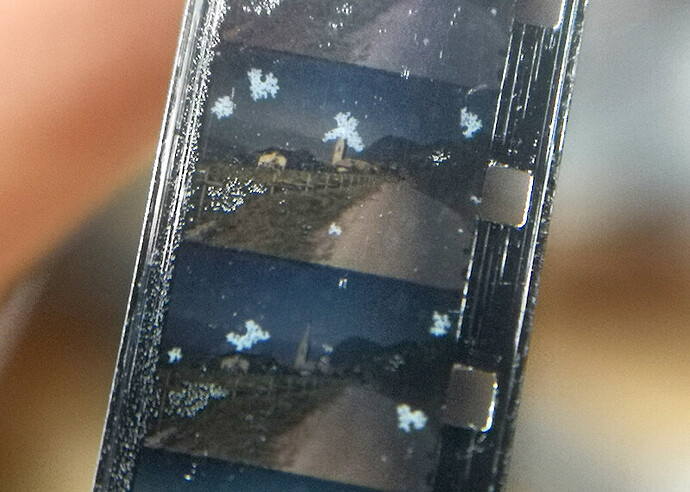
which shows that this material has taken quite some beating over time. The clearly visible white patches are the mold.

After some additional internet research I actually found out the following: it seems that in the beginning of the 80’s, Agfa Moviechrome, Perutz and other material was coated with something derived from bee wax - which is ideal for mold to develop.

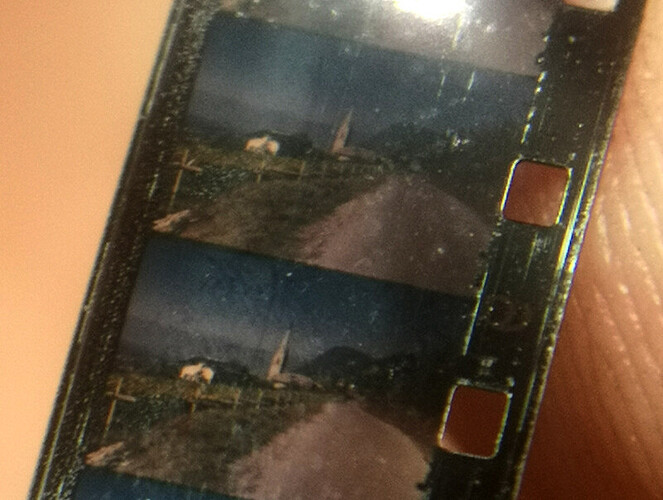
Well, it turns out that the solution is very simple: just use a cloth and destilled water to wipe off the mold. Gets off easily. Just make sure to dry the film after application of the destilled water. Here’s the same part of the movie after the destilled water/cloth treatment, followed by a Isopropyl/cloth cleaning step:


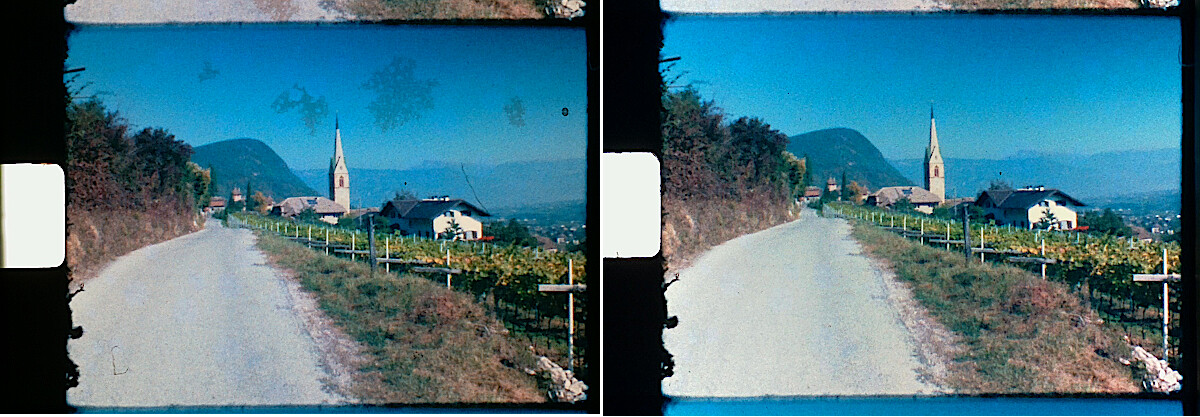
Clearly, the parts previously affected by the mold are gone. Here’s a comparision between the inital scan (left) and the result after cleaning (right)

As a side note, the 99% Isopropyl Alcohol did not affect in any way the splice tape at the cuts of the Super-8 movie.

3 Likes

Very nice! I never would have thought to do that but I will definitely keep that in mind now. Thanks for sharing