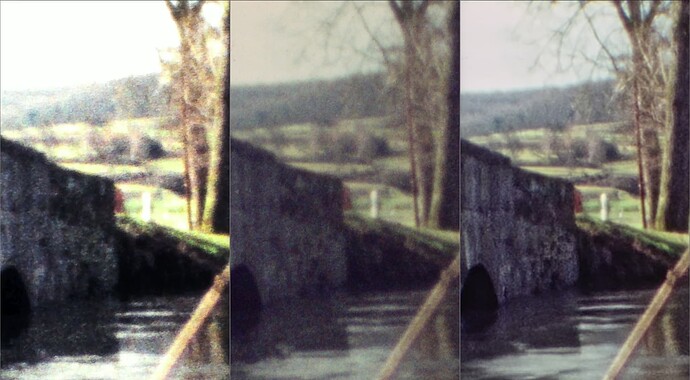
Here’s another cut-out comparison. From left to right: one of the exposures from the USB3-camera (left), the raw capture from the HQ sensor (middle, developed in RawTherapee) and the enhanced material (right):
In retrospec, it seems pretty clear that the USB3-camera (left) did perform under the hood both spatial smoothing operations and egde-aware sharpening, leading to increased grain apperance - without me acutally noticing this in 2020, as I was lacking any comparision.
In fact, a similar thing occured with the Raspberry Pi v1 camera - which being based on a mobile phone design does the same kind of operation as the USB3-camera. Again, I only realized this after comparing v1 scans of the same frame with scans from other cameras.
Besides this denoise/sharpen processing under the hood, often already happening at the sensor level, usually you are at the mercy of the camera manufacturer when it comes to the image pipeline converting raw data to real colors. Color science is not an easy task and dependents in part also on personal taste.
For example, the standard tuning file for the IMX477 of the Raspberry Pi guys gets some colors wrong. This is kind of covered up by working with a too strong gamma (contrast), which washes out these colors. So they are less noticable. As a nice side effect, the overall color saturation increases as well with this choice, leading to richly saturated colors. Well, this is certainly a question of choice.
It’s anyway unclear what goal one has and that goal might even change with the intended audience. Do you want to have colors closely matching the original scene (“natural colors”)? Or rather the colors experienced during former times when the film was projected (“film characteristics”)? How much of this do you want to keep in the digital version? In the extreme case, you could even carry out atmospheric color correction of the film material (“color grading”), as it common practice today.
The same artistic choices of course appears in the question of how to handle film grain. Note that I highly doubt that you can capture film grain accurately with existing camera equipment - the spatial structures of the dye cloud are just too fine for this. What you capture is anyway only an approximation, depending on quite a few details of your scanner (mostly optics and camera characteristics). As evident from the above examples, you end up with visually very different film grain, depending on your setup. More technically speaking: the noise characteristics depend in part on your scanners hardware and software and only partially on the real film grain.
In any case, film grain covers up fine image detail you might be interested in for historic reasons. So on the opposite side is the approach I have taken with the 2024 version: get rid of the film grain, recover as much as you can the visual information hidden in the old footage. I think that there is acutally even a further escalation possible: add as a final post processing step artifical digital grain back to the cleaned version. The advantage: you can finely control that type of grain, it won’t spoil the recovered image details and it will restore the “film look” people working with pure digital media are after - for artistic purposes.
Well, I won’t do the artifical film grain stuff, as I think this is a step too far. Artifical film grain increases at least your bandwidth requirement (as the original film grain does as well), and that is certain a show stopper for me.
So, summarizing: in the end, the product your audience will enjoy (hopefully) is the outcome of a lot of artistic choices. After all, you are converting an analog medium to a digital one, with very different visual characteristics. There’s no way to do this 1:1…
