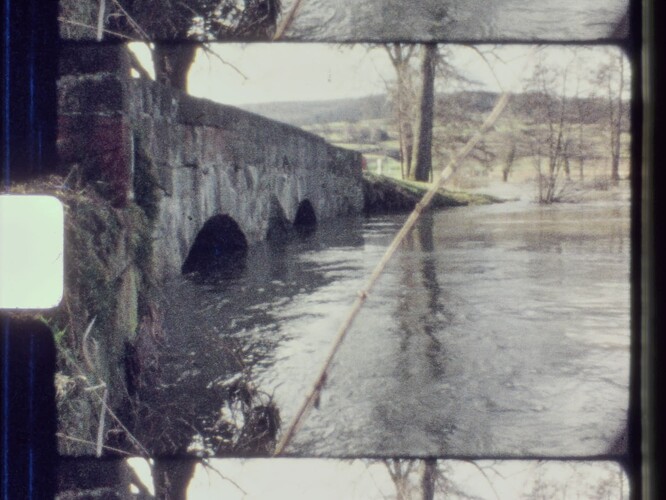
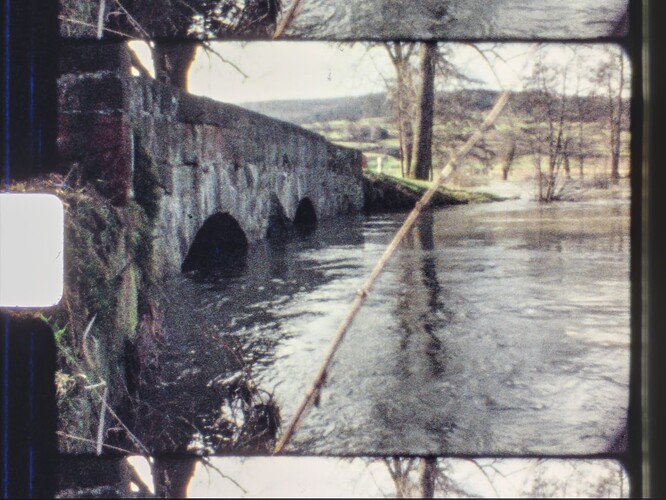
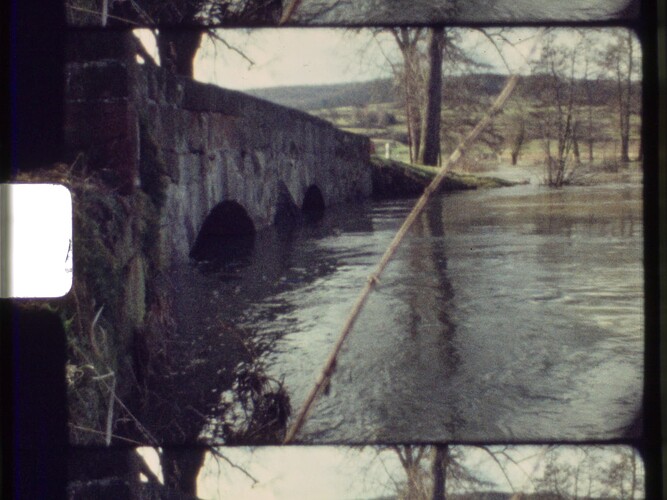
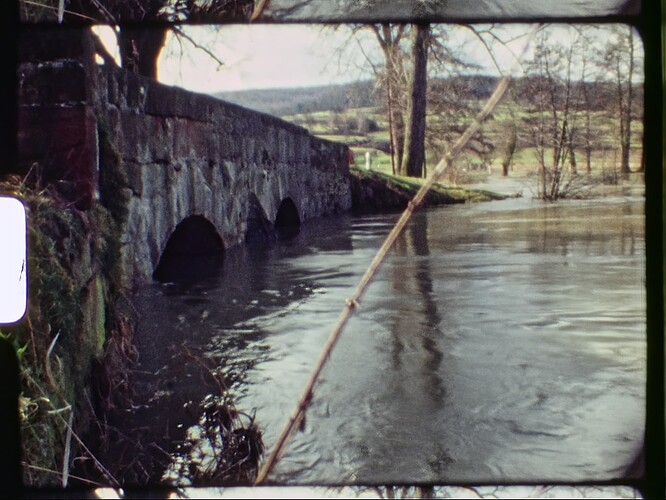
Comparison Scan 2020 vs Scan 2024

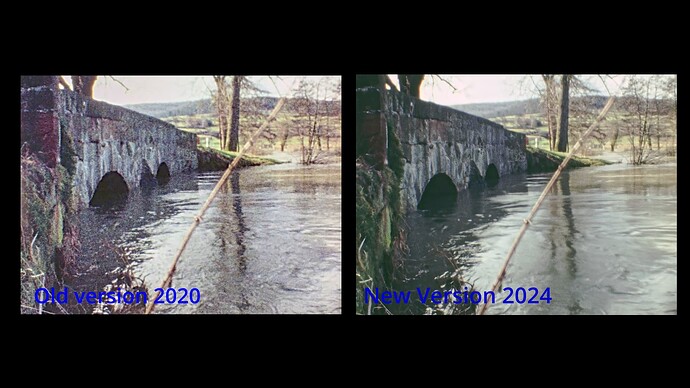
Here is a comparision of the scan results of possibly the first roll of Super-8 film I ever exposed, around 48 years old. Quite challenging source.

As some you might know, I am trying to improve the visual quality of old footage with quite elaborate post-processing. Four years ago, my attention was converting multiple exposures of the film into a HDR source image in order to not loose any image information in the dark und bright areas of the image. It turned out that this multi-exposure approach was not necessary, as nowadays most software has the ability to work with raw image data. Nowadays, I am trying to get rid of the grain and increase frame rates of the source material, trying to transform the old material closer to something the audience might expect and/or accept.

Automatic exposure, too fast pans and a very grainy film stock (Agfachrome).

Recorded on a “Revue S8 Deluxe” which was a rebranded Chinon. It had sometimes problems with the sprocket registration - there’s one skip which can be observed in the footage at 00:05 sec.

In 2020, the scanner used as sensor a See3CAM_CU135 camera, capturing 5 different exposures of each frame. They were combined into a single HDR source frame via exposure fusion for further processing.

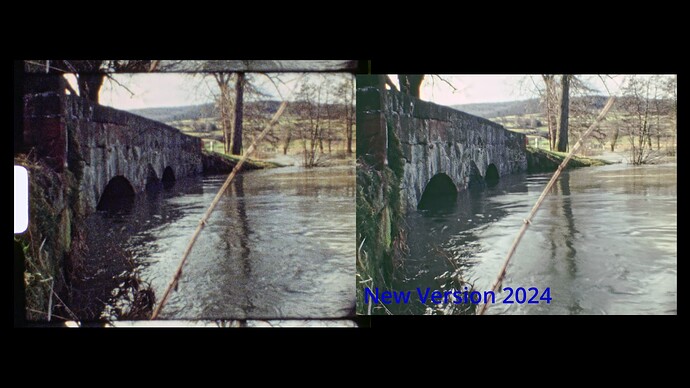
In 2024, the scanner’s sensor was a Raspberry Pi HQ camera (IMX477 sensor). A single 12-bit raw image was captured from each frame. Further processing was done with a 16-bit pipeline.

Both captures were done using a Schneider Componon-S lens.

The 2020 version was only color-graded, the 2024 version was deshaked, spatio-temporal denoised and the framerate increased from 18 to 30 fps.

6 Likes

Hi @cpixip,

The new version is clearly more pleasant to look at, especially due to the stabilization of the images and the absence of grain.

The color has also improved.

However, in my opinion, the old version has a little more detail in the dark areas.

Congratulations for the good work.

1 Like

I have to say the frame rate conversion and grain removal makes it look really plasticy. despite the color issues, I much prefer the old version, perhaps with some stabilization to steady it a bit, but at the native frame rate.

I just don’t understand the appeal of increasing the frame rate at all. The film was shot at 18fps and that’s how it should be viewed. On modern televisions you can view it at that frame rate (most TVs will play an MP4 file off a thumb drive at 16, 18, 24, 25 fps without motion artifacting and without the smoothing that comes with most FRC.

1 Like

Love the comparison! The new scan is definitely more pleasing to look at.

I have to agree with @friolator though that the new version looks a bit too smooth. Of course we are getting very deep into subjective territory of taste here, which has been discussed on the forum countless times before. Personally, I would also keep the original framerate and denoise less to preserve a “pleasing” amount of film grain.

The black levels in the new footage also look a bit too high / flat for some reason (?)
What is more, the noise in the 2020 scan looks very digital to me. Is that digital noise or film grain?

1 Like

@Manuel_Angel, @friolator and @jankaiser - thank you for your comments! You all have quite sharp eyes…

Let me reply to some of your observations/remarks.

The reason is that I did not bother to optimise this part in the new rendering. It would be better to have here a little bit more contrast. If you analyze the footage with DaVinci’s parade, you’ll notice that there is some room for improvement in the blacks. I need to ramp up my color grading skills a little bit…

Your observation syncs with

In this respect - multiple exposures combined with exposure fusion (2020) performs a kind of local contrast equalisation, improving generally the definition of dark areas somewhat, compared to a single raw capture. As discussed elsewhere, the IMX477 has a quite high noise floor in dark areas, even increasing from the left to the right side of the sensor. Won’t be noticable once a noise-reduction is performed, but can be noticed in the original raw. While we’re at the difference between multi-exposure and single raw capture - at least my choice of exposure times did lead to a loss of image information in very bright areas - due to misusing the shoulder of the exposure curve here. The highlights in the raw capture are better defined.

Well, the additional compression of the Vimeo-site is not helping here. It reduces the resolution of the new version while covering up some of the film grain in the old version. Here’s a single original frame from the above video:

The film stock (Agfachrome) combined with a medium level Super-8 camera created just a horrible image by todays standards. The 2024 version is resolution enhanced and shows details which would otherwise not really be visible. But for this resolution enhancement, you absolutely need to get rid of the grain. Which indeed might lead somewhat to the “plastic” impression. When using digital footage (=‘too clean’ footage) nowadays, often artifical grain is added to get rid of this (I am looking at you, DaVinci 19 with your “Film Look Creator”).

The frame interpolation helps only in certain circumstances. When I recorded the footage, I was quite inexperienced and panned too fast (this is probably the first Super-8 roll I ever exposed). If you look at the above footage from about 00:35 to 00:45 sec, you will notice the jerky movement in the 18 fps 2020 version, compared to the 2024 version with 30 fps (which was created by DaVinci 19 “Speed Warp Faster”-setting).

Well, I think it mostly film grain. Somewhat digitally enhanced by the color grading. Have a look at the following frame grab, where I replaced the 2020 footage (recorded with a different camera) with the 2024 raw image (converted to rec70) of the 2024 scan.

You’ll notice very similar film grain in the 2024 raw scan vs the 2020 scan - this is just a very grainy filmstock to start with.

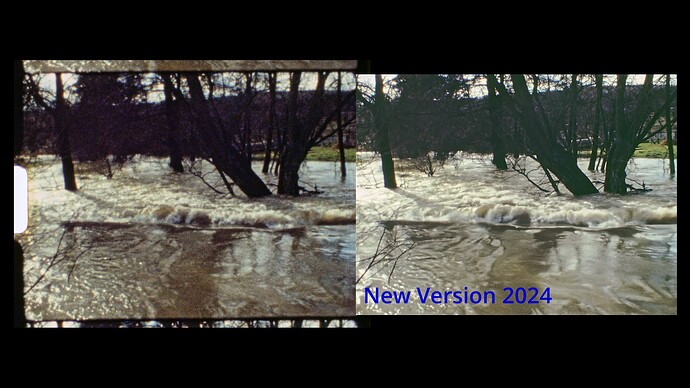
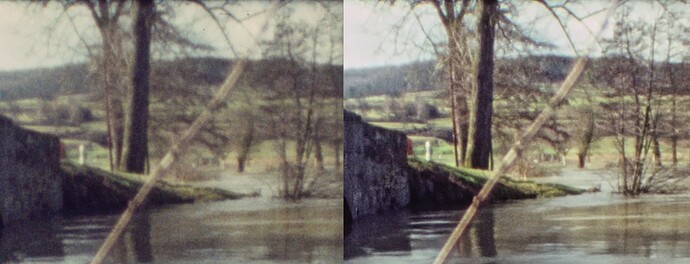
I think I am finishing this post with yet another direct film grab. Here’s the film grab, again showing on the left the 2024 raw scan (converted to rec709) and on the left the heavily processed “New Version 2024”:

Notice how the fluffy undefined areas of the image (the dark branches) come out of the film soup. Note also that some fast-moving areas somewhat loose small detail - that is one of the drawbacks of the current method. That is one of the compromises you have to make when using these algorithms. Annoying and time-eating, as every footage will have its own requirements, mostly depending on the amount of film grain, the amount of movement as well as the amount of small structures (tree branches, a flock of birds are challenging) in the footage. Naturally, the processing times are prohibitive for commercial applications - the above 2 min clip requires about 1.5 hours of processing time at a reduced resolution of 2400 x 1800 px.

One last note: color grading is much less demanding if you start with a single raw image instead of an exposure-fused intermediate. The reason is that tiny color shifts happen when doing the exposure fusion - not a big deal within the context of a single image, but in our use-case, every single scene needs to be color-graded individually. Which is not necessarily the case if one is working with raw files.

1 Like

I’m mostly in agreement with Perry and Jan that the 2024 scan could be improved.

You can’t really “improve” the quality with post-processing work, at best you can mitigate the limitations in post to make a scan more serviceable - but really it shouldn’t be noisy to begin with now if you use a decent camera. This camera would work well and if you see any visible FPN then just return it for a replacement, or put a high RPM fan on it and that should sort it out.

What type of backlight are you using?

Sensor noise is caused by heat, the Raspberry Pi camera has no cooling hence why you’re seeing FPN and it’ll be most visible in the part of the sensor that is the hottest. It’s not caused by the sensor itself, it’s caused by being in a camera with no cooling.

Well, technically speaking, this is wrong. Like you reconstruct an analog music piece from digital samples, you can reconstruct - to a certain extend - the original brightness variations the camera saw at its gate at the time of recording. There is a way from the noisy digital samples back towards the original optical signal (signal reconstruction). It just not trivial.

Well, again, I disagree: the noise noticeable in this footage is film grain and not related to the camera’s noise floor. For starters, the 2020 version used a very different camera (a USB3 camera) from the 2024 capture (a CSI-connected one). And a very different technical approach as well, namely multi-exposure capture vs. single raw capture. The film grain noise is very similar in both captures, as you can convince yourself by investigating the above examples.

I know these guys and their cameras from the time they were still calling themselves “Point Grey Research” (around 20 years ago?). I myself ran at that time a company developing cameras with special logarithmic sensors which do exhibit strong FPN - so I know a little bit about that stuff. Fixed-pattern noise plays no role here at all. The noise visible in the scans above is primarily film grain of one of the cheaper Super-8 film stocks you could buy in the mid '70s of the last century. (It’s actually the worst filmstock in my collection - that’s why I had chosen it for experiments on how far you can push spatio-temporal denoising and image reconstruction.)

High temperatures undoubtedly increase thermal noise.

To the best of my knowledge, in principle, I have not heard of any “cooled” digital image sensors. Please correct me if I’m wrong.

Cooling is often used in LNAs (low noise amplifiers), for example in satellite dishes of radio telescopes.
For this, Peltier cells or even much more elaborate cooling systems are used.

On the other hand, in the field of digital images, there is another factor much more decisive than temperature and that is analog gain.

For example, with the same camera we can take the same image in two different ways:

  • We take a first image at 100 ISO.
  • Next we take a second image of the same subject, but, for example at 6400 ISO.

If we compare both images, logically taken with the sensor at the same temperature, we will see that the image taken at 6400 ISO has much more noise.

The reason is very simple, by increasing the sensitivity from 100 to 6400 ISO, what we actually do is increase the analog gain applied to the sensor output.

An analog amplifier cannot distinguish signal from noise, it amplifies both equally and also adds its own noise.

Regards

1 Like

They’re extremely common. Some just have a simple fan, others use refrigerant. Nearly all cameras used for astrophotography are cooled in one way or another. The camera on my telescope can bring the temperature down to 20 degrees below ambient temp, and it makes a huge difference in the amount of generalized noise in the image.

The camera we have in the Sasquatch 70mm camera has a heatsink and fan, but is not a “cooled” camera, which uses refrigerant to bring the temps down even more.

2 Likes

Yep, cool cameras make cool images…

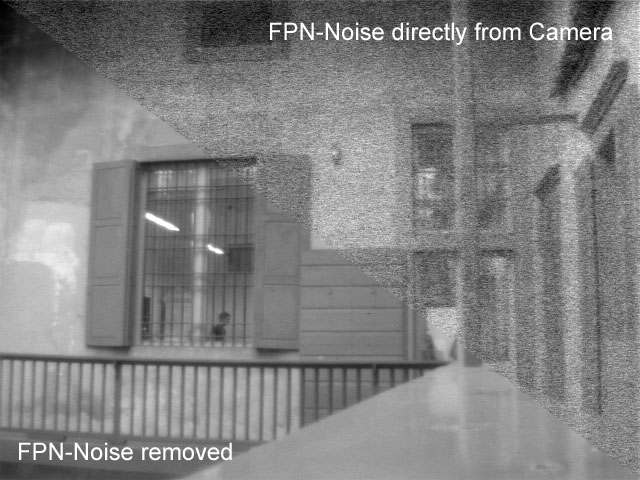
Just to state the obvious again: the noise in the film scan above is not related in any way to camera noise. It’s simply film grain from a not-quite-as-good-as Kodak film stock. Just out of curiousity, I dug up an image from a sensor I was working with around 2003 or so:

A2 b

Now, that (upper right part) is what I would call FPN… - and as you can see in the lower left part of the frame, that can be handled by appropriate algorithms, in realtime.

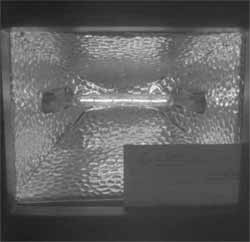
By the way, this was a special logarithmic sensor, featuring a rather wide dynamic range. Here’s an image displaying what this sensor was capable of:

Logres_bulb2_small

The image shows a 500W tungsten halogen light in an otherwise totally dark room - you can see the hot filament of the bulb, but if you look closely, the camera was also able to read the dark side of the business card attached to the lamp. (Sorry, no larger resolution available - that was a long time ago…)

1 Like

Was the 2020 scan sharpened in some way? It gives off almost this old mobile phone camera look, a little (but nowhere near as bad) as you get from Wolverine & Co. type scanners. I have to agree though that Agfa stock can be quite noisy and I’ve found the noise to also look strange (maybe more colour noise) compared to something like Kodachrome or Ektachrome.

But to get back on topic, I personally and subjectively actually really like the look of the 2024 RAW scan, especially frame 455 (the other frame is just not a pretty one in general). There is definitely a lot of noise from the film grain present there too, but the noise looks softer and the tones of that image feel on point to me. I guess there isn’t really a RAW scan from 2020 as such, but the RAW 2024 would definitely convince me of the newer camera setup and RAW workflow.

2 Likes

Well, I can not rule that out. For starters, I only kept the exposure stack of each frame and the final rendering, but did not keep a record on the processing steps used. But I think that no sharpening was performed in post production. What I can not rule out is the image processing which happens in the camera used, a See3CAM_CU135-USB3 camera.

Note that this camera does output only something close to a rec709 image, but no raw data. That is, the only thing you will ever have in hand with this camera is some heavyly processed derived image - many times including a sharpening stage. Here’s one of the original exposure levels of a frame close to frame 455, directly from the USB3-camera (original resolution 2880 x 2160 px):

On close inspection I would bet that an in-camera noise reduction plus a sharping stage is at work here.

No, the USB3 camera delivered images like the one above. No raw image data was available at that time.

Which brings me to another big point! The IMX477 sensor of the Raspberry Pi HQ camera is up to my knowledge the only sensor on the market where you do not have to use the manufacturers supplied ISP software. You can roll your own color science, for example (which I did - there is a variant of the IMX477 tuning file available in the RP-distros were my color science is used.).

Note that if you are capturing raws, the .dng-files the RP cameras are producing are not really raw - for starters, the “raw” includes compromise color matrices which many raw developers are using under the hood to come up with a viewable image. So in a funny twist, even so you are capturing in raw, you want to make sure that the color science is as perfect as it can get. Also, you do want to stay away from the newer “compressed raw” formats - which are not lossless.

In any way - I would not swap the HQ sensor (IMX477) with any other camera - because at this point in time, I know exactly how the HQ camera behaves. Not so true for most other cameras on the market.

(On a lighter note: the color science of the different film stocks interpreted and transformed anyway the real colors of the scene, often in quite distinctive ways. With a little experience, you could spot the film used for the scene just by looking at the colors). In the end (the final grading), it boils down anyway to personal taste when finalizing the colors. Occasionally, at least with me, that “taste” changes from hour to hour…)

1 Like

Thanks for sharing this comparison. Like you, I was not satisfied with the first round of scanning, and certainly the available tools (and the HQ sensor) have open new options.

I am going to set aside my personal preferences (color grading, frame rate, and smooth/plasticity), since at the end is whatever one likes best.

It is impressive that the processing preserves the fine tree branches and powerlines, even during panning. It is also remarkable how well is the film stabilized.

One take away -for me- is the interaction between the grain/noise, the video compression selection at post, and the delivery compression (vimeo). It is noticeable how the grain/noise comes and goes. The shot at 1:03 is a good illustration.

Regardless of one personal preference -as indicated above- the increase/decrease (dancing) of grain/noise, which -I believe- is a result of the level of noise/grain and the compression pipeline is something to keep an eye for. I would have preferred that the level of noise/grain be somewhat the same (whatever one personal preference).

Much to learn on the digital improvement of the scanning, again thanks for sharing your work.

1 Like

The stabilization was done with DaVinci, mostly in “Translation” mode, a few scenes in “Similarity” mode. With default parameters - no tuning. Ideally, one would compensate pan, tilt and rotation only, but DaVinci does not offer this mode. “Translation” compensates just pan and tilt, and “Similarity” handles pan, tilt, rotation and zoom. So the ideal compensation mode would be something between “Translation” and “Similarity”. As the DaVinci engine is fast enough, one can easily check which one of the available modes is better for a given scene.

For the increase in frame rate from 18 fps to 30 fps, DaVinci’s “Speed Warp Faster”-setting was used which seems to give somewhat better than the usual optical flow methods.

That is an interesting topic. Frankly, I highly doubt that a realistic experience of film grain is possible within the context of digital media. Because even if your high-quality source might come close to the true nature of your film’s grain, digital intermediates and streaming services will destroy that fine balance on the last mile.

And frankly, already on the beginning of that journey, at the point where one tries to capture realistic film grain with high-resolution imagery, you are probably not even close to faithfully capture the film grain structure. In order to capture the finely structured dye clouds, performance would have to be increased even further, even for high-resolution images. With today’s technology probably unrealistic.

Noting further that for esthetic purposes clean digital plates are beautified with artificial grain (have a look at the new “Film Look Creator” of DaVinci 19 beta). Clearly, this film grain is not real. Yet another upcoming distribution trend seems to be the denoising of grainy/noisy imagery, transmitting this cleaned version plus additional noise/grain information, so that the viewer’s video player can “reconstruct” the appearance of the original. This saves bandwidth. Currently - as far as I know - this is only a research topic, but as it is considered for bandwidth reduction, it might show up at some point in the real world.

For my own work the (possible) detail enhancement in historical footage is more important than rendering a realistic film grain. The technique employed has it’s limits (for starters, transparency is an issue), but I expect big progress here in the next years, given the current advances in generative AI.

1 Like

The delivery target for all the footage I have in my care is eventually going to be a single-page website with the clips listed chronologically. At the top there’s going to be a depiction of our family tree where you can click on someone to filter the list to only those clips where that family member appears.

I had already been on the fence about adding another feature and this thread has convinced me: one additional toggle that should be available on the page is this post-processing choice so that I am not imparting my own preference on my family. (Granted, having multiple copies of every clip will take more S3 storage, but that storage is cheap and we’re only talking about 40 reels.)

Do the “natural” cut-offs for this preference fall into the following buckets? Said another way: would being able to choose from the following list make everyone (here in this thread or otherwise) happy?

  1. color-grading and stabilization.
  2. choice 1 + denoising.
  3. choice 2 + frame-interpolation.

There isn’t anyone that wants to see ungraded/faded colors or a shaky picture, is there? Including a choice 0 with something close to the raw capture seems like it’d be a waste, right?

Yep, I think that captures it, basically. Whether you want to offer a choice “0” depends on your color grading skills. Analog films used to have a certain way of rendering certain colors. A sort of film characteristic. Think of the blue of a sky on Kodachrome or the brown of trees on Agfachrome.

If your color grading is keeping these differences in film stock, a choice “0” would probably be an overkill. If your color grading efforts equalize every film stock to “nearly perfect” colors, you might want to think about it. Of course, if nearly all of your footage just uses Kodachrome, again, there’s not really a point in this.

Note that all this (intermediate) footage is evolving more or less naturally during the various processing stages you need to do to arrive at stage “3”. Successful degraining/denoising (step “2”) requires pre-stabilization (step “1”) to give good results. So once you have arrived at stage “3”, you automatically have produced the intermediate stages anyway. By the way: interesting presentation idea!

1 Like

I think it might be interesting for others to get a little bit more detail on the different ways the above clip was recorded and processed.

As already remarked, it was one of my very first Super-8 recordings back in 1976, using a rebranded Chinon camera with not-so-great Agfa film stock available at that time.

While I initially started with the Raspberry Pi v1 camera, it soon turned out that the microlenses in front of the camera sensor (derived from a mobil camera) did not mate well with the Schneider Componon-S 50 mm lens I was using. Basically, color shifts occur which gives you a magenta-tinted center with a greenish tint on the image edges. This color spill caused by microlenses is non-recoverable. Took me some time and effort to find that out… Upgrading to the RP v2 sensor, the color spill got actually worse. At that point, I decided to abandon the idea of basing my scanner on RP sensors and bought a See3CAM_CU135 camera. This is a USB3-camera, so you get an image already “final” for display. The maximal image resolution I could work with, 2880 x 2160 px, was deemed to be sufficient to capture the full resolution of the medium-range Super-8 camera’s zoom lens.

The dynamic range of this camera was however nowhere close to the dynamic range of the film stock, as evidenced by the following single capture (to see at full resolution, click on the image and choose the “orignal image” link) :

Having experience with HDR-capturing, I opted to capture from each frame an exposure stack with a total of 5 different exposures. Initially, I used Devebevec’s algorithm to compute a real HDR from the different exposures. Here’s the result (The image ranges over about 11 EVs; it is mapped for display into a LDR-image by appropriate linear rescaling (min/max normalization):

Quite a difference in terms of dynamic range, as hoped. However, the colors are quite washed out. Also, it seemed at that time to be difficult to automatically map the huge dynamic range of various footage into the LDR image (Low Dynamic Range) which would be video-encoded. So I tried instead Merten’s exposure fusion algorithm, which yields automatically a LDR image.

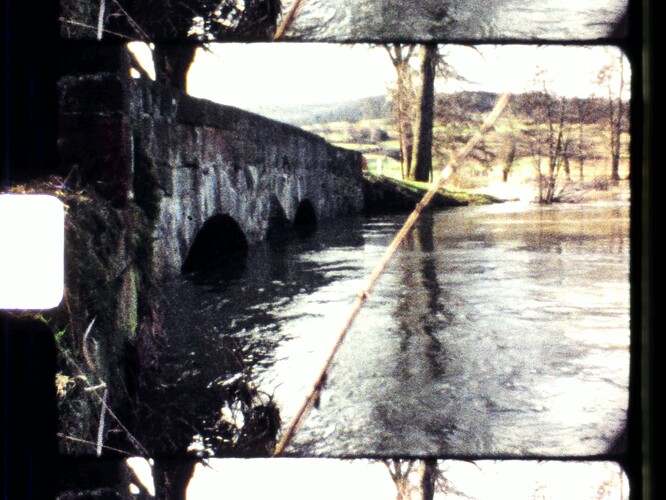
Running exposure fusion results in the following image:

Two things can be noted: the colors are more vivid and the overall sharpness impression is slightly better. Exposure Fusion increases the local contrast. Sadly, this applies to the film grain of this film stock as well: it’s noticably stronger.

Anyway - this exposure fusion image was the data used in creating the above 2020 version of the film. Pushing the color saturation a little bit further in an attempt to come closer to the impression the film would make if actually projected by a Super-8 projector, the film grain is enhanced even further. Actually, for my taste, to a point that the dancing film grain covers up a lot of the fine image detail I would like to show my audience.

As soon as the Raspberry Pi guys introduced the v3 sensor (HQ camera, IMX477 sensor chip), I switched back to a Raspberry Pi setup, since that camera would allow me to test out capturing higher resolutions, up to 4056 x 3040 px. Only to discover that the supporting software was less than satisfactory. That got even worse when the Raspberry Pi software switched from the closed-source Broadcom image processing to libcamera (and correspondingly, from picamera to picamera2). I have never seen a more badly designed software, and I have seen a lot.

However, it turned out that not all is lost. For starters, the image processing from the raw image data to human-viewable images is mostly governed by a tuning file which is user-accessible. So for the first time ever, it was possible to exactly define and optimize how images are created from the data a sensor chip sees. This resulted in some optimizations which ended up in an alternative tuning file, “imx477_scientific.json”, which is now part of the standard Raspberry Pi distribution (it’s not used by default, but there are various ways to activate it).

A second important development came along when the RP people added raw image format support to their software. Here’s (nearly) the same frame as above, but captured as a single raw image, developed by RawTherapee, with Highlights and Shadows pushed by +30:

The 12bit dynamic range of the IMX477 does not quite match the dynamic range available with the HDR-exposure stack, but it is close enough; some film stock can go up to a dynamic range requiring 14 bit, but this specific frame needs only 11 bit. I set my exposure level so no highlights are burned out, compromising a little bit the very dark shadows - you can see this comparing the dark areas under the bridge in this image and the HDR version.

Still, the visual quality of the material is falling behind todays standards. As my primary goal is to recover the historical footage for today’s viewers, image enhancements are desirable. The basic tool here is spatio-temporal degraining. In a sense, the algorithm works very similar to human perception, creating from the available noisy and blurry data a world-model of the scene and recreates from this world-model a newly sampled digital image. That works under many circumstances, but not always. In any case, here is the result of that algorithm:

The chosen processing resolution is 2400 x 1800 px, much less than the inital scan. Here, the raw conversion/development was done via DaVinci Resolve instead of RawTherapee like in the previous image. The color science both programs are using is based on the “imx477_scientific.json” mentioned before. This data was used as the basis for the 2024 version.

Comparing the two files, the enhancement in terms of image resolution should be noticable. As this footage featured pans too fast for the 18 fps it was recorded with, there is occationally some jerky motion present which distracts viewers nowadays. So in a final postprocessing step, DaVinci was used to increase the frame rate to 30 fps. Ideally, both steps, spatio-temporal reconstruction and the creation of intermediate frames, could be combined. This would however require an extensive software development (mainly GPU-based), for which I currently do not have the time…

Anyhow, here’s a cut-out comparision between the raw scan (left side) and the processed image (right side) to show the image improvement possible:
4 Likes

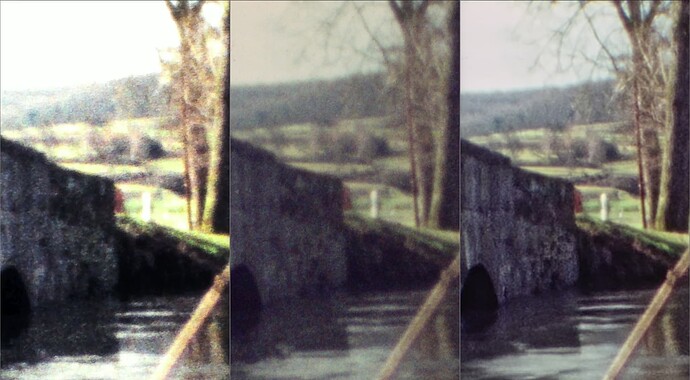
Here’s another cut-out comparison. From left to right: one of the exposures from the USB3-camera (left), the raw capture from the HQ sensor (middle, developed in RawTherapee) and the enhanced material (right):

In retrospec, it seems pretty clear that the USB3-camera (left) did perform under the hood both spatial smoothing operations and egde-aware sharpening, leading to increased grain apperance - without me acutally noticing this in 2020, as I was lacking any comparision.

In fact, a similar thing occured with the Raspberry Pi v1 camera - which being based on a mobile phone design does the same kind of operation as the USB3-camera. Again, I only realized this after comparing v1 scans of the same frame with scans from other cameras.

Besides this denoise/sharpen processing under the hood, often already happening at the sensor level, usually you are at the mercy of the camera manufacturer when it comes to the image pipeline converting raw data to real colors. Color science is not an easy task and dependents in part also on personal taste.

For example, the standard tuning file for the IMX477 of the Raspberry Pi guys gets some colors wrong. This is kind of covered up by working with a too strong gamma (contrast), which washes out these colors. So they are less noticable. As a nice side effect, the overall color saturation increases as well with this choice, leading to richly saturated colors. Well, this is certainly a question of choice.

It’s anyway unclear what goal one has and that goal might even change with the intended audience. Do you want to have colors closely matching the original scene (“natural colors”)? Or rather the colors experienced during former times when the film was projected (“film characteristics”)? How much of this do you want to keep in the digital version? In the extreme case, you could even carry out atmospheric color correction of the film material (“color grading”), as it common practice today.

The same artistic choices of course appears in the question of how to handle film grain. Note that I highly doubt that you can capture film grain accurately with existing camera equipment - the spatial structures of the dye cloud are just too fine for this. What you capture is anyway only an approximation, depending on quite a few details of your scanner (mostly optics and camera characteristics). As evident from the above examples, you end up with visually very different film grain, depending on your setup. More technically speaking: the noise characteristics depend in part on your scanners hardware and software and only partially on the real film grain.

In any case, film grain covers up fine image detail you might be interested in for historic reasons. So on the opposite side is the approach I have taken with the 2024 version: get rid of the film grain, recover as much as you can the visual information hidden in the old footage. I think that there is acutally even a further escalation possible: add as a final post processing step artifical digital grain back to the cleaned version. The advantage: you can finely control that type of grain, it won’t spoil the recovered image details and it will restore the “film look” people working with pure digital media are after - for artistic purposes.

Well, I won’t do the artifical film grain stuff, as I think this is a step too far. Artifical film grain increases at least your bandwidth requirement (as the original film grain does as well), and that is certain a show stopper for me.

So, summarizing: in the end, the product your audience will enjoy (hopefully) is the outcome of a lot of artistic choices. After all, you are converting an analog medium to a digital one, with very different visual characteristics. There’s no way to do this 1:1…

3 Likes

When I started that topic, I presented different versions captured four years apart, with different cameras and processed quite differently. As a follow-up, I want to isolate and discuss in the following only the core difference of the processing schemes, specifically the spatio-temporal denoising step and retiming to 30 fps.

The following data is based on a recent raw scan utilizing the HQ/PI5 combination. Instead of using Vimeo (or any other video platform), I’d like to invite you to download a comparision video. Download it directly (File->Download, should have a size of 394 MB), view it on your computer and comment about your impressions. I will only use a few screen captures out of this movie in the following.

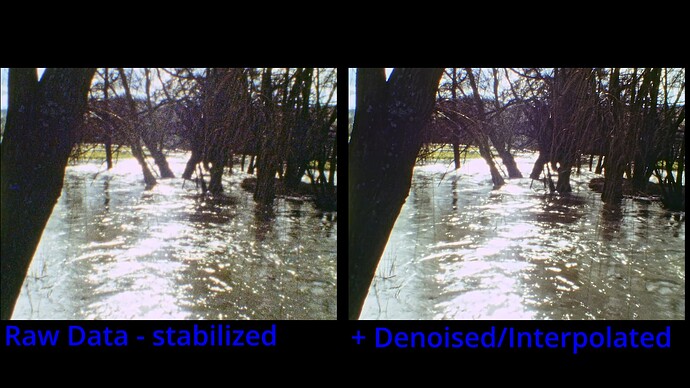
The video linked above shows on the left side the outcome of a complete processing, including camera stabilization and color-correction of the raw capture. On the right side, only the spatio-temporal processing step is added in addition to the existing processing pipeline. Otherwise, the processing between the two versions is identical (stabilization and color-grading).

The most prominent difference between the two versions is probably the difference in image detail. The tree branches on the right side are barely visible on the left side. Watching the scene in the video (01:33), the difference is less pronounced - your brain will do spatio-temporal processing as well.

The retiming from 18 fps to 30 fps is most noticable in the clip starting at 00:33 which is a long pan, too fast for the original frame rate of 18 fps. The retiming was done natively in DaVinci Resolve, by using the option “Optical Flow” and “Speed Warp Faster”.

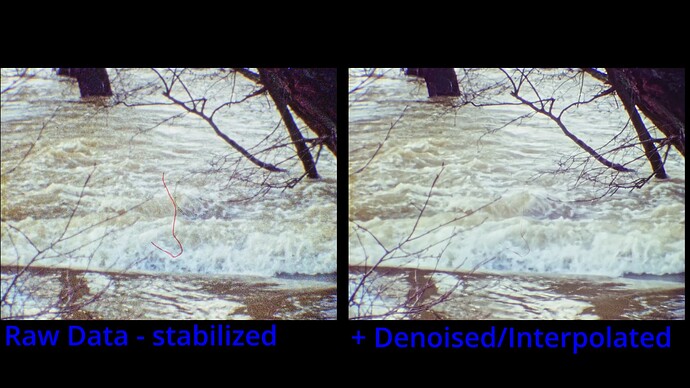
Besides these two major improvements of the additional processing, dirt is also occationally slightly reduced, as the following frame (02:10) shows

The two versions of the footage are in a sense two extreme ends of a continous scale. Of course, one can add the “film grained” (left) version in various amounts back over the “cleaned” version (right), according to taste. But that is a different story.

Now, the cleaned version introduces also some artifacts and leads to some image degradation occationally, if you watch closely. I wonder if this is tolerable and would be interested in some comments!

1 Like