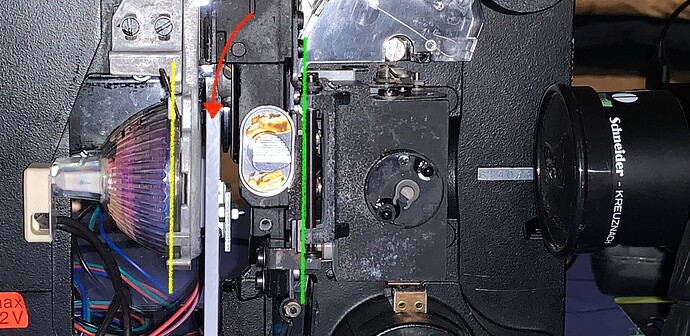
Below you will find a photo of my setup for orientation.
I’m using a greenandco MR16 CRI90+ LED (200 Lumen) that slots in right where the original projector bulb was. The lens of this LED is a little recessed. I tried to estimate roughly where it is by the yellow line in the picture. From the lens of the LED it is roughly 1cm to the diffusor (red arrow) and then probably almost 3cm to the film plane, roughly indicated by the green line.
I am actually not losing too much light. When I started to put my machine together, I originally went with a Philips Master LED expertcolor that is supposed to give 420 lumen. With my old ground glass diffusion this turned out to be too bright. At a shutter speed of 1/2000s, an aperture of f4.7 and both gains at 1.0, the highlights were clearly blown out. The HQ Camera technically accepts faster shutter speeds, but the images did not seem to get darker when I set them, so I assume faster speeds are not really supported. I then switched to the weaker LED. At this point, I was able to just about resolve the highlights nicely at 1/2000s and the same settings everywhere else. Now, with the new diffusion, I get roughly the same brightness in the picture at 1/250s. So there is obviously less light, but I actually prefer that I now have a little more flexibility in terms of exposure. I usually keep the camera at these settings, though, and even when the film is slightly underexposed, the scan can usually be saved well enough by turning up the exposure of the RAW images in post.
Maybe one more word on the diffusion: I actually ordered the WH14, WH52 and WH72 variants of the PLEXIGLAS LED. I didn’t test the other two on the scanner, but from holding them up to light sources, the WH14 seems quite similar to WH52. The WH72 is visibly darker but also seems to diffuse more.
As @dgalland mentioned, you can order 100x75mm samples from the PLEXIGLAS website for just 3€ and free shipping. These are more than large enough for building a scanner, so it didn’t hurt to get all of them for testing.
