Superb demonstration. One clarification.
Left image : you down converted the original scan (2016 X 1512) to 1440 X 1080 and after processing (temp de-grain etc.) further scaled down to 960 X 720 and applied some sharpening. Sharpening was added at the last step.
Right image : Straight down conversion to 960 X 720 from the original scan of 2016 X 1512.
Am I correct?
Thanks.
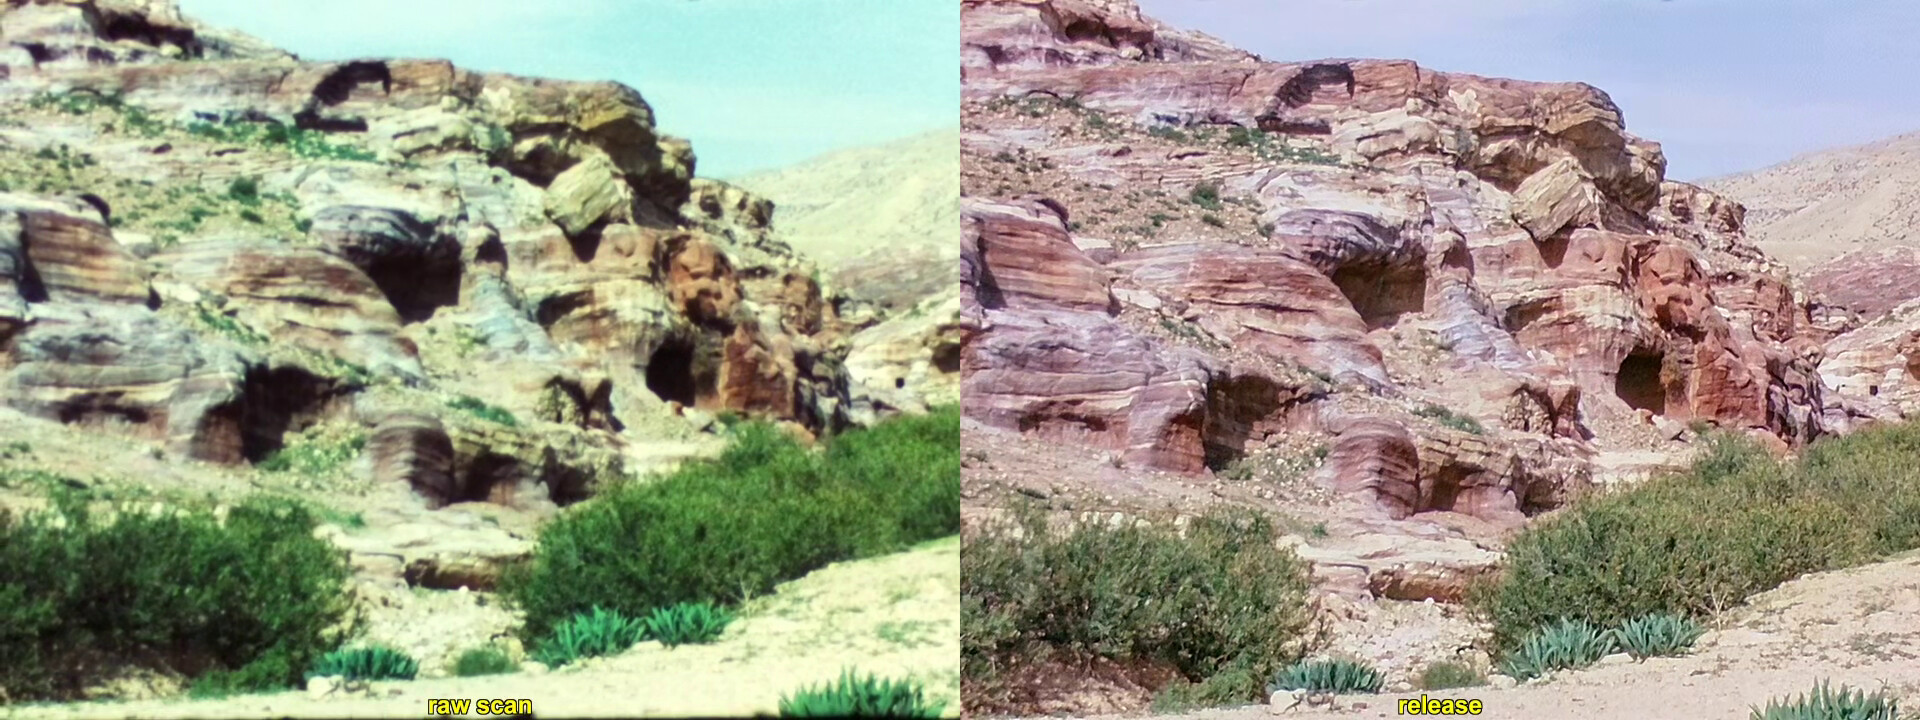
well, it’s the other way around ![]() . The image marked “raw scan” is the data directly from the scanner, the image marked “release” is the image which had to endure a lot of processing before it came to life.
. The image marked “raw scan” is the data directly from the scanner, the image marked “release” is the image which had to endure a lot of processing before it came to life.
The left image (“raw scan”) shows one of the original scans @ 2016 x 1512 px. In my approach, 5 different scans are taken from each film frame. Basically one highlight scan which is guaranteed to capture any highlights present, followed by a prime scan stepped slightly more than 1 EV up (it is brighter) to record the primary image content. Three more shadow scans follow, each stepped up again slightly more than 1 EV to the previous scan. So in the end, for every film frame five different scans are taken, covering a large exposure range.
The image above marked “raw scan” shows the data of the primary scan, just cropped to show only the frame of interest (not the over-scanned areas) and then re-scaled to the same resolution of 960 x 720 px as the “release” frame. Note the lack of detail in the highlights and shadow areas of this “raw scan” image.
The right part of the image above, marked “release”, is the result of the image processing pipeline sketched above. Again, since I over-scan, the original 2016 x 1512 px needs to be cut out to remove sprocket hole information and also data from neighboring film frames, which reduces the effective image resolution to 1440 x 1080 px. That is the resolution the image pipeline (color-grading/de-grain/etc) is operating at. After the temporal de-graining step, the resolution is reduced again to the final output resolution of 960 x 720 px. As the very last processing step, a sharpening algorithm is run before saving the final image to disk. The end result of this processing pipeline is the right image, marked “release”.
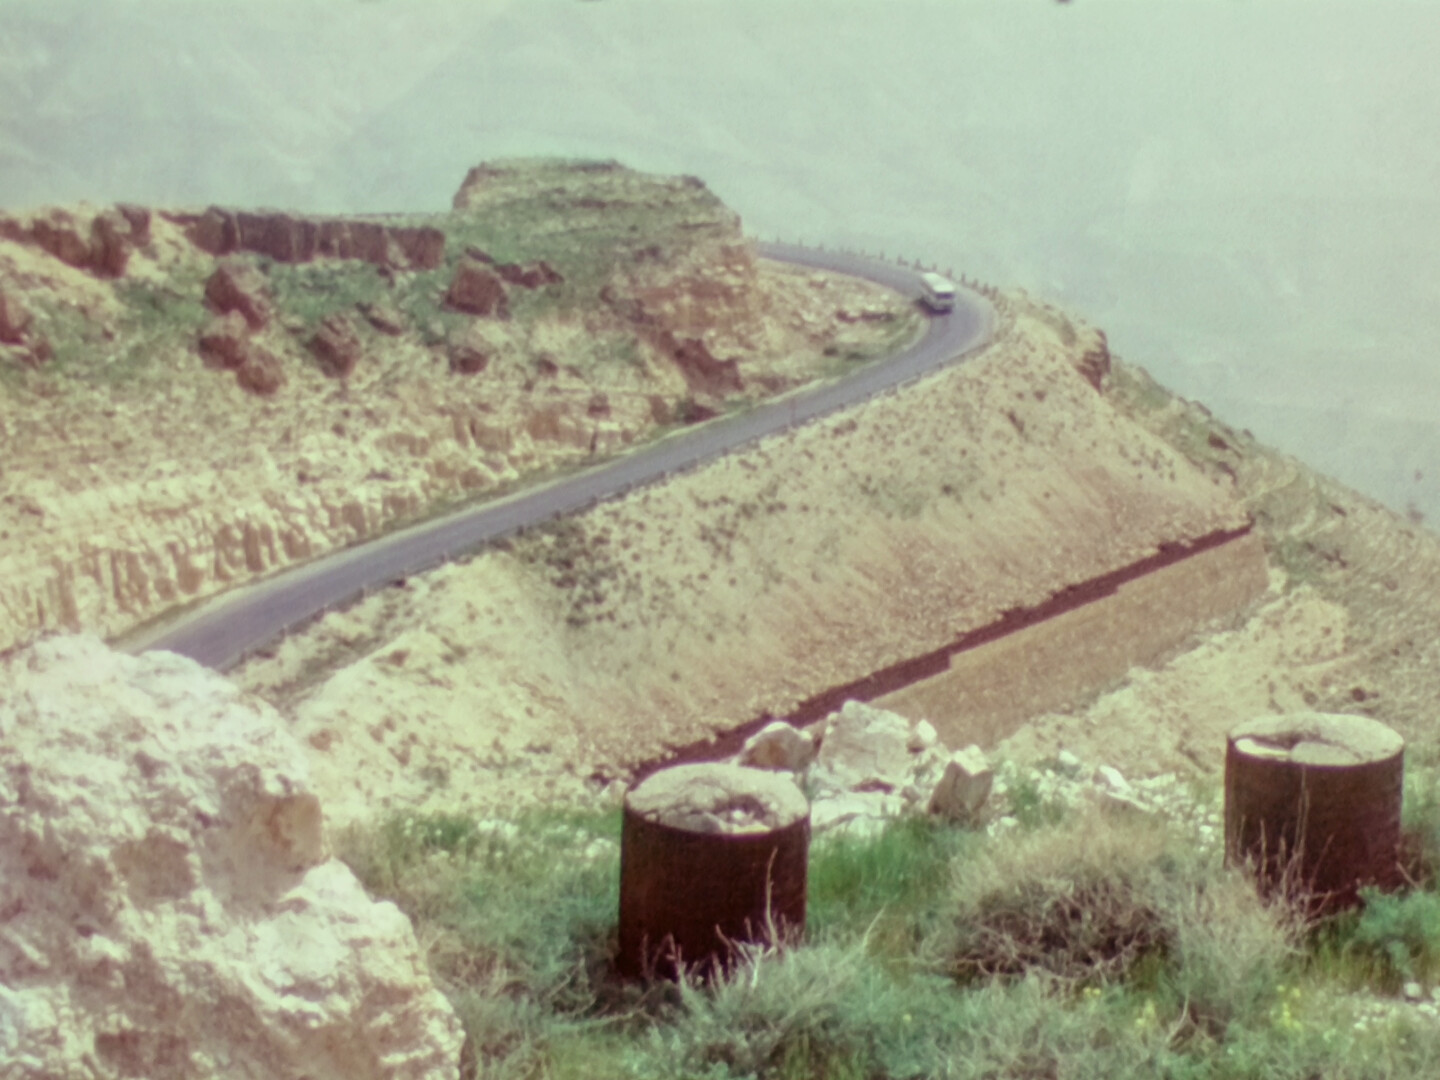
If you look closely, in the release image the definition of highlights and shadows is improved - this is a direct result of the use of the exposure fusion algorithm (with the 5 different exposures per frame). Furthermore, the poles of the barriers are much better defined than in the original “raw scan”. This is the result of the temporal de-graining step, combined with the final sharpening step. If you would apply the sharpening before or without the temporal de-graining step, you would just amplify the grain of the film stock, but would not gain any improved image information. Lastly, if you look closely at the dark wall below the street, you see both main algorithmic parts, namely exposure fusion and temporal de-grain, working in combination: in the “release” image, you can just notice the single bricks this wall is made of (you may need to enlarge the image to see this). In the “raw scan”, the same area is just a dark-brown mess without any noticeable structure. Also note the difference in appearance of the vegetation in front of the rusted concrete-filled barrels in the foreground. Here, the improvement in visual image quality is achieved as well by the combination of exposure fusion and temporal de-graining.
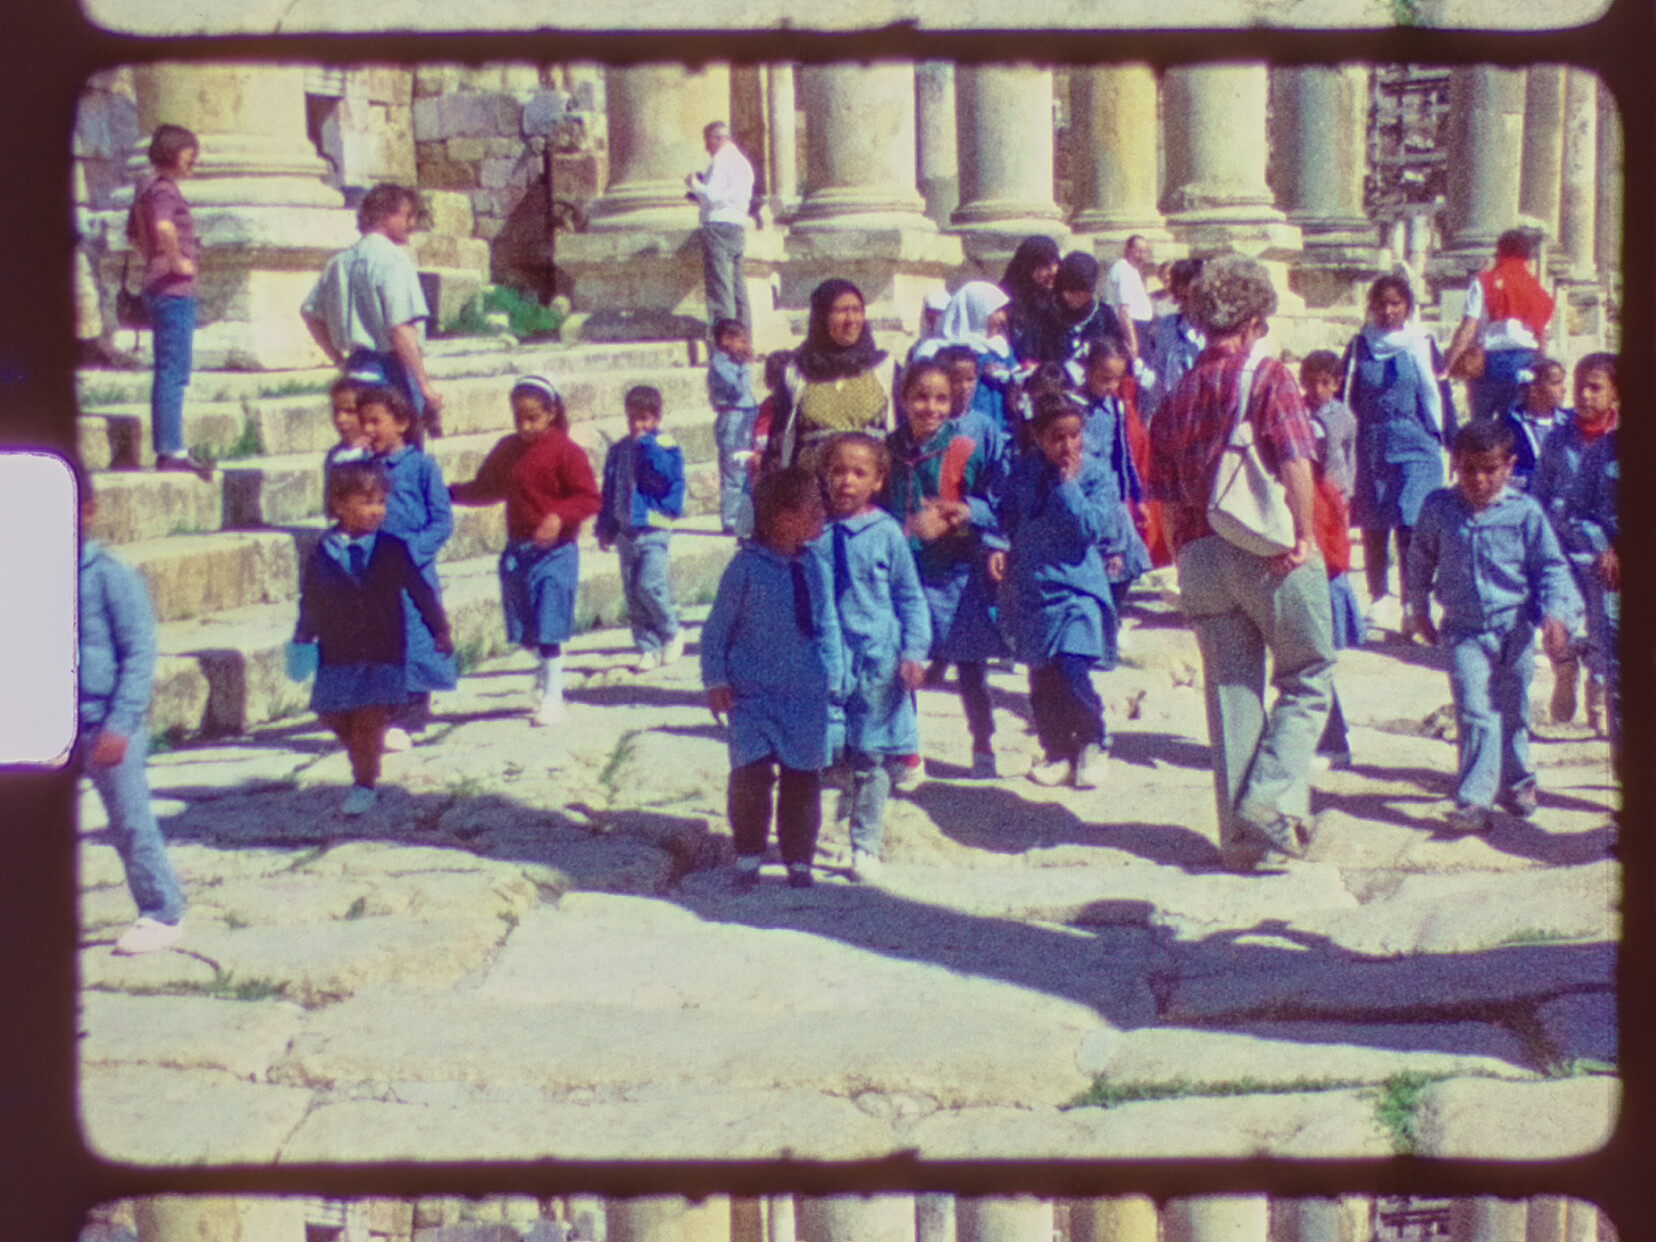
Here’s yet another example from the same reel, a 1988 Kodachrome film of a journey through Jordan (Ebay-find):
2 Likes
OOPS, Before posting anything I must learn what is left and what is right. 
Although I understood you correctly, in my post I made a mistake.
I knew your HDR workflow from your earlier posts. But I was really impressed by the details that appeared after processing. It is Night and Day. That sharpening algorithm is magical. I do not see any artefacts normally seen in sharpened images.
Thanks.
@Udayarangi - I am still trying to understand the influence of the various processing steps on the outcome with different film material. My 1988 test film was probably shot with a rather high-quality camera (at that time) and on Kodachrome. My own camera was not bad, but certainly not of that quality and, as a student, I often opted for cheaper film stock, displaying much more grain (the Monument Valley images above are from my camera, but also Kodachrome, and from 1981).
Now, I thought it might be of interest to present some more material on one of the above examples, namely the bus-image. Here’s a cut-out of the original prime scan, at the original resolution of the scan:
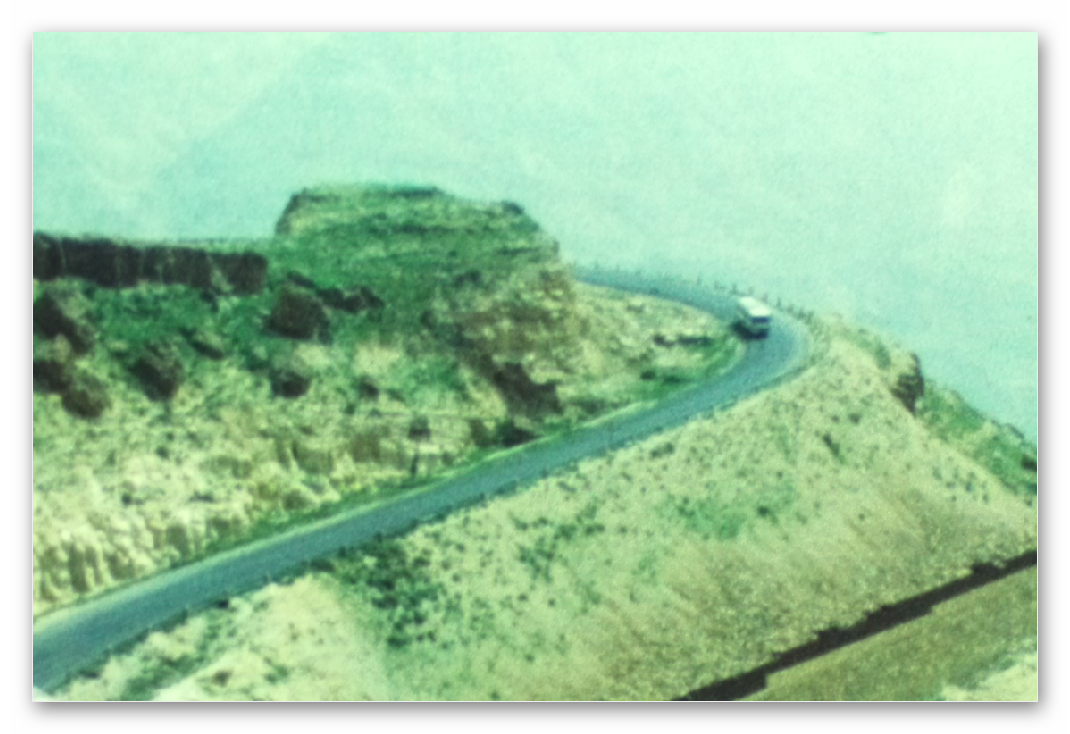
The above image shows (if clicked to show the original size) the data of the original scan one-to-one. You can notice very small image structures, like the barrier poles. But noise (film grain) is all over the place, and the top of the bus is starting to burn out.
Next is the result of the exposure fusion step followed by a coarse color-correction and a tiny amount of gaussian sharping to enhance the highest spatial frequencies of the footage. The later step is helpful as exposure fusion tends to increase blurr at these scales.
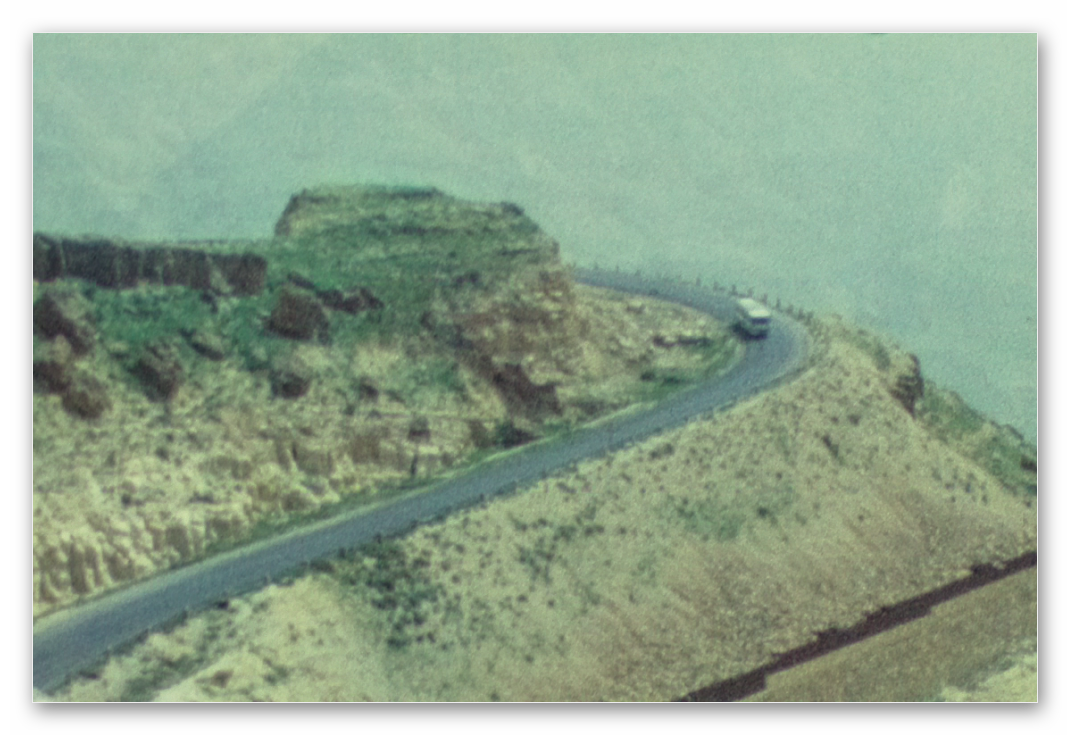
Note the better definition of the highlight at the top of the bus and some improvement in the shadow areas. This frame is actually a frame which could easily be scanned without exposure fusion with respect to the image content. The exposure fusion does however do another thing: since every pixel gets information from multiple scans, the overall image noise which comes from the camera’s sensor is reduced. Haven’t looked into this in any detail, but comparing prime scan with the exposure-fused result, something like this seems to be happening.
Now, coming to the final image:
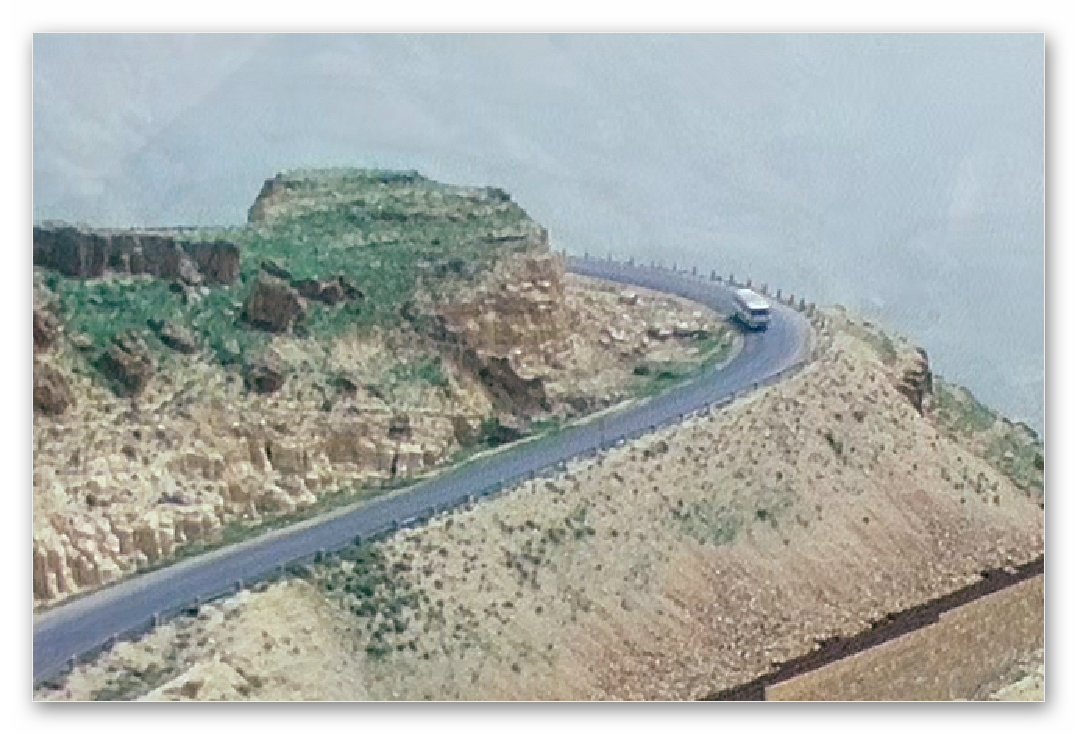
If you click on the image and view it at the original scale, you will notice that each pixel ocupies about a 2x2 pixel area. The reason is that I wanted to keep the same cut-out in all example images and the final output image is just 960x720 px. Here, the grain was removed by temporal de-graining, a manual color correction was performed, and finally again a mild gaussian sharpening applied. There are some very faint halos from this sharpening visible if you look closely, as well as some left-overs of film grain. These things are usually gone once the frame-based footage is recoded into a MPEG-4/AVC video (where the initial comparision image was taken from).
The gaussian sharpening I mentioned several times above is a very mild sharpening, a linear operation ( = does not add artifacts to the source, could be undone in a later processing step) and dead-simple to perform (here: Python + opencv):
    blurred   = cv2.GaussianBlur(img, (0,0), sigma)
    sharpened = (1.0+amount)*img-amount*blurred
“img” is here the input image, “sigma” the filter’s standard deviation, “amount” governs the amount of sharpening, and “sharpened” is the output image. “blurred” is just an intermediate image. Finally, the “(0,0)” entry in the GaussianBlur asks the opencv-routine to estimate the required filter kernel size by itself.
2 Likes
Thank you for the lengthy explanation. Could you please upload before and after images of gaussian sharpening. I am using Resolve and no experience with opencv. Would love to test this operation with Resolve.
@Udayarangi - hmm. First of all, what I called gaussian sharpening sails also under the name “unsharp masking” and was a sharpening technique which was already used with analog (film) media. Second, I actually missed the fact that in the above processing pipeline, another sharpening filter was applied, based on a laplacian filter:
        smoothed  = cv2.GaussianBlur(img, (0,0), sigma)
        laplace   = cv2.Laplacian(smoothed,cv2.CV_32F)
        result    = img - amount*laplace
Anyway, here are the requested images. First the “raw” image before any sharpening is taking place
This is probably quite comparable to the image the film camera’s optic was throwing actually onto the film stock. So the next processing steps more or less try to counteract the deficiencies of the camera’s optic.
Anyway, here’s the result of the gaussian sharpening (unsharp masking) described in a previous post, with parameters sigma = 1.0 and amount = 2.0:

Note that barely a difference to the input frame is visible. This is not a very strong sharpening. The next step to the final image was the laplacian-based sharpening described above, which results in the following end result:

The laplacian filter was run with sigma = 1.0 and amount = 2.0 as well.
The trick here is to enhance just the dimished high spatial frequencies of the image source, with the right amount of sharpening to get them back again out of the signal. Only if you turn up these values too much, halo effects become visible. The operations are very similar to the use of an equalizer in an audio setting. If done correctly, you can get an amazing amount of sound out of a not so perfect speaker.
Note that the sharpening algorithms I used here are linear operations - some sharpening algorithms do work non-linear, by detecting borders and enhancing them selectively. These non-linear algorithms might give visually more pleasing results, but chances are that you encounter halo-effects much more easily.
1 Like
Thanks for all the details and images.
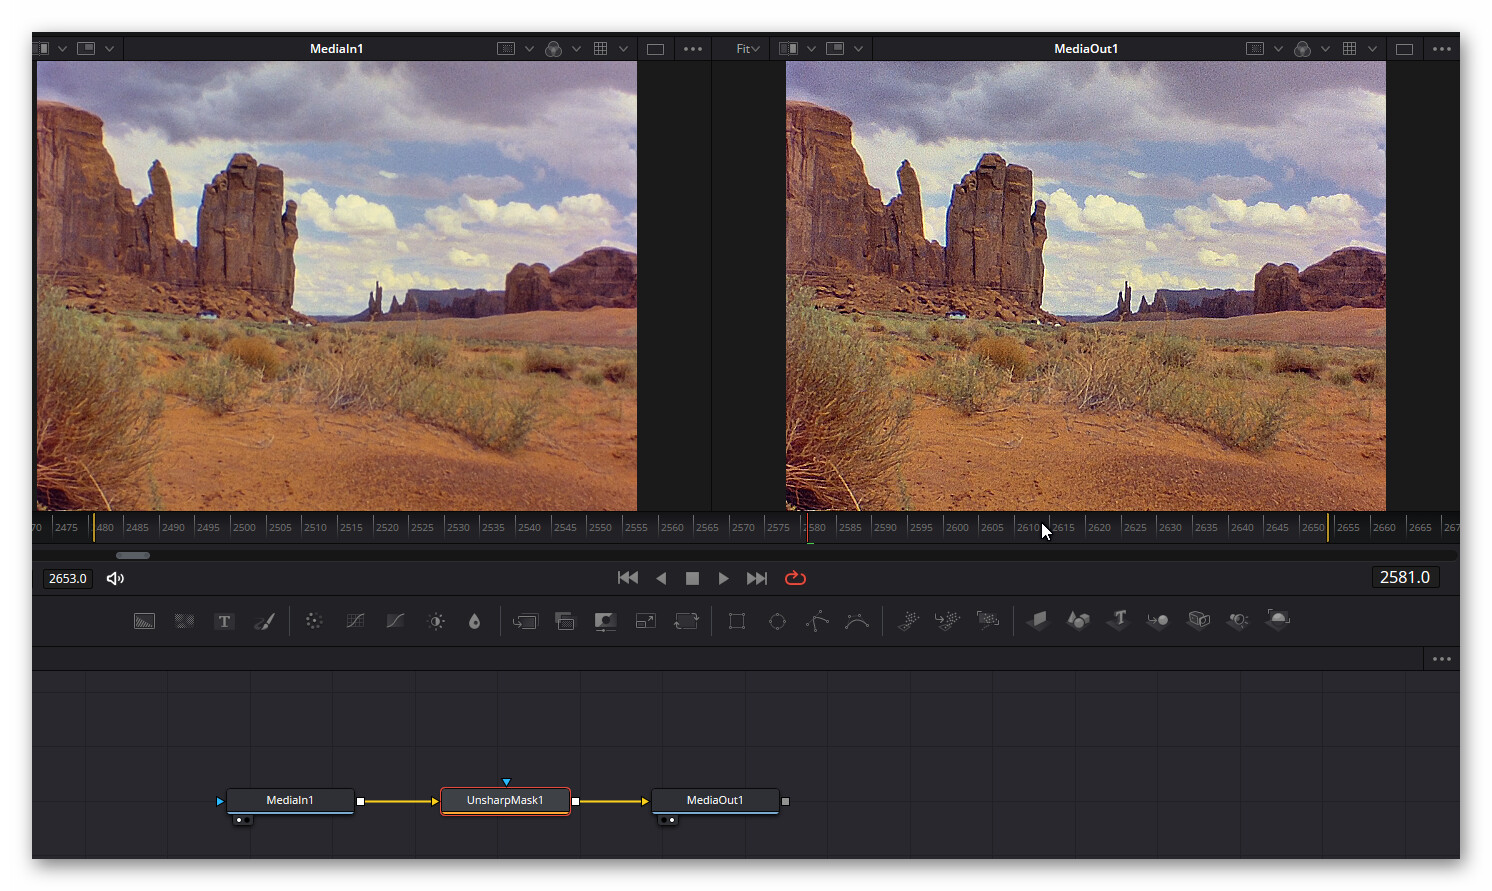
@Udayarangi - well, there is a unsharp masking tool available in daVinci. You can add it for a selected clip at the “Fusion” page like this (but note my comments below on the proper order of doing things when using DeNoising):
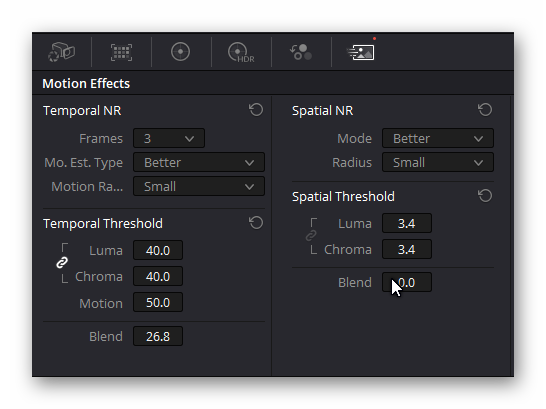
There is also some temporal/spatial filtering available under the “Color” page for every clip you have selected. It’s hidden under the right-most image icon and labeled “Temporal NR” and “Spatial NR”. However, when used, it adds a watermark in the free version. It is probably very similar to the opensource tool chain I described above, but with a much nicer interface.
To mimic the processing scheme I sketched above, you need to apply a sharpening after the temporal/spatial DeNoise. This can be done in the “Color” page of daVinci as well, by adding a “Resolve FX Sharpen” mode like this:
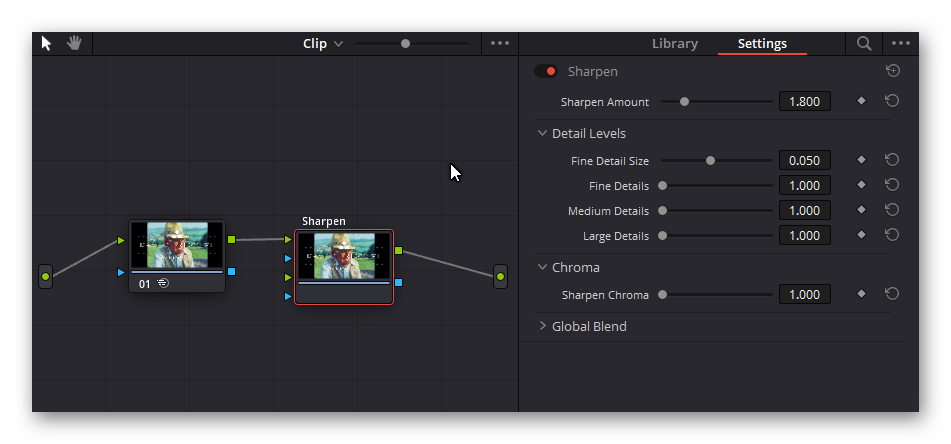
Lot’s of sliders to play with, but sadly not available in the free version. You should not apply any sharpening in the “Fusion” page if you want to DeNoise Super-8 material, since any processing here is done before the color grading. So sharpening at the “Fusion” page would only enhance the film grain, obscuring the real image content.
2 Likes
Dear @cpixip,
Your examples look really good. I would love to try to do this but I must say I would prefer to do this in Davinci Resolve. How do you think the quality and abilities of Davinci resolve vs avisynth and Virtualdub + deshaker compare?
I myself have been experimenting with the tracker feature under Fusion in Davinci resolve. I use it to track the perforation hole in the film and have it correct the position. It works great and becomes super stable. The downside is that it takes about 34 hours to do a 30 min reel with an AMD 3600. And also the movement of the cameraman and or woman does not necessarily improve of course. So I have only tried really short clips.
Under “Color” you can also use a tracker which works a lot faster! However I suspect it stabilizes the visuals in the frame but also the perforation hole. So my next thought is to crop off the perforation hole and try to stabilize the visuals only. Would you know what the best approach would be in Davinci for this?
Or would you always recommend Avisynth and virtual dub and deshaker?
And of course maybe @dgalland (or anyone else) has an opinion about this, I would love to hear it then.
Hi @Rutger,
I am actulaly looking into the possibility to use Davinci, but at the moment, this is just work in progress. So the following comments are somewhat preliminary…
One step in the approach is a spatio-temporal filter operation which gets rid of film grain obscuring small image details. While Davinci does have Temporal and Spatial NR (in the Color page, left-most entry in the lower-left panel), I have yet to come up with a setting which gives results comparable to the avisynth+/TemporalDegrain2/VirtualDub2 combo.
Spatio-temporal noise reduction works best with stabilized material, especially if you are working with amateur material which were quite often no tripod was used during recording. Davinci has here some advantage with respect to the VirtualDu2/Deshaker-combo I was using initially. Most notably, there are a lot of different trackers available in Davinci.
I have not bothered too much with using one of the trackers available in the fusion page. If you click at the Edit page on the inspector, there is a Stabilization entry available which features several quite different stabilization behaviours. However, the same trackers are also available at the Color page, and this is where I use them.
Once I have loaded the scanned frames into Davinci, I first introduce cuts for every scene of the footage. Once done, the rest of the work happens all in the Color page.
For every scene, I do a color-correction. This is necessary, as sometimes different film material with different aging behaviour was spliced together, and quite generally, often colors simply do not match.
After color correction of the scene, I switch to the tracking page. This page is somewhat hidden in the lower central panel. It is the sixth entry from the right. Once you click on that, you will see the entry “Tracker” and three bullet points in the center part of the panel. Click on the second bullet, and you will see the equivalent of the Stabilization entry discussed above. You have all the tools available, plus a few hidden ones…
I won’t go into the details of the various parameters, as they are quite well described in the Davinci manual. The most important setting is the “Perspective/Similarity/Translation” setting, as this selects the motion model you are going to use during stabilization. For normal camera shake, the most appropriate model to choose is certainly the “Translation” mode. Try this first. If you have too much rotation in your footage, you will need to switch to “Similarity” mode. Sadly, this mode analyzes also the “zoom” of your footage, which can introduce some funny image motion occationally. Avoid if possible to use “Perspective”, as this can give quite funny results occationally (it’s the full motion model).
The parameters of this panel are quite powerful - if initially the tracking does not give satisfactory results, try to play a little with these parameter. Of special interest might be the checkbox “Cam”, which tries to stabilize the footage is if the camera was on a tripod.
If that tracker does not work well with your footage, there are two other trackers available on that page, but they are somewhat hidden. If you click on the three bullets on the right side, a sub-menue opens. Select the second entry from the bottom, “Classical Stabilizer”, and the panel will show yet another tracker. Make sure to select the “Cloud Tracker”, as this thing gives you usually the better results. Only in rare situations, the “Point Tracker” performs better. Details on how to use these trackers can again be found in the Davinci manual.
All trackers have a “Zoom” setting which ensures that no black areas become visible when the footage is stabilized. It’s quite convienent, but I work differently. I usually use a little overscan, as in the following image.
This gives me some additional border area which can be used with the tracking. The little part of the perforation hole does not disturb the tracking.
Once the footage is tracked, I select the “Sizing” panel in the center panel (second entry from the right) and adjust the zoom setting manually.
At the moment, once I have color-balanced and tracked the whole footage, I save the image sequence to disk and do the temporal degraining with the avisynth+/TemporalDegrain2/VirtualDub2 combo. I have not found yet a satisfactory way to do it in Davinci.
The cleaned frames are piped through my own program to perform a slight sharpening and to scale down the frames to the final size. I am doing this at the moment with my own program, as I have yet to find a similar way to do this sharpening step in Davinci. The sharpening operators available in Davinci seem to operate on too coarse scales. Maybe a change in the timeline resolution will help, but I have not yet succeeded here.
Finally, the footage is again loaded in Davinci for a final cut and for rendering out a .mp4-file.
As mentioned above, this is all not the final workflow. I still need to optimize things especially the frame sizes used in the intermediate steps. They have a large influence on the outcome.
In summary, at the moment I see potential to use the tracker facilities in Davinci - they offer better performance than the VirtualDub2/DeShaker combo, are faster and can be tuned better. Color-balancing should certainly happen in Davinci. Whether there will be way to do the sharpening operations needed in Davinci remains to be seen.
2 Likes
I haven’t tried DaVinci and I think you need the paid version to have all the possibilities.
As I use a modified projector that positions the frame exactly so I don’t need to detect perforations.
For me avisynth + virtualdub do a great job ( stabilization, denoising, sharpening and some color adjustment) but are still quite complex to use. This is what I tried to simplify and automate in my github restore project. I had a lot of reels and an automated batch processing saved me a lot of time compared to an interactive tool. To process a clip I execute successive batch steps like this:
do concat images films clip
do deshake films clip
do clean deshake clip
do adjust clean clip
do render264 clean clip
Between each step the clip is encoded with a lossless codec. It is also interesting to be able to re-run a step like adjust without re-running the much longer steps like deshake or clean.
The only point where DaVinci or any other NLE editor (I use Sony Vegas) could be superior would be the color corrections. Indeed, apart from a simple white balance and level adjustment, it is impossible to find an automatic color correction valid for the whole film, this correction must be done scene by scene.
I do them at the end in the final cut.
1 Like
@dgalland is right - the spatio-temporal noise reduction tools in Davinci are not available in the free version. Also, in my experiments, I did not succeed (so far) in finding parameters which would give results comparable to the VirtualDub2/avisynth+/TemporalDegrain2 combo for my Super-8 material. Also didn’t succeed yet to find a way in Davinvi to sharpen the footage after the spatio-temporal degraining in an appropriate way. All sharpening operations I found in Davinci operate on a way too coarse spatial scale.
While setting up avisynth+ with the appropriate filters is a little bit challenging, I think @dgalland’s github repository is a good place to start working with these tools. Personally, I prefer single images (.tif/.png/.dpx) instead of using a lossless decoder for the intermediate data. But that’s just a matter of taste. Also, as @dgalland’s approach suggests, you certainly want to keep these intermediates, as some of them are costly to recreate in case some minor adjustments come up in the final phase of your project.
1 Like
It is still interesting to have an encoded clip with a looseless codec for intermediate steps since it can be viewed normally with any player. Also, it should probably be faster in reading or writing to process an encoded clip rather than separate frames?
I also have a compare step, for example :
do compare clean deshake clip
which generates the compare clip between two steps, here to see the effect of cleaning.
As an intermediate looseless codec I use MagicYUV, not free but the price is very reasonable, you can also use UTvideo which is free.
1 Like
Thank you to @cpixip and @dgalland for explaining your workflows and sharing your insights. I did not know about another stabilization option in Davinci (the classical one) and I will try to test if I can make a lossless file in Davinci and degrain it using the VirtualDub2/avisynth+/TemporalDegrain2 combo.
@Rutger some small comment:
There exist at least three different versions of the TemporalDegrain-filter.
- the original TemporalDegrain() filter
- a modified TemporalDegrain2() filter version 2.2.1
- yet another TemporalDegrain2() filter version 2.3.1
They need different support software (plugins) and will produce different results.
I’ve tested all three and tried to find optimal parameters.
Currently, I would recommend TemporalDegrain2() filter version 2.3.1 (download). The software required for this filter is different from the old version. You can find links for downloading the plugins required for this filter in the first few lines of the script (it is a simple text file).
Note however that this script will not work well on color-reversal Super-8 movies with the default parameters. I suggest to at least include the parameter
ppSCD1=20
in your call. Also, the former boolean parameter “grainLevel” of the old 2.2.1 version has now been changed into a numerical parameter. You will want to use for Super-8 material the following parameter setting in your call:
grainLevel=2
1 Like
Hi i use a free program called Enfuse version 4.2 works very good for HDR when i do my 8mm and super 8mm scans
you can see more here how i do it
later i did notice that i have to fine tune the gamma on my low and high exposure capture to get the Enfuse HDR merge to work good with my own captures here you can read more about it
here is two of my hdr scans with Enfuse 4.2 but it’s not 4k the other film clips i have i did use Avisynth hdr script


the flicker you see on the sky i have fix that now it was a problem in my Arduino script when the Led light flash the Low and High Exposure
3 Likes
Very nice results! Enfuse implements the same exposure fusion algorithm like a lot of other programs, including OpenCV. The orignal paper describing exposure fusion as well as Matlab code to run it (very slow) can be found here.
I assume that you are working only with two differently exposed images - in this case the tuning of the camera’s transfer functions (like a gamma correction) helps in establishing a pleasing end result.
If possible, I would suggest using at least three different exposures: shadows, midtones and highlights. If you have time to spare, it’s a good idea to add additional shadow passes. I am using not one, but a total of three shadow passes, ending up with a total of 5 different exposures/frame. That covers approximately the full dynamic range of Kodachrome color-reversal stock.
In any case - these are great results! I think it would be helpful for the members of this forum if you can share some more details about your system and approach - what type of camera/capture software/lens/etc. are you using? I found on YouTube a short video of your scanner setup (I assume this is your current setup?) - quite fast scanning which is shown there!
1 Like
Cpixip Thanks for the info
The camera i use is a DFK 23G274
the lens is Rodenstock APO-RODAGON D 75mm 1x f/4
i use IC Capture to capture the images Software für Windows und Linux herunterladen
and here you see it in action https://www.youtube.com/watch?v=xnBGaFhk70Y that is my Main scanner
the other one that you did link this one https://www.youtube.com/watch?v=IaJuNBdQgH8 it does not work so good maybe some day i try to work on it and fix it ![]()
here i have post much info about my scanner
3 Likes
Thank you very much for the additional information! A nice setup with a fast HDR scanning speed. And the results above look really great. Thanks for sharing!
This looks great but it looks great because it’s done on a real scanner and not because it is 4K. Even a 2K scan of a super 8 film has an input resolution of over 7000 dpi which exceeds the top FADGI standard (the targets laid out by the US library of congress for archive digitization) by 3000 dpi. Film only has so much resolving power and adding additional resolution does nothing to improve the clarity of the image on a tiny super 8 frame. This seems very much like an audiofile type of argument where a person will argue their 400 dollar HDMI cable delivers a better image than a 40 dollar one.