I know there has been some discussion as to whether or not to use HDR. I’ve been working on getting my homemade telecine up and running for a while now, with a few breaks in between. Some people say 4k on Super8 isn’t worth it, but I think that it is, based on the quality I’m getting. Also, HDR is beyond useful for getting the image color quality out of the original frame. I’m using a Canon 5d Mark II (an older professional body) and a Laowa Venus 2.5x-5x macro lens (on 5x) with a modified dual 8 projector. Both exposures are at f/8 (it goes from f/2.8 to f/16, but the DOF at 5x and f/8 is .1mm, so I don’t want to go to a wider setting than that). The first exposure was taken at 1/160, 200 ISO, and the second was two stops higher at 1/80 and 400 ISO. For the HDR output I used a program called EasyHDR, which I am using because you can batch process large quantities of files. While I’m trying to stay open source for all the software I use, this one is paid, but it’s affordable AND it’s a perpetual license.
Yes, I completely agree.
Just have a look at this sample of Super8mm scanned in 4K: 4K Film Scan da Super 8mm - Riprese Andrea Dojmi - YouTube
It’s was scanned apparently with the Filmfabriek Scan Station-Scanner using Schneider-Kreuznach optics (https://www.tele-cinema.it/film-scanner/).
Just incredible how much you can get out of Super 8mm, especially if it’s brand new Kodak Vision 3 50D stock. Just wow! ![]()
I guess for this type of discussion one should at least differentiate between scans of newer color negative film material and scans of old color-reversal footage. Very different beasts!
Also, “HDR” is a much overused synonym. Real HDR technically gives you a map of scene radiances - but this is most probably not what a film archivist is really after. The algorithm to create a radiance map (HDR) out of a stack of different exposures is photogrammetry at its best and because of that it creates (has to create) very funny looking “images”.
To get to something close to the impression of the original footage, always a kind of electronic development similar to the “development” of raw images is needed. This step is generally called “tone-mapping”. There exist tons of different approaches to tone-mapping, all of them not universally applicable in an automatic fashion. People tend to call the image which comes out of the tone-mapping “HDR”, but this is technically wrong. (I can give more details here if anyone wants to know.)
Your software “easyHDR” is offering a mode called “Smart Merge” for tone-mapping which is actually not based on an intermediate radiance map (so it’s no HDR in the pure sense), but it is kind of equivalent to exposure fusion (judging from the manual of easyHDR). There are ample examples on this forum about what you can achieve with exposure fusion and Super-8 color reversal material.
Last point to note: for any approach (HDR/exposure fusion) working with different exposures of a single film frame, you have to make sure that any setting other than the exposure time stays really constant between the different exposures. Most notably the color balance needs to be rock-solid set to a fixed value between exposures.
@Marian - Wow! That is fantastic footage. Unfortunately, my footage is 50 years old (in fact that is my sister in the stills, born in 1971…) But I’m still getting good information from the footage, so I guess I didn’t wait to long!
@cpixip - Yes there is a “Smart Merge” mode in EasyHDR, but there is also a “True HDR” mode as well which does the radiance maps. Realistically, since there is so much variance in HDR software, you should do custom settings for each frame, but no one’s got time for that. I played with a variety of software packages, and this one came out the best when you factor in cost (Lightroom was really good too, but the subscription fee was frustrating) and final image quality. It doesn’t do the best for any given shot, but it does the best over a range of different shots without thinking about it.
My process is to take a few of the representative exposure settings from the original film, and set the baseline exposure of the capture from that. Then I step it up 2 stops. This can be done either by ISO, or shutter speed. As @cpixip said, shutter speed works best. I can then modify an XML file to process the whole lot of them in EasyHDR.
For archiving - I don’t save any of the intermediate files unless they’re sidecars. I am using Darktable to do some post-processing (again, I can batch copy the settings to the whole lot), and then export .png’s which I merge in Blender (although I may start using Shotcut, exploring that option now), and image stabilize with an algorithm called Deshaker for use in VirtualDub. Then I delete all the intermediate files and only keep the camera raw’s, and sidecar files.
The idea here is basically the only important thing from an archival point of view is to save the data - and as much as I can, in as original a format as possible. I want to produce watchable videos right now, but if at some point in the future technology improves I can regenerate the movies from the camera raw files. Because of the size of the raw files, a single shot 3600 frame (50’ Super 8, or ~15m) takes around 70-80gb. Two shot at different exposures (the minimum to make any kind of HDR) is thus nearly 150gb. Ideally I’d love to capture 3 images two stops apart each to get the maximum information but I have 90 films to do, and I’m still going to need a bigger hard drive than I have by the time I’m done. Factor in a backup drive and I would need about 30 TB of storage for raw files. I just don’t have the budget for that right now.
It’s about 2 hours to scan one 50’ reel this way. Another hour or two to make HDRs - another hour or two to export all the color corrections from darktable, and an hour to put the movie together from images and then about 30 minutes to do the motion shaking. For the 8 hours of scanning and processing one movie my time spent is probably about one hour. But again, this is worth it to me. The movies I’m getting are so much more watchable than some scanning house that costs $25/reel. And I don’t have the $200/reel for one of the better scanning houses that might give me the individual frames for future editing.
@busting_bravo - well, my current workflow is actually quite similar to yours (and still evolving). For speed reasons, I do not capture raw files but compressed jpgs. Each frame is actually captured with five different exposures. This takes currently about 3 sec per frame, the following postprocessing takes actually longer per frame. Like you, I keep the original scans for archival purposes - my aim is to produce from these original scans the best copy I can transfer and display with current technology.
In my opinion, the best way to combine different exposures into a final product is exposure fusion. Three things are import for me in this context: first, there are some parallels between the way our visual system is working when watching a movie on the screen and the way exposure fusion combines the different exposures to a single image. Second, exposure fusion is quite tolerant - even grossly underexposed scenes (which you will always have in amateur footage) come out decent. Thirdly, you do not need to adjust any parameters - this algorithm is largely parameter-free. Here’s an example of what one can expect:
To the left is best of the five exposures taken from the single frame. The frame is actually from a 1981 Kodachrome 40 color-reversal reel and was scanned originally at 2880 x 2160 px, here reproduced at only 720x540 px (click for original size). Note how grainy and unsharp that original scan is even in this reduced format. To the right is the final result of my image processing pipeline, consisting currently of a combination of own software as well as a few avisynth- and VirtualDub-filters.
The first step in my processing pipeline is exposure-fusion of the five different exposures. Well, in the example given, exposure fusion has actually not much to do, as the dynamical range of this specific image is captured quite well with a single exposure (namely the one displayed on the left). However, one has to note here that the exposure fusion did get it correctly here anyway - there is no tonal compression happening here, as it is often the case with HDR/tone-mapping approaches.
The next step in my processing pipeline is a coarse manual color-grading (which I can later fine-tune in a video editor). This happens here at that point, as I am going simultaniously from a 16bit/channel image (with plenty of head room for color grading) down to a 8bit/channel image for the rest of the processing pipeline.
After this comes a VirtualDub pass with deshaker, mainly to prepare for the next two processing steps - film cleaning and temporal degraining. Because of the deshaker pass, the individual film frames are much better aligned for these processing steps and you get away with less aggressive filtering. You can see the film cleaning working by noting a few dark spots in the sky region of the archive frame missing in the release frame. The grain removal is also quite obvious in comparision.
Only after the film grain is removed, a sharping step is performed. This sharpening step is now able to reduce the defects of the old Super-8 camera’s optic, improving the overall impression of the footage in the release frame. If you would do the sharpening step before grain removal, this would not work - you would only increase the graininess of the film, obscuring the underlying image structure even more.
Degraining is essential also in another respect - grain is eating up your bandwidth in any electronic transmissions.
@cpixip wow, that is actually very close indeed! What do you use to remove/reduce the film grain? I’ve been looking for something and haven’t found anything (although I’ve found a lot that ADD more film grain, haha).
Mmmmm…very nice!
What software do you recommend for this type of work?
Are you working frame by frame? Is that how you took the dirt out of the photo?
Busting Bravo…
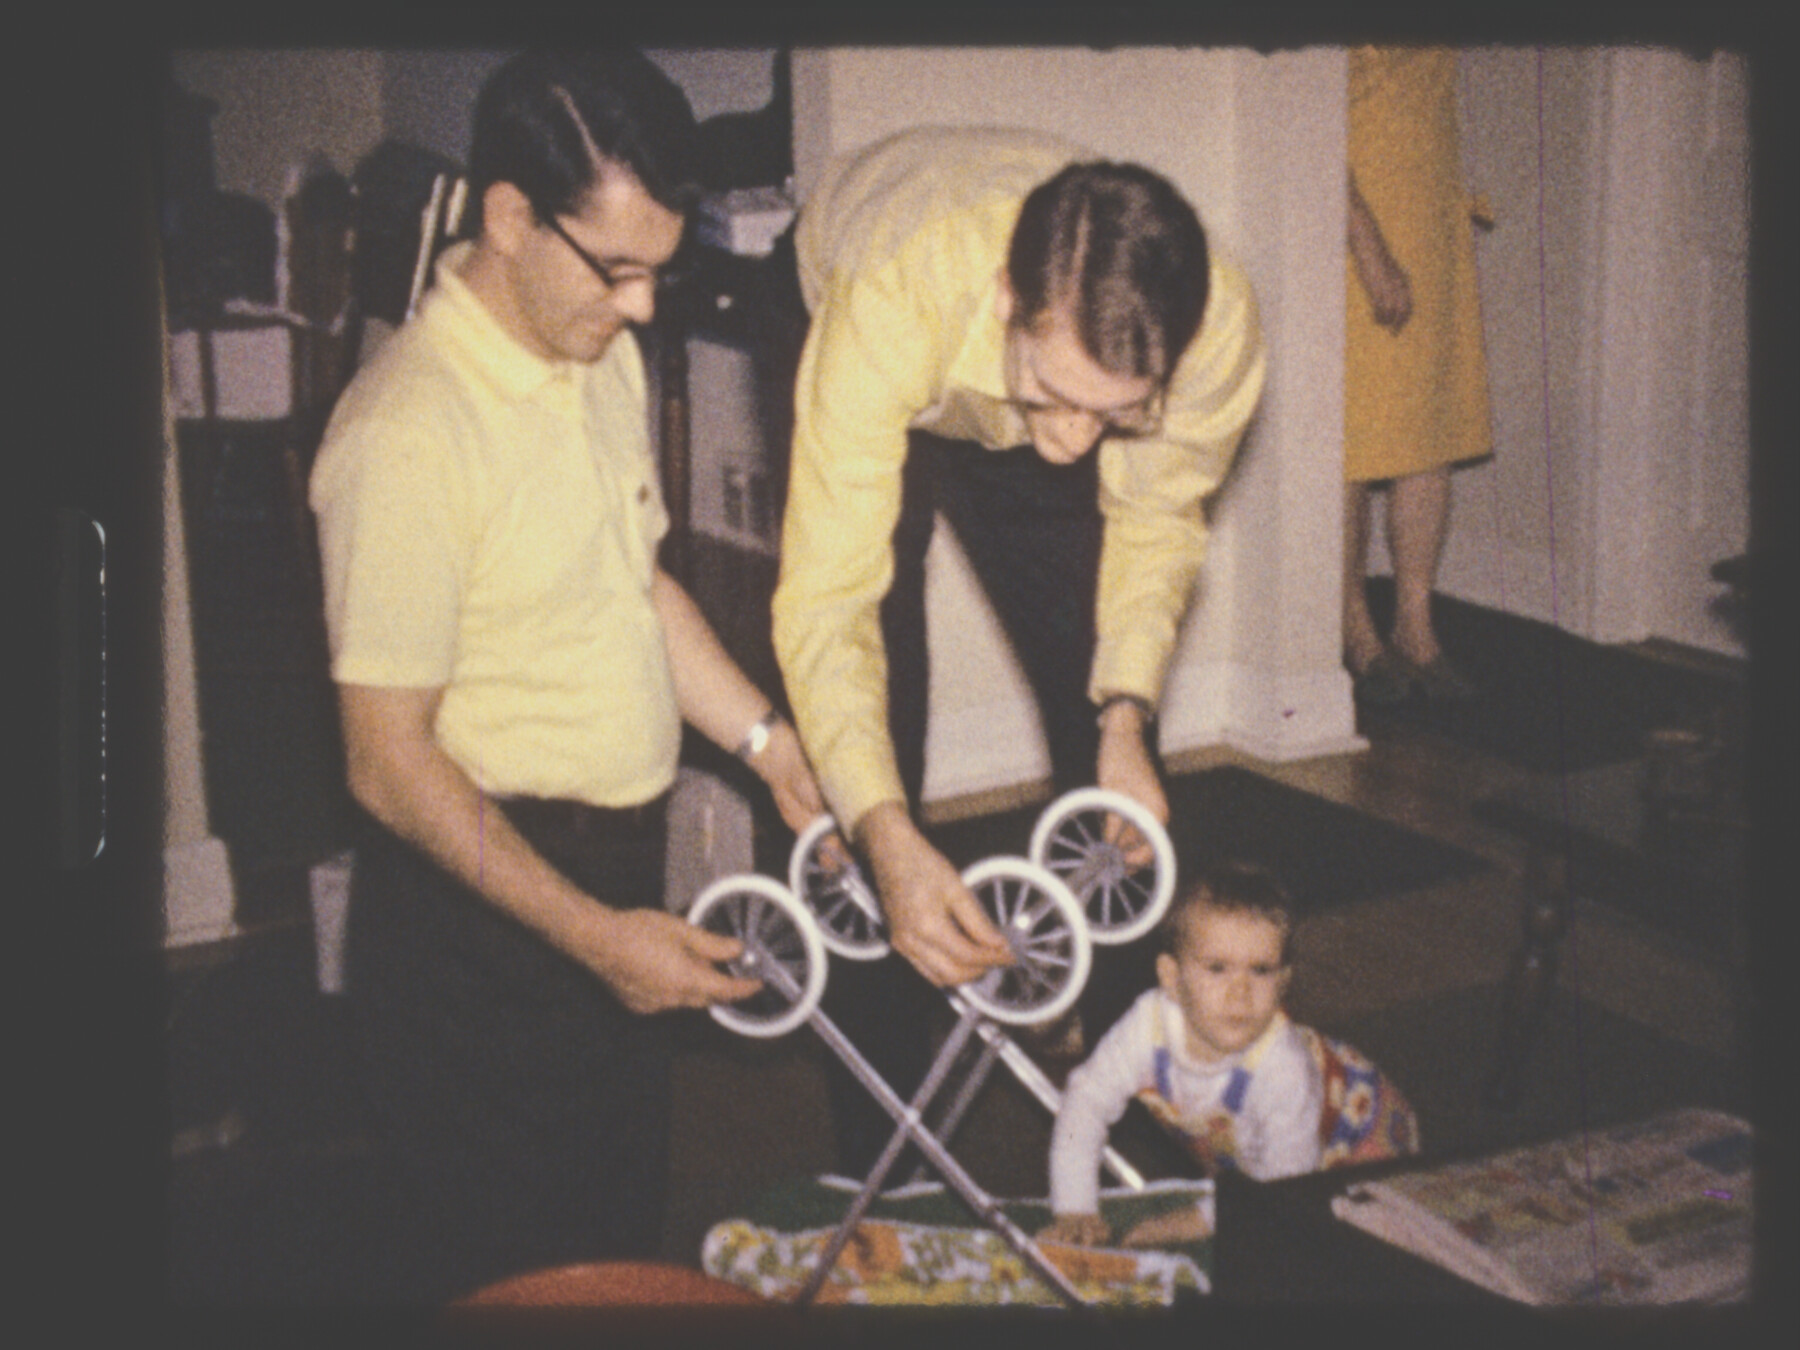
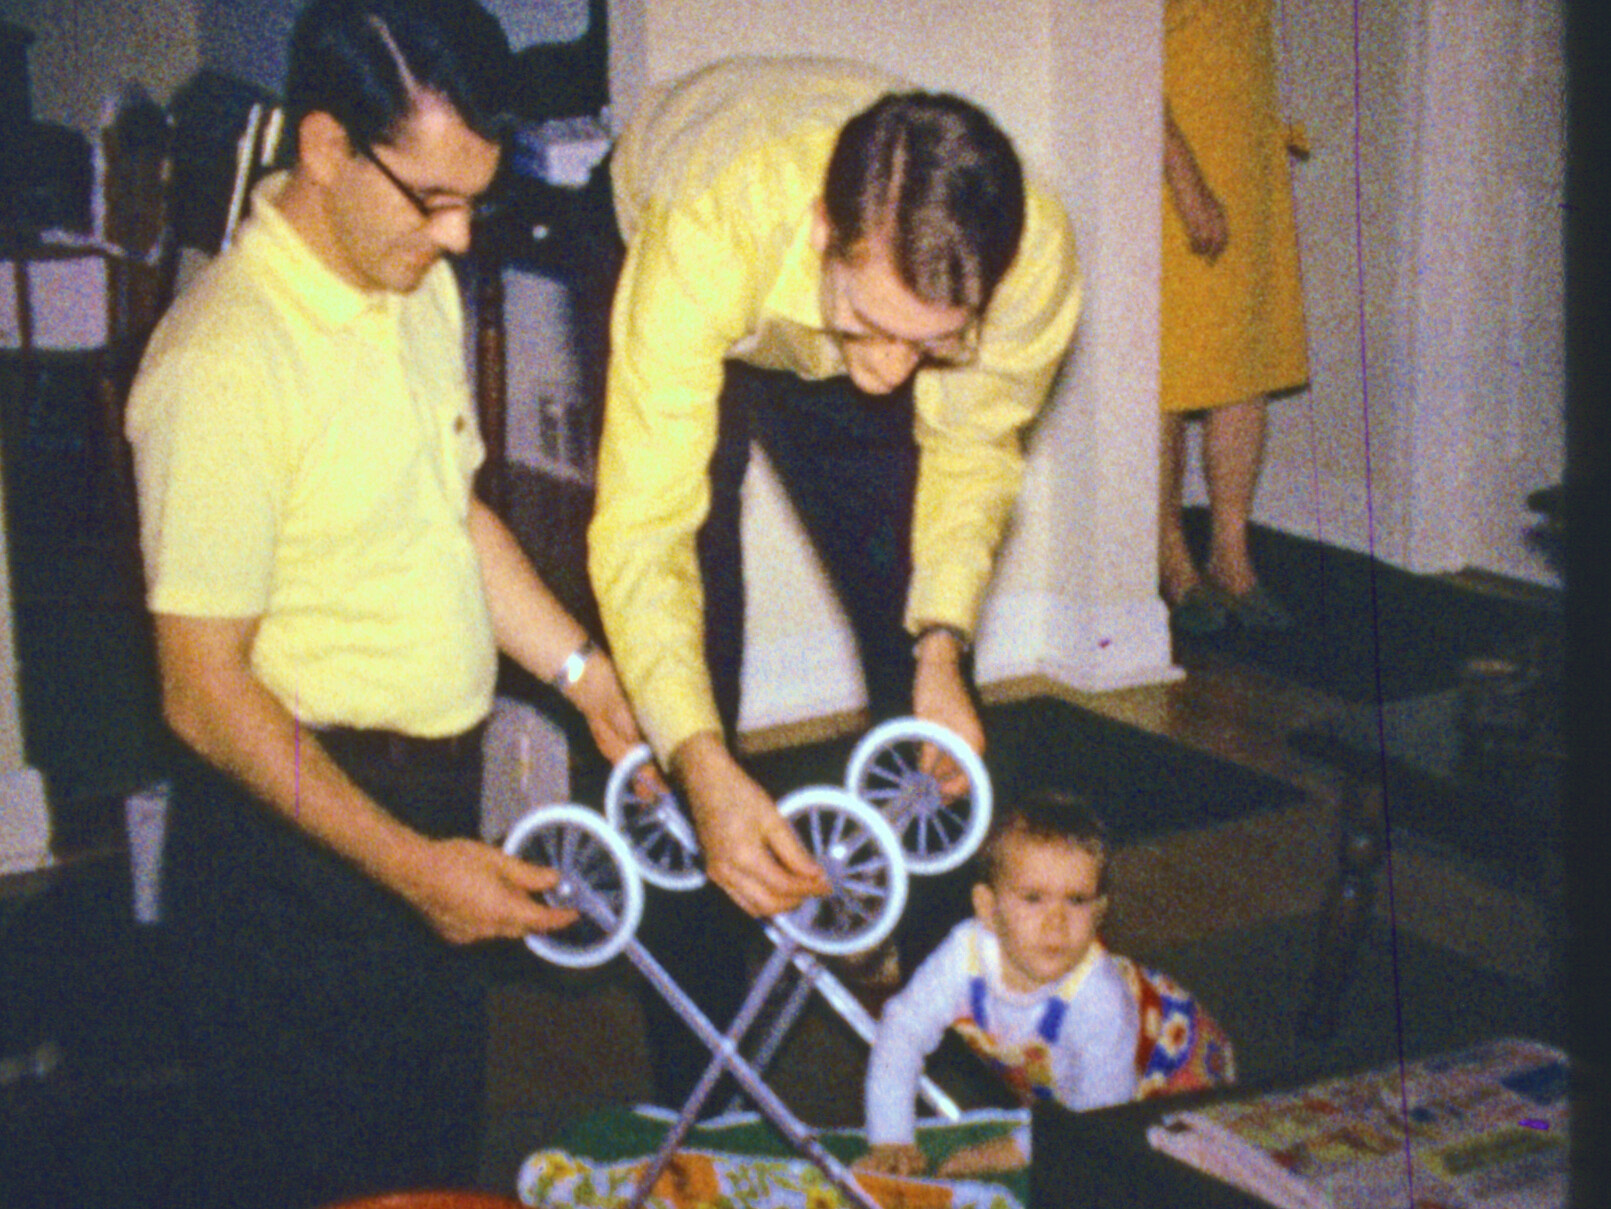
What are the specs for each sample image? Which is which and which one is your final image?
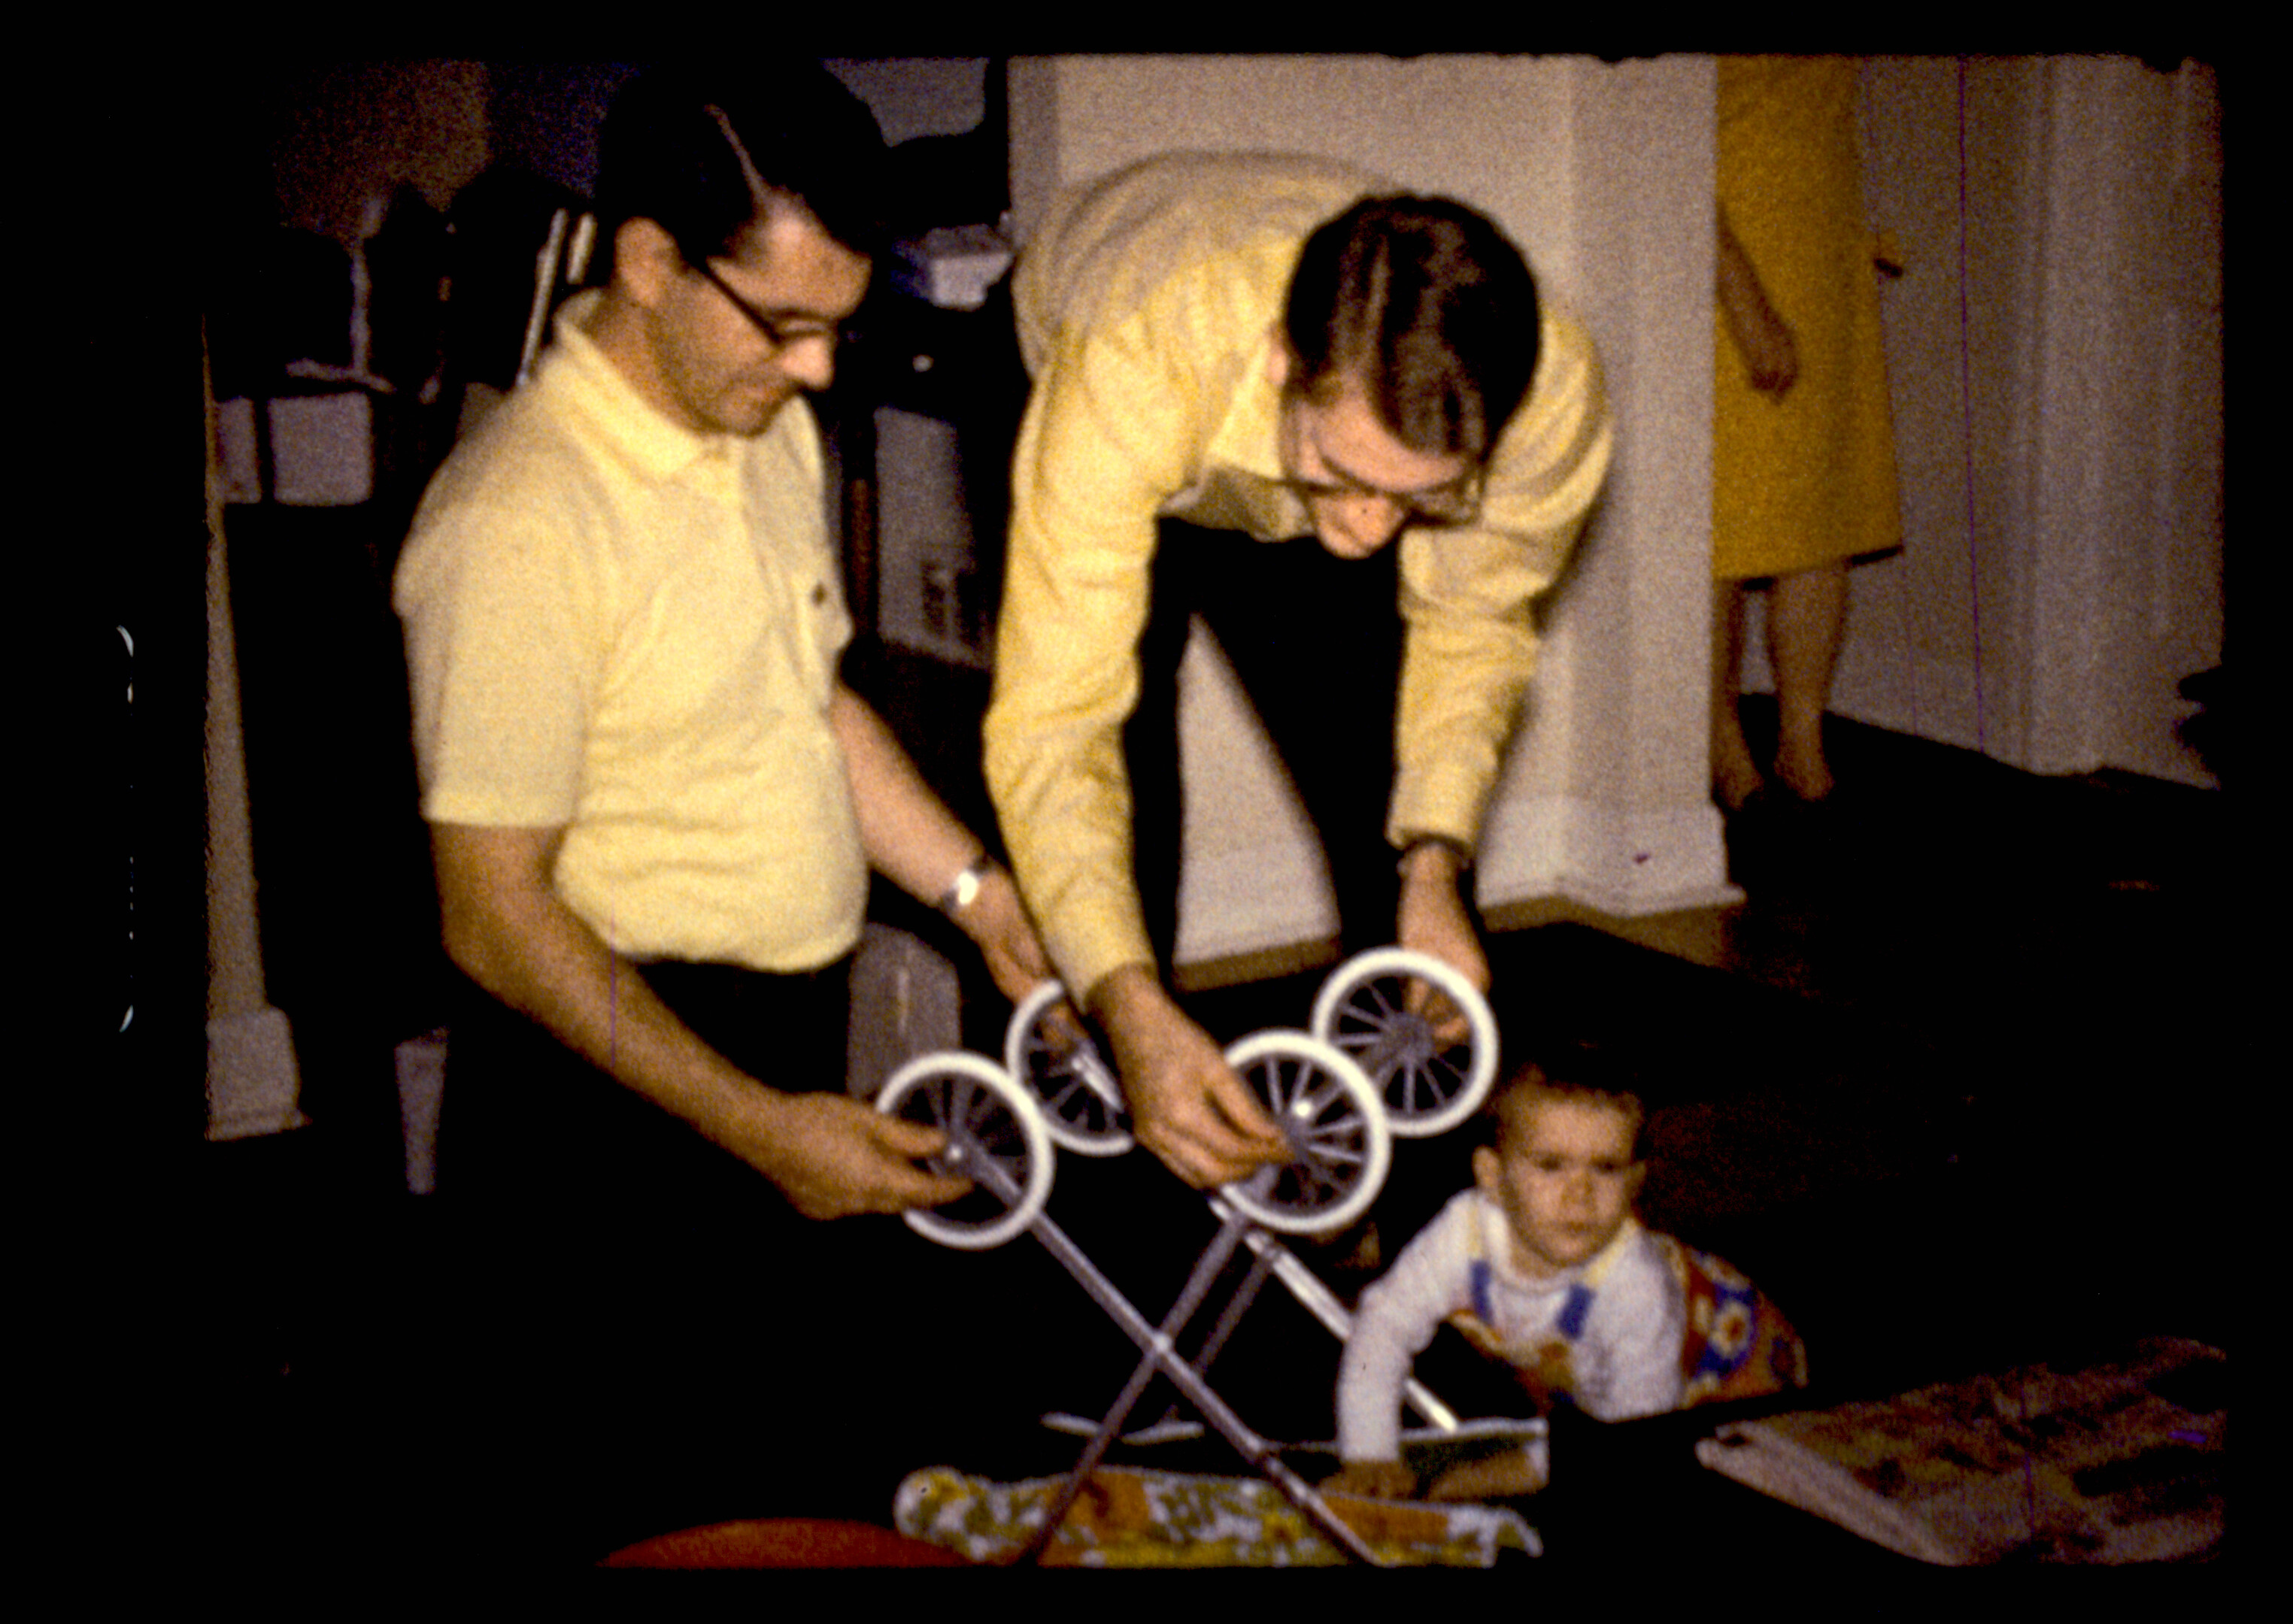
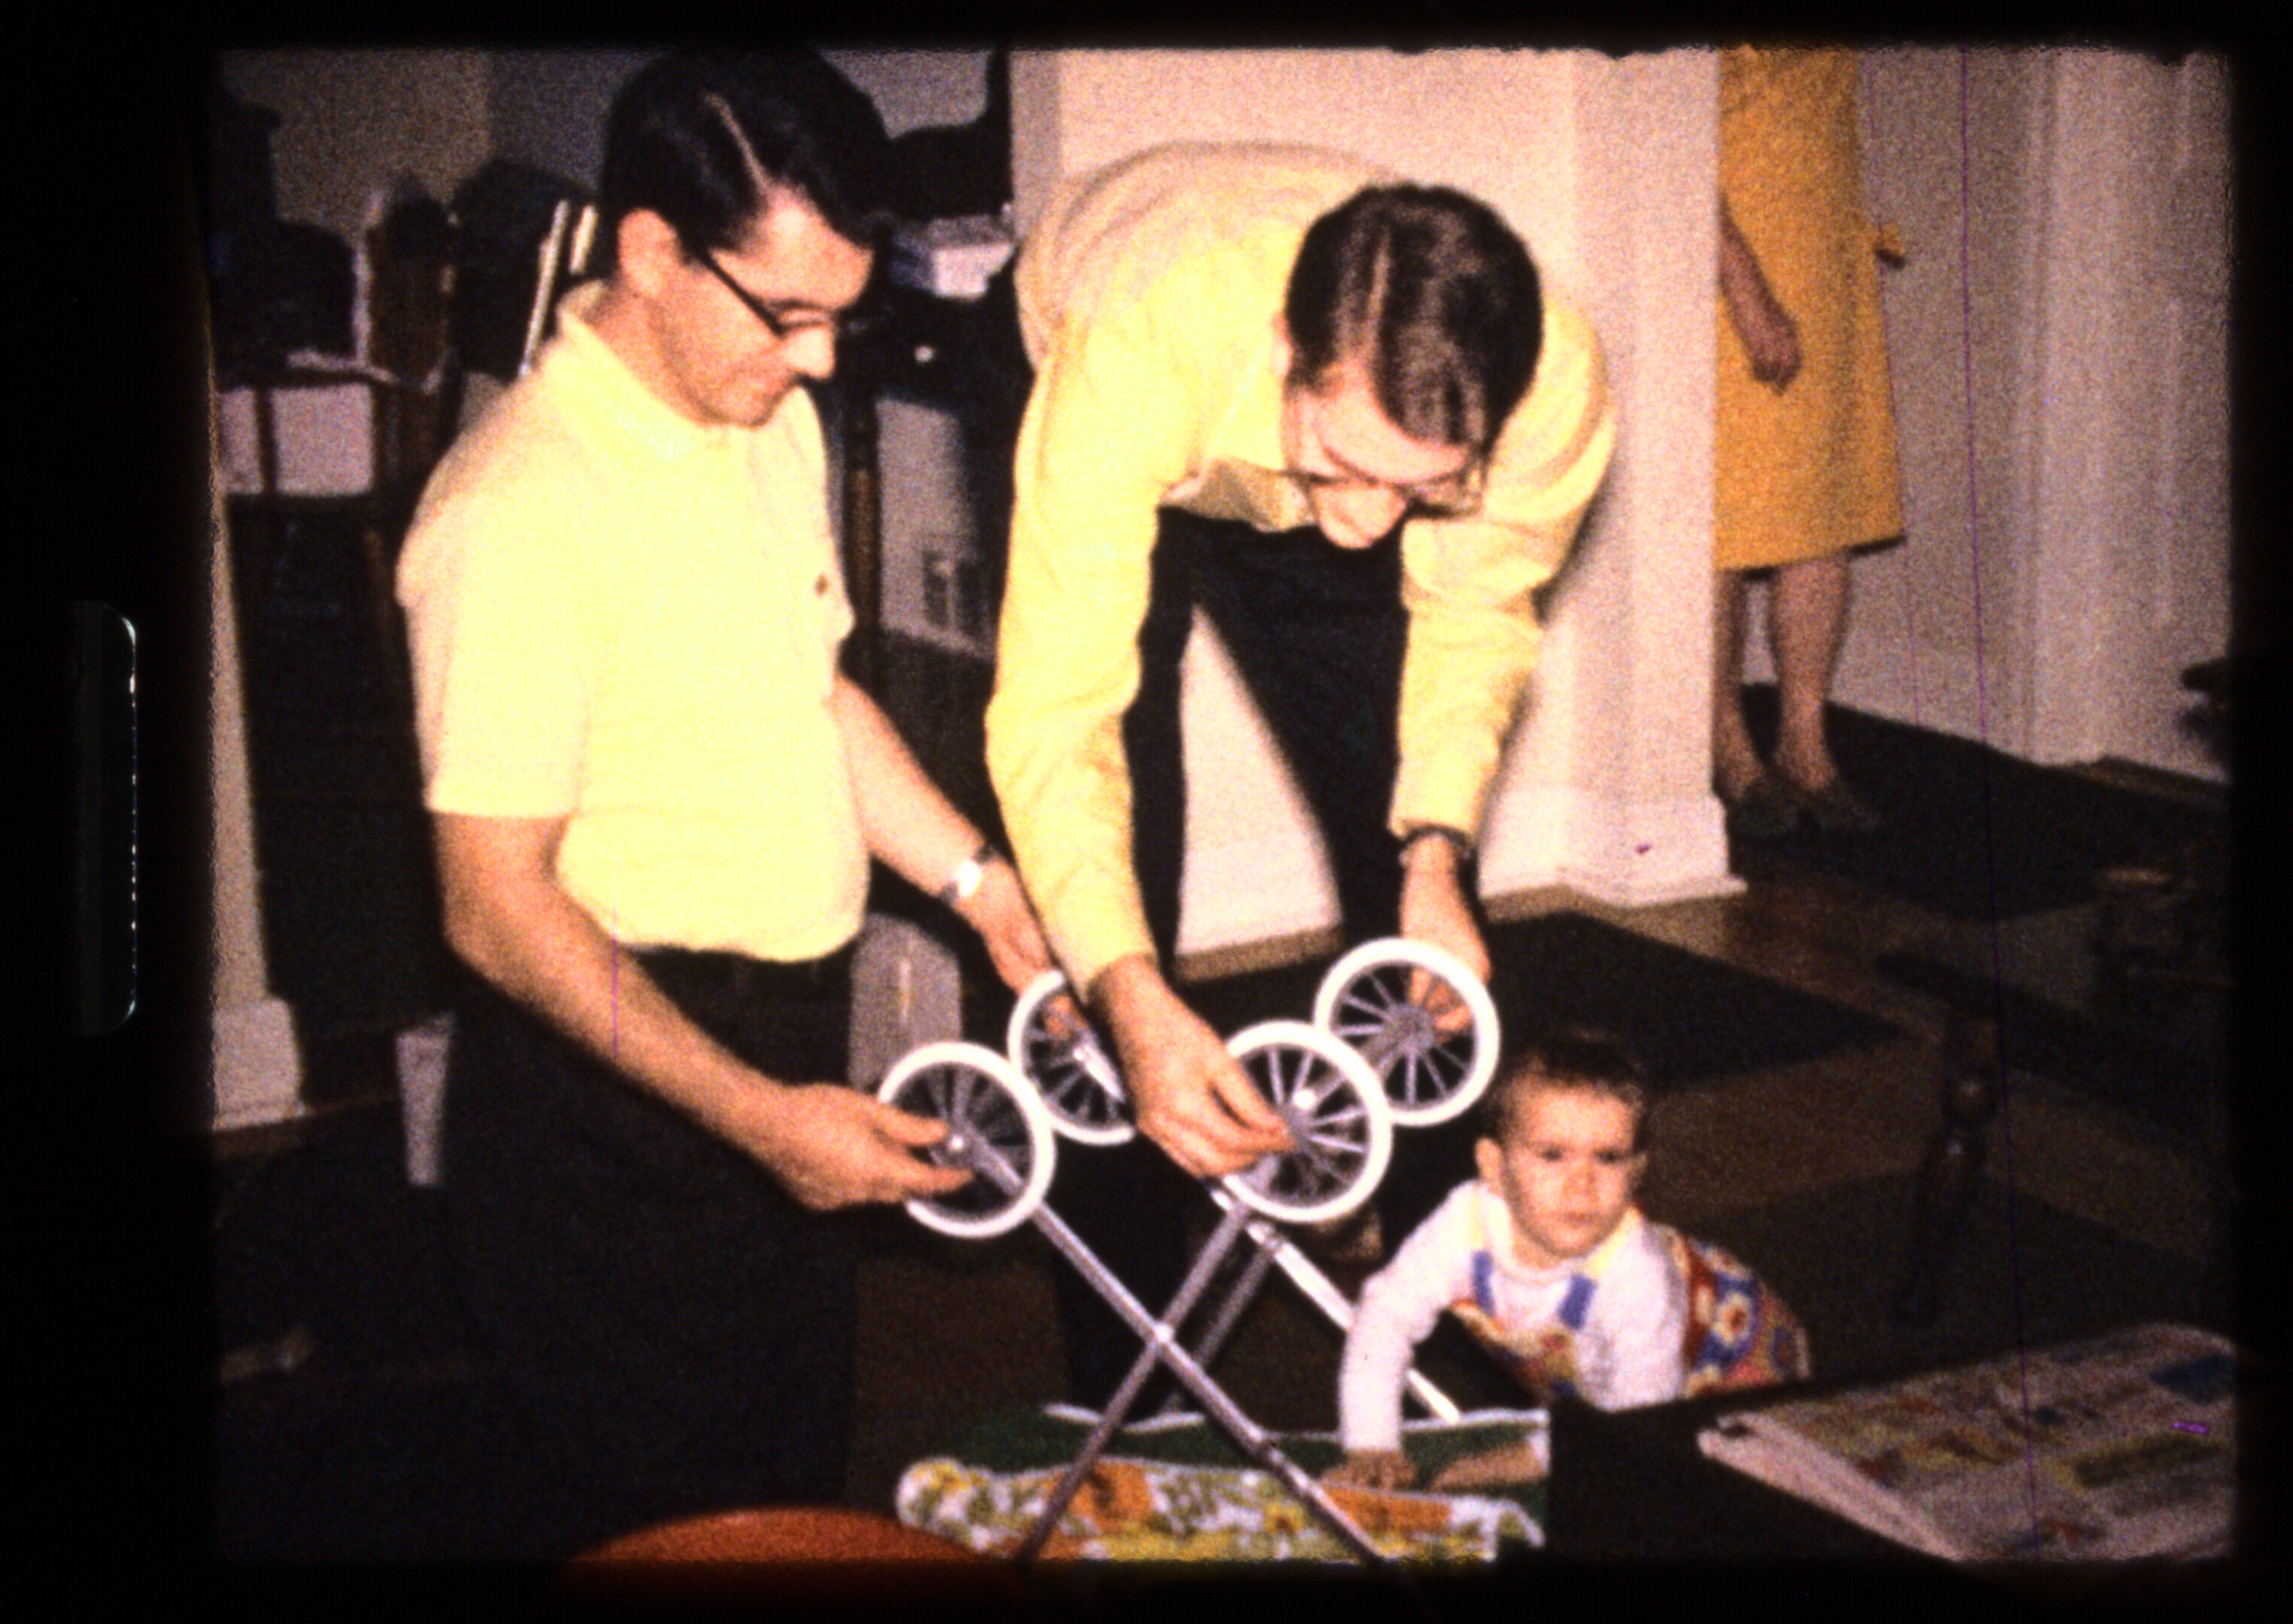
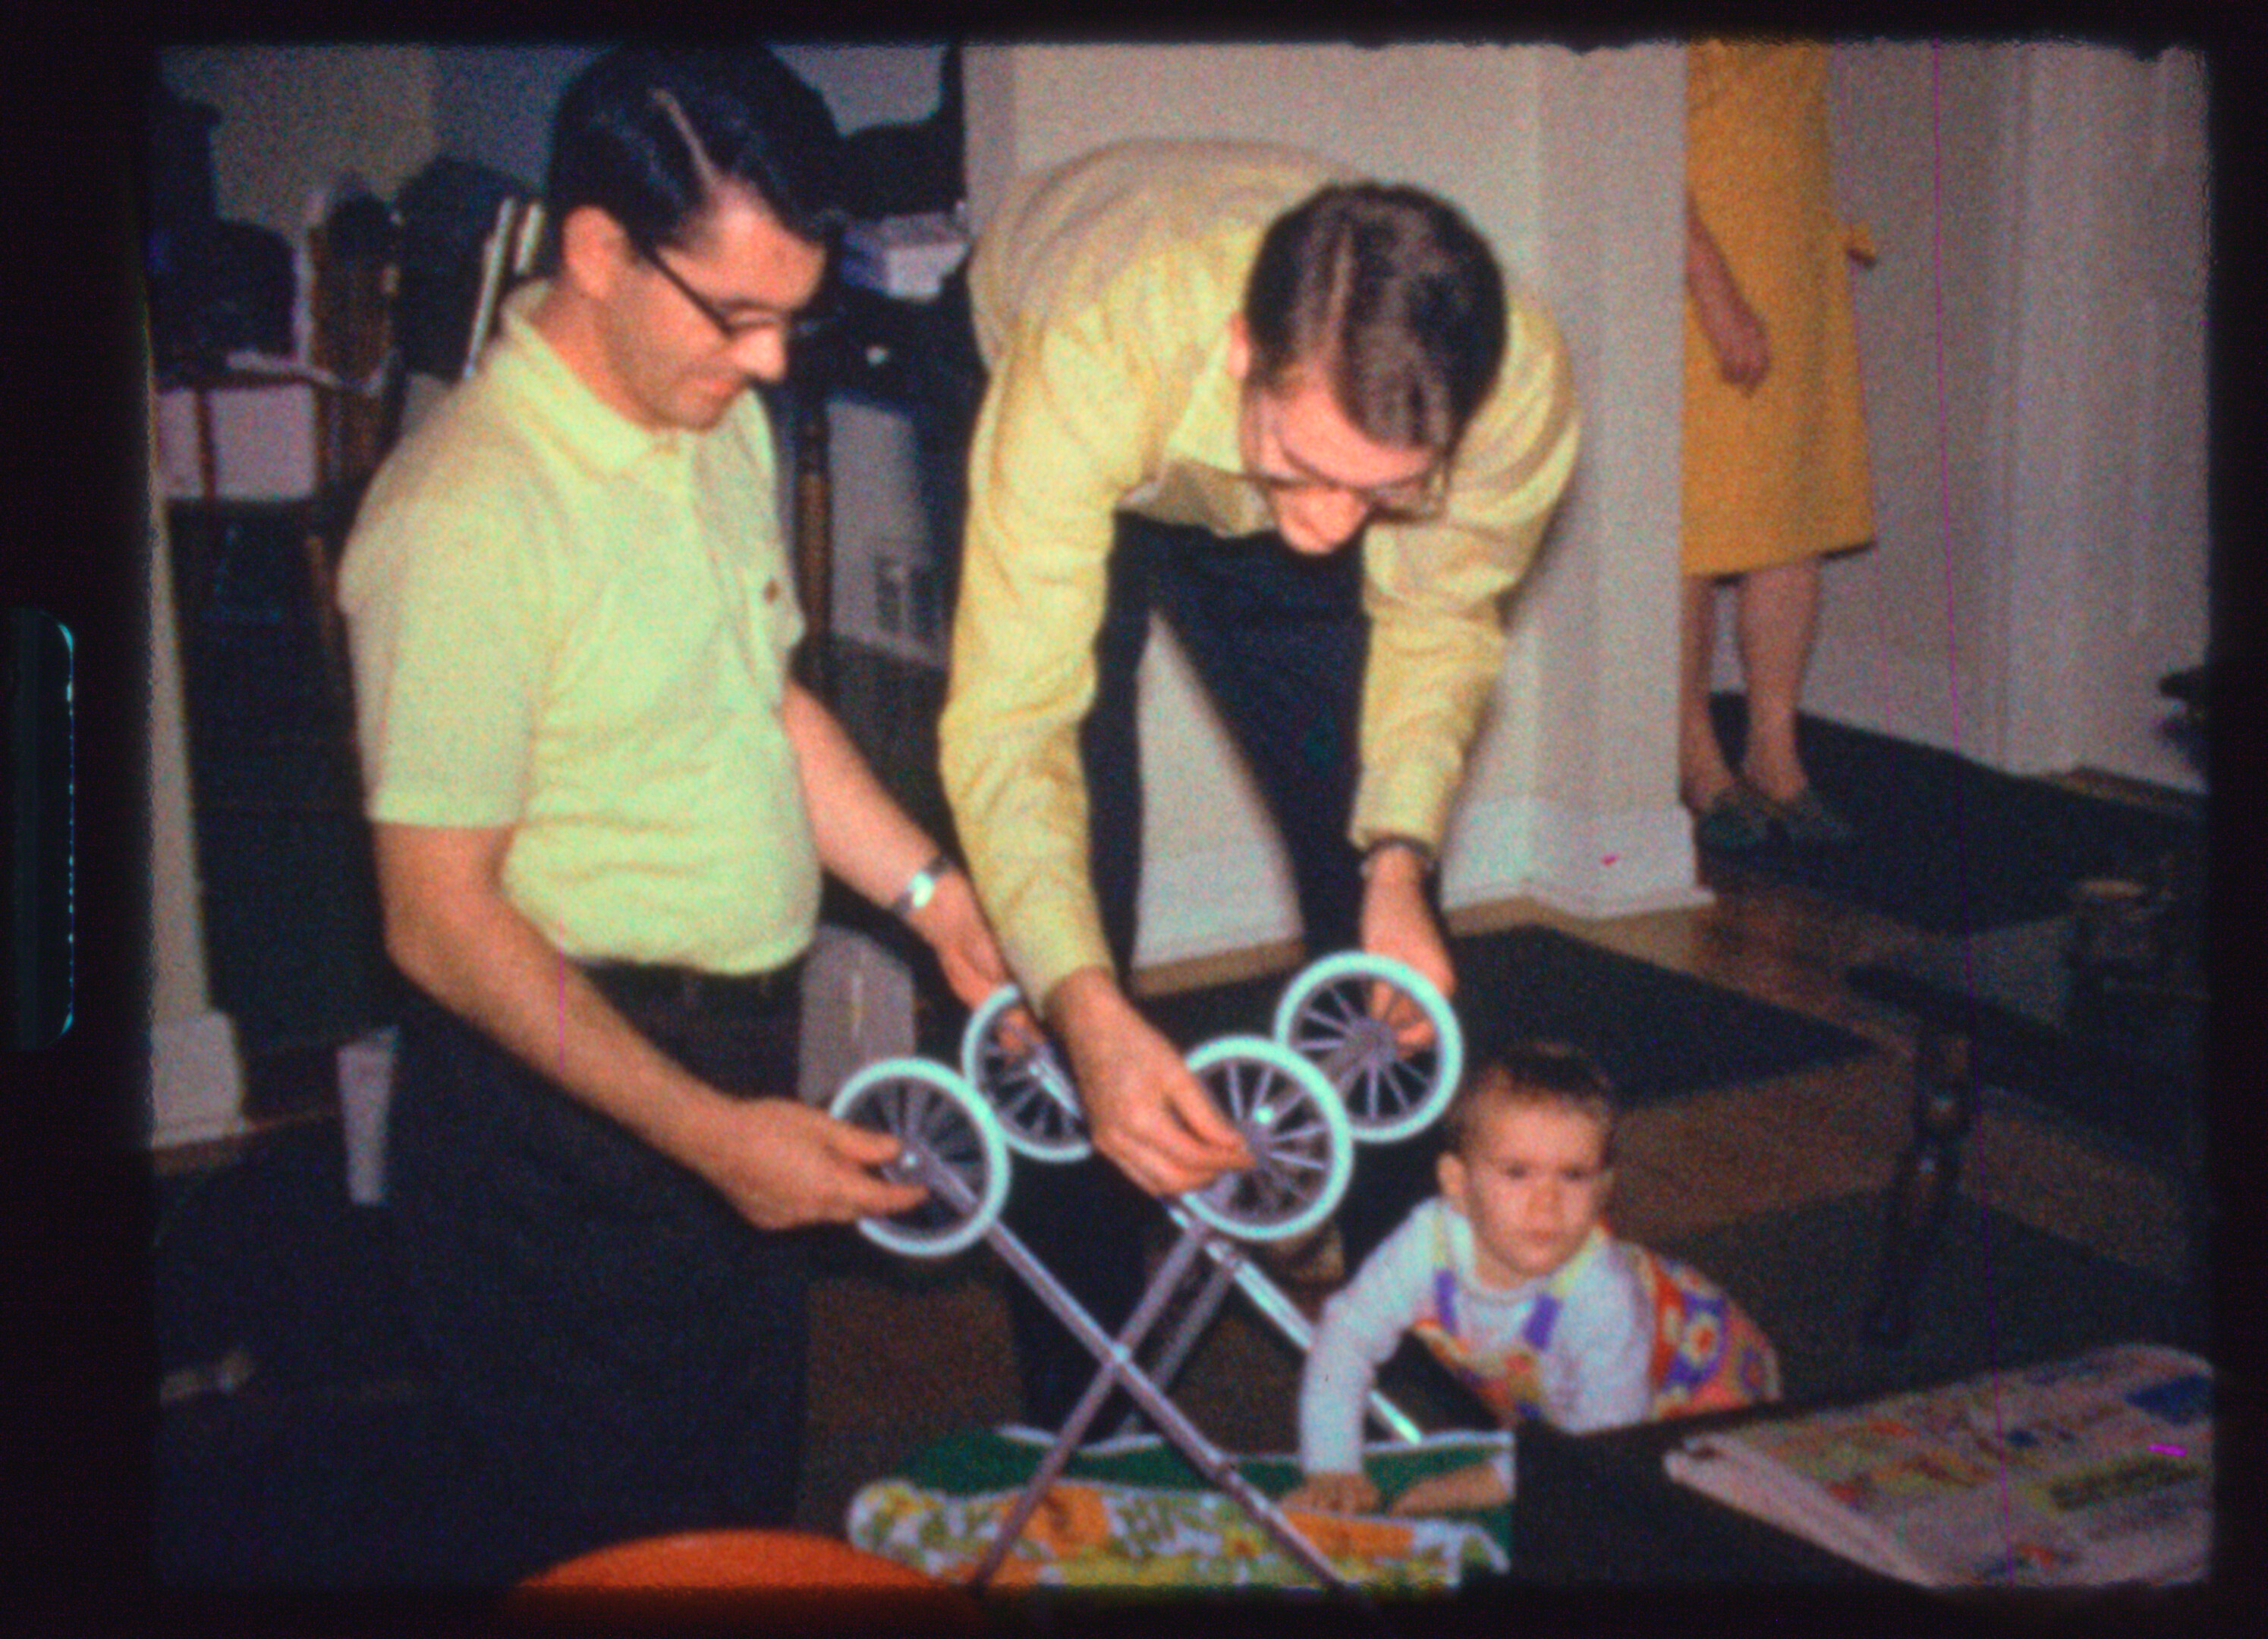
I mentioned the specs in my original post above. Unless you mean resolutions in which case the images are usually around 3100 across (depends on my cropping - I may have to tweak that moving forward and get a standard crop) and 2160 down. The top two are the two I use for the tone mapping and the bottom one is almost the final - I still need to run it through some color post processing (you can see the wheels have a slight blue tint after the merge because I’m still trying to figure out how to do good color correction)
Oh, one other thing about these pictures is I’m taking them all with the mirror locked up, aka “Live view” because the mirror actuation actually shakes the camera enough to blur the image slightly.
Out of curiosity, I ran an exposure fusion algorithm similar to what is described here, (“merge_mertens”) on your two input images. There was a slight vertical shift between your images; after aligning, the following 16bit/channel result can be obtained:
The dynamical range of the pixel values is scaled down here on purpose, as sometimes exposure fusion can lead to pixel values less than zero and larger than 1.0. Not sure whether your easyHDR software obtains a comparable result.
I took this 16bit/channel source image, remapped minimum and maximum pixel values to the interval [0.0 : 1.0], cropped it and applied an initial color grading, basically just consisting of a slight amplification of the green channel and a slightly larger one for the blue channel. Finally, a gamma correction (gamma = 0.65) and a tiny saturation push was applied. I ended up with this here:
There’s not much blue tint noticeable in this result, however, the color saturation is certainly reduced in my example, compared to your result. Anyway, looking at the exposure fusion result, there seems not to be any blueish tint present in your material - that might be caused by one of your other processing steps.
Well, I sketched above my basic workflow. Note that this workflow is not settled yet, it is still evolving. So things might change.
After taking the various different exposures of a single frame, exposure fusion of this image stack is performed. This algorithm is basically available ready-to-be-used in the opencv library. One of the best options to use it is probably by utilizing the Python interface of this library.
With Super-8 material, the initial scan resolution (whatever that is) is reduced before exposure fusion to 1800 x 1375 px. This has two reasons: the smaller the input images of the exposure fusion algorithm are, the faster the processing runs. Also, taking into account physics and chemistry, that resolution is more than enough to capture all of the visual information which is available in a Super-8 frame. Specifically, I do not care at all about the film grain, as film grain is, from an information theorical point of view, noise distracting from the original image content (albeit with interesting characteristics, which makes it difficult to simulate film grain digitally). Before exposure fusion, the images in the stack are aligned with each other - occasionally, I do see the images drift a few pixels between the different exposures.
The result of the exposure fusion is potentially an image which has pixel values continously varying between some upper and lower bound. While initially I was testing a floating-point format similar to OpenEXR for intermediate storage, I finally opted to switch to 16bit/channel .png-files for diskspace reasons.
The 16bit/channel intermediate frames are input into a color-grading software I developed myself (still not finished, still evolving). During this process, the 16bit/channel image is downsampled to ordinary 8bit/channel pngs. Also, the movie frame is cut out from the overscan, leading to images of size 1440 x 1100 px saved for further processing.
The next processing step is performed with VirtualDub2, paired with the DeShaker-plugin. Most of the time, it does a decent job in stabilizing the footage, but it actually works better with smaller image formats than I am using here. Here’s certainly room for optimization.
Anyway - the stabilization at that point in the processing chain is critical. The following processing steps work best with stabilized footage, as the search radius of the algorithms can be substantially reduced.
There has been a long tradition of restoring Super-8 material; one of the first successful open source processing chains, based on aviSynth, was put together by Freddy van de Putte, improved by various other contributors and discussed extensively at Doom9’s Forum. Due to the basically non-existing documentation, this has traditionally required a steep learning curve for anybody trying to follow the path finders.
AviSynth is quite a challenging beast to set up and get running. I think a good approach is to install AviSynth+; than, head to our forum member @dgalland’s github-repository, go to the [Restore]/Scripts/ Avisynth/ , get the files there and copy them into the appropriate folders of your newly installed AviSynth+ (you might want to run a virus scanner over the .dlls before that, just to be sure). Actually, you might want to check @dgalland’s restauration pipeline as well, while you are there. It is quite similar to what I describe here, albeit based on videofiles as intermediates, not separate images for each frame as I do.
Well, while the original restauration scripts of Freddy van de Putte and others did contain a lot of code, there are only two tasks which we want to perform at this point of the processing pipeline: getting rid of dirt, and getting rid of the remaining film grain. This simple AviSynth-script
threads = 6
Import("C:\Program Files (x86)\AviSynth+\plugins\RemoveDirt.avs")

source   = ImageSource("0C_stabilized\MY_%05d.png",start=0,end=6100,fps=18).ConvertToYV12()

# dirt removal
cleaned     = source.Removedirt()

# grain removal
denoised=cleaned.TemporalDegrain2()

Eval("denoised")

Prefetch(threads)
does all this magic. Basically, it loads a special filter (“RemoveDirt.avs”), the sequence of image files, and than applys first the RemoveDirt filter, than the TemporalDegrain2 filter. If you put these lines with a simple text editor into a file with .avs extension, the moment when you open that file in VirtualDub2 as video input, AviSynth+ springs in the background into action, delivering to VirtualDub2 the cleaned files.
There are some points to be noted here. First of all, these filters have quite a lot of parameter which you might be temped to fine-tune. I would refrain from this, because other helpful people have done that before you, and found good working parameters. Second: these filters were not designed for Super-8 cleaning, but for other purposes. So the trick is to feed the beast the right size of material. Let me elaborate. Here’s the result of this script with an input size of 940 x 720 px
Note the patchy appearance of the rocks as well as pixelization in the sky. Here’s the result with a slightly larger input format:
Better, I would say. In fact, I am currently doing dirt removal and degraining at a resolution of 1440 x 1100 px.
Only after all these processing step I finally have a source material where ideally no film grain is visible any longer. I have arrived at an image which is as close as possible to the original light distribution the camera lens was shining onto the Super-8 material. That is now the point where I am able to apply sharpening and other image improvement steps, aiming at improving whatever the camera lens originally captured. In this final processing step, the image is also reduced yet again, to the final resolution of 960 x 720 px.
Here’s another comparision of an original film scan (left) and the ouput of the above detailed processing pipeline
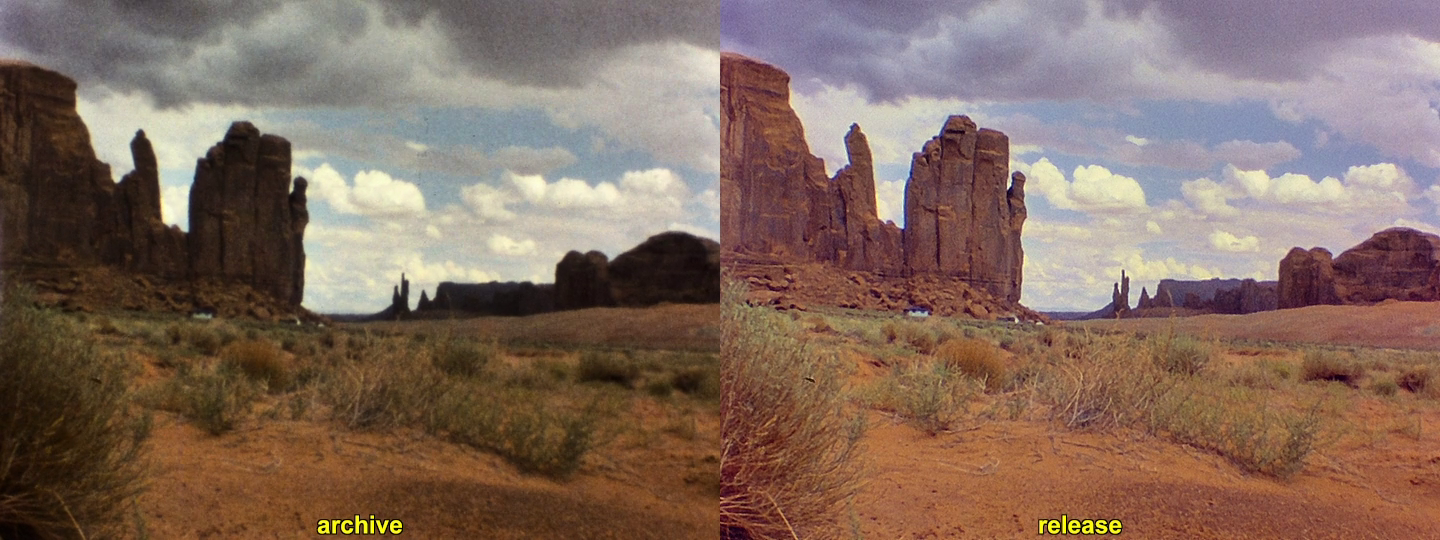
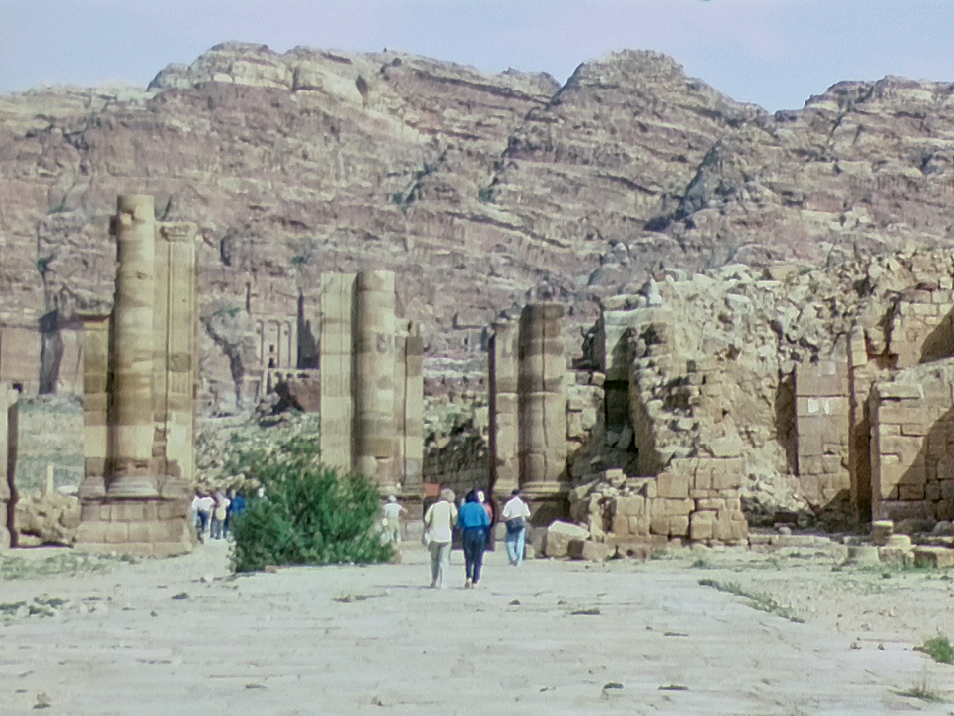
If you look closely between the rocks on the left side of the frame, you can even notice the color aberrations of the original Super-8 camera in the restored frame (the rock has a slight yellowish shine on one side and a blueish shine on the opposite side). Hard to notice in the base scan.
Of course, besides improving the visual appearance of the footage, you also gain bandwidth for the image content, as your video codec does not have to transmit rapidly fluctuating random film grain.
Yes, it is understandable to want to capture with the best resolution knowing the possible future advances in processing and visualization.
But it seems to me that a vertical HD 1080 resolution is sufficient for 8mm/Super8, it’s not so much a problem of storage but rather of capture time especially with HDR.
I scan with Raspberry HQ camera, three HDR images, and only a 1500*1080 capture gives me an acceptable time, with the raspberry camera you have to wait a certain amount of time for each shutter adjustment, this is probably not the case with your camera and it will be faster.
The interest of HDR is to compensate for the limited dynamic range of the camera, more detail and no burnt whites in the light areas and more detail in the dark areas, we can see it in your example. On the other hand this should not play on colors and the drift to blue of the result of EasyHdr is not normal. Be careful to lock the AWB between captures as the cpixip says.
For HDR processing I did a lot of testing, the real HDR processing by radiance is complicated to tune, the much simpler Mertens merge gives very good results.
Now here is my workflow:
- Capture in JPEG on the PI, transmit to the PC and immediate merge mertens, I don’t keep the three HDR images. The merge is done in Python/opencv.
- Join images to create a MJPEG movie.
- Deshake with the virtualdub plugin
- Cleaning/Denoising with avisynth
- Adjusting colors and sharpening avisynth
- Rendering X264/X265 or editing with NLE and rendering
Between all these steps the film is encoded with a looseless codec.
My project Restore automates in batch all these steps, we launch and wait for the end !
I certainly would recommend people working with Super-8 to have a look at @dgalland’s github pages.
Also, to bust the myth of scan resolutions with respect to Super-8, one should look at some basic facts. First, the silver halide crystals in the various film layers do have sizes between 0.2 - 20 µm, with the most light sensitive being the larger ones. No image structure smaller than that can possibly be recorded by a film. Obviously, the brighter image areas will show a larger resolution than the dark shadows.
The second number of interest is the following: during development of the color-reversal stock, the silver halide crystal are replaced by colored dye clouds. And these dye clouds are of much coarser size, namely 10 - 30 µm. Many of these overlaying dye clouds create our beloved film grain.
The third number of interest is the diameter of the Airy disk - no lens will focus sharper than the diameter of that disk. There’s a simple rule-of-thumb to calculate that diameter, given a specifc f-stop of the lens (see for example here).
A normal lens works best in the center of it’s optics; the farther away from the center of the lens light passes through, the worst the performance of the lens gets. That’s why you usually close the aperture - this shuts off the not-so-perfect-performing parts of your lens. If you close too much however, the wave nature of light kicks in, any we start to see diffraction effects. For every lens, there is actually a sweet-spot where the lens performs best. For our much discussed Schneider Componon-S it is at 5.6, for example.
Assuming for simplicity that our old Super-8 cameras worked with the same aperture, we can calculate the Airy disk to have a diameter of around 7 µm. So even if Super-8 film stock would be able to resolve finer detail, the lens of the camera was probably not able to. Note that this number just lies between the range of sizes of silver halide crystals and dye clouds.
Now it is time to get an old picture of mine about the dimensions of the Super-8 format out of the drawer:
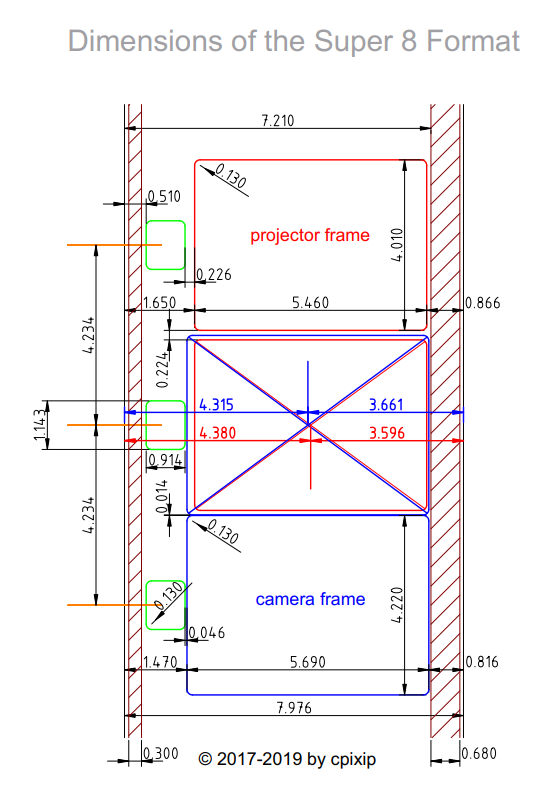
Let’s focus on the camera frame dimensions (blue) because this one is larger than the projector frame. The horizontal dimension is 5690 µm. Dividing that by the 7 µm Airy disk resolution, you end up with only about 800 px horizontally. The same calculation for the vertical dimension, 4220 µm, gives you about 600 px vertically.
Taking into account that the above rule-of-thumb calculation was for green light, and we still have the (sharper) blue light, one can assume that probably 720p, specifically 960 x 720 px, is the maximum resolution you can expect from Super-8 material.
Given, since one is doing probably overscan and as some headroom is always a good idea, a 2k scan resolution should considered to be sufficient for Super-8 scans.
One final remark: as the numbers given above indicate, the film grain of an old color-reversal film is actually larger than the finest image structures available. That is why the processing pipelines sketched above (@dgalland and mine) are able to actually improve the image by computing the film grain out of the equation. In a cinematic setting, this is done by temporal integration performed by our human visual system. That is the reason why a stopped projected image becomes slightly sharper as soon as the projector movement is turned on again.
@cpixip Thanks for those scientific numbers, I looked around the internet for a long time and could not find anything other than the dimensions of the Super8 (and 8mm) film.
One thing that I’m not sure you’ve considered though is that the 7µm disk would not be centered in an 800x600 grid, as is the nature of a computer screen. The very nature of the film is analog - and that “pixel” (if we want to call it that) could be anywhere. One of my reasons for wanting the highest resolution scan I can get is exactly for the reason that future algorithms will be able to take all of the physics into account, and clean up the film dramatically, perhaps using some combination of AI and physics. Maybe I won’t do this - but my as of yet not existing grandchildren will.
By tripling the horizontal and vertical resolutions from 960x720 to 2880x2160, you are essentially giving the center of that disc 9 possible locations. That’s a lot of extra information to be used by future algorithms. 4k seemed to me to be the practical limit - both in terms of storage and of processing. What motivates my fear is knowing about all those people that “scanned” their Super8’s onto a VHS tape and then threw away the film. Perhaps I’m going too far in the desire to capture data but I’d rather capture a little too much that’s not useful over capturing not enough and having that data lost for forever (aka 480i - shudder).
On a separate note - I would love to see a scan of a frame of film (could be 8mm, 35mm, I don’t care) by an electron microscope. I looked briefly but couldn’t find anything. That would be fascinating! (And no, I’m not building one just to scan one frame of something!)
As Always fine piece of scientific theory. Thanks.
What will be the effect of the Bayer Sensor on the required minimum resolution?.
So did I. Very difficult to find reliable numbers - a lot of the numbers given are simply wrong. I am rather sure that my drawing above is close to the actual dimensions of Super-8 material.
With respect to better “locate” the center of the Airy disk - that would be not the challenge here. Under normal circumstances, every point your camera focused upon would create such a small disk, and the image would be composed of the overlapping Airy disks of all points. In other words, the image is blurry beyond a certain scale. Throw in movement of subjects, movement of camera plus not-so-ideal lenses and the image gets even worse. But: the above calculation was just a crude estimate and I am happy if anyone can add more insight into that.
I actually scan with a larger format than my current processing pipeline needs and I keep this original scans, also in the hope that I might come up with some improvements. On the other hand I must confess that advances in optics and sensors were more rapidly evolving in the last 10 years than advances in image processing. So in the end, I am always ended up in re-scanning my material with a better system instead of reprocessing the old scans.
Generally, I would advise everyone to keep the original analog film in a safe place. As one who started computer-programming with punch cards, I know that the life time of classical film exceeds the life time of any digital media by far. Digital media changed a lot over time, and digital formats come and go as well. I found myself more than once in the situation that I needed to write converters for old digital data, as the programs able to read that data were not able to run on newer operating systems. In short: play with your digital data, but keep the trusted analog stuff! (At least if it’s Kodachrome color reversal or something similar. Cinematic color negative films from the 1950-1980 period are known to quickly fade into a nice magenta setting. Just ask Georg Lucas…)
well, that’s a totally different rabbit hole. First note that the above discussion was only concerned with the image formation process in the Super-8 camera.
Actually, with any image sensor you want a certain smoothing of the image projected onto the sensor. Basically you want to make sure that you can still sample/represent the highest spatial frequency on the sensor with the pixel spacing given by the chip’s design. Otherwise, aliasing effects will occur.
A sensor with a Bayer pattern has a more complicated spatial sampling structure and of course this influences which signal can be faithfully recorded. In any case, the raw signals are de-bayered, and there are simple algorithms (which basically interpolate the reduced color channel information to the higher resolution final image) and more complex algorithms (which take into account correlations between the different color channels to come up with a better answer). On top of this, you have only one red and blue channel, but two different green channel sampling grids. In summary, giving a correct answer about the resolution of a Bayer sensor is not an easy thing. Often a reduction by a factor of squareroot(2) is cited, and that might be a close enough guess.
May be my question was not precise.
If 960 X 720 is the maximum resolution of the 8 mm frame, the scanning sensor needs more than 960 X 720 resolution to record that, because of the bayer reduction. If the reduction factor is 1.4 (squareroot of 2), to record 960X720 the scanning sensor must be at least 1344 X 1008. But, as you said in your post, a 2K Bayer scan covers that.
This is what I wanted to include to the discussion.
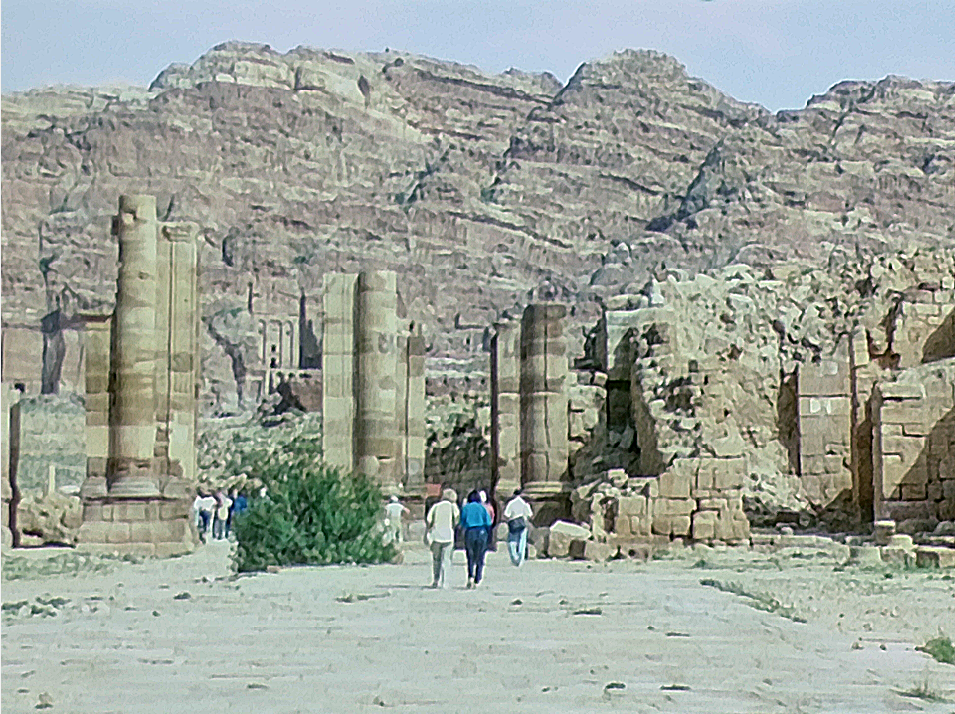
yep, that is true. Also, if you are planning temporal degraining, it is a good idea to add some resolution before that step and scale down afterwards (see my example above with the footage of the Petra archeological site). So yes, around 2k seems to me to be an appropriate resolution for most needs.
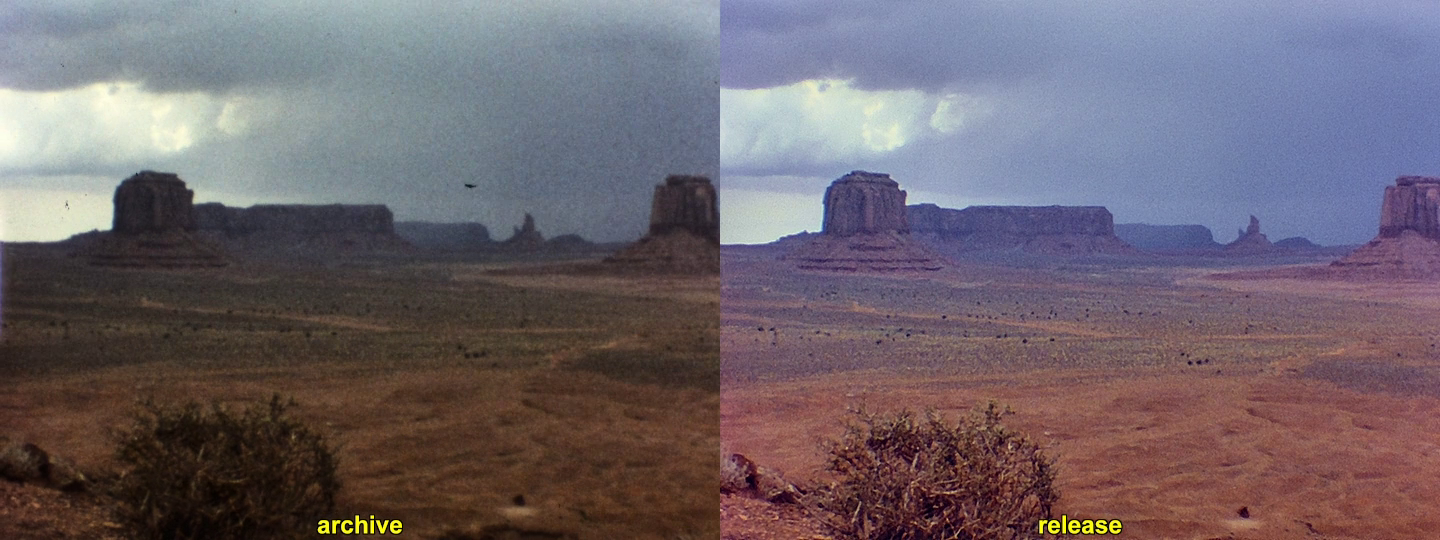
here’s an example to support the 2k resolution estimate.
The film frame was scanned with a Raspberry Pi HQ camera, mode 3, at an initial resolution of 2016 x 1512 px. From the original over-scanned frame a sub-image of 1440 x 1080 was cut out, color-corrected and temporal de-grained. After this, the image was zoomed down to the final 960 x 720 px resolution and some sharpening was performed at last. The resulting 960 x 720 px image is shown on the right (“release”). On the left (“raw scan”), for comparison, the best out of five different exposures of the initial scans, cropped and scaled down to the same resolution.
The image is a direct frame grab from a “compare.mp4”-video file:
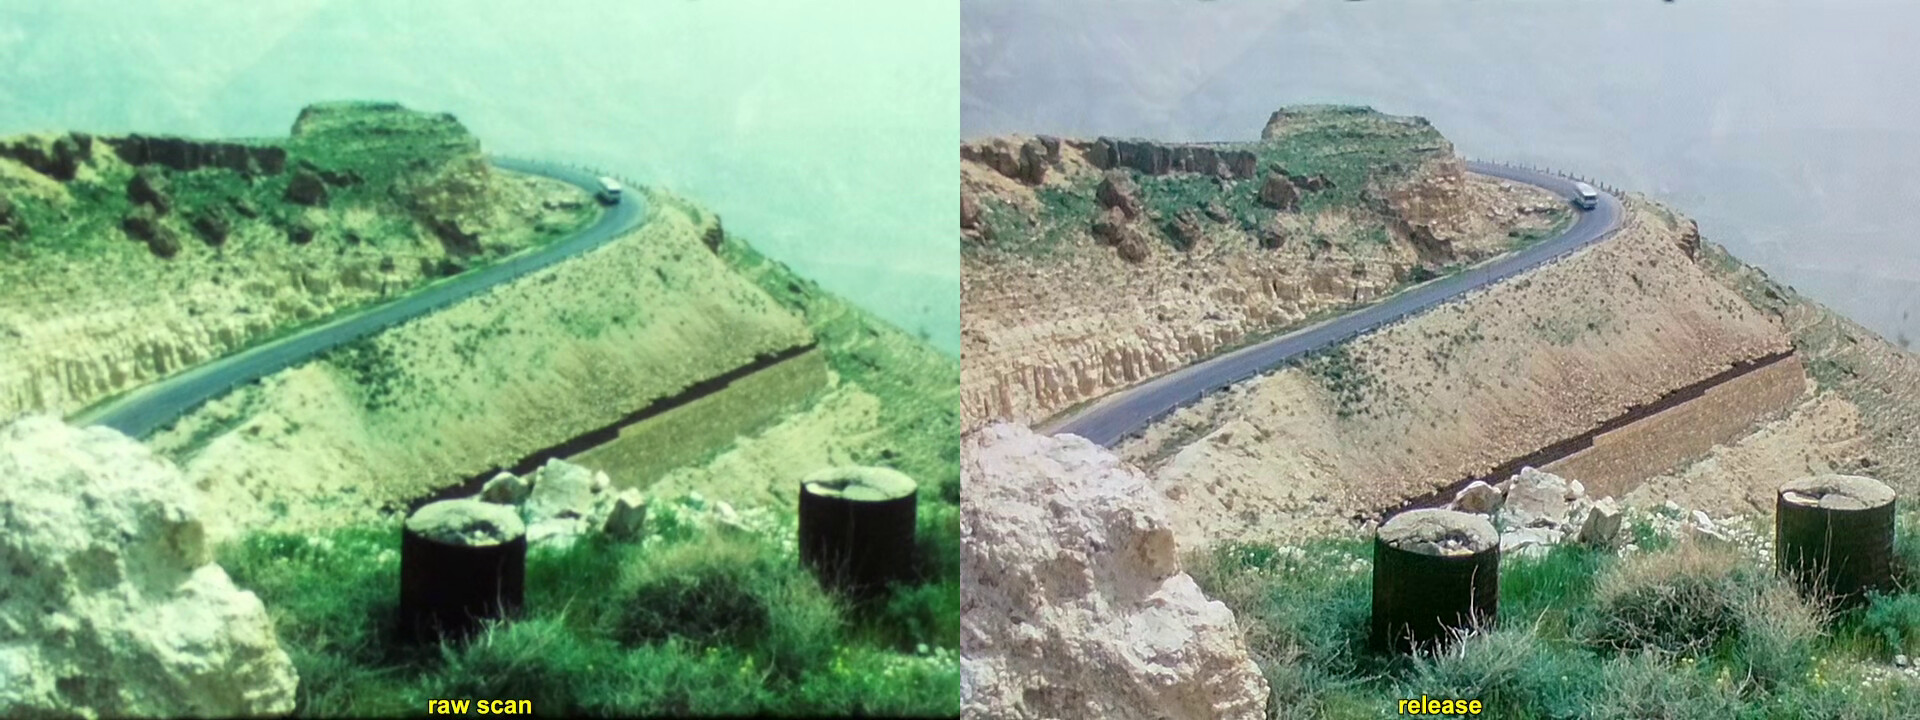
(click on the image to enlarge)