well, that should be the idea. What is happening when you request an exposure change might depend on the camera model. I would be actually interested in getting some data for different camera models.
I started with Raspberry Pi cameras, and they all feature a lot of automatic things you can not turn off, interfering with exact exposures. I tested one camera which is used in machine vision applications, the
and was surprised that at least this camera features the same problem as the Raspberry Pi’s cameras.
Specifically, I did the following experiments. A fixed frame was imaged continously by the camera. At a certain time point, a new exposure was requested. The average intensity of the image should ideally jump right to new value, corresponding to the exposure requested and stay there.
Of course, caused by the images already recorded but not yet consumed by the image software, one expects a certain delay between the exposure trigger and the change in average intensity. Ideally, it would be just a single frame.
Now, here’s a diagram of what happened:
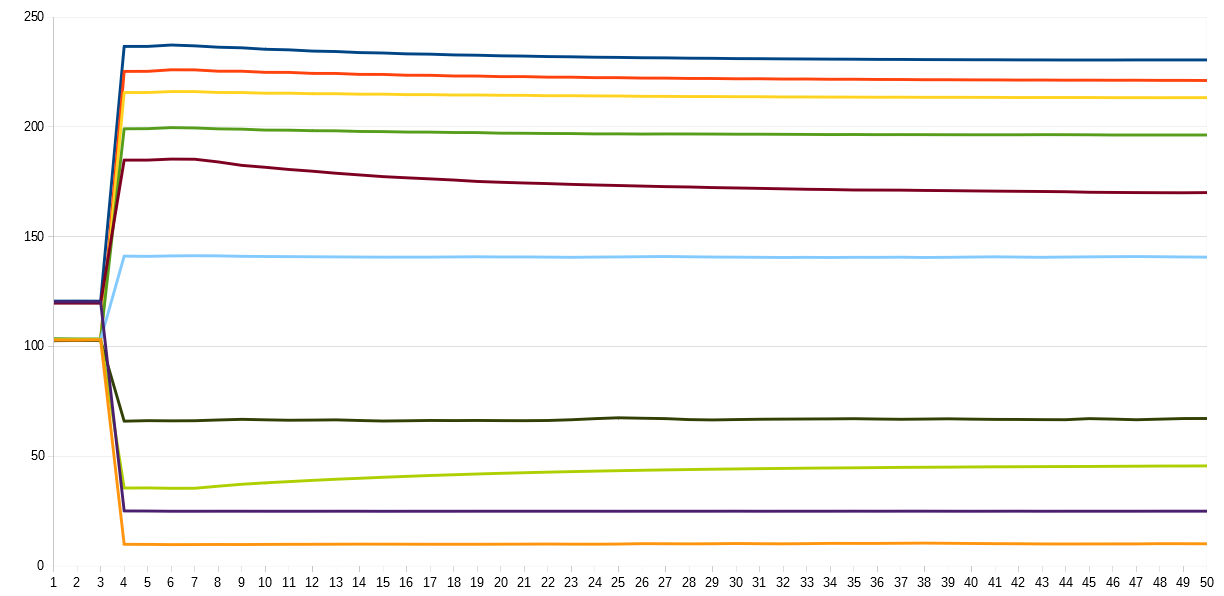
The x-axis shows the frame numbers after a new exposure was triggered, the y-axis the average intensity of the frames. Clearly, it takes 3 frames until the camera reacts to the new exposure. These 3 frames are presumably just the intrinsic pipeline delay.
The inital new intensities the camera delivers after the third frame are actually not correct - the intensities the camera delivers 50 frames after the new exposure are more appropriate for the exposure requested. Note how long some exposure changes took and how uneven the response was, depending on the difference between initial exposure and new exposure requested.
I am sure that there are cameras which perform better in such a test, but I have none available. Most manufacturers do not bother to give any hint on the processing pipeline delay (here: 3 frames) or on the speed of exposure changes.
Another twist: normally, the exposure time you are requesting is mapped to certain camera registers. And these registers usually have some constraints. So it might happen that you request an exposure time of 1/1000 sec, but the camera will actually use 1/1024 sec instead. By the way, this happens occationally with normal DLSRs as well. Nothing to worry about normally, but if you depend on precise exposure times, something to be aware of.
So, anyway. For me (and probably anybody wanting to go into HDR/exposure fusion) it would be very interesting to get some information on the performance of other under rapid exposure changes.