Well, there are some whitelight-LEDs mentioned in various threads in this forum which are suitable. The price range is substantial, from a few €/$ up to hundreds…
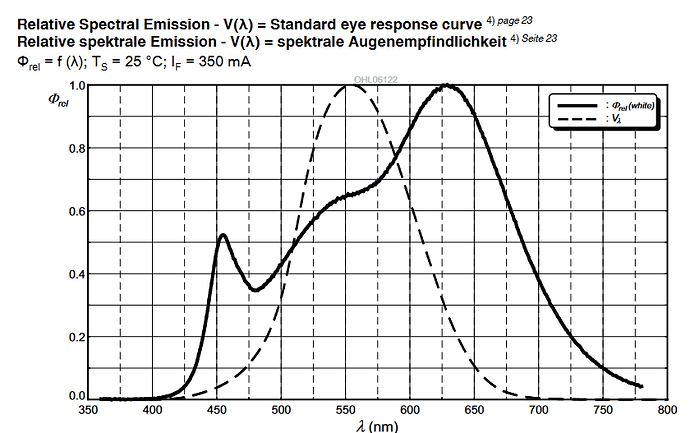
I am using an Osram Oslan SSL 80 type (because I had this in my spare box) which typically features a CRI of 96. The data sheet guarantees a CRI > 90. Here’s the spectral distribution of the type of LED (the solid curve):
You see a small peak in the blue region (around 450 nm) - this is actually the signature of the real LED; the rest of the spectrum is created by flourescent material embedded in the LED - and this is where the science/magic of the manufacturer comes into play. But basically, that’s how a whitelight-LED’s spectrum typically looks like.
This spectrum is not really a daylight spectrum - for which your camera’s color science is normally tuned to. Ideally, one should take this spectrum into account when creating the color science for a scanner. However, from my experience, the difference are negligable for high CRI LEDs.
There’s another point to remember here: again from my experience, the colors of old amateur footage typical need a color correction anyway, in postproduction. There are several reasons for this. First of all, Super-8 material had only two color temperatures available at the time of filming: either daylight or Tungsten. But “daylight” is a broad term, ranging in color temperature from 4000K to over 8000K typically. So you were typically already off color-wise when recording the footage.
Additionally, some film stock will have faded over the years, making it even more challenging to obtain colors close to the original scene. @PM490 has some nice examples here on the forum of how far you can recover faded memories.
My guess on why you got these initial weird results with the HQ camera (too blue, too saturated) is the following:
- your LED has a much stronger blue peak than one of the LEDs with a higher CRI. This creates the blueish tint. One can counter this with reducing the blue gain (no AWB!). But the better approach is to improve the illumination
- the colors of you .jpg-scan are too saturated. This is probably caused by a deliberate choice of the Raspberry Pi team to have vivid colors delivered in the standard configuration. This is backed-in into the standard tuning file; especially the contrast curve used in the standard tuning file pushes colors. You can counter this by using the “imx477_scientific.json” mentioned earlier. This tuning file includes also a few other modification you want to have when scanning film stock, most noteably, the apdative lens shading algorithm is deactivated as well as some other automatic algorithms which lead to flickering in your scanning results.
