(Reverse-)Mounting Schneider Componon-S 50 mm on C/CS-Mount

I think the main reason the Componon-S is so popular (at least with people who want to scan smaller film sizes like 8mm) is its macro capabilities. The image quality is also very good, and being an enlarger lens it has a very flat image plane. It’s also easily available. Used ones can be had at very good prices (I got mine in like-new condition for just 50€).
See this website for some general bits of information on the Componon-S and macro photography: https://www.closeuphotography.com/schneider-50mm-componon-s/2017/2/8/schneider-kreuznach-componon-s-50mm-f28-enlarging-lens
I think there are at least some commercial scanners that use this or a similar lens, too. The lens on the Filmfabriek HDS+ looks an awful lot like a metal barrel Componon-S.

Finding a suitable C-Mount lens would certainly be an option. It would need to have good image quality and most likely require a bellows or extension tubes to achieve the same magnification. The latter would be easy, just get a bunch of those dirt cheap CS- to C-Mount adapters. But I worry that finding a sharp enough lens with a flat enough image plan even at the required magnification might be difficult.

I don’t know how much of an issue macro is on Kinograph with 35mm millimeter film. But I imagine you don’t need as much magnification, especially, when you are using cameras with smaller sensors.

1 Like

@jankaiser Yes, exactly! The big draw for me was the high performance in a macro configuration for the given frame size and magnification needed for my sensor. You hit on the key point about having an especially flat image plane, something that is going to be even more critical for 35mm. My starting point was honestly mostly working backwards from how Filmfabriek solved the issue with their scanners, but then I had to do it a bit differently. I’m actually using both a Schneider Iris and helical “bellows” unit to focus, they came together with the lens since I bought it from an inspection lab of some kind that was going out of business and liquidating their instruments. From there it was a matter of getting a few spacer rings to get from M42 down to C/CS for the camera. Since B&H Photo is just a few minutes away from me I sourced those run-of-the-mill adapters there.

Apropos, Schneider makes that enlarging lens in multiple focal lengths… 50mm just happens to be one of the more popular ones :smiley:

@johnarthurkelly I hadn’t considered the flat image plane issue. Sounds like perhaps the Componon-S + adapter solution is preferable. What specifications should I be looking for in a lens for 35mm/16mm? I have no idea what to look for.

Also, Schneider lists a C-Mount adapter for their Unifoc lenses (including the 2.8/50mm) here: https://schneiderkreuznach.com/en/industrial-optics/lenses-unifoc-macro-system

I think it’s going to depend some on the geometry of the machine and the size of the sensor used in the imager. This is a situation where the focal length and configuration of the optics will depend solely on the size of the sensor. It’s a little harder to work backwards from frame size to sensor but doable. Take a look at this lens calculator that Kowa made (Lens Calculator | Focal Length | Working Distance | Field of View)- it has a lot of machine vision camera sensor types and allows you to work backwards from focal length or field of view. This would be handy to use if we A.) choose a lens first based on ideal characteristics OR B.) have a known maximum working distance that we have to be within. Either way we have to be cognizant of the working distance of the lens (then we can worry about focusing it afterwards).

1 Like

After doing some more research on this, I went and ordered a couple of parts a few days ago. They arrived today and I did some experiments.

The basic idea I’m following is to adapt from the Componon’s M39 thread to an M42 thread and then to the C-/CS-Mount thread. The advantage of this approach is that M42 thread parts are fairly easy to get. This is partially due to Pentax using this thread on their cameras in the 1960s and 1970s. You might even find M42 referred to as Pentax-Mount. The fact that all three mounts are simple threaded mounts also means that, if you have access to a machine shop, you could in theory make your own components, as they are just tubes with threaded ends.

That said, here is what I got:

  • M39 to M42 thread adapter ring like this one. These are super simple and don’t add any length to your assembly, which is handy. I got a no-name one for about 7€ ($7.90). If you have the patience to order from China, they can be had for as little as 1-2€ (roughly $1.70).
  • M42 Albinar extension tubes (3 pieces: 10mm, 19mm, and 26mm). I’ve had them laying around from an old Pentax camera. No-name ones like these usually come in similar sets of three, and seem to cost just under 5€ ($5.65) from China and around 10€ ($11.29) otherwise.
  • M42 to C-Mount adapter (this one). I believe this is actually the same one @johnarthurkelly used. This was the hardest part to find. Here in Germany it cost me roughly 40€ ($45.16), but the manufacturers themselves sell for it for just under $25 elsewhere. Other no-name ones can be had from China for as little as 20€ ($22.58), if your patience allows.

Instead of or in addition to extension tubes you can also get an M42 focussing helicoid of similar length such as this one for $75. Alternatives from China cost just under 20€ ($22.58). This allows you to focus the camera without having to move the entire assembly. I’m using the Raspberry Pi HQ Camera, which has a built in back-focus, which is why I stuck with the extension tubes I already had anyway.
I am also using a CS- to C-Mount adapter that comes with the HQ Camera. Because C- and CS-Mount are essentially the same, you can skip this one if you don’t need the additional 5mm distance between your lens and the sensor.

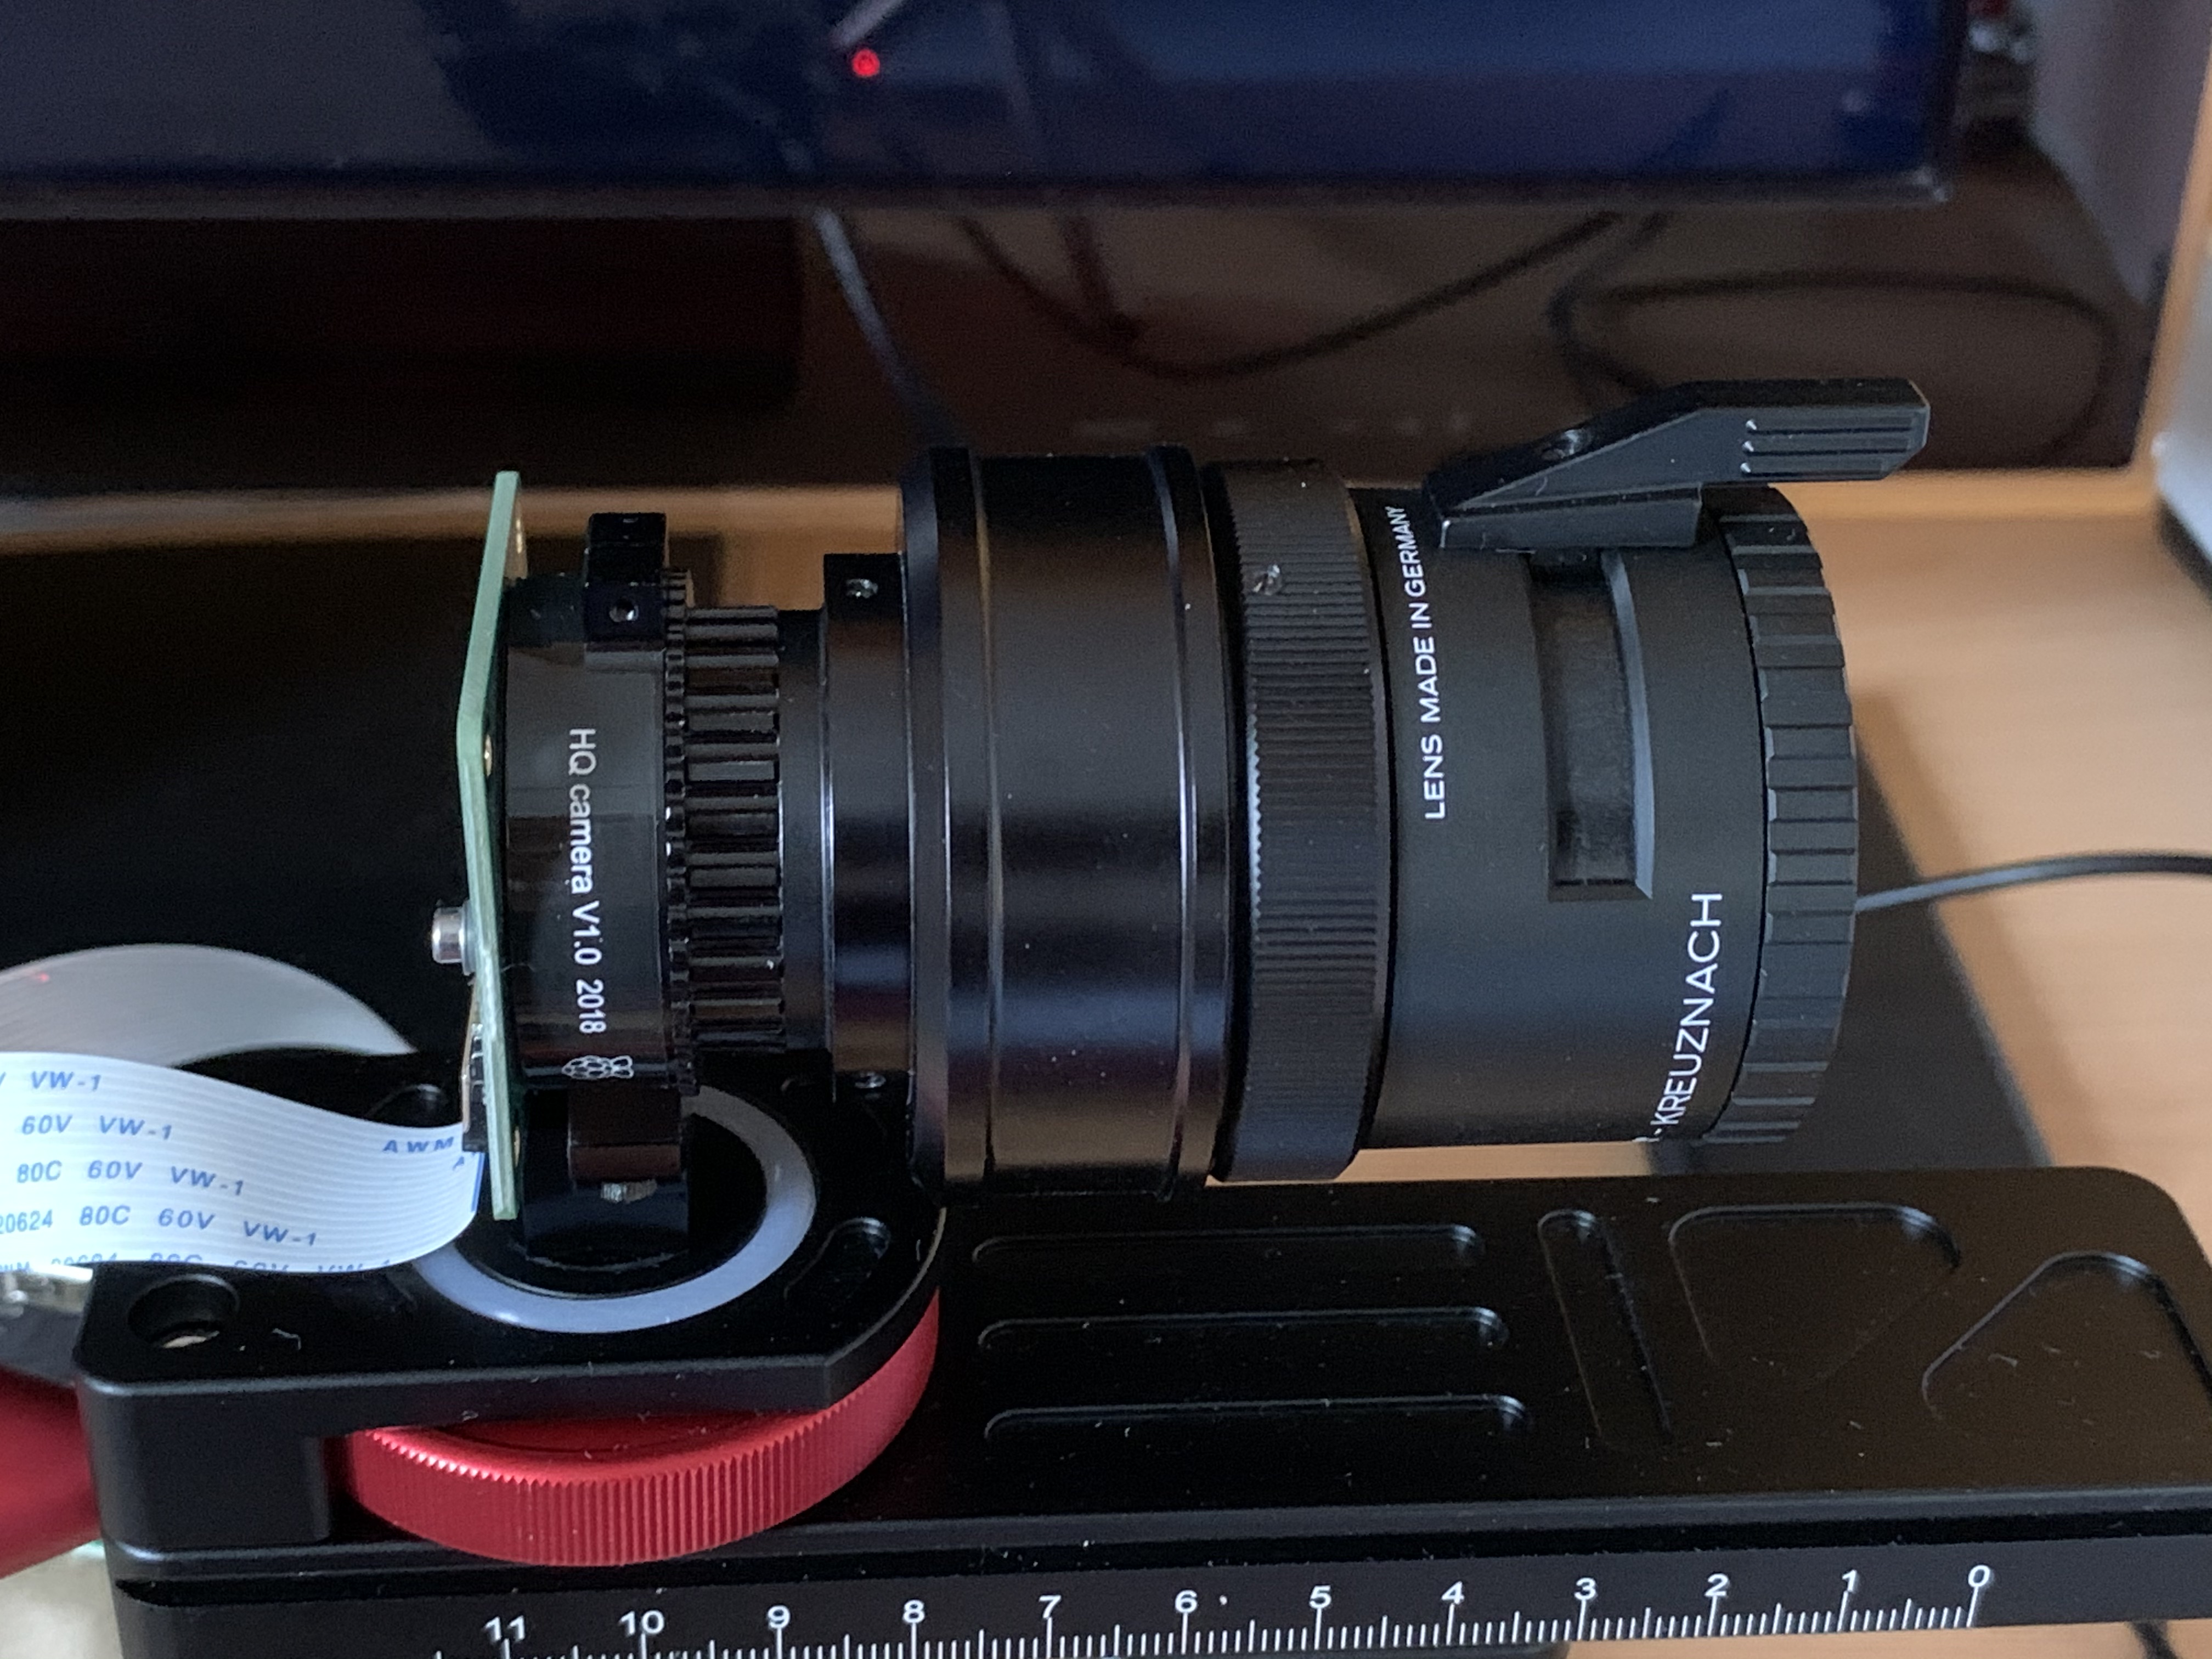
As for the experiments I did: I mounted the camera with the Componon lens and the aforementioned adapters on a tripod, facing a piece of 1mm graph paper. This allows for a quick and dirty assessment of how large an image area the sensor covers with a given optical setup. I wanted to try this for 8mm film, and while I was already at it, I did the same experiment for 16mm and 35mm, as well (hope this helps others).

For 8mm I used in order: C- to CS-Mount adapter, M42 to C-Mount adapter, 19mm extension tube, 26mm extension tube. See photo below. Resulting flange distance: 90.5mm


The next imagine shows the graph paper more or less in focus at about 78mm away from the lens. You can see that a Super 8 frame of the dimensions put together by @cpixip should fit comfortably with a bit of play on all sides.

Here is a similar experiment for 16mm. This time I used in order: C- to CS-Mount adapter, M42 to C-Mount adapter, 10mm extension tube. This gives a flange distance of 55.5mm. The graph paper is in focus at roughly 240mm away from the lens.


For 35mm the setup looks as follows. I used in order: C- to CS-Mount adapter, M42 to C-Mount adapter. I also unscrewed the back-focus ring to about 2mm. The flange distance is therefore roughly 47.5mm. The graph paper is around 568mm away from the lens.


Please keep in mind that this is just a dodgy, quick and dirty experiment I threw together. The numbers I’m giving are not precise, but should give a rough idea of what is what. Also, the graph paper was just held in place with some clamps. It probably wasn’t perfectly straight, so parts of my images may well be out of focus even though they could actually be sharp if I had tried a little harder.

While the setup for 8mm is pretty much ideal, I realised that for the larger film sizes, the distance between lens and graph paper is rather long. I’m not sure if this requires using a lens with a shorter focal length or if there is an “easier” trick to solve this.

5 Likes

While the Componon is a great lens, there are many other really good enlarger lenses suitable for the Job. I use an EL-Nikkor right now since I had it handy and it seems to be at least as good as my pricey Apo-Rodagon (which I use on a bellows for other means).

For my setup (using the Raspi HQ Cam), I used C-Mount extension tubes (~20€ from China) and than a C-Mount to M42 adapter, including a M39-M42 adaptor ring. I am not using the enlarger lens reversed though, the sharpness is even wide open pretty stunning, stopped down 2 stops almost painfully crisp up into the corners.

Here is a Super 8 SMPTE Test Film Frame I shot with the Raspi HQ Cam in Raw-Mode, converted with pydng and developed in ACR.

Also, here is a (top left corner) comaprison at 100% zoom level, using the Wolverine Scanner on the left (framegrab) and my setup on the right…

3 Likes

@peaceman Your setup looks great! Do you happen to know how much extension you get from your extension tubes? I’m assuming you are using the HQ Camera’s back focus for focussing, too?

I would guess that most enlarger lenses have similar qualities, such as the flat image plane, that are useful to scanning film. I have in fact seen photos of Kinetta film scanners use both a Schneider and a Nikkor. The Schneider probably just happens to be a good example, that’s easily available and by the way also still being made new. According to this article on the EL-Nikkor for macro photography the EL-Nikkor might actually be a little cheaper than the Componon-S, though.

For Super 8, I seem to need about 50mm extenison for overscan, 55mm seems to be right for no overscan. I can’t say yet exactly since my test mounting was rather temporary and flaky :slight_smile:

It might be that I am wrong (optics keep confusing me), but I think the HQ-Camera’s Back Focus adjustment isn’t a focus adjustment here, but a fine tuning for the extension length. Focusing in this setup happens by adjusting the distance from front lens to film.

I cannot claim to be an expert on optics at all. But my understanding is that focussing (as in changing the distance between focal plane and sensor) is done by changing the distance between the actual glas of the lens and the sensor. That’s also what a focussing helicoid does, it’s just a variable extension tube. If you happen to have one at hand, take a look at a mechanical focus lens (where the focus ring isn’t electronic). You should be able to see the lens assembly moving back and forth inside the lens barrel as you turn the focus ring.

The back focus on the HQ Camera does essentially the same, which allows you to either use the camera with a a lens that cannot focus on its own, or change the focus range of a lens that can.

What you are describing does of course work as well. By keeping the focus constant, your focus plane remains at a constant distance to the camera’s sensor. Then, moving the camera, of course, moves the focus plane with it.

I hope that clarifies some things. Someone please do correct me if I’m mistaken. My understanding of optics is based only on playing around with lenses at times.

This is great - I’m actually very interested in where you got the SMPTE Super 8 test film - I’ve been searching off and on for one and haven’t had any luck!

@johnarthurkelly - have a look here

Testfilm Super 8 (Testtafel RP-32), 5m

A little bit pricy (5m = 219€), but still available…

1 Like

I actually bought the “2nd choice” one:
https://www.wittnercinetec.com/epages/WittnerCinetec-Super8-16mm-Film.sf/de_DE/?ObjectPath=/Shops/WittnerCinetec-Super8-16mm-Film/Products/1054-B

Also, the price was much lower back then when I bought it.

2 Likes

Here’s my reverse mounted Schneider Componon-S, attached to a Flir BFLY-U3-23S6C-C camera.

In between there’s a 43-52mm step up ring > 52mm reverse adapter > 52mm to 42mm helicoid adapter (25-55mm) > then a Kood M42 to C mount adapter.

Having tried it at the weekend for the first time, I think it probably needs a slightly longer extension between the lens and camera to give a good range of focusing and enlargement. 55mm almost allows me to fill the camera’s image with the full frame, so great if you’re wanting the edges of the frame and sprocket captured. If you want to max out the resolution of the camera then for my setup at least, it needs to be slightly longer so I’ve ordered some additional extension tubes.

2 Likes

Out of curiosity — is that way to mount the camera/lens stable enough? I am not seeing any support under the extension tubes nor lenses… or is this a temporary setup?

@peaceman it is a temporary setup, but the lens bit is extremely stable and won’t change. The lens and camera are all metal parts, and the lens mount on the camera is a very strong mount despite being the size of a large coin. There is no way you can exert any flex on it at all, and the sum of all the adapters and lens is still lighter than most 35mm camera lenses.

The mount on the other hand… it’s a bit rubbish. Because of the level of magnification, it’s almost possible to move the picture by breathing on it. I’m kidding, but it’s not great. There is very slight play in the sliding table for X/Y travel, which gets magnified a lot, and you have to be super delicate with the threaded mounts and wood blocks when adjusting.

It’s good enough for now though. Just annoying as you can’t set and forget. I think a slide vice type arrangement, with micrometers is probably the best solution, I was just really disappointed with the low cost slide stage I got from eBay as the top and bottom plinths weren’t even level and would have required shimming. It has to be metal, with very fine adjustment.

1 Like

@peaceman @cpixip this is fantastic, thank you for the links!

@bainzy Most of the linear translation stages I’ve found are pretty pricey, but I was able to get a small one that works very well for the fine focus adjustment on my setup - they’re good for short distances otherwise they get pretty pricey. I’ve also been eyeing dovetail optical rails for other optics experiments, but something like that would likely work well here and be very stable.

Thanks John! Just done a quick image search, those look very applicable and more or less what I had as a fuzzy idea in my mind.

I got the idea for the slide stage from your photos actually a few months ago, I think I just had back luck with the one I’d purchased. Definitely agree on the pricing, anything 80cm+ becomes uneconomical, so I ended up with a 60x60cm one.

The threaded screws and nuts mounting isn’t a bad concept in some respects, because it makes it easy to correct the level say if you’re using a modified projector, and the projector isn’t perfectly level either. Lots of options to play with though and it’s great seeing what everyone else is doing.

1 Like

It is tempting to obtain one of these precision sliding tables, but I am strictly trying to stay on a budget, so will try to be creative.

I suck in 3D CAD and don’t have a 3D printer either, so sketched something together with a pencil and it will be based on simple MDF plates and screws:

Raspi Cam, Extension and lens on top (tripod screw on the left not drawn yet). The C-Mount Adaptor has a 54 mm diameter and fits perfect into a pipe clamp from the hardware store. It is mounted with a M8 screw with the 22mm “brick” underneath. This screw and the 1/4" UNC 20 tripod screw shall alow me to level the optical part perfectly, lock nuts should hold it in level.
The batch of MDF plates is supposed to bring the optics on to projector gate level. Also, for Z- and X-Axis adjustments, there will be two knobbed screws going into drive nuts, fixable with lock nuts. The MDF plates are sliding between 10x10x2mm aluminium profiles.

Let’s see how this holds up. Cross your fingers :slight_smile:

2 Likes

Looking forward to seeing how this works out!