8mm Film Scanner ... my build

Hi all!

It’s been 3 years working on this project on and off, and now it’s finally time to post my finished build. :tada:

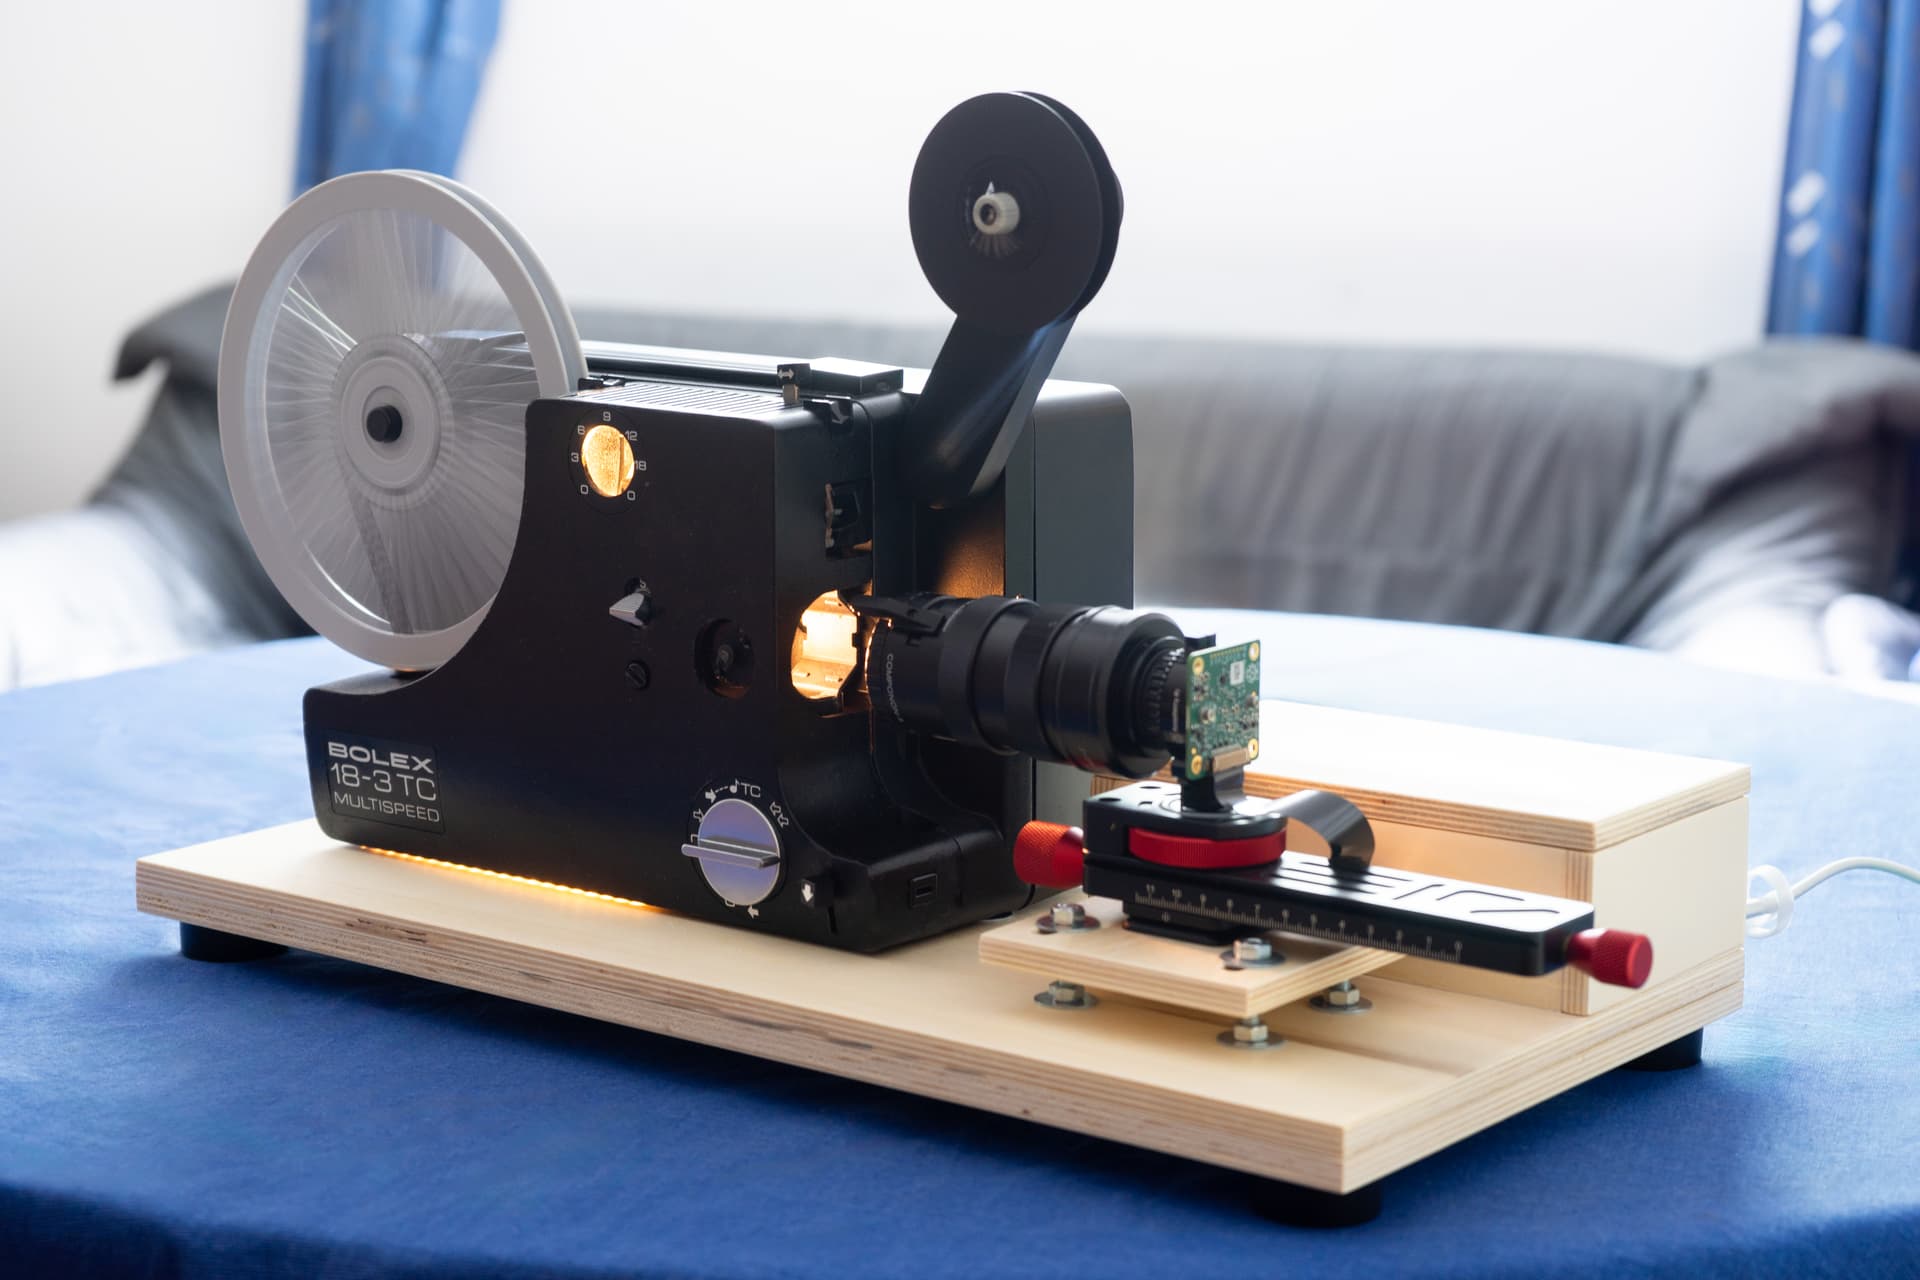
Without further ado, here is the finished 8mm Film Scanner.

TL;DR: All details on how this scanner was build including the software are available on GitHub: GitHub - jank324/8mm-film-scanner: Conversion of an old projector to a Regular 8 and Super 8 film scanner. Sample scans and a screenshot of the software can be found below.

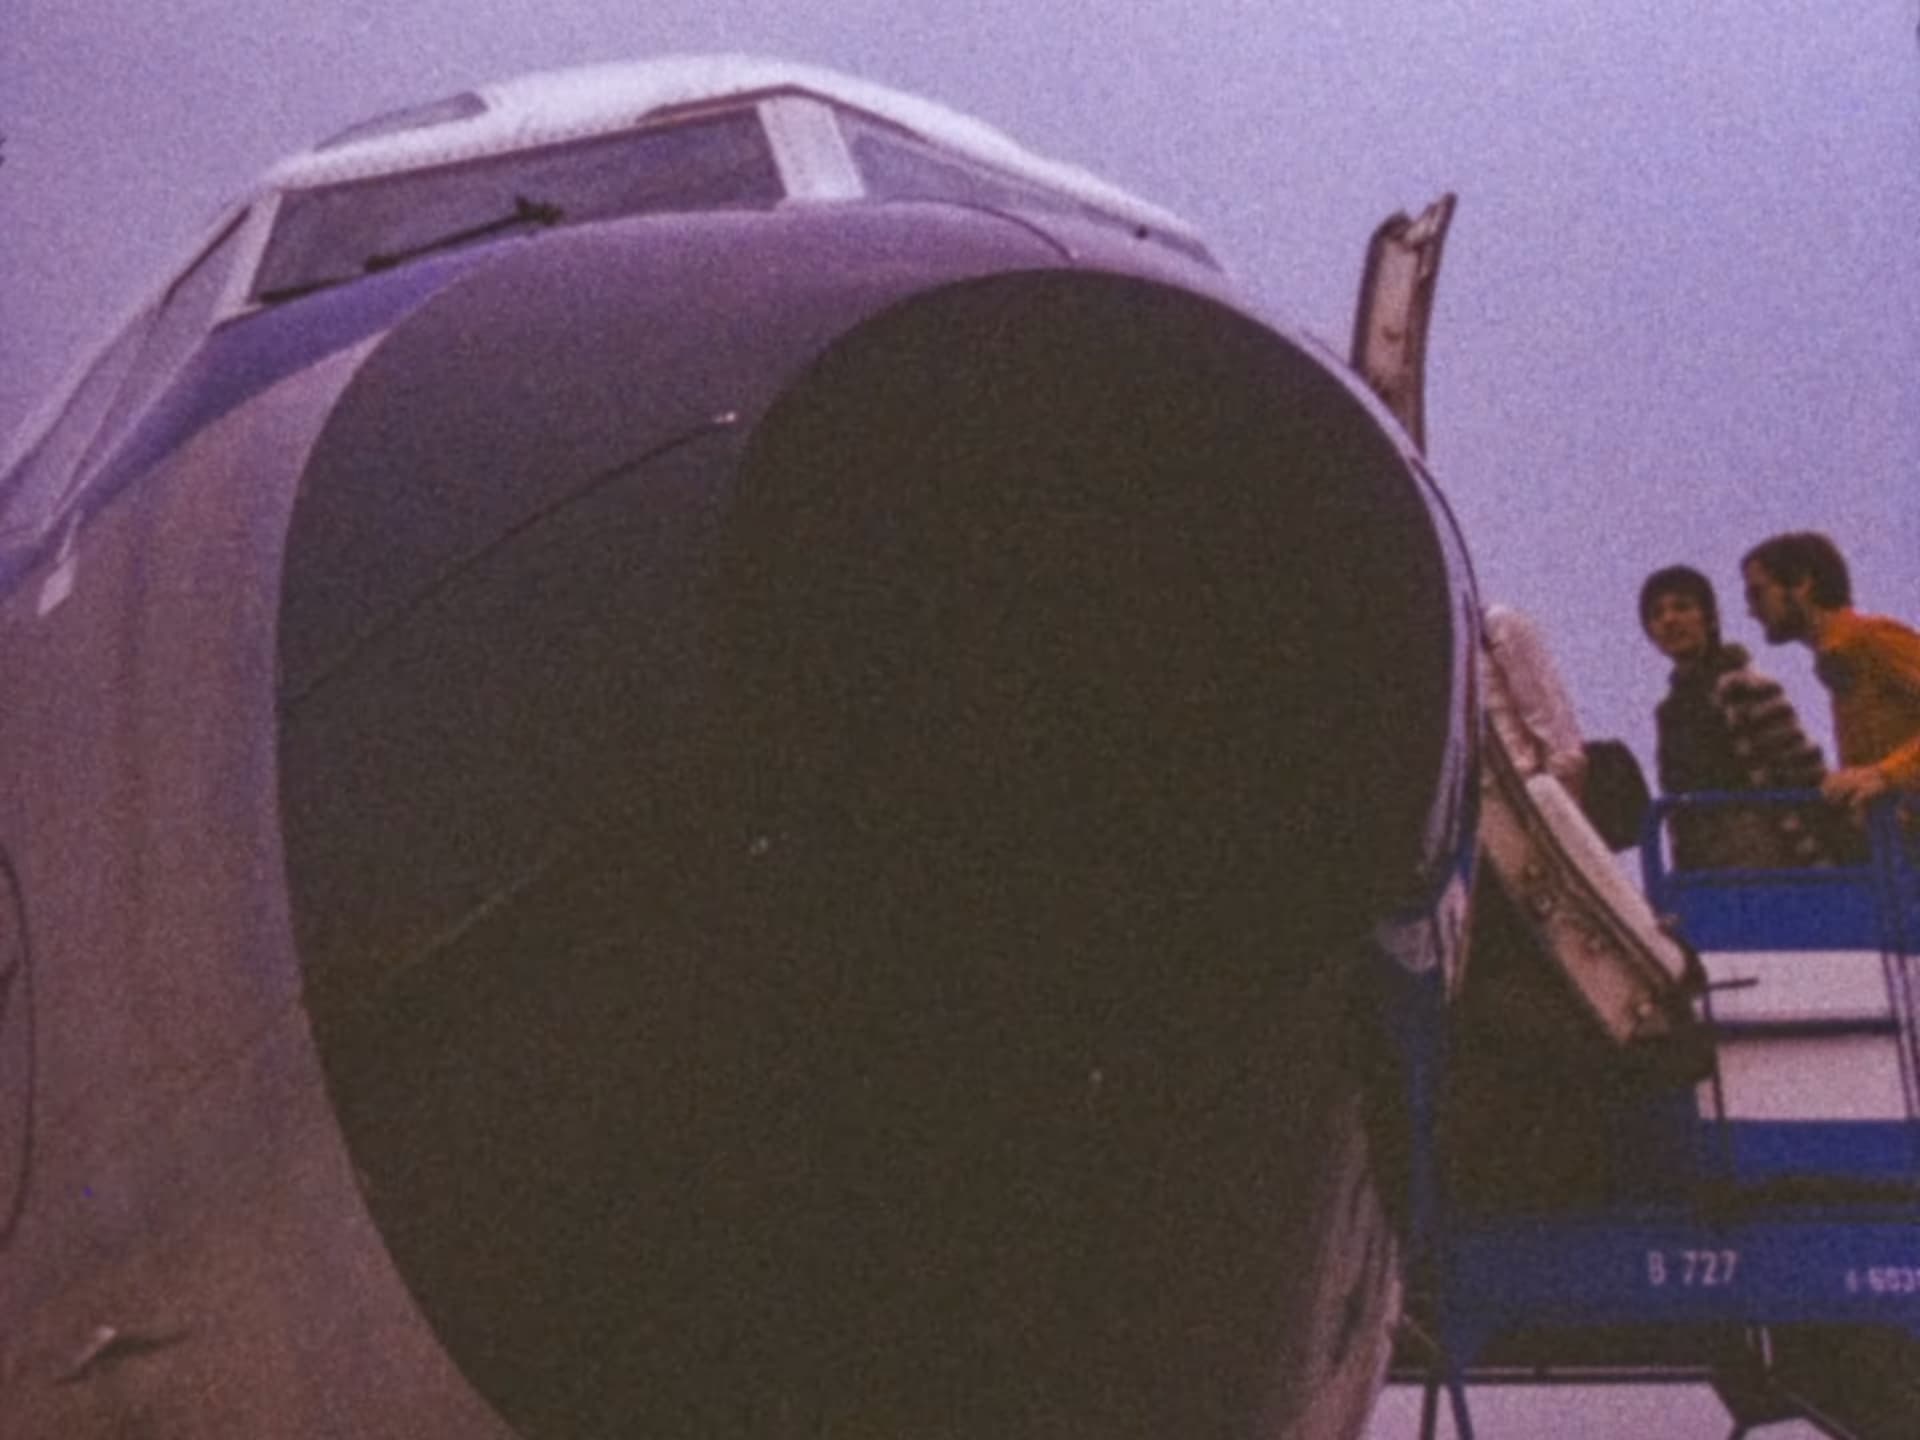
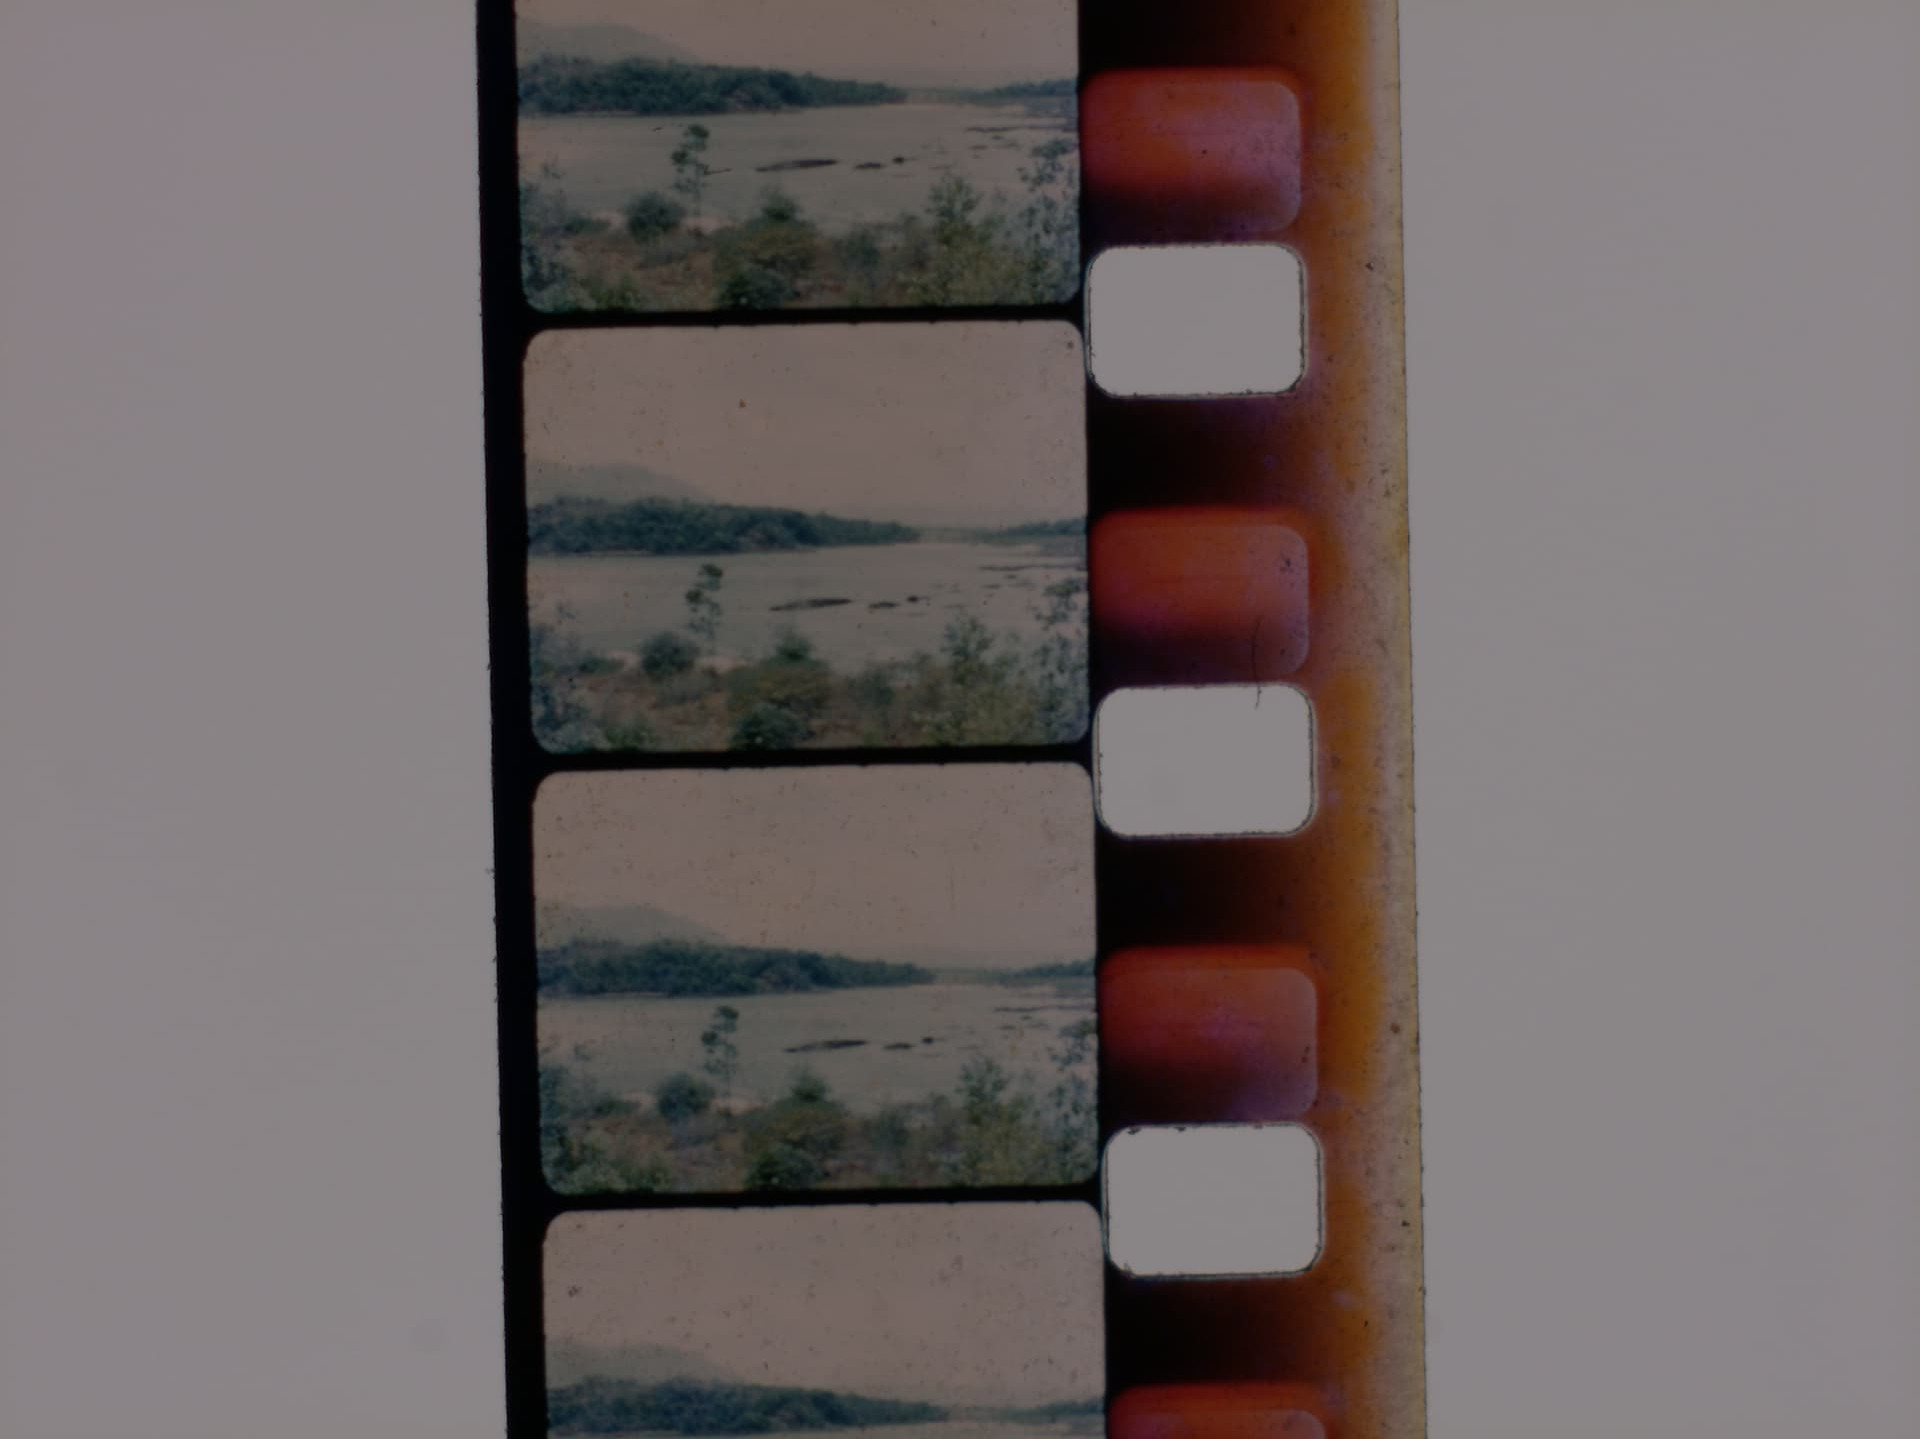
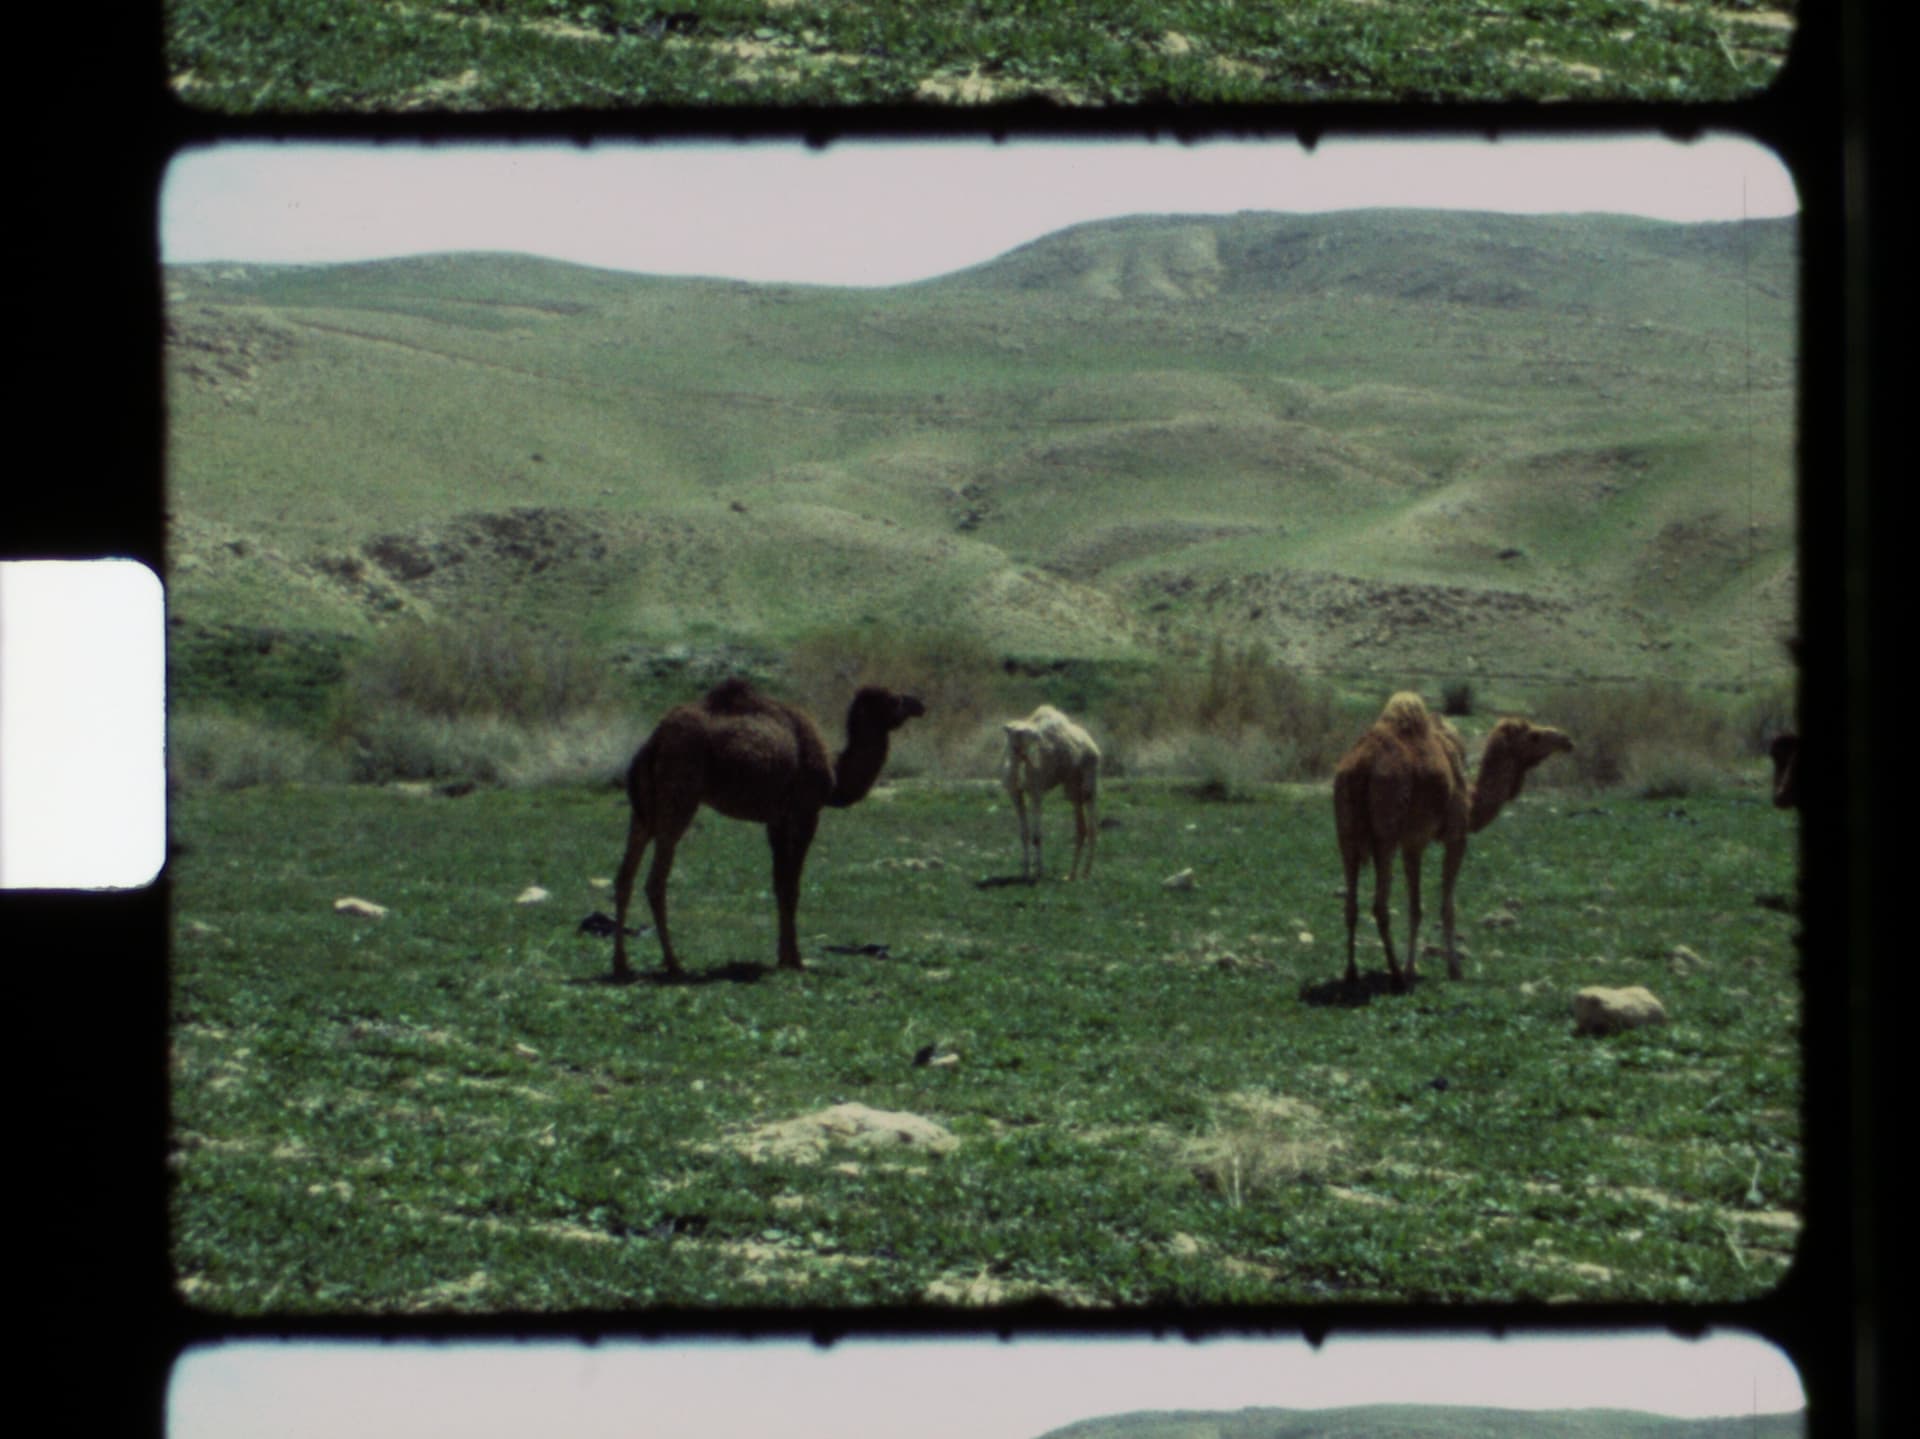
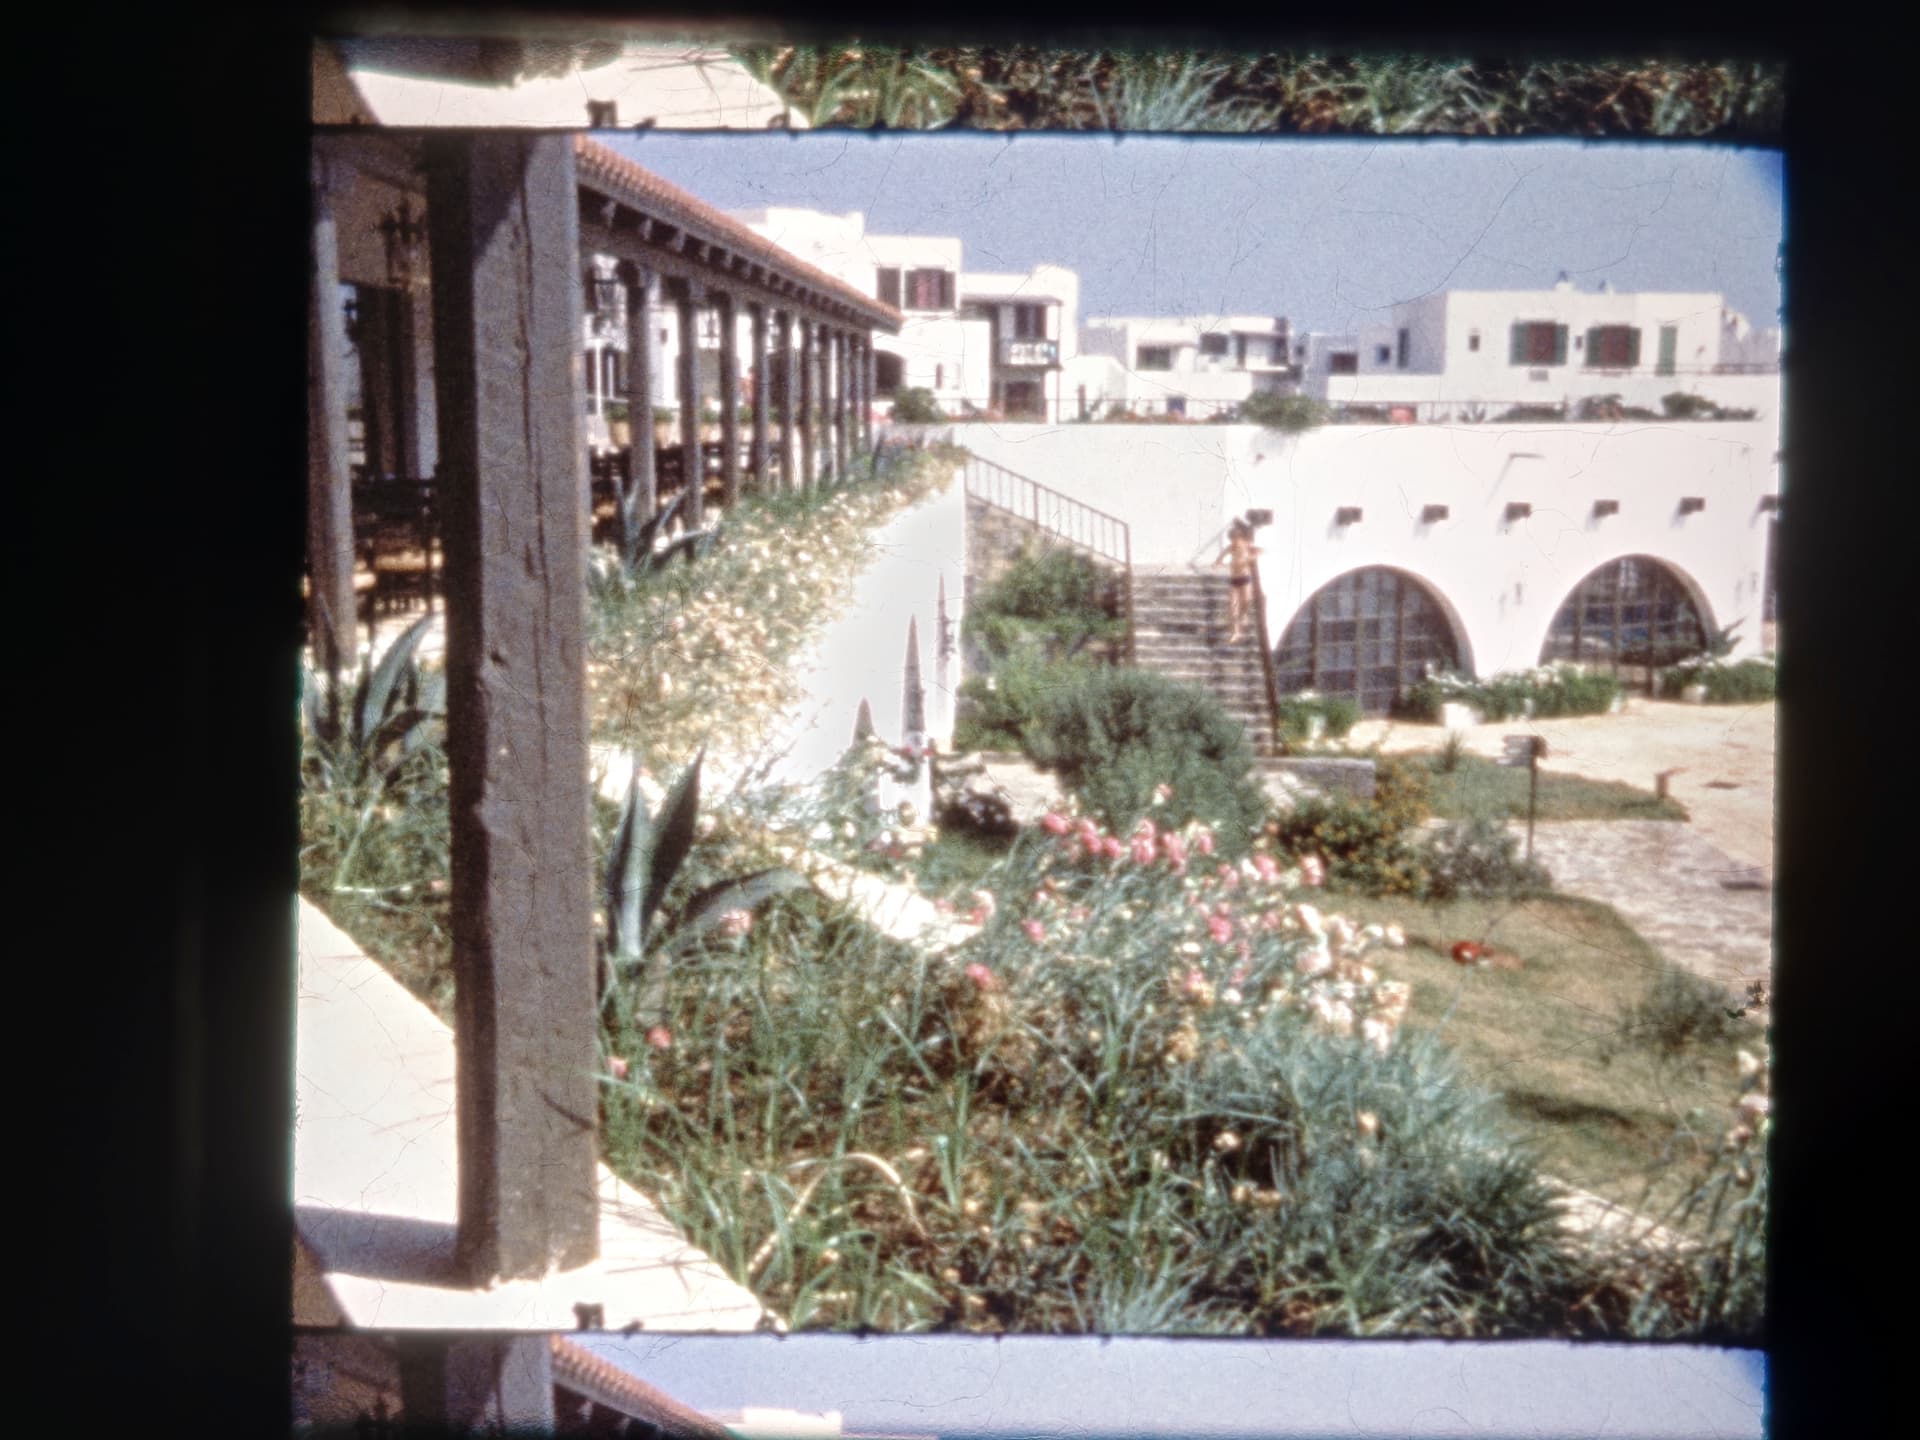
I started building this scanner and following the forum over 3 years ago, when I was given my grandfather’s collection of Regular 8mm and Super 8 films. Originally, I wanted to build a Kinograph-style scanner completely from scratch, but I soon realised that this was a tall order. My focus switched to converting an old projector when I found a very beat-up Bolex 18-3 TC in my local area for very cheap, and around the same time, Scott Schiller released an excellent and inspiring video on his projector conversion over on YouTube. With this change in direction, the project was finally making serious progress, and about 1.5 years ago, at the end of 2021, the scanner was finally “finished”, and I could start properly scanning and archiving the extensive collection of film reels I have. Since then, I have scanned over 50 reels, and while some quirks of this machine have made themselves known and some things were never quite finished properly (“Nothing lasts as long as a makeshift solution.”), I can say that I am really happy with the results I’m getting.

The overall concept is very similar to other frame-by-frame machines, such as Scott Schiller’s as well as the build by @Manuel_Angel posted on the forum many moons ago. Similar to them, I have replaced the motor of the projector with a stepper motor that is controlled by a Raspberry Pi. Also similar to many scanner builds, I am using a Raspberry Pi HQ Camera with a Schneider Kreuznach Componon-S 50mm enlarger lens. I have written some more about the camera setup in another thread. The entire scanner is tied together by a wooden base plate that also comes with a case to house the Pi and some other electrical components. This makes the scanner super easy to move around and store. A nice (but probably unnecessary) touch is that the entire scanner can be powered via an off-the-shelf USB-C power supply as you might already be using to charge your phone or laptop. It feels good to be able to comply with upcoming EU regulations. :rofl:

Where I believe this build differs from some of the others I’ve seen on the forum, is in terms of software. Of course, most of the software is also written in Python, but unlike other software, a connection to a client PC is not needed during scanning. Instead, the Pi provides a web interface (shown below) that can be used to set up the scan, and after that the scanner runs independently, saving frames to an external SSD connected to the Pi.

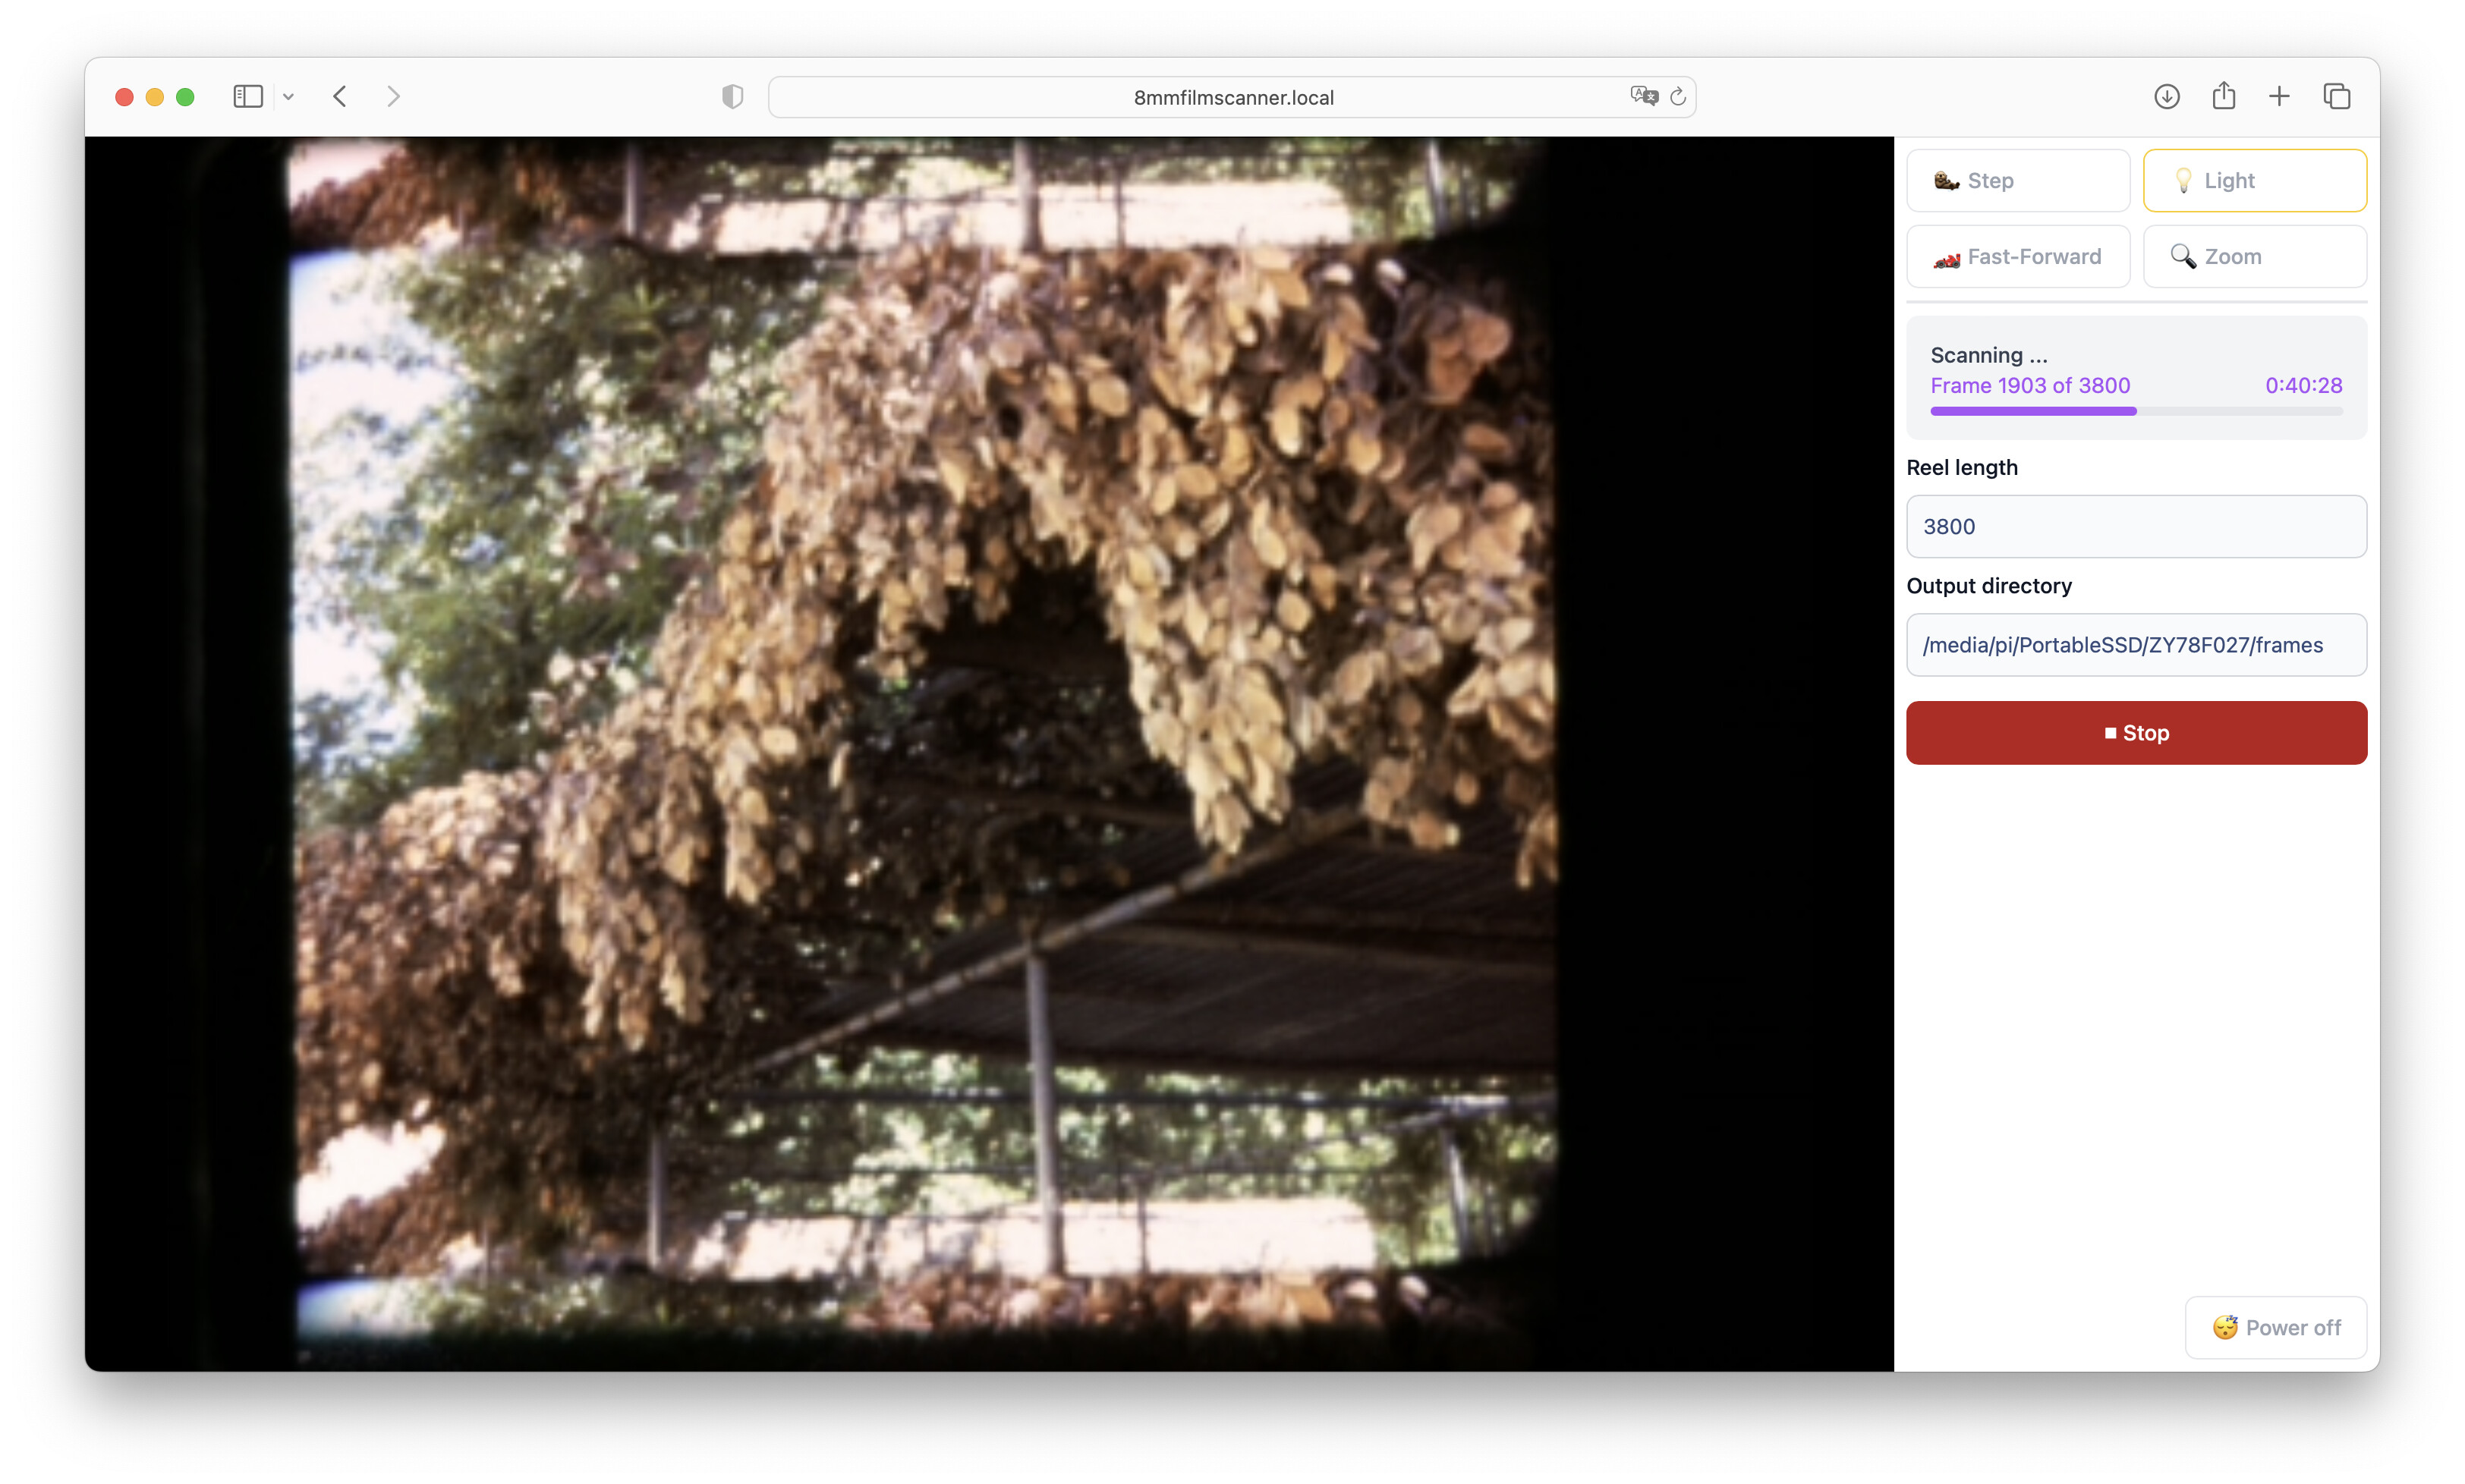
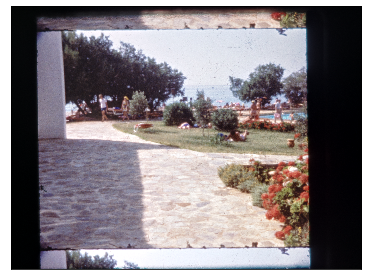
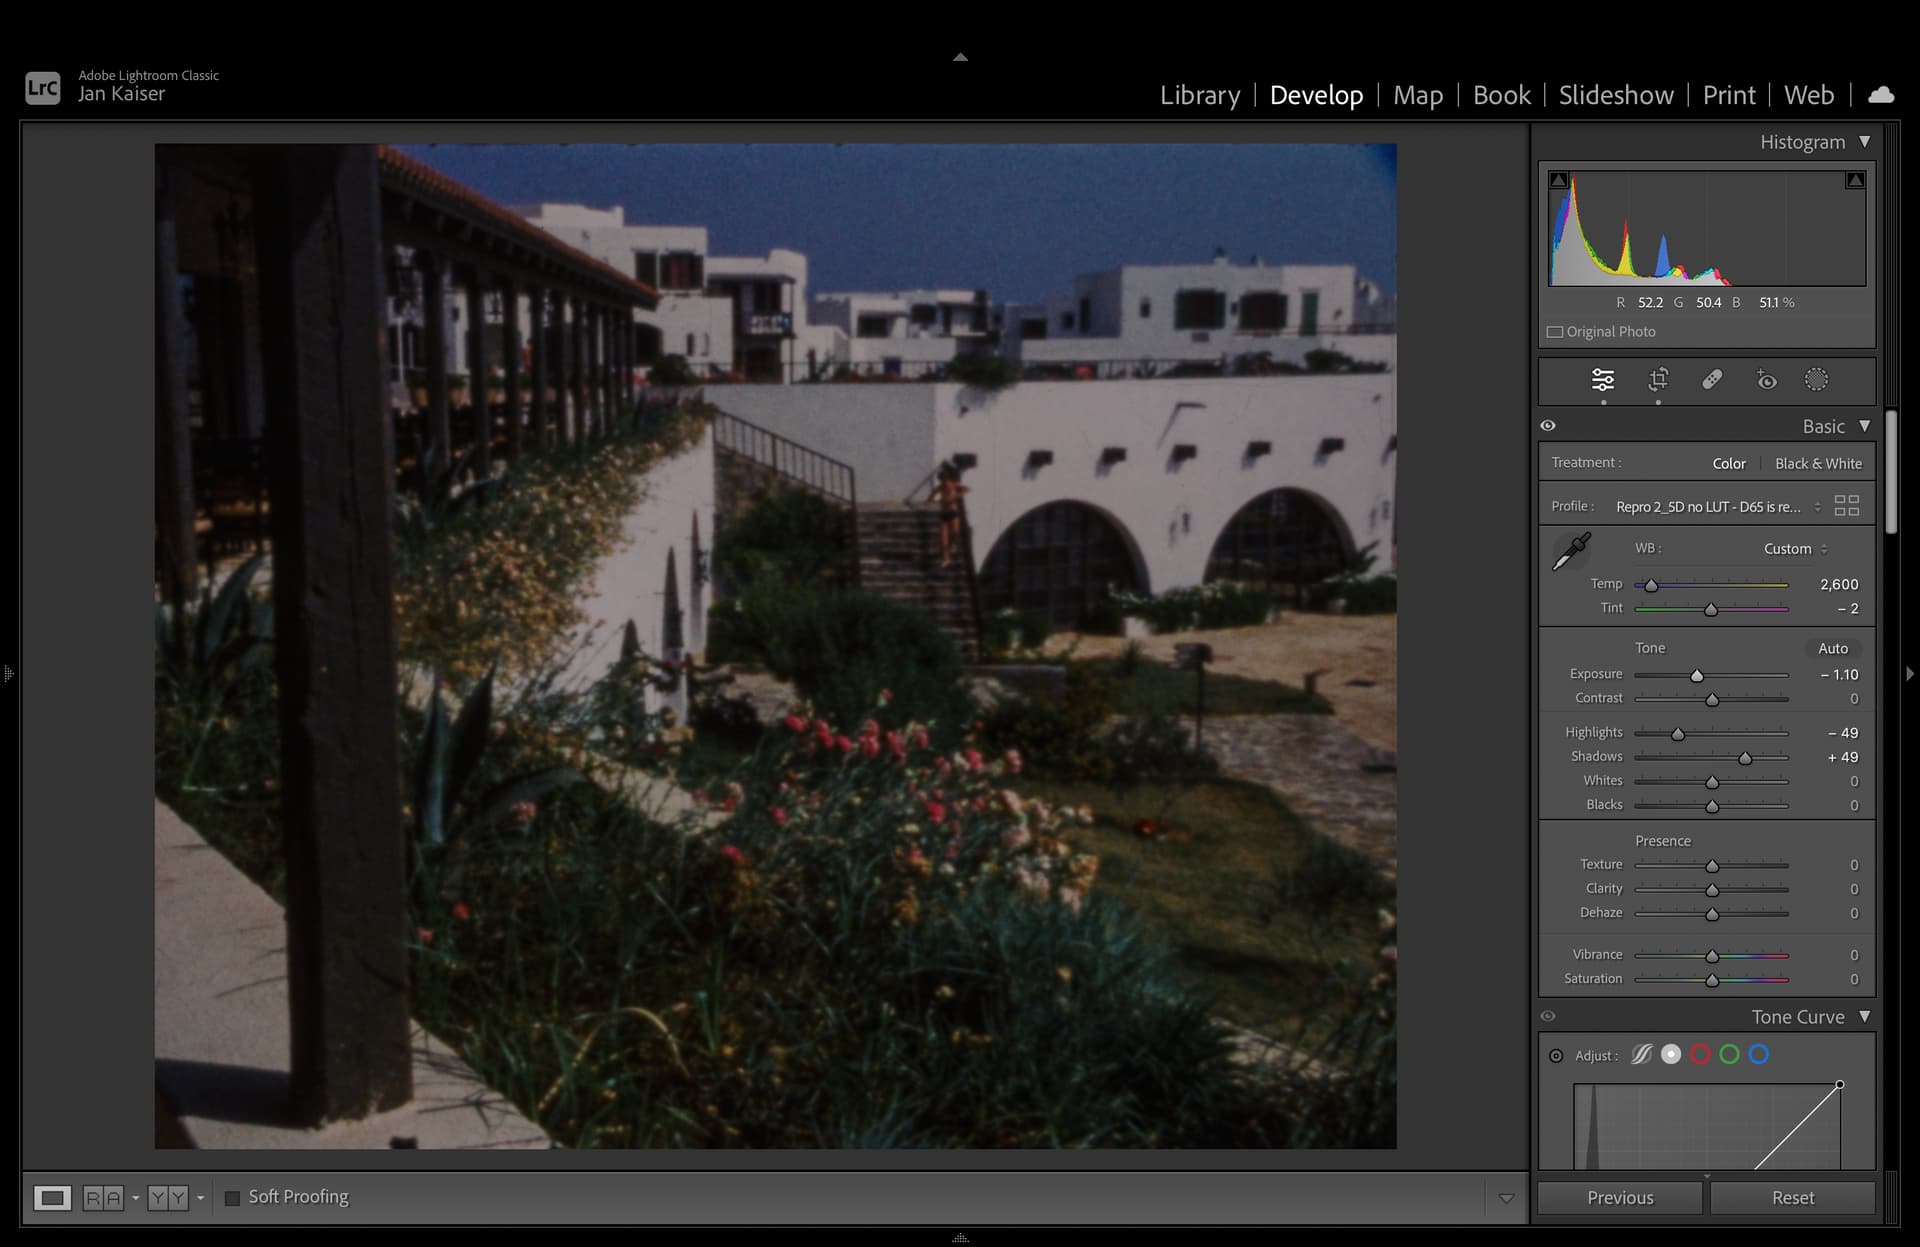
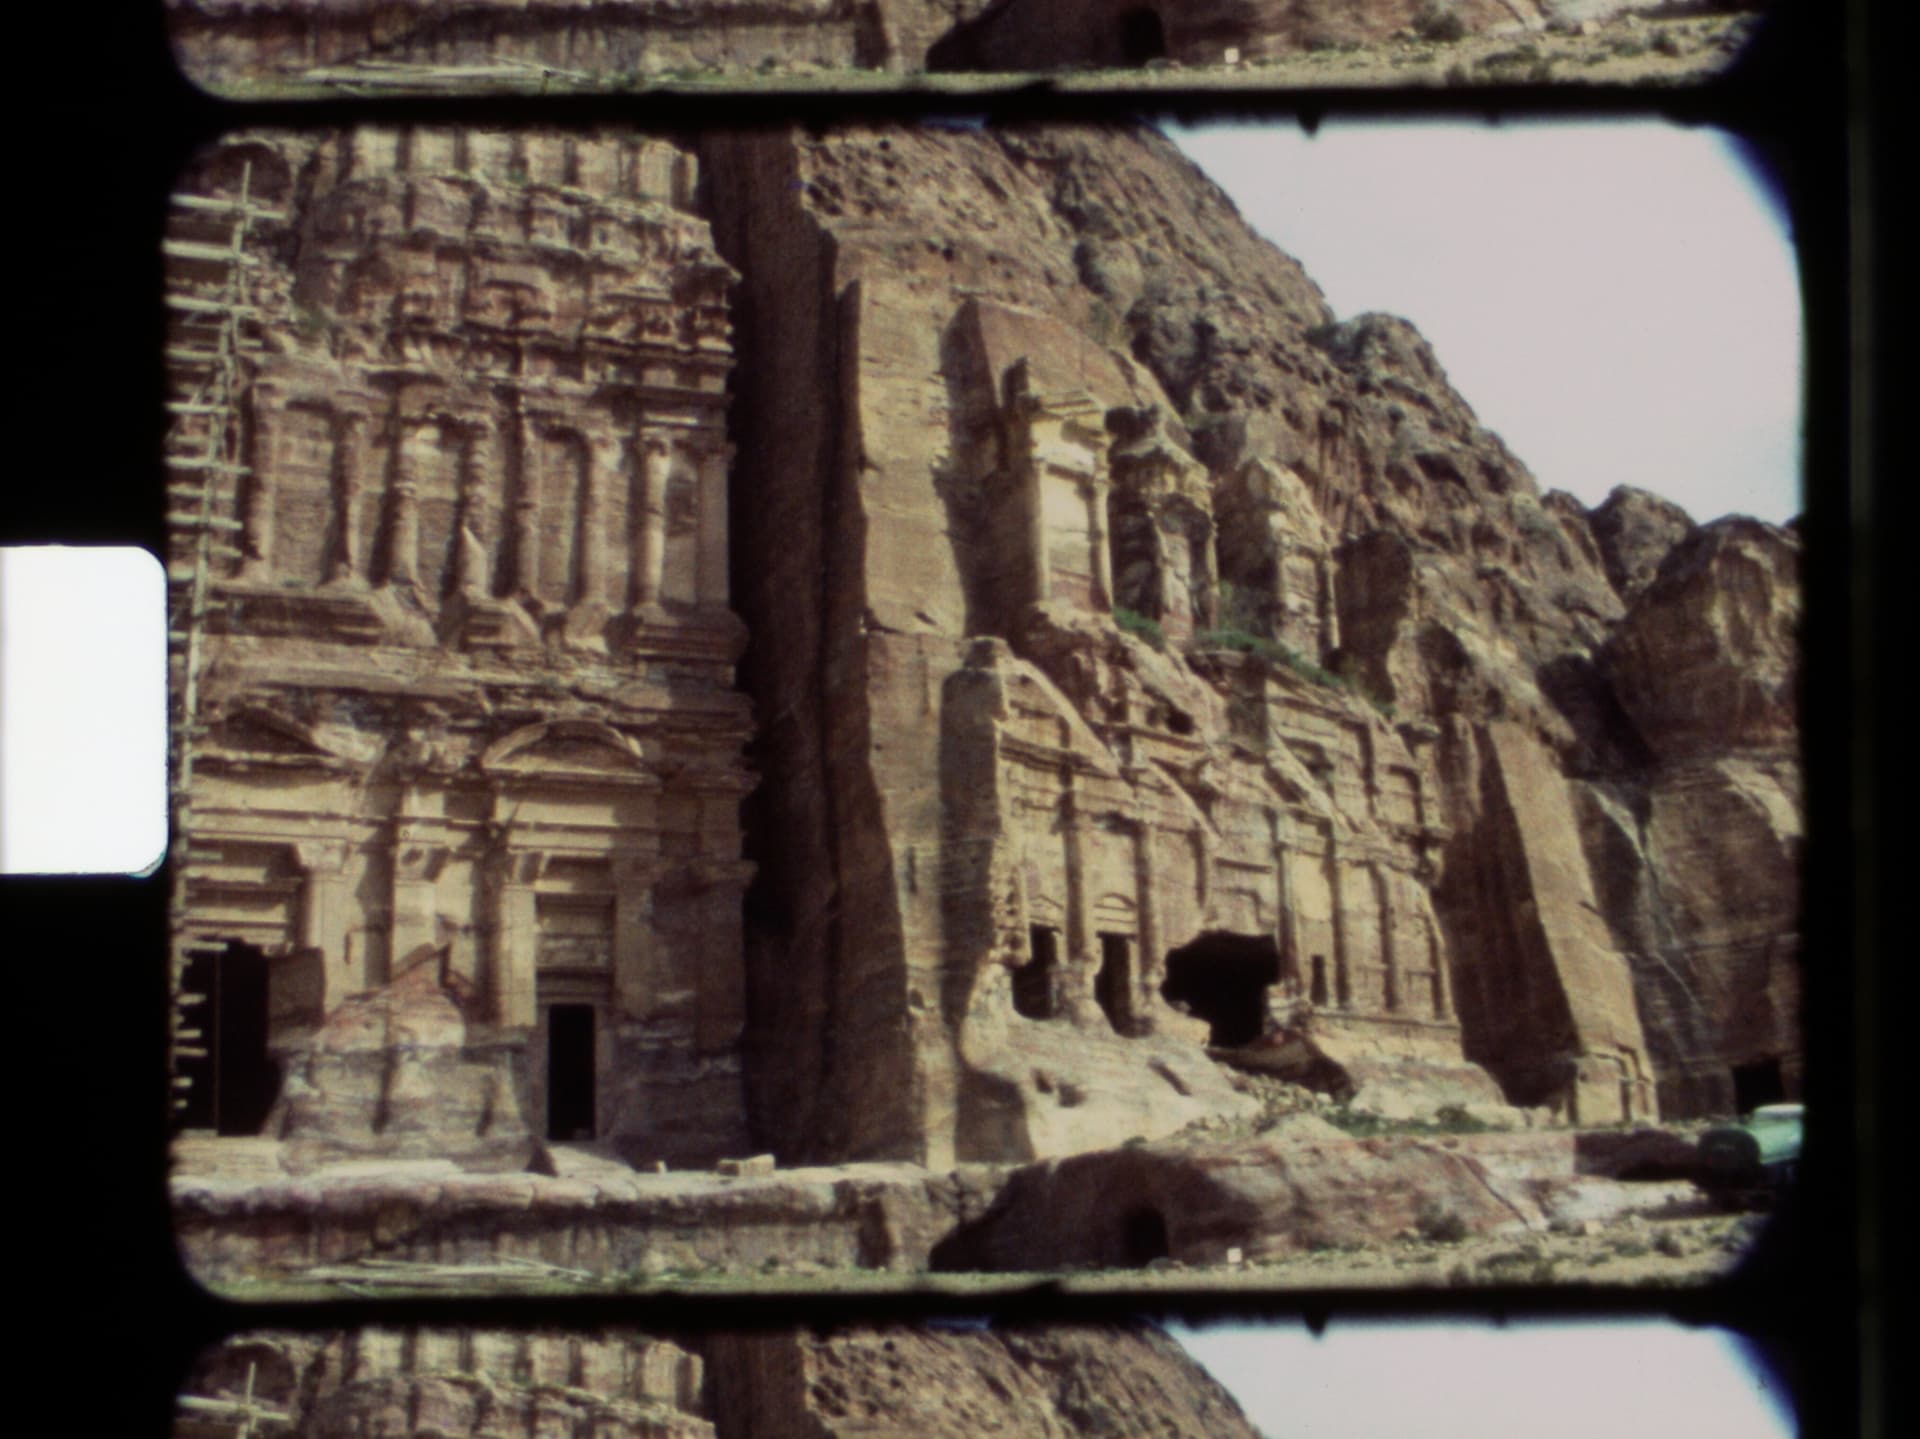
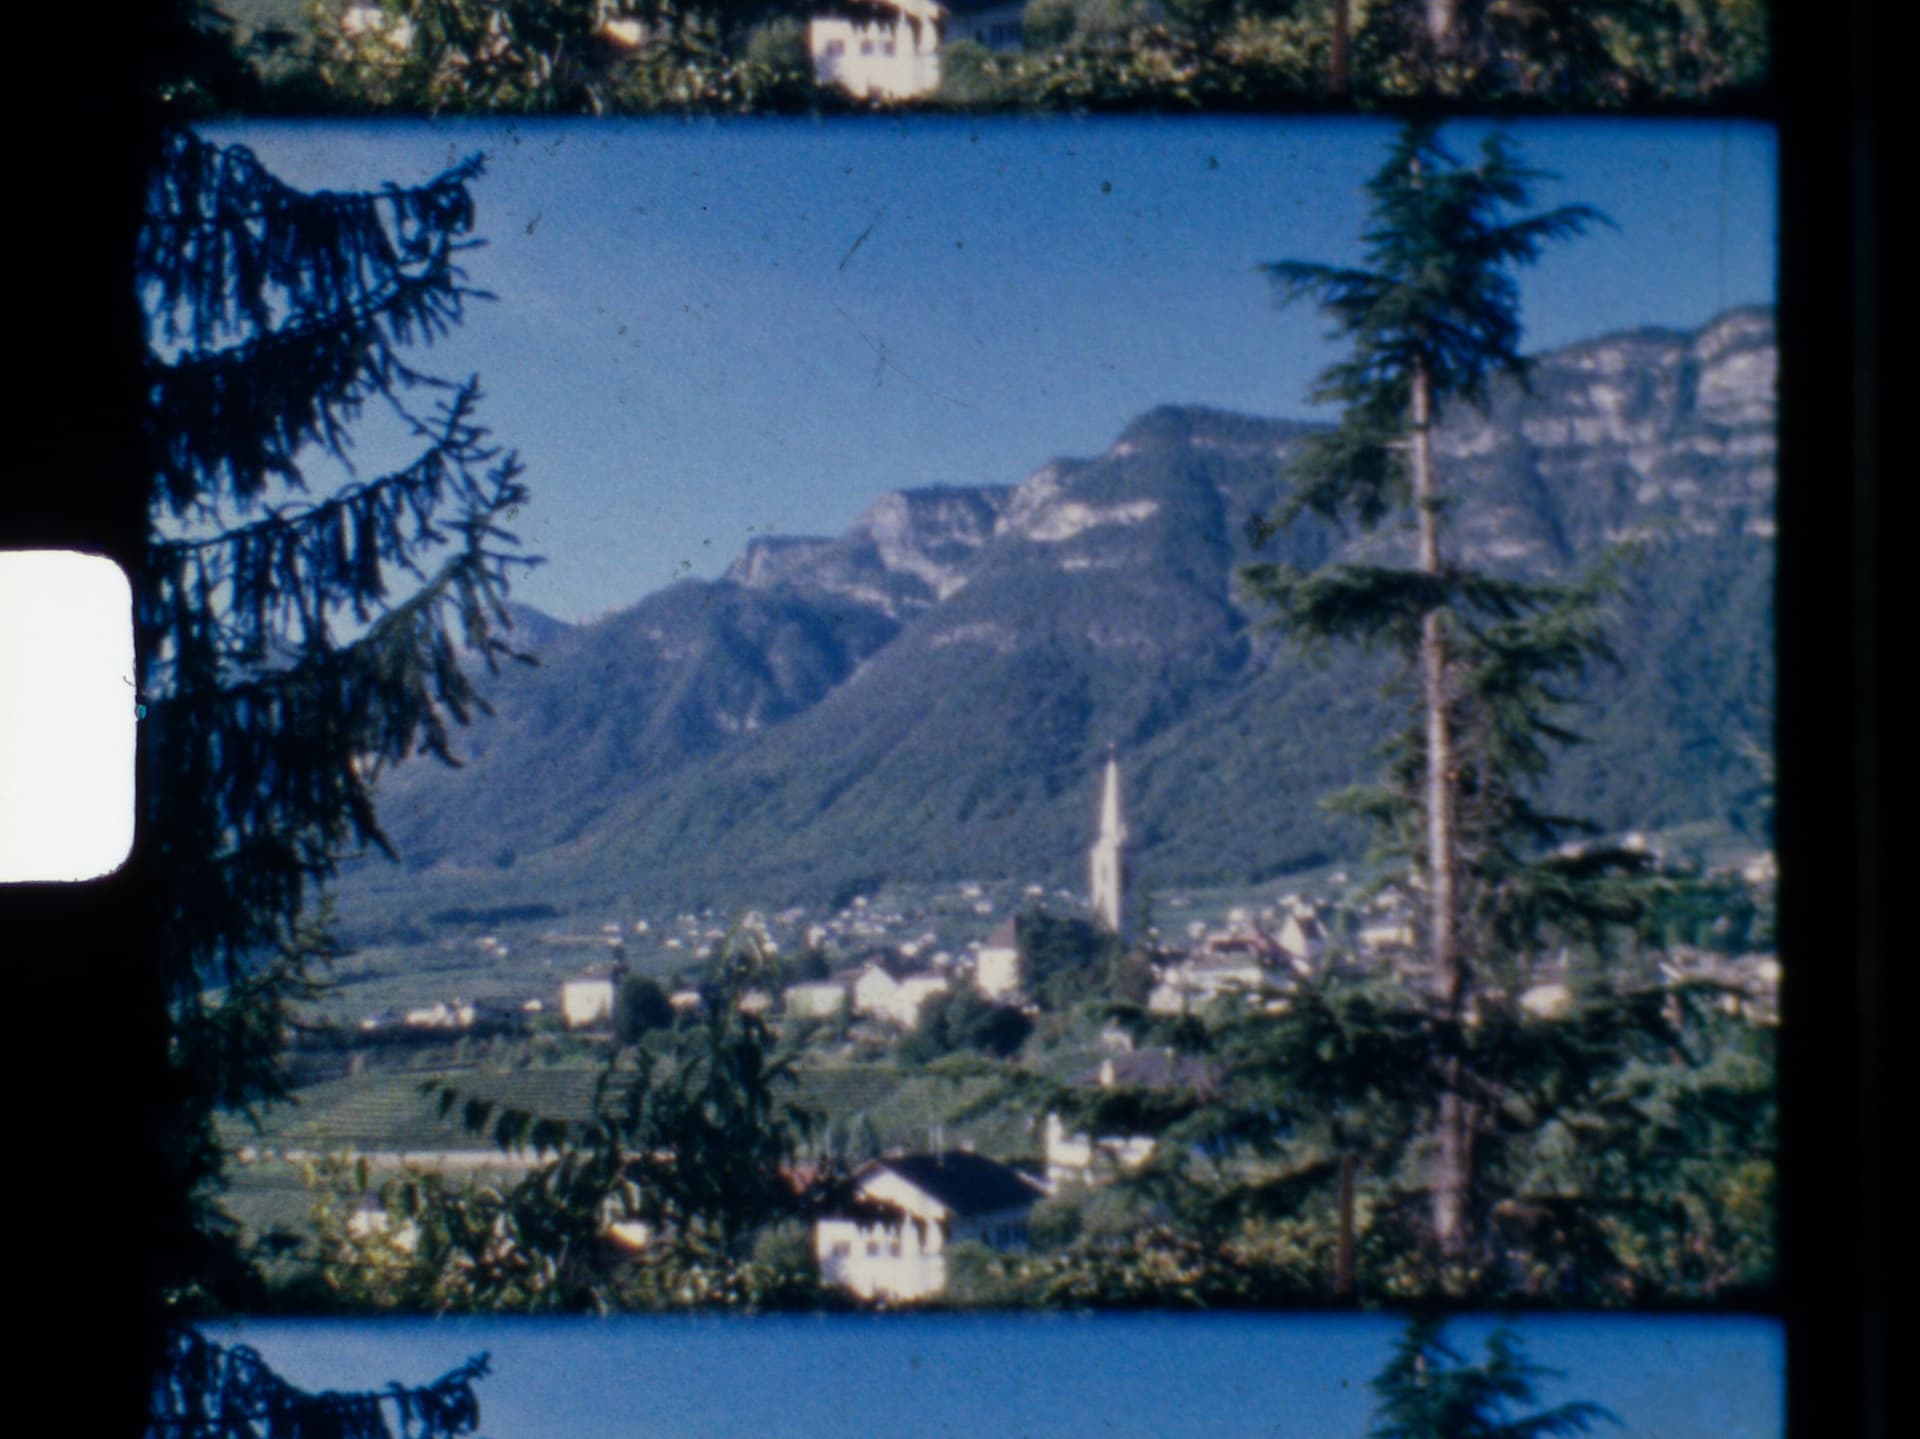
The scanner saves RAW images from the HQ Camera. These are then post-processed on my laptop after the scan. A Python script converts the raw data produced by the HQ Camera into .dng files, which are then edited in Adobe Lightroom via a preset. Next, I use Apple Compressor to produce a video file which is stabilised and cleaned of dust in Final Cut Pro.

Here is a sample video of what the end result looks like:

If you would like to use the software for your own scanner or simply read up on every technical detail about my build, I would like to point you to the following GitHub repository where I have tried to collect absolutely everything related to this project: GitHub - jank324/8mm-film-scanner: Conversion of an old projector to a Regular 8 and Super 8 film scanner.

Questions, suggestions and comments are highly welcome!

Last but certainly not least, I would like to thank the members of this forum for the amazing corner of the internet that has been created here. The knowledge collected in this forum is outright amazing and was a huge help for me and surely also for others building such a film scanner to preserve works of art, documents of the past or precious memories.

10 Likes

Hi @jankaiser,

My congratulations for the good work done and the results obtained.

The scanner is very well made and you have a very clean and compact construction.

All the work is very well documented and without a doubt constitutes an excellent starting point for anyone interested in starting out in this world of digitizing old films.

The samples of the results of digitized films have seemed to me of very good quality.
However, the samples correspond to very well exposed films with good lighting.
As I think, in your scanner you only take a single shot for each frame. I wonder how the scanner behaves when there are very contrasting scenes.
Likewise, do you always use the same exposure time for all scenes?

For my part, more than two years ago I decided to replace my old V1 camera with an HQ camera and use a quality lens together with the new camera.
I did everything based on your optical system that you were kind enough to share on the forum. The truth is that I am very satisfied with the results. Your idea of taking graph paper images seemed very suitable to me to correctly adjust the required magnification. Thank you for sharing your ideas.

Best regards

1 Like

@jankaiser nice build and extra thumbs up for the nice wooden look, detailed description, the github repo, tailwind and most important: darkmode :sunglasses:

1 Like

@jankaiser - fantastic build and great results!

Following Manuel, I’d be interested on how far you can push capturing raw footage compared to capturing an exposure stack and exposure fuse. Looking at your source code, it seems that you are capturing with a fixed exposure time. From my experience, with the 12 bit per channel the HQ camera is able to support, there will occasionally be scenes which are too dark or too bright to fully fit into these 12 bits, but again, your results look amazing. You do mention that in Lightroom

Pulling in the shadows and the highlights accounts for the naturally contrasty nature for positive film stocks and Kodachrome in particular.

In particular, Highlights is set to -49 and shadows to +49. I guess that sort of helps with the shadow- and highlight-details. You further write

While the provided exposure correction should be just fine for properly exposed scenes, you might encounter underexposed scenes in particular. Here it might make sense to pull up the Exposure slider, but values of more than 2.9 usually don’t reveal any more image details. Note that this is not a limitation of the image files, but of the film itself, as experiments with longer exposure times have shown.

Your standard setting seems to be +1.3. If you pull up exposure, are the highlights lost? I assume they will at least be squashed a little bit. I have no experience how Lightroom performs here, never even touched this program… :upside_down_face:

In any case, I love that the characteristics of the different film types show up in your scans. Lastly, the whitebalance of your example footage is great - are you adjusting the whitebalance manually for each scene/roll?

2 Likes

Thank you all for your nice comments!

To address @Manuel_Angel and @cpixip:

The exposure time is fixed at a fixed setting.

When I had the lighting and camera up and running, I spent some time trying different exposure settings on different scenes of one reel of Kodachrome. In the end, I ended up focussing on one scene in particular, where the hat of a woman was way overexposed. I then settled on a longest exposure time that still revealed all details of the hat, i.e. didn’t blow out the highlights. The goal was to preserve highlights at all costs as to avoid a “cheap looking” digital look.

As unscientific as that method was, it turned out that at this exposure time even in a picture of just the backlight the highlights can be recovered in Lightroom. Similarly, I found that at my chosen exposure time, I am also able to recover the film grain of a totally dark unexposed frame without the digital noise becoming too visible. All that leads me to believe that, at least for Kodachrome film stock, at the right exposure, the HQ camera’s RAW files can recover the entire dynamic range of the film stock.

This is further supported by scans I have made of severely underexposed Kodachrome stock. I have some rolls like this, where when viewing them on a regular film editing viewer, I can barely even tell what is on them. Nevertheless, if captured at my fixed exposure time, I can pull up Exposure in Lightroom and recover at least somewhat of an image. As written on GitHub, I usually stop at +2.9, because after that there simply isn’t any more detail to recover, just film grain. Interestingly, I have scan some of such rolls with +10 stops of exposure time in-camera, to see how that compares to pulling the exposure up in Lightroom. It turns out, there are no more details to be found. Digital noise was already fine when pulling up the exposure in Lightroom and it wasn’t visibly improved by doing so in-camera. Basically, even those hopelessly underexposed scenes could be scanned about as well enough with my fixed exposure time. Below is a sample from such an underexposed scene after going through post processing. It still looks terrible, but I would like to reiterate that with actual Super8 viewing equipment, this scene was unwatchable.

Your standard setting seems to be +1.3. If you pull up exposure, are the highlights lost? I assume they will at least be squashed a little bit. I have no experience how Lightroom performs here, never even touched this program… :upside_down_face:

As @cpixip discovered, I actually underexpose the frame by roughly one stop and then increase the exposure again in Lightroom. This is exactly because I found that it leads to better highlight detail. Apparently, if I physically increase the exposure in-camera, I lose highlights, but whatever the Exposure slider in Lightroom does, it allows me to fix the exposure while preserving those same highlights in the RAW conversion.

In any case, I love that the characteristics of the different film types show up in your scans. Lastly, the whitebalance of your example footage is great - are you adjusting the whitebalance manually for each scene/roll?

I actually use the same white balance for almost all rolls. Specifically, the setting I show on GitHub was found by taking a properly exposed picture of the film gate without film (properly=for the light source) and then using Lightroom’s white balance picker to find the white balance setting. Note that the colour temperature differs from the advertised colour temperature of the light source, so using this picture as a baseline was well worth doing. I found that this white balance setting holds up very nicely for basically every roll of Kodachrome and for modern Ektachrome, so I just keep it the same / reuse that preset for all of them. Where I’ve found this setting doesn’t hold up is with Agfachrome. This film stock seems to turn towards blue and magenta with age, presumably because one of the dyes fails. Therefore, I actually try to save Agfachrome presets for each year that a roll was originally developed. Rolls developed the same year seem to be fairly consistent, but one has to keep in mind that all my rolls were stored exactly the same way for the past 30-60 years. I’ve actually experienced the same effect scanning Agfachrome slides. In the end, I think this really speaks for the longevity of Kodachrome film stock. Btw, I have no idea how well old Ektachrome has held up. I have some rolls of Ektachrome lying around, but didn’t get around to scanning any of them yet.

All in all, the setup with RAW captures on the HQ camera at a fixed exposure time and a reusable Lightroom preset is a very nice case of set-and-forget – at least most of the time. In Lightroom, I really only scroll through quickly and fix the occasional severe underexposure, which might be needed once every couple of rolls I scan. The rest just kinda works itself out out :smile:

Well, in digital photography (which we do when scanning film) you always have to expose toward the highlights. That is the same as the old photographer’s rule for color-reversal film. When working with negative film, you would instead expose towards the shadows (memories of yesterday…)

It seems that the HQ camera with its 12bit per channel resolution is just sufficient to capture most details with an appropriate chosen exposure. Certainly it helps that, with your Lightroom-setting, you are flattening out the shadow and highlight regions of the image. This gives you freedom to adjust exposure in the post without compromising shadows and highlights too much.

I suspect that a dark frame pushed brighter during development shows more digital noise (both sensor noise as well as quantization noise) in the dark areas of the film frame - however, the film grain in these areas will overwhelm any of this. The digital noise reduction you employ as an intermediate processing step will take care of this added noise as well.

So I think your approach (raw 12bit + development with flatten shadow- and highlight-zones (S-curve) + exposure adjustment in post + digital noise reduction) is actually an interesting alternative to the exposure fusion based approaches (capture several different exposed images + exposure fusion via “Mertens”-algorithm + digital noise reduction). The advantage of your approach is that only a single image needs to be taken - which reduces scanning time by a noticeable factor. Also, frame-registration of multiple exposures is not necessary in your approach (it is necessary when combining multiple exposures - film always moves a little bit).

Also, storing the captures on a SSD connected to the Raspberry Pi (RP) is an approach different from what I have seen - nice. From what I understand of your approach, you are requesting .jpgs with the additional raw data from the RP attached? Have you any idea how long this takes? Background: I know that some guys needed to do some tricks (like storing directly the raw image in binary form) to get a fast enough raw capture on the RP.

Turning to the question of color science. When loading the raw images into Lightroom, I guess you are basically using the color matrices John Hogan came up with ("Repro 2_5D no LUT - D65 is really 5960K" sounds familiar in this context). These are manually optimized matrices for daylight imagery - certainly a valid choice for high CRI illumination and better than the standard color matrices which are shipped with the standard HQ tuning file.

Well, here, my experiences differ. I encountered color differences/shifts between two rolls of Kodachrome exposed one after the other, but from a different lot. Given, that was probably not a usual situation in the old days. Another issue is the fading into pink of old Ektachrome stock. The old Ektachrome film was very bad in this respect and scanning this material is really a challenge.

Speaking of “pink” - some people (including me) have noticed a tendency towards pink of very bright highlights of Kodachrome film stock. Say, for example, bright clouds seem to turn a little bit towards magenta side of colors - I’d be interested in whether you have noticed something like that in your material?

In summary, you got me into reevaluating scanning with a single raw capture (again :wink: ) . It seems that this could be a feasible, faster approach than scanning multiple exposures with necessary complicated and time-consuming post processing.

3 Likes

@jankaiser,

I agree with @cpixip.

With your work method you have managed to arouse my curiosity and I have thought about carrying out tests with a similar method.

However, the picamerax library that you use in your software is based on libmmal which, I believe, is due to disappear in no time, replaced by libcamera.

I plan to carry out the tests with picamera2 which, on the other hand, allows the capture of raw images and generates dng files directly, avoiding the use of the dngconverter.py script.

2 Likes

Also, storing the captures on a SSD connected to the Raspberry Pi (RP) is an approach different from what I have seen - nice. From what I understand of your approach, you are requesting .jpgs with the additional raw data from the RP attached? Have you any idea how long this takes? Background: I know that some guys needed to do some tricks (like storing directly the raw image in binary form) to get a fast enough raw capture on the RP.

I actually did some studies timing all the phases of capturing a single frame a while back, but I can’t seem to find those results anymore, so here is what I do have. The scanner right now achieves roughly 0.8 FPS, i.e. the entire process of capturing a frame and advancing to the next one takes about 1.25 seconds. About 0.45 seconds of that are spent on the actual mechanical film advance, so the RAW capture takes 0.8 seconds as it stands. NOTE that this does not include saving the image to disk. Saving to disk is actually done concurrently to the frame advance, meaning that as long as saving the 18 MB of one JPEG+RAW file to disk takes less than 0.45 seconds, it doesn’t actually impact the scanning speed. This also means that I also don’t know how long it takes right now, just that it takes less than those 0.45 seconds.

I actually decided to go with the SSD over the “internal” SD card of the Pi after reading an article, where the author showed that an SSD connected to the USB 3.0 ports of the Pi 4 is much faster than the SD card. It turns out that even on the Pi 3B+ without USB 3.0, you can see some speed improvement. In earlier experiments, I was saving images straight to the SD card. With that setup, the scanner needed a little break to breathe every couple of frames. As a side note: If the concurrent saving of the last frame is not finished by the time the frame advance is finished, the scanner will wait for the saving to finish before capturing the next frame. I guess that when I ask the OS to save an image, it is actually written to some buffer in RAM, the OS tells me saving is done, but it is actually still writing to disk in the background. When saving to the SD card, I presume, that at some point the RAM buffer simply filled up, and that’s when the scanner needed some time before continuing. With the SSD this is no issue. Saving to disk is always done by the time the next frame is about the be captured.

Another side note at this point: I don’t actually know if the SSD is needed. Maybe your average external HDD would do just fine making use of the Pi’s USB ports. I just haven’t tested that.

Regarding the DNG conversion, I did actually have this running on the Pi during the scan as well. But this slowed down the scan significantly as the Pi’s CPU seemed quite heavily burdened by the conversion. Converting after the scan on my laptop’s much faster CPU was simply the faster option.

Speaking of “pink” - some people (including me) have noticed a tendency towards pink of very bright highlights of Kodachrome film stock. Say, for example, bright clouds seem to turn a little bit towards magenta side of colors - I’d be interested in whether you have noticed something like that in your material?

Interestingly, I haven’t really noticed a colour shift in the highlights of Kodachrome stock, at least not a noticeable one. In the sample footage I’ve published, no efforts were made to reduce any such colour shifts.

However, the picamerax library that you use in your software is based on libmmal which, I believe, is due to disappear in no time, replaced by libcamera.
I plan to carry out the tests with picamera2 which, on the other hand, allows the capture of raw images and generates dng files directly, avoiding the use of the dngconverter.py script.

Yeah, so picamera2 is actually something I’ve had my eye on, but for now I’m very much following the idea of “Never change a running system”. I guess once picamera2 becomes stable and I have some time, I will give it a try and see if it integrates well with the rest of my workflow and then make a decision if I want to upgrade. That said, I’m actually following the tests of picamera2 on this forum with great interest.

For the time being, there are more pressing issues like the automated dust removal, that have a much more significant impact on the time it takes me to scan a roll of film, and therefore should absolutely be solved first.

2 Likes

For the Raspberry 4B, the increased speeds for both Ethernet and USB3 make it play well into the scanning application.

According to this benchmark, the limit is likely set by the drive write speed, and I think that the SSD choice is a must.
Within SSD, performance will vary from the 200s MByte/s to 1000s MByte/s, one certainly may not need all the speed, but the selection will make a difference in write time.

1 Like

In effect, it is a computer maxim that, in my opinion, is very accurate: “If it already works, don’t fix it.”

In my previous software versions I have always used the traditional picamera library, with good results.

But for now, the latest version of the Raspberry Pi OS, called Bullseye, no longer supports picamera, and has replaced it with picamera2 - libcamera.

At first I had resisted using it, especially because it was in alpha version.
Apparently, it is now in beta version. In the forum there are users who normally use picamera2 and for this reason I have decided to use this new library in the latest version of my software.

I have to say that I congratulate myself on the change. The library, still in beta version, works correctly and the processes are carried out in less time.

Once I’ve run tests capturing images to dgn files, I’ll post my results.

1 Like

@jankaiser - many thanks for the feedback about the timing of the capture. That gives a good reference for others to compare!

Well, it’s an issue I am still working at with my scanner/color science. I currently approach the whitebalance similar to your approach, namely setting the whitebalance on the empty film gate. While this seems to be a decent approach, it probably would be better to base the whitebalance on some grey image area in the actual footage. One reason: in the old days, Super-8 did know only two color temperatures - daylight (realized with an in-camera filter) and tungsten (without filter). So already when taking the footage, you most probably did not have the “correct” color balance for the scene. For example, I have seen scenes taken with flourescent lights - these have quite some interesting color variations…

Aesthetically, one could argue that this is one of the features of Super-8 film stock and you want to reproduce it in the digital copy. In this case, the whitebalancing of the empty frame is a valid approach. Or: you assume the opposite position and aim at not having these color shifts, caused by the technology at hand in those old times. In this case, you need to base the whitebalance on the scene content (find some grey area in the scene an color-balance this).

Now, if I use the empty film gate approach, I do see occationally a drift of very white areas (typically clouds in the sky) toward the magenta color with Kodachrome film stock. You can notice this magenta sky in a scan Pablo (@PM490) posted in his SnailScanToo or 2 thread (reproducing it here to spare you the search):

Notice that the empty sprocket area is more or less whitebalanced, but the sky in the frame looks kind of pinkish?

I have several ideas where this might come from:

  • the camera sees in these areas basically the support material of the film stock. This should be absolutely clear, but of course, this is not the case. The support material certainly acts like a little color filter and this could potentially introduce the color shift in bright area I am seeing.
  • the exposure fusion I am using (“Mertens”) is not really color-neutral. It exagerates local color variations and has the potential to introduce slight color shifts, as it is a non-linear process.
  • some other reason, like a weird interaction between the spectrum of my white-light LEDs (but Pablo’s system “sees” it too) or the conditions the film was stored, or whatever…

So it’s interesting to me that you did not notice such a phenomene in your Kodachrome scans.

This might be related to the different way you create your final frame (raw capture, processing in Lightpath, no exposure fusion). Exposure fusion will pass through color differences even in very bright areas. On the other hand, capturing just a single 12-bit raw is demanding in terms of dynamic range - you either have more noise in the dark parts of your image, or very bright image areas might blow out. In the later case, these image areas would be trivially “white-balanced” (i.e. loose their color).

From the description of your setup, I think this is not the case. However, later on, you pipe your raw data through your light room profile, expanding with your Shadow and Highlight settings the image definition of the highlights and shadows. As a side effect, this operation will squash the tonal range of colors in these image areas, maybe to such an extent that any magenta cast is not noticable anymore?

Here’s an example from my scanner, showing the same effect:

If you use your color picker on the sprocket area of this 8-bit scan, you should measure around 245 in all three color channels. That is how I set whitebalance and exposure. Doing the same on the overcast sky, you will find values like R: 207, G: 198 and B: 201, which is a slight magenta cast, or values like R:204, G:195 and B:198, which is a kind of redish one.

Sorry for this long technical detour - it’s just a question I am researching at the moment where I do not have an answer yet. I am tending to think that it is a Kodachrome-issue, but I am far from being certain about this. That’s the reason I asked you whether you have noticed such an effect. In any case, thank you for your feedback!

4 Likes

Very interesting! I went through some more of my scans and I was not able to spot any similar tints in the highlights in any of them by checking visually.

I did, however, find something else that might be interesting in this regard. When I was dialing in my workflow a long time ago, I actually tested Mertens Merge on my scanner, meaning that I have a reasonable comparison of the results of both post-processing workflows.

For the Mertens Merge version, I captured five exposures at 1 stop apart going from 1/2000 s to 1/125 s. Note that these settings cannot quite be compared to my current settings because I was using a ground glass for diffusion at the time, which let through more light. This is also why there appear to be “cracks” on the film – more on that on another thread.

The code below was used to merge the five exposures. You can find the full Jupyter Notebook in an older version of my repository.

mertens = cv2.createMergeMertens()
merged = mertens.process(images)

minimum = np.percentile(merged, 1)                                 
maximum = np.percentile(merged, 99)
scaler = 1.0 / (maximum - minimum + 1e-6)
scaled = scaler * (merged - minimum)
scaled *= 255
clipped = scaled.clip(0, 255).astype(np.uint8)

Below is a merged frame from the roll I did back then.

Maybe there is a slight magenta tint in the highlights. On the other hand, the entire frame might be a touch red-ish, which is interesting because the original 5 frames all had good white balance. Below you will find, of a different frame originally filmed just minutes after the above one, the original five exposures as well as the merged one from the Notebook.

Unknown-3

For comparison, here is a screenshot of Lightroom with the same as the original frame but processed the way I current process all my frames. I’ve placed the cursor on the brightly lit facade of the building in the right half of the frame, so below the histogram you can see RGB percentages for that particular section of highlights. You can see that the red component is ever so slightly larger. You can also see in the histogram that the reds are poking out a tiny bit in the highlights on the right.

For fun, I’ve pulled down the exposure to test @cpixip suggestion that the highlights might “lose” their colour. While the bright white facade of the building still doesn’t look too much like it has a tint, if you look at the colour components in the top right, the red component’s “dominance” has indeed become slightly stronger, seemingly confirming his suggestion. Keep in mind that the colour picker might not have been on exactly the same pixel. However, also note that the red channel histogram is poking out more now in the highlights.

All in all, looking at this example, I feel like the film base does in fact seem to have a bit of colour to it, be it from factory or through age. I’m honestly not terribly surprised by that. Furthermore, it appears that my RAW workflow manages to “hide” this colour where it is most apparent, i.e. the highlights, while Mertens Merge appears to preserve highlight colour better, and in doing so makes this “defect” of the film stock more apparent.

Unfortunately, I don’t have a similar example for a different film stock, so I’m not sure if this is unique to Kodachrome. At least with Agfachrome, it would probably also be difficult to say anyways, because there the colours were very difficult to get right across the board.

Edit: One thing I am now realising is that the slightly larger red channel on the facade could also be caused by the orange tiles below reflecting on the facade, so take it with a grain of salt.

2 Likes

Well, as I mentioned above, I do see that redish tint in burned-out image areas mainly on Kodachrome film stock; here’s another example:

The sky on the top-right corner of this frame could be expected to be white - instead, I measure for example R: 204, G:195 and B:197.

For comparision, here’s a Agfa Moviechrome frame from the same scan run:

Measuring RGB-values on the house in the foreground, I get R: 203, G:202 and B:194. That is a ligth yellowish tint - which is not too objectable. In fact, in the old days it was a usual trick in development departments to throw in a yellow tint. That would cover other color tints up so you did not have to spent too much time during development, and it pleased the customer usually, as the scene got a more “sunny-like” appearance.

1 Like

Congratulations, Jan, for a nice mounting and very good results.

For me, I’ve finished all my digitizing and my yart project is dormant.
Our projects are quite similar but here are the few differences I can point out, not for criticism, just for discussion !

My project classically uses a jpeg capture with multiple exposure fusion and I read with great interest the discussion on RAW capture.This is really interesting to consider, as multiple capture slows down the process considerably, especially when you take into account the time required for a change of exposure.
But I’m not at all sure that you’ll get such a good result ?

On the projector:
The EUMIG (I have one) is a little marvel of extremely compact mechanics that allows you to make very clean mounting like yours. However, access to the drive mechanism and projection window is rather difficult. With the ELMO, I was able to remove the three-blade quite easily, mount a toothed pulley on the main axis and enlarge the projection window as much as possible.

On the lighting and the diffuser:
There are discussions in this forum about the best position for the diffuser, close to the lamp or close to the film?In my experiments, it seemed to me that a diffuser close to the film reduced the effect of scratches (to be confirmed ?).

On focus
A good focus is fundamental. Are you really sure that the focus is optimal in your video examples?
Your MENGS W-160 slider is interesting, but I’m not sure how precise it is, and it has only one axis.
Even if it’s a bit expensive, I’ve never regretted my purchase of an XYZ axis sliding table.
Yart’s code includes a numerical calculation of a focus indicator, which shows that a micrometric displacement is useful.

On sofware, everyone can have their own ideas !
My images are transmitted to the PC for Mertens merging, but storage on an SSD is also a good solution.
I’ve done a lot of web development in my work, but in this case I’m not sure that control via a WEB interface is the best solution. It introduces additional complexity as soon as the interface is enriched, as in my project or Manuel’s ? I prefer to stay 100% Python

For post-processing:
You use applications like Lightroom, FinalCut, DaVinci, Neatvideo, … for a good result !
I personally use Avisynth for corrections and ffpmeg for encoding (X265, AV1, …), the possibilities are endless but the initial investment is difficult ! Another advantage, when you have a large number of films, is the possibility of automation.

Regards and once again bravo for your work !

2 Likes

@dgalland, thank you! These are some very interesting points for discussion.

Personally, I think the results are very nice. This is of course from a perspective of someone looking for a result that looks good, not necessarily with a 100% eye for what one might call “archival” quality. @cpixip is doing some fascinating experiments at the moment on this topic, which I think we can all learn a lot from. I think the results so far can be summarised as “Exposure fusion is still better in terms of actual quality, but RAW capture is a very capable compromise.” That might of course change once we consider more capable cameras than the Pi HQ camera for their RAW captures.

Yeah, so I’m quite happy with my little Bolex projector especially because, as you mention, the mechanics and available mounting options make it very easy to mount your own hardware in there once you’ve gotten the original motor out (which I have to admit was a bit of a pain to do). However, I do also have one gripe with my choice of projector, pertaining to, as you mention, linking the drive mechanism. One annoying problem I have here is that with the toothless belt and pulley that’s already on the projector’s drive shaft, the belt occasionally slips. This would be nearly impossible if I could mount a toothed pulley and belt, or maybe even a proper gear like @Manuel_Angel has done. While something toothed would be my favourite fix, for the time being I am seeing two issues with the toothless system that might be causing the slipping:

  • Improper belt tension: I’m no mechanical engineer, so I just winged the position of the stepper’s pulley and as a result the belt tension. It might be worth doing properly, which includes using a V-belt pulley on the stepper side and a V-belt, which would be what was originally used on the projector’s motor. Interestingly, the round belt I am using now was sold as a spare specifically for this model projector. :thinking:
  • Regreasing the mechanism: Another reason for the belt slipping could be that the mechanism has too much resistance. The projector was very beat up and dirty when I got it (which is why I didn’t mind converting it), so the lubrication is probably far from perfect after 50 or so years. Unfortunately, I don’t know what the proper kind of grease for these is and have no experience doing something like this on a film projector. In addition, there are parts of the mechanism, specifically the speed selector “gear box” that I still don’t quite understand and don’t really dare to mess with.

In the end, it’s probably a mix of both, but I welcome and value any more ideas and input on this.

This theory sounds about right. I can confirm that changing the diffusor significantly reduced the effect of scratches. I’ve written about this on another thread where I also shared the distances on my scanner. I believe the question of how far away to place the diffusion was also discussed extensively in relation to the Essential Film Holder where the distances are adjustable. Note that on my build the distances are simply where things were easiest to mount and I made no effort to “tune” this aspect. Nevertheless, the results look good to me.

The MENGS W-160 slider is certainly not perfect, but it’s good enough and actually amazing for the money. It’s definitely possible to focus well enough to get an image where the grain, the dust and the scratches are sharp to the pixel, which is the case in my examples. It’s just a little annoying at times, because, while the slider is much better built than others I have had the displeasure of using at this price point, there is definitely still a touch of play when adjusting it back and forth that can certainly been “felt” when focusing on Super 8 film. My vertical and orthogonal axis are very coarse hacky adjustments, but luckily I’ve only adjusted them once and never again. I would also like to point out that the height on whatever the camera is mounted on was a point of consideration for me. An initial assembly I had was too high and would have required lifting the projector as well. All in all, I think the XYZ axis sliding table is definitely the more ideal and pleasant-to-use solution, but the macro slider and wooden plate can absolutely achieve the same results if you have a little patience to focus them right. I might upgrade at some point, but for now there are more pressing improvements to make.

I don’t actually think that the web interface introduces any more complexity than a Python client, for example based around PyQT, does. The latter is actually what I started with. I don’t regret moving to the web interface and actually found it easier to develop for than I did with the Python client, both in terms of network communication and building the UI, especially because there are so many resources online. Another advantage for a film scanner here is that it requires no installation at all on the client device. I have to say, though, that all of this was made much easier by frameworks like React and TailwindCSS which had some initial learning curve to them. In my case learning them was part of the fun because in my work I rarely get out of the Python world. :smile:

Actually, Avisynth is something I am very interested in! I know there are some pretty cool scripts out there that people have tuned extensively for Super 8 film scan post-processing. However, I am on a Mac, so unfortunately I was never able to try them. :confused: Being able to run and try them on Mac would actually be amazing!

1 Like