Dust and scratch removal (in post processing)

Hey everyone,

I’m currently researching how to improve my dust and dirt removal in post processing and I would be interested to see what methods everyone else is using or other methods that people might be aware of. So please feel free to describe your approaches and your feelings about others at length below. I’m hoping that this thread can become a collection of information dust and scratch removal.

In the rest of this post, I will describe my own approach, why I’m not perfectly happy with it, and the direction I’m currently researching to improve it.

My current workflow and its problems

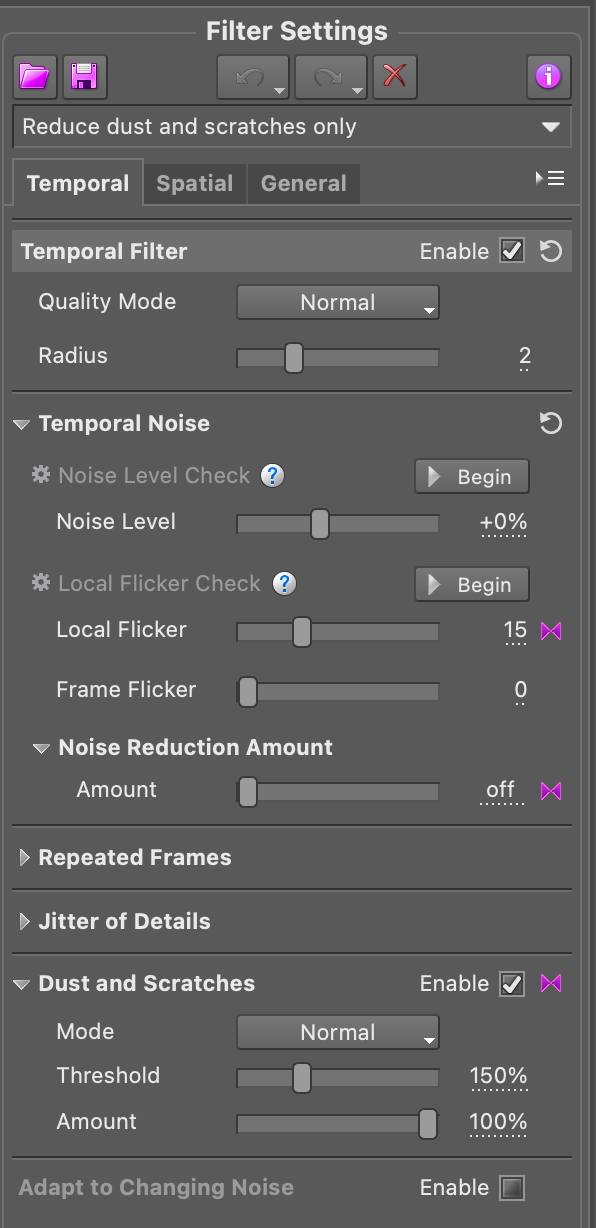
So right now, I am using Neat Video, which is a plugin for all kinds of denoising tasks, available for most commonly used video editing programs. Rather than for denoising, I use Neat Video primarily for its dust and scratch removal. I’ve outlined this a little more in my recent post on my own scanner build and the README of the corresponding GitHub repository. To spare everyone the search, here are the Neat Video settings I’m using:

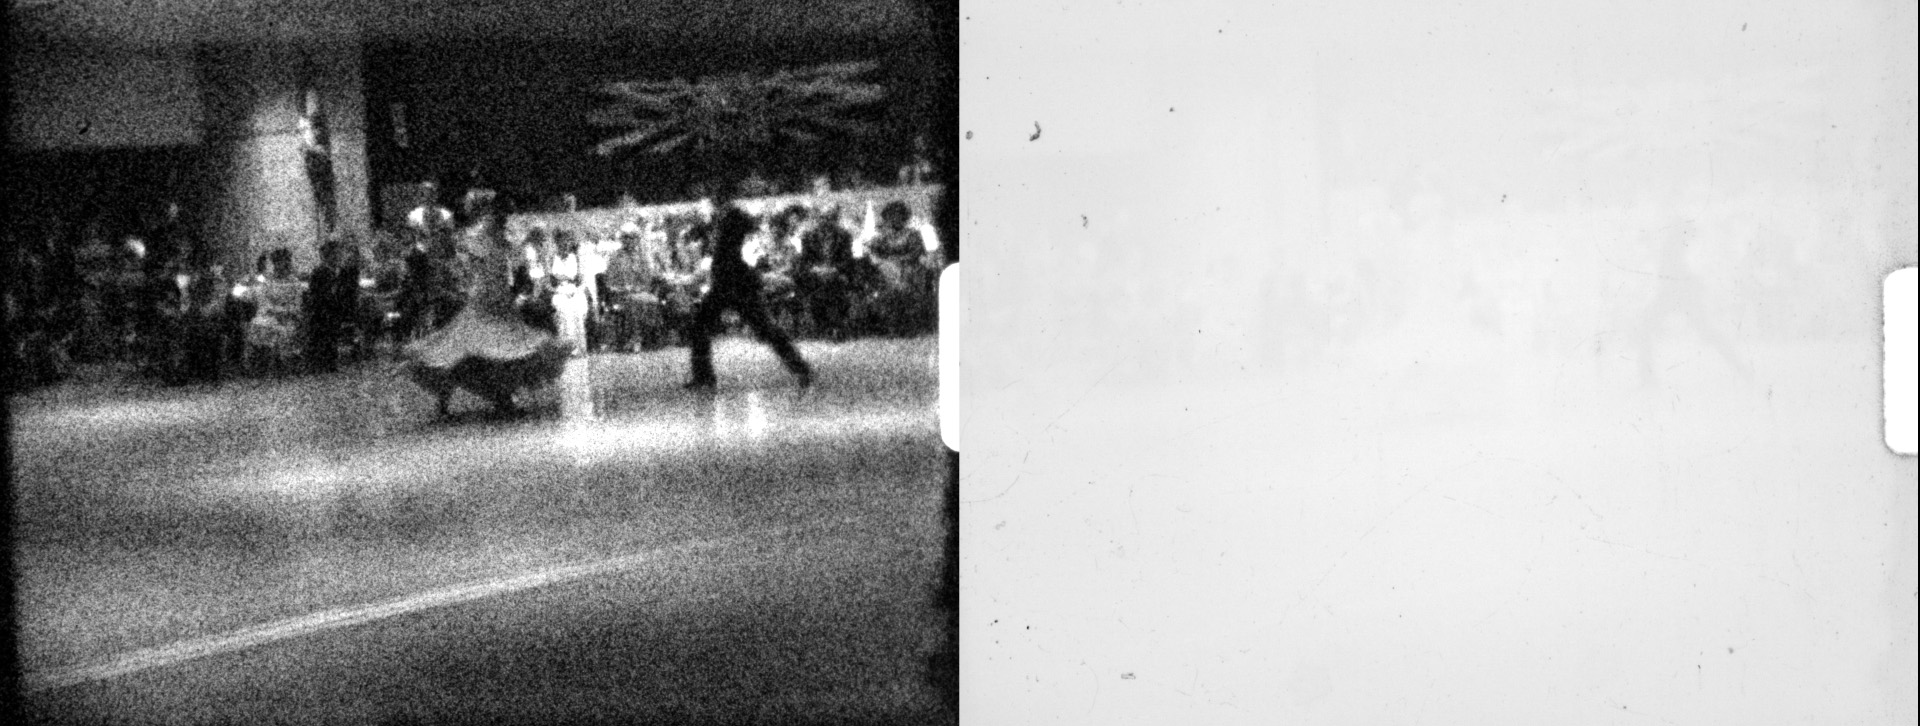
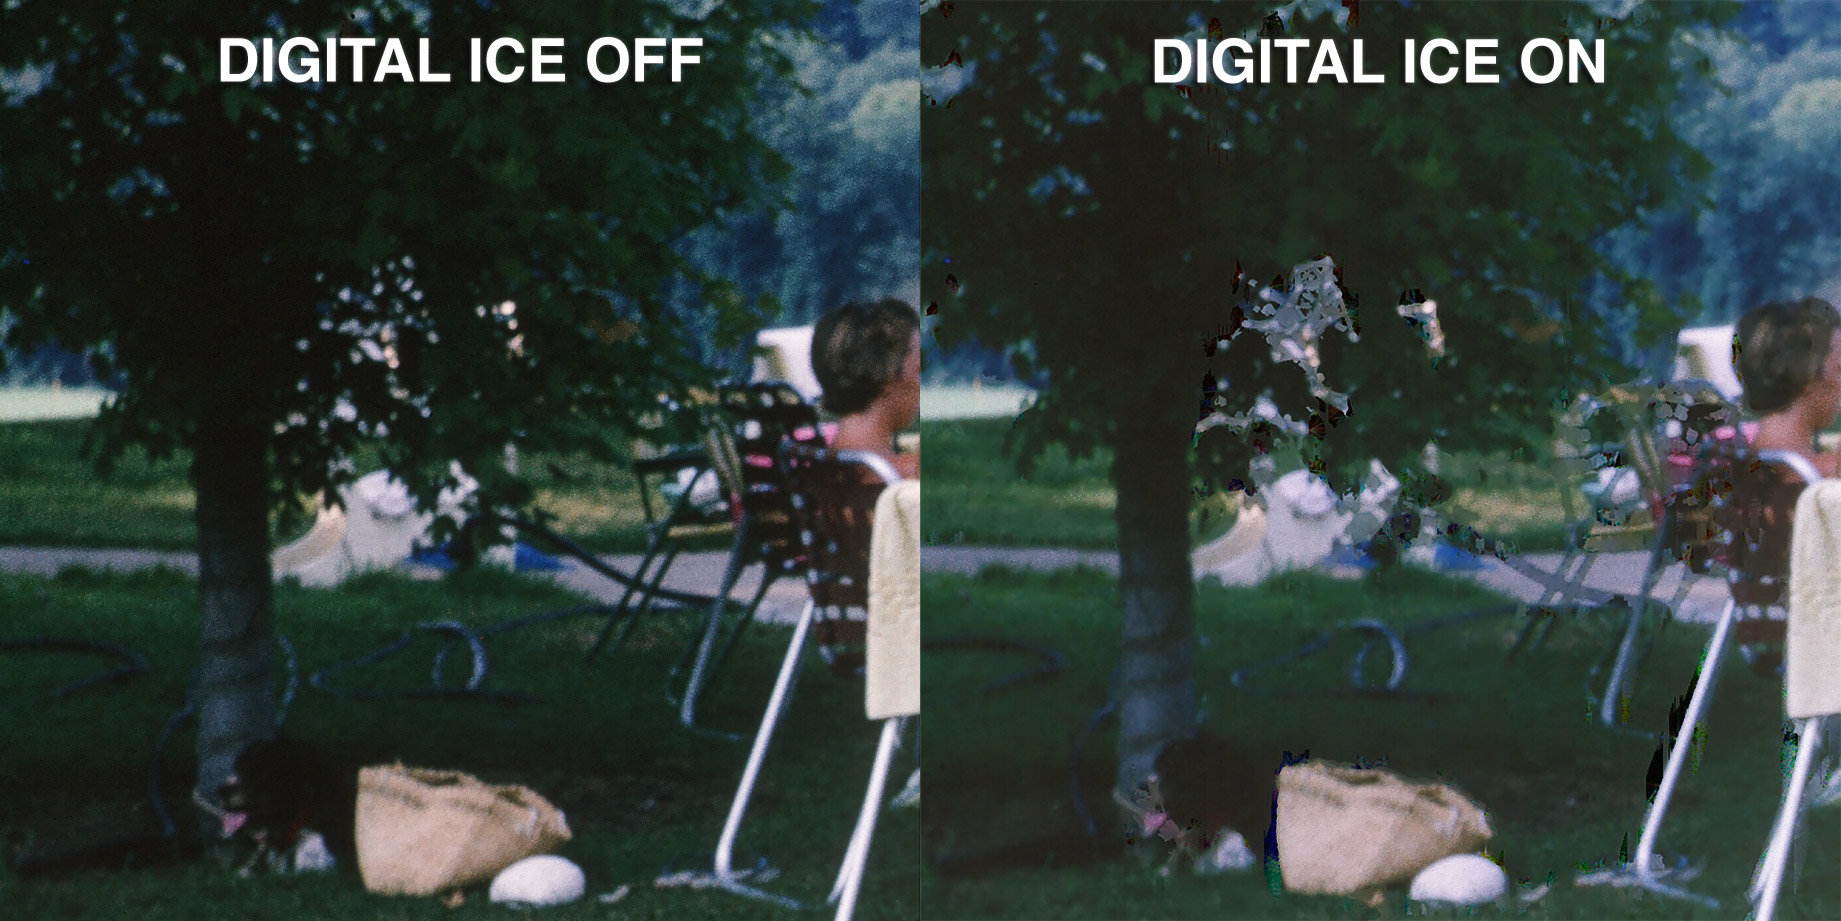
Now overall, I’m actually very happy with Neat Video. Most of the time, the software performs great and works as a one click solution … until it doesn’t! Every now and then, Neat Video fails at its job and produces the weirdest artefacts, like blotches, sometimes it also removes peoples limbs or other fast moving objects, and water reliably ends up looking a bit off. This article points to some of these issues as well. Most of these issues are not always immediately visible on a first watch-through, but at some later point, you will watch your video, see the artefact and be very annoyed with it. As a result, my current workflow is to apply Neat Video almost by hand, only to frames or even part of frames, where there is obvious and disturbing dust or dirt. The general goal here is not to make the film look perfect, but rather to make it look as good as a very clean film may have looked back in the day when projected. Furthermore, I generally go by the principle that “natural” dust or scratches are better than weird digital artefacts.

The issue with this approach is that it takes a LONG time – often hours for just a 15 m roll of Super 8 film. As a result it slows down my scanning process significantly, which is why I am looking for a better solution.

Goals for the future

What I would like, is a workflow that is reliable enough to be applied as a one-click solution, i.e. that more or less removes most of the dust while producing (almost) no visible artefacts. Compute times are not so much a concern in this case, at least not for me, as you can just set and forget the software to do its thing and do other things in the meantime.

I’m not aware of any other approaches that can deliver this kind of performance. I know that DaVinci Resolve has similar tools to Neat Video (Dust Buster?), but my understanding is that they work in a very similar way to Neat Video and have many of the same strengths and weaknesses … but I’m interested in other people’s opinions on this.

Otherwise, I am planning to do some research on using Neural Networks to do this. This is my personal professional background, so to me it seems like the obvious tool for the job. Unfortunately, I’m not aware of any recent publications already trying something similar, not even for dust removal on stills images (film scans). If a good solution for the latter already exists, this would absolutely be a first thing to try on our motion picture films.

Closing words

With all that said, I’m looking forward to seeing other people’s solutions, and hope that this thread can become this forum’s collection of information dust and scratch removal.

In still photography scanners for slides and negatives, the Canon Super CoolScan came with “Digital ICE4” built into it’s software. It does an amazing job of removing dirt and repairing scratches. I relies on an InfraRed scan of the negative to get a map of physical imperfections and works to remove those. I don’t know if ICE (Image Correction and Enhancement) is available as a standalone, or if trying to integrate an IR scan would be worth it though.

It looks like LaserSoft, the maker of an ICE competitor iSDR (Scratch and Defect Removal) also have a software based SDRx that can remove dust and scratches without an IR channel (so can be used on Kodachrome and B&W). The Photoshop plugin is only about $50.

2 Likes

Using an IR exposure to locate the dirt works great. Those sites have good descriptions of the method, but you really get to see the magic when you look at the raw IR capture itself:

The left is some eBay Ektachrome footage under blue light. The right is the same frame lit by a 940nm IR LED. The light passes through the dye layers almost completely unimpeded.

Kodachrome is a bit of a troublemaker because of how dense the dyes are. The Wikipedia link above mentions that IR cleaning is less viable in that case, but for most other film stocks, it’s straightforward to use the result to automatically generate a mask for in-painting.

One curiosity: if you leave your focus position alone, the IR capture will look blurry compared to the visible light captures. Because index of refraction in most lenses (and air) is a function of wavelength and not just a constant, changing the wavelength of light actually changes the focus position. But it’s not a problem for this application because you’d probably apply a bit of blur to the dirt exposure anyway, before the thresholding operation that converts it to a 1-bit mask. It almost saves you a step by being a little out of focus.

3 Likes

Digital ICE is definitely a very cool technology. I especially love the elegant simplicity of the approach and that it really is pretty much hands-off and reliable. Technology Connections actually made a pretty nice video about Digital ICE some years ago, if anyone is interested.

If my film stock allowed for this, I think Digital ICE would be the way to go. However, at least when scanning Super 8 films, one is likely to encounter a LOT of Kodachrome. As noted by @npiegdon, Kodachrome does not necessarily play nice with Digital ICE. The video I linked, actually references this example of some of the trouble the cyan dye on Kodachrome can cause when using Digital ICE.

It looks like LaserSoft, the maker of an ICE competitor iSDR (Scratch and Defect Removal) also have a software based SDRx that can remove dust and scratches without an IR channel (so can be used on Kodachrome and B&W). The Photoshop plugin is only about $50.

@junker SDRx looks pretty cool for stills scanning. However, even in their demonstration video, it still needs manual intervention on a per-frame basis. Presumably it is using a comparatively simple approach of finding small near-black and near-white spots, identifying those to create a dust mask and then using an in-painting method that would otherwise be used with the infrared dust mask.

This talk of Digital ICE, however, gives me an idea. I was thinking of using a more intelligent neural network-based approach to create the dust mask. The part currently holding me back from actually putting this idea into action is that I would need a reasonably large dataset of scanned film frames and corresponding dust masks. So far, two ways of creating this dataset come to mind. The trivial one is to take a bunch of my scanned Super 8 frames with dust on them and draw the dust masks by hand. This would result in good and realistic dust masks, but obviously also in an enormous amount of work. The other idea would be to take clean frames or entire film scans and add dust in post using Photoshop brushes or one of those many filters for video editing software that are supposed to make modern video look like old films. In that case, we would know where we added dust and therefore have the dust mask. However, I’m not sure if this artificial dust actually looks similar enough to the real dust I am seeing in my own scans.

Now, here is the idea: I wonder if anyone has scans, including infrared captures, of their film using film stocks other than Kodachrome, and would be willing to make these available. This would make for a great dataset to train a neural network-based dust mask predictor which could then be used on film stocks that don’t support infrared capture of the dust, or scanners that are not capable of doing the same.

@jankaiser - great idea! And probably quite a challenge. I thought I list a few examples of what can go wrong.

The first thing is to reliably detect dust or scratches in your footage. Not an easy task, because small, fast moving objects might be things which are in your footage. Examples are plentyful, for example wind-blown thin tree branches close to the camera, a flock of birds fly up or a flagpole moving fast through your frame. Here’s a failure with fast moving small structures:

grafik

The lettering on the plane should read “Sabena” - obviously, only the last two letters survived the automatic dust removal.

Even if the patch is successfully detected, the next challenge is to fill-in appropriate image structure. With film material, we are in a better position compared to working with only a single image, as we might be able to “borrow” the missing information from a frame before or after the current one. For this to work, one needs a reliable motion estimation unit - a challenge by itself. Especially object borders tend to pose challenges to motion estimation algorithms; if wrong motion estimation is supplied, the wrong image information is sampled from the previous or following frame. In this case, there is still the posibility to use only the textural information in the original frame and fill in data from there. This process has been researched for quite some time, and many algorithms have been developed, including things based on fractal image coding and other means of texture analysis. Just for fun: we as human beings have a blind spot in our retina, and our brain is nearly perfect in filling in the missing data there - or have you ever noticed your blind spot?

Anyway, here’s an example from the same scene. While the large dirt spot was correctly detected, the in-filling algorithm failed to create a convincing patch:

grafik

Given, the algorithms do have a lot of parameters which you can tune to achieve better results - which is especially necessary in our small format scans, where also film grain noise is an annoyance. The “Automatic Dirt Removal”-tool of daVinci is doing a decent job most of the time and gets better with parameter tuning. For very difficult situations, there is also a manual “Dust Buster” tool available. If both fail, usually much more challenging and time-consuming manual work is required.

1 Like

The state of the art in this area is getting really exciting. It’s such an active area of research that this page keeps a running leaderboard of the new methods leapfrogging the old each year. (Clicking any of those “See all” buttons in the Benchmarks section will show a list of all the modern papers, some from this year.)

The results almost seem too good to be true in a lot of cases. Here’s a good demo video from a 2022 paper. (GitHub repo, here.)

If they can do that much for macroscopic features that persist across dozens or hundreds of frames, I can only imagine how much easier the small, single-frame dust features would be to fill in. I haven’t explored any of these (besides learning that they exist), but I’m excited to try a few methods out. That most of these papers have started including a GitHub repo with the source should make it easier to experiment with them.

1 Like

@cpixip These example were all done with DaVinci’s Automatic Dirt Removal, am I getting that correctly? Both problems you show are very similar to what I see happening with Neat Video’s Dust and Scratch Removal. However, while the first example absolutely seems to be something that would go wrong in Neat as well, the second seems to me like a scene with very little potential for such an “error”. Do you know what happened there?

@npiegdon Yes, the research that is happening on video in-painting is absolutely fascinating and the fact that many of these papers come with code and even their pre-trained models makes it all the more interesting. Because of this, I think in-painting once a dust-and-scratch-mask is available could already be easily improved over existing tools like Neat and DaVinci. Even the model architecture for creating the such masks is already well researched in the field of semantic segmentation, where the U-Net architecture is likely the obvious choice. Really, the main difficulty is generating a dataset (as it generally is the case in machine learning) of dust and scratch masks corresponding to scanned film frames. Unfortunately, dust and scratch removal doesn’t seem anywhere near as popular a direction of research as for example video in-painting is in the machine learning community, so there is very little prior work one could profit from.

Here is however some work that I’m aware of that goes a little in our direction.

This first one seems almost like an all-out approach at film restoration. I’m not sure if that’s even what I personally want, but nevertheless, I briefly but unfortunately unsuccessfully tried to get their code running a couple of weeks ago.

Here is what looks to me like some kind of university project removing dust from stills. I also tried to run this one some time ago, and I remember having some issue getting it to run, but I forgot what the issue was.

1 Like

well, I constructed it in order to go wrong… :sunglasses:

More specifically, I worked in another life over a decade on human and animal vision, and precise optical flow is very important part of the computations going on in our brain (in-painting as well). So I kind of knew where to search…

Here are the three base frames of the first example:

First, the base frame before the frame in question:

Now the frame actually analyzed:

and finally, the frame just after the frame analyzed:

Notice something? As usual in hand-held cinematography, especially when only recording with 18 fps, things tend to become blurry occationally. Furthermore, the lettering consists of repeating patterns (sort of). Both things can throw motion-estimation algorithms (optical flow) off the track. And indeed, this is what happened here.

The second example’s original frame is this one:

Comparing with the failure example above, one notices that daVinci’s plugin (and in fact, you are right, I used daVinci to create the examples) did a pretty good job in detecting the outline of the “dust” - only it did fail in the in-filling part. I suspect the main reason is the difficulty to do proper motion-estimation on very detailed structures - the little antenna structure the dust blob obscures is no help here. The new approaches typically utlize “intelligent” segmentation techniques to do this better, albeit at the cost of increased processing times…

If you look closely at the first example given above, there is a tiny scratch close to the cockpit of the plane. There are quite a few different types of scratches and dust and other things which show up in old footage. For fun, have a look here for some other examples of one might encounter when scanning old film…

1 Like

Have you seen the following projects?

https://github.com/daniela997/FilmDamageSimulator

https://github.com/mr8bit/old-film-scratch-detection

1 Like

This was a patented process by Kodak for many years, but I believe that patent has lapsed and anyone can do this now. Note that it will only work for physical dirt on the film (not on dirt that’s printed in, say on a duplicate element), and it doesn’t work on B/W film, only color.

A better approach to doing this in-scanner, in my opinion, is to create a dust map that restoration software can read using the IR pass. This is a monochrome file that’s the same dimensions as the scan, and is used by the restoration software to target automated fixes to just the areas marked on the map. That way you’re not decimating the grain, overly softening the image, or accidentally affecting parts of the image that are supposed to be there but might get tripped up in a filter.

We do digital restoration for a living and have for over 15 years, using all of the various commercially available tools on the market in that time (MTI, Diamant, PFClean, Phoenix). None of them will do it correctly in an automated way 100% of the time. There will be a ton of false positives, and without the correct tools in your software to identify where “fixes” have been applied, you might never know you wiped out a bunch of legitimate picture that the software thought was a defect. Our process is to run an auto-pass then watch it in “red” mode in Phoenix. This highlights all the fixes it made in red, which lets you look for patterns - objects that got picked up over several frames, for example, but are supposed to be there - and erase those fixes. Then we typically watch it 2-3 more times, looking for things that seem to flicker or don’t look quite right. While we’re doing these passes, we’re going through with the manual tools to clean up stuff the auto filters didn’t get.

And this is with software that costs thousands of dollars per year to license and is used at the professional level.

Software like Neat Video works on the whole frame, every frame, and is designed for unwanted noise, not the film grain that’s part of what makes film look like film. It will typically smooth out the grain, losing fine detail in the process. I mean, if that’s the look you want, that’s fine. Noise reduction has its place (especially as a preprocessing step before certain kinds of compression, to help optimize), but usually if you can see the effect of the noise reduction you’ve gone too far and have started destroying the original image.

1 Like

Nice! I have not seen them, though some weeks ago I’ve saved the paper that the first repository apparently belongs to. I have since thought of another way to generate data by using the films I have already cleaned mostly by hand and computing diffs to their dirty versions. It might make sense to combine both approaches. :thinking:

This process sounds very interesting! By highlighting the changes, it is certainly a much more time efficient way of making use of existing tools than what I’m currently doing. I wonder if highlighting the changes is something that can easily be done in Final Cut Pro.

Actually, Neat video allows you to use the dust and scratch removal without any of the denoising. That is in fact the way I use it, and in that case, the grain is completely unaffected and only the dust is removed (with the aforementioned limitations).

Interesting. When I looked at it a while back it didn’t work like that. I wonder how it determines what’s dust and what’s not. Same with scratches. Neither is an easy thing to correctly determine in an automated way without also picking up false positives in other parts of the film. The best restoration systems use motion analysis to try to figure out if something is supposed to be there or not by comparing to surrounding frames. This is hard to do when there’s a lot of subject or camera motion, or when the film is something like fireworks, or rain, or anything where you can’t easily track a single object from frame to frame.

It does a tempo-spacial comparison with the previous and next frame to find spots/scratches. It has the limitation/distortions listed above, but not bad for the money.
For the noise reduction part, it also has the ability to narrow the noise profile. That part works well with radically spatially different items (for example large 8mm film grain and small pixel sensor color noise). It is possible to set options/tuning to remove the color noise without affecting the grain. Again, not perfect, but incredible value for the money.
I used Neatvideo with Virtualdub2, and it has a lot of options for tuning/settings. I think they have become more aware of not taking all the noise, because one of the options is a slider to add noise back.
Virtualdub2 has the advantage of setting the chain of processing, so one can set the plug-in sequence. For example, first deshaker, then crop, then neat video. Something which may be harder to control in the editing software plug-in.

I have to say however, that my taste has shifted and somewhat now prefer the dirty look.The approach you describe to provide a sidecar IR is certainly the way to go, but for whoever wishes a cleaner look, and simple workflow, Neat is a very decent poor man’s alternative.

1 Like

I accidentally stumbled upon and read the paper associated with GitHub repository https://github.com/daniela997/FilmDamageSimulator

The actual paper
Simulating analogue film damage to analyse and improve artefact restoration on high-resolution scans

provides much more info than the GitHub repository.
For example

a dataset of 4K damaged analogue film scans paired with manually-restored versions produced by a human expert

The paper also discusses the difficulties of using machine learning for automated scratch and dust removal and compares several different methods for dust and scratch restoration.

The conclusion is particularly disheartening

All of the machine learning approaches we tested for film restoration perform well below the level required to be competitive with professional hand restoration.

On the plus side, the paper provides a large dataset of scanned images with manual corrections suitable for training a model. It also contains the previously mentioned model for generating synthetic dust and scratches that could augment the scanned dataset. The paper focuses restoration of still images. Perhaps the temporal nature of motion stabilized film can be leveraged for improved restoration?

2 Likes