My telecine machine

I want to share with the forum the machine that I have built.
It is based on an old 8mm / Super8 Ricoh Auto 8p Trioscope projector from 1975.
The reason for using the projector has been to have it available at home. It was broken and did not work as such a projector. Apart from this, in my case it greatly facilitated the task of transporting the film. It would not have been possible for me to build a machine from scratch, since although I have some manual skills, I do not have a suitable workshop.
So I removed all the unnecessary components from the projector and attached a new stepper motor with its corresponding driver.
The transmission is carried out by means of a toothed wheel and pinion, so that once the first frame is in position, it is only necessary to turn one complete turn of the main shaft of the projector to advance or back exactly one frame.
As you can see, the whole assembly can be closed with the original projector cover and I can have it on my desk.

Disassembled components:

Interior views:


I have recently modified the mechanical coupling to make the film transport faster and now it looks like this:

Illumination:

Lens and camera:

Back view:

Finally a video of the system in operation:

Greetings to all members of the forum.

4 Likes

Brilliant! Thank you Manuel!

I like your determination and ingenuity.

Nice very compact just a question what software are you using to capture the scans and control the PiPojector?? looks lik ea very nice interface… thanks for sharing i’m about to embark on my own build of a super 8 scanner for my families films…

Hi Kevin.

First of all, I thank you for your interest.

The software that I use in my DSuper8 project (Digitize Super8), I have developed myself. It is based on the original software from the rpi-film-capture project GitHub - jphfilm/rpi-film-capture: A project to capture 8mm and 16mm films using a raspberry pi & camera, and a modified movie projector..

When I made the decision to build my own system, I came across the rpi-film-capture project that I immediately identified with. It was just what I wanted to do.

However, the software is highly modified and adapted to my tastes and needs.

From the original software I have taken the following elements:

  • General appearance of the GUI, using the PyQt library.
  • Communication between the server (Raspberry Pi 3) and the main computer.
  • Use of independent threads and processes.

For my part, I have ported the software to Python 3 and added new functionalities.

An essential feature of my device, contrary to the vast majority of projects I have seen, is that it does not use any type of detector to determine the correct position of the frame to be digitized.

From the beginning I made the following reasoning: the original projector, when it worked as such a projector, did not use any sensor to correctly position the frame to be projected and, nevertheless, the image remained stable on the screen.

In my project I do exactly the same, thus avoiding unnecessary complications in modifying the projector and software.

After many digitized films I can assure you that it works correctly and with total precision, using the stepper motor and the gear transmission.

Now I am in the process of adapting the device to use the Raspberry Pi HQ camera. The original camera was the Raspberry Pi V1 which has the lens shading problem and therefore the software has to be adapted as well.

If you are interested in my software, I can send it to you (free of course) although the GUI is in Spanish, you can translate it yourself.
Personally, I run the software on Linux, both on the Raspberry Pi and on the main computer, although since it is written in Python I don’t think it is difficult to adapt to other operating systems.

Regards.

1 Like

Hello Manuel, very interesting project.
I sent you a mail with my email address so if you’re so kind to send me a copy of your software.
I thank you very much indeed
Mauro

very impressive yes would love a copy of your software. kdhildred5@gmail.com is my address.
Regards
Kevin.

I just finished upgrading my device. I have made the following changes:

  • Replaced the lamp. The old was 70 lm, the new 170 lm.
  • Replaced the old lens with a Rodenstock Rodagon 50 mm f 1: 2.8 lens.
  • Replaced the old Raspberry Pi V1 camera with a new Raspberry Pi HQ camera.

Attached are some photos of the current configuration of the machine.

New lamp.

Label of the new lamp.

Histogram obtained from the light provided by the lamp, after adjusting the gains of blue and red.
Histograma

Final configuration of the optical system and the camera.
From left to right: Rodenstock Rodagon - 28mm M42 Fixed Extension Tube - 17 to 31mm Variable Extension M42 Helical Tube - M42 to C-Mount Adapter - Raspberry Pi HQ camera.

By physical impossibility, due to the dimensions of the new lens, I have not been able to bring it closer to the film, in order to obtain more magnification of the frame, but anyway, in my opinion, the magnification achieved is sufficient.

Images captured with the new settings:

Full field of view covered by the camera.

Photo of the same frame with zoom applied.

Photo of the same frame with trimmed margins, corner rounding, and resize to HQ (1490x1080 px)

The images have been taken with my own software, with the following settings: Rodagon at f/5.6, iso 100, 6 shots per frame between 0.8 and 12 ms (4 stops), capture resolution 2028x1520 px. Applied Mertens fusion to obtain the final HDR image. All the aforementioned operations (zooming, cropping, corner rounding, Mertens fusion, etc.) are carried out on the fly as the frames are digitized. Only the final HDR image is saved.

Thank you for reading.

5 Likes

Dear Manuel, impressive build. I’ve just got a T-Scann 8 ready for scanning using the same HQ camera. Would be interested to know what your scanrate is? With the T-Scann 8 I currently get between 1-2 frames per second. I’m thinking to modify one of my Bauer projectors in a similar way that you did. Regards, Hans

Hello Hans,

Thanks for your kind words.

I find the capture speed of between 1 and 2 frames per second impressive using a Raspberry Pi in conjunction with the HQ camera.

In my case I have to admit that the capture speed is much slower.

In order to get final pseudo HDR images, I am currently digitizing with 6 images from each frame.

Due to the behavior of the HQ camera, to stabilize exposure times, two images are previously taken for each frame and sent directly to the null file. The third image is sent to the Mertens algorithm, so actually 18 images are taken from each frame.

Under these conditions the capture speed is one frame every 4 seconds.

I have to say that I am more in favor of quality than speed and with the mentioned procedure good results are achieved.

Using a modified projector we have the advantage of having solved the mechanical transport of the film. The positioning of each frame is exact, no additional processing is needed to stabilize the film.

You will inform us of the progress made.

Regards.

1 Like

Hello Manuel, Thanks for your remarks. I started half a year ago with a Bauer T502 and Panasonic HD camera (16,6 fps). Currently the T-Scann 8 results are a little bit better but the process is much slower. But the project helps me to learn the Rpi, Arduino and HQ camera. So I will be able to use this knwoledge for the Bauer projector scanner. Will keep you and others updated. Regards, Hans

Hello Manuel,

Congratulations on your design, I’m always admired of people that is able so complete such a project from scratch.

Same as Hans, I built the T-Scann 8 scanner, and I’m using it to preserve my family movies. As a former developer, I have also found the time to implement a post-processing tool (here) to automate and facilitate with the conversion to video, and even to modify the original software provided by Torulf in order to, same as you, adapt it to my tastes and needs :wink:.

Reading your answer I’m realizing what you have done with the HDR (pseudo or not) is something I could implement as well in my T-Scann 8 version as an optional feature (speed vs quality, as you say). So if you have the time, could you please add some details about how you handle it? I’m specially interested by your mention to the ‘behavior of the HQ camera’, and the fact you throw away the first two pictures (a delay won’t work?).

Thanks in advance for your replay.

Juan

1 Like

Hi @Juan,

Thanks for your kind words and welcome to the forum. This is a great place to share ideas and experiences in this world of film digitization.

Managing the Raspicam (V1 or HQ) is the issue that has caused me the most headaches.

In my software I have implemented several existing HDR algorithms in the OpenCV library, although in practice the one that has given me the best result has been the Mertens algorithm.

In a few words, it is about taking several images of the same painting with different exposure times.

The images are saved in an array and when we have the last one, they are sent to the HDR Mertens algorithm that takes care of selecting the best exposed pixels of each of the images and merging them to produce a final (pseudo) HDR image.

I am currently digitizing with 6 images per frame separated by 6 stop points, ie the fastest exposure is 0.9ms and the slowest 56ms.

The problem is that the Raspicam does not behave like a still image camera, but rather like a video camera, which is continuously taking images at a certain speed or framerate.

The first thing to know is that it is impossible to take a still image with an exposure time slower than 1/framerate.

For example, if we have a framerate of 25 fps, it is not possible to take an image with an exposure time greater than 1/25 s (40 ms).

For each image taken you have to adjust the framerate and the exposure time.

Unfortunately, the camera does not immediately adjust to the new exposure time we want, it is necessary to take several false images for the exposure time to stabilize.

In my case, I have experimentally verified that two false images are sufficient. The third image is the one I save to send to the Mertens algorithm.

I leave you links to the operation of the camera and the HDR algorithms of the OpenCV library.

https://picamera.readthedocs.io/en/release-1.13/fov.html

https://docs.opencv.org/3.4/d2/df0/tutorial_py_hdr.html

Best regards.

2 Likes

Thanks Manuel for your detailed answer, I was not aware about those details of the HQ camera, which obviously are a must before implementing such an algorithm.

I’ll go through the links you provide before I start. I’m using PiCamera2 but the information on the Pi camera hardware you provide seems to be good anyway, and I don’t see it in the PiCamera2 docs.

My only concern is the speed. I have already scanned about 70% of my films, so the prospect of starting again, at a much lower speed, is not fun, but if the resulting quality justifies it, I’ll go for it for sure.

Regards,
Juan

Update 5th Nov: So, after spending the morning with this, I have some news, good and bad.

Good news: Thanks to your directions, I could add the Mertens algorithm to my scanning app, using your same approach (6 steps between 0.9 and 56 ms). And yes, I can see a difference (I have tested only with one film for now).

Bad news: Mertens algorithm seems to be too much for the Raspberry Pi. The speed I achieve is 4 frames per minute, which is really a no-go (for a film roll with 15,000 frames it would required almost 3 days of continuous scanning, vs less than 3 hours with the 120 FPM I do without it).

In any case, I’ll keep the feature and look further into it, maybe some optimized algorithm might come in the future that produces a more acceptable delay.

Cheers

Juan

@Juan,

I don’t know how you currently do digitization with your machine.

Yesterday I was left in the inkwell to comment on the issue of exposure times.

In the same film there will be dark frames, which will need a long exposure time, and other much lighter frames that logically need a shorter time.

You have to vary the exposure time as necessary.

The autoexposure algorithm of the PiCamera library, in my opinion, does not usually give good results.

With the HDR algorithm we have solved the problem. With 6 exposures, we have a range of exposure times wide enough to cover almost all cases. The rest is done by the Mertens algorithm.

On the other hand, implementation of the Mertens algorithm on the Pi is indeed unacceptably slow.

In my case, the process of the images is not done by the Raspberry Pi.

The Pi acts as a server that sends the images to the client running on the main computer (PC) and this is where the fusion takes place.

I enclose a fragment of the log of my system, where you can see the capture times with a resolution of 2028x1520 px:

2022-08-08 18:35:18 - INFO - Waiting for image 1542
2022-08-08 18:35:18 - INFO - Received light on signal
2022-08-08 18:35:22 - INFO - Bracketing image 1542 received - 843455 bytes - Exp. time 493 us
2022-08-08 18:35:23 - INFO - Bracketing image 1542 received - 1067424 bytes - Exp. time 1145 us
2022-08-08 18:35:23 - INFO - Bracketing image 1542 received - 1309324 bytes - Exp. time 2631 us
2022-08-08 18:35:24 - INFO - Bracketing image 1542 received - 1350448 bytes - Exp. time 6059 us
2022-08-08 18:35:25 - INFO - Bracketing image 1542 received - 1305845 bytes - Exp. time 13915 us
2022-08-08 18:35:25 - INFO - Last bracketing image 1542 received - 1272489 bytes - Exp. time 31993 us
2022-08-08 18:35:25 - INFO - Image 1543 requested
2022-08-08 18:35:26 - INFO - Images fusion done
2022-08-08 18:35:26 - INFO - Captured image saved in: /home/mao/Super8/Pruebas-HQ/img00001.jpg
2022-08-08 18:35:26 - INFO - Frame advance signal received
2022-08-08 18:35:26 - INFO - Engine stopped signal received
2022-08-08 18:35:26 - INFO - Bracketing image 1543 received - 849885 bytes - Exp. time 493 us
2022-08-08 18:35:27 - INFO - Bracketing image 1543 received - 1107944 bytes - Exp. time 1145 us
2022-08-08 18:35:28 - INFO - Bracketing image 1543 received - 1272745 bytes - Exp. time 2631 us
2022-08-08 18:35:29 - INFO - Bracketing image 1543 received - 1346435 bytes - Exp. time 6059 us
2022-08-08 18:35:29 - INFO - Bracketing image 1543 received - 1323364 bytes - Exp. time 13915 us
2022-08-08 18:35:30 - INFO - Last bracketing image 1543 received - 1264395 bytes - Exp. time 31993 us
2022-08-08 18:35:30 - INFO - Image 1544 requested
2022-08-08 18:35:31 - INFO - Images fusion done
2022-08-08 18:35:31 - INFO - Captured image saved in: /home/mao/Super8/Pruebas-HQ/img00002.jpg
2022-08-08 18:35:31 - INFO - Frame advance signal received
2022-08-08 18:35:31 - INFO - Engine stopped signal received
2022-08-08 18:35:31 - INFO - Bracketing image 1544 received - 851721 bytes - Exp. time 493 us
2022-08-08 18:35:32 - INFO - Bracketing image 1544 received - 1110344 bytes - Exp. time 1145 us
2022-08-08 18:35:32 - INFO - Bracketing image 1544 received - 1311304 bytes - Exp. time 2631 us
2022-08-08 18:35:33 - INFO - Bracketing image 1544 received - 1294766 bytes - Exp. time 6059 us
2022-08-08 18:35:34 - INFO - Bracketing image 1544 received - 1288289 bytes - Exp. time 13915 us
2022-08-08 18:35:34 - INFO - Last bracketing image 1544 received - 1228847 bytes - Exp. time 31993 us
2022-08-08 18:35:34 - INFO - Image 1545 requested
2022-08-08 18:35:35 - INFO - Images fusion done
2022-08-08 18:35:35 - INFO - Captured image saved in: /home/mao/Super8/Pruebas-HQ/img00003.jpg

I find the 120 fpm scanning speed impressive for the Raspberry Pi, I would like to know some details such as capture resolution and setting of exposure times.

Regards.

Hello Manuel,

Yes, adding an extra system to the T-Scann 8 set-up would allow to improve the speed. It is a possibility I can (will) explore, although it breaks the concept of T-Scann 8 as a self-contained, independent unit.

Regarding the details you ask, here they are:
• Raspberry Pi 4B, 2GB ram
• Capture resolution: 2028x1520 (same as you)
• Exposure: Automatic
• White balance: Automatic
Exposure (and white balance) handling:
• Although automatic exposure was working fine for me (I’m not too demanding), I noticed that when transitioning between scenes with different luminosity, the HQ cam was taking a couple of seconds to adapt the exposure. So what I did (high level) was to loop before each snapshot, reading the exposure value from the camera, waiting for it to stabilize. For white balance I did the same.
As for the speed, there are a few factors to consider:
• OS: Migrating to Bullseye 64 bit is definitively the major factor I achieving higher speeds. To do this I had first to migrate the scanning application to PiCamera2 since the legacy version does not run on 32 bits (AFAIK).
• SD Card: Captured images are written to RPi SD card, 128 GB V30 Class 10 (this one). Writing to other supports (USB stick, NAS) is certainly slower.
• Application workflow: The original T-Scann 8 application was performing all tasks sequentially. I noticed that a big part of the time spent in each exposure was spent in two areas:
◦ Saving the file to disk
◦ Displaying the ‘preview’ image (see the note at the bottom)
So, in order to optimize those tasks, I created a couple of queues (save_queue, display_queue), along with some threads (1 for display, 3 for saving) that allowed to carry on those tasks in parallel with the main process. Not sure of the importance of this one (didn’t test the sequential version on 64 bit), but probably minor. Also worth mentioning, due to the speed, a delay of around 100ms is required before each snapshot is taken, otherwise the captured image would be blurry.
I copy below a table with the figures I took when making the tests (T-Scann 8 is the original app, ALT-Scann 8 is mine):
ALT-Scann 8 speed chart

And I think that’s about it. As you can see in the table above PiCamera 2 is definitively slower than the legacy flavor, however the 64 bit OS improvements compensate, by far, for that.

Note: One (not so) major drawback of PiCamera 2 is that the preview that can be used in a graphical environment (QtGL) is not really usable for this kind of application. One one hand it is too slow due to the context switch between preview and capture modes, and on the other, for this kind of use at least, it is quite inaccurate (what you see in the preview is not the same as what is captured). Therefore I opted to ignore preview altogether, and display to the user the captured image instead. And there is a processing cost for that, hence the optimization I mentioned before. Usability wise, after a while the user (me, at least) cannot tell the difference with a real preview. However, ‘real’ PiCam2 preview is still used for actions where it is mandatory (mainly focusing the camera).

Sorry for the extension of my reply, there are more details, but I think this describes quite well what I did.

Rgds/Juan

1 Like

Hello @Juan,

Thank you for your detailed answer where a high technical level is appreciated and by the way nothing boring.

Although I believe that the future is the Picamera2 library, until now I have not dared to use it, partly because I consider that it is in a fairly early stage of development and partly because the processes take place in the CPU instead of the GPU, therefore more slowly.

Things have changed a lot. When I started developing my system, it was quite a bit faster to send a file over the LAN than it was to save it to the Pi itself. Therefore I have never considered this last possibility.

Yes, I have done tests using a Raspberry Pi 3 as a server and a Raspberry Pi 4 as a client.

Although the set worked fine, the processing times using Mertens HDR fusion were unacceptable, so the client software ran it on a PC.

As in your case, the images that are displayed in the GUI of my system are almost in real time. These are the images actually captured, both preview and capture.

Regarding the issue of white balance, in my opinion, it depends on the color temperature of the lamp used. Once adjusted with the first image, the adjustment is constant for the rest of the scanning session. You can even make a fixed and definitive adjustment as long as you don’t change the lamp. I say this because possibly if this operation is avoided, we will save some time during the capture.

Regards.

1 Like

This is an interesting discussion. I have a few questions/comments!

The current version of the picamera2 lib reports the following capture formats available for an attached HQ-camera:

{'format': SBGGR10_CSI2P, 
 'unpacked': 'SBGGR10', 
 'bit_depth': 10, 
 'size': (1332, 990), 
 'fps': 120.05, 
 'crop_limits': (696, 528, 2664, 1980), 
 'exposure_limits': (31, 667234896, None)}, 
 
{'format': SBGGR12_CSI2P, 
 'unpacked': 'SBGGR12', 
 'bit_depth': 12, 
 'size': (2028, 1080), 
 'fps': 50.03, 
 'crop_limits': (0, 440, 4056, 2160), 
 'exposure_limits': (60, 674181621, None)}, 

{'format': SBGGR12_CSI2P, 
 'unpacked': 'SBGGR12', 
 'bit_depth': 12, 
 'size': (2028, 1520), 
 'fps': 40.01, 
 'crop_limits': (0, 0, 4056, 3040), 
 'exposure_limits': (60, 674181621, None)}, 
 
 {'format': SBGGR12_CSI2P, 
  'unpacked': 'SBGGR12', 
  'bit_depth': 12, 
  'size': (4056, 3040), 
  'fps': 10.0, 
  'crop_limits': (0, 0, 4056, 3040), 
  'exposure_limits': (114, 694422939, None)}

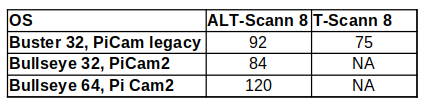
There is only one format (SBGGR10_CSI2P) which will give you frame rates of 120 fps. That delivers a bit-depth of 10 bit at a maximum image size of 1332 x 92 pixels. Assuming that the fps quoted in your table are calculated correctly, you are probably operating your camera in this mode. Note that you might not notice that immediately, as libcamera (which is what under the hood does the work in picamera2) might simply scale up the image to the resolution you are requesting.

On the other hand, I am rather sure that @Manuel_Angel ís using instead the SBGGR12_CSI2P-format, which maxes out at 40 fps, but operates at 12 bit-depth and a maximal image size of 2082 x 1520 px.

Just to round up the discussion of capture formats: the SBGGR12_CSI2P-format delivers images with 12 bit-depth and 4056 x 3040 px, but it is awefully slow. It maxes out at 10 fps.

There is no way to obtain higher frame rates within the hardware constraints of the Raspberry Pi (it is connected to the two CSI-lanes available between HQ camera and main board).

Coming back to the topic, since the SBGGR12_CSI2P-format (40 fps) does use binning at the sensor level, an image obtained with that mode is not that sharp as an image obtained with mode SBGGR12_CSI2P (10 fps/full sensor resolution) resized by libcamera to the 2082 x 1520 px resolution.

In case you are operating your camera in the SBGGR10_CSI2P-mode (120 fps), you are actually grabbing images of size 1332 x 990 px which will be enlarged by libcamera to the requested 2082 x 1520 px size. This image will be the least sharp of all three possibilities. Also, the native bit-depth of your captures will only be created from 10 bit raw data instead of the 12 bits the sensor is capable of operating with.

Another comment: the jpeg-encoding is done in picamera2 via software, it was done in the original picamera lib (the legacy stack) in hardware. That is the reason why picamera2 is slower than the original picamera. The speedup between 32bit OS and 64bit OS is interesting - I would not have expected that it is so noticable.

That is certainly an interesting observation. The SD you linked to is quoted with a write speed of 45MB/s; a portable Samsung SSD connected to one of the USB3 ports of the RP4 (>300MB/s) should be faster by a noticable factor. I have planned to do exactly such a comparision/test in the near future. Can you elaborate on your experience?

3 Likes

Hello Rolf,

Thanks for your reply, it contains some interesting information but I’m afraid I do not get all of it.

First, I don’t really know which capture format I’m using :flushed:. I’m just calling PiCamera 2 create_still_configuration with the resolution I want (2052x1520). Also, and this is something I should have make more clear in my previous post, the figures in the table are not FPS (I wish!) but FPM (frames per minute), which probably is something that can explain why the resolution I’m using is probably correct. Anyhow as soon as I have time, I’ll try to dig into this, I would like to know now.

As for the media, I didn’t dig further in my tests (NAS, USB stick, SD card) since with the SD Card I got a speed that not only I was happy with (almost double the original design) but that also seemed like an upper limit for this particular scanner (as I had to add a delay before the capture to allow the film to completely stop). Writing the images in a parallel thread (actually 3 of them, not sure all are needed) is about the only optimization I could think of. But of course, if you have any suggestion, I’m interested!

Regards,

Juan

Ok. That:

solves this mistery :upside_down_face:

I get about 20 frames per minute in my current capture setup. These are five different exposures per frame streamed to a WIN10-PC. On the PC, it takes 1.6 seconds to process the five 2028 x 1520 frames into the exposure-fused result - but that is done offline, after the scanning. 20x5 frames = 100 frames per minute, that is comparable to your speed. However, the server used is only a Raspberry Pi 3+ with a 32bit OS.

Just swapping this with a RP4, I get about 27 frames per minute (which are a stack of 5 exposures per frame each). That would be equivalent to a total of 135 frames captured and transferred per minute. These timings are with a 930 ms delay for the scanner to advance the film after capturing the exposure stack of a frame. I can also confirm that changing the RP4 OS from 32-bit to 64-bit results in a small speedup of 5% or so.

The numbers are obtained in the mode SBGGR12_CSI2P (40 fps camera frame rate) which is equivalent to the mode 2 of the old picamera lib. With the camera running at full resolution (the old mode 3), the camera itself does not deliver more than 10 fps and things would be noticably slower.

(Note for all my following comments: the picamera2 lib is still in beta, so these things might change.)

Let’s discuss now the sensor modes a little bit more in detail. The HQ camera features within the picamera2 context 4 different basic modes (listed above). If you simply request a certain image size, libcamera will look at these basic modes and select whatever mode it thinks will work for you. It will than capture at that resolution, but will deliver you the image size you have requested, by scaling the raw image appropriately. That might result in either unscaling or (most often) in downscaling the raw image data.

If you do not want that behaviour, you will need to request a certain “raw” capture mode during intialization. That is described in the following discussion-page at the picamera2 repository. In addtion, now that the manual of picamera2 starts to be actually quite usable, so you might want to take a look here.

Another point I want to mention: you should be able to speed up image capture by not using the still configuration, but the video configuration. In the still configuration, the camera pauses, takes a few frames to figure out exposure and white balance, and only after that has been done, your requested frame is being delivered (at least this was the case in the alpha-version of the lib). In any case this is different in video mode, were the camera needs to run continously.

Furthermore, the number of buffers in still configurations are by default less than in video configurations, so you might run into resource problems when heavily using still configurations. You can however increase the number of buffers libcamera uses also in the still configurations. Also, there are other differences between still and video configurations, most noteably the amount of noise processing, you might be interested to check what parameters are used.

I am currently investigating the possibilities and issues of the new picamera2 lib (or, more specifically, the libcamera/picamera2 approach), in case you want to investigate this further.

The client-server approach that @Manuel_Angel is using is quite common in practice. Streaming 2028 x 1520 px images via LAN from a RP3 to a WIN10 machine at 4 fps results in a transfer rate of about 25 MBit/s - nothing a LAN can not handle. And that is live preview, in actual capture mode, the requirements are even lower, as not every image cpatured is streamed. At the high end machine exposure fusion can be done noticably faster (about 1.6 sec for a stack of 5 exposures of size 2028 x 1510 px).

I have been proposing exposure fusion for a long time (search the forum here), as it is one of the ways to handle the large dynamic of color-reversal stock. Worked fine with the old picamera lib based on the Broadcom ISP, but does yield less than satisfactory results with the new picamera2, based on the libcamera2 ISP. The reasons are many and can be attributed to bad implementation choices in libcamera. Also, some of standard tuning files shipped with the Raspberry OS are less than perfect.

So another approach I am currently investigating is to capture raw data (not jpegs) and create image data from the raw images by my own pipeline (so libcamera is basically out of the equation). The results look promising so far and better than what libcamera is able to deliver. However, a single raw capture for each film frame has not enough dynamic range. To handle the dark image areas, one has again capture several images of a single frame with different exposure settings. How to combine these raw images into a single raw image with bit depths of 16 bit or even float is my current subject of research.

In any case, the sizes of raw images are not managable with continuing streaming the image data via LAN to a PC. That’s why I am interested in your tests with SD and USB sticks. Generally, it is probably better not to use the SD card for a lot of storage operations (google “sd card corruption raspberry pi” for some fun read).

2 Likes