Super-8 enhancement, progress report

hmmm… - there exists a VLC version for Mac OS X. You might want to install this player and check how it is doing with the video file in question. Again, I downloaded my own video file and tested it with WIN10 software, namely VirtualDub and VLC (for Windows). Everything worked fine…

I am neither a Mac user nor a Final Cut Pro user; however with Windows-software, you often ran into troubles between incompatible DirectShow-codecs, sometimes left over from some old installation. Again, this video file was specifically prepared for @dgalland to try out his avisynth-scripts, and he has not yet said anything on how the video file works for him. Nor has anybody else noted any issues. Frankly, I do not know how to solve this issue…

well, that’s no bug but a feature! This is the raw footage as it came out of my scanner/exposure fusion software. It is not color-corrected at this point in the processing pipeline on purpose. I am doing color-correction as the very last step of the editing process.

Note the histograms reveal that only a part of the full dynamic range of the frames are used - this is done on purpose, to be sure that during post processing work no clipping of data can accidentally happen. That “there is still a lot that can be corrected in the shadows and highlights” is actually the whole purpose of my scanner/software design. :innocent:

Would it be helpful for you if I try to re-encode the file in a more standard format, like 1920x1080 px and adjust a little bit the image intensities?

No thanks, I just wanted to test the stabilization using the punch hole in Final Cut Pro and/or DaVinci Resolve Studio. But your clip doesn’t play smoothly in either program.

Oddly enough, it just plays in Adobe Premiere Pro.

@Hans: just out of curiousity, I downloaded the clip again (just to be sure that Dropbox didn’t recode) and stuffed it in my DaVinci Resolve - guess what, no problems playing the file at all on my Win10 station.

Tested again with all programs I could find on my PC: VirtualDub, VLC, DaVinci Resolve, Magix Video deluxe Plus 20.0.1.80 and finally the Windows Media Player (current and “classic” (the later from 2011)). The video file worked with all these software.

Maybe the video stream settings of this file are a little bit too much off with respect to the standard ones. This video file was encoded at a resolution of 2016x1512 px and a frame rate of 18 fps. Not the usual 1920x1080 px @ 24 fps.

Also, in the video file which you have trouble decoding, the sprocket hole has already been stabilized.

So here’s a better example: I have encoded with 1920x1080 @ 18 fps (which should be closer to the standard) the raw prime scan of this footage (at a lower 1920x1080 resolution), which is a much more challenging footage for sprocket stabilization. Have a look at Example Scene 03-04 LDR01 raw.mov and see how this works in your setup.

@cpixip
I’m using Final Cut Pro even before Apple officially announced it, even had to sign a Non Disclosure for it.
The size of the format will not be the problem, I also edit with 8K Apple ProRes RAW. And Final Cut Pro is one of the few NLEs where you can place all formats, fps and codecs in one timeline and play and export everything perfectly.

The reason that the clip now plays properly will not be the format, but the encoding.
The first version was AVC (High@L5) (Cabac / 2 Ref FRames) and the second AVC (Main@L4) (2 Ref frames) encoded.

And it is indeed surprising how well Final Cut Pro stabilizes the images. You certainly don’t have to come up with another difficult solution such as LED, laser or OpenCV.

Thanks.

:+1: fine that this worked!

A further update. Recapped my old own work on motion estimation (neural network stuff, but in the 1990’s), read about the current state of the art (mainly neural network stuff utilizing GPUs) and digged further into the avisynth-motion estimation stuff. (The goal is: can we improve the visual quality of raw scans of old Super-8 footage? It follows a path initially started with VideoFred’s (Freddy Van de Putte) avisynth scripts, with a lot of people coming up with own versions.)

The avisynth motion estimation stuff is mainly based on classical algorithms, very much similar to what is used in video-encoding like h.264 and the like. Lots of rather undocumented parameters to play with.

The new neural network stuff looks promising, but has two disadvantages. First, work is focused on video material, and analog film is quite a different beast. So at least a retraining would be necessary for film stock. Not sure how these approached would perform on challenging film grain like the one present in small format films.

Another point is that example implementations of these new neural network stuff are often based on specific programming environments, in this case mostly piTorch, which in turn requires specific hardware to achieve a decent performance. That’s a plan for the next year.

So in the meantime I dug futher into the parameter hell of avisynth’s motion estimation engine and could improve the behaviour of this algorithm with respect to film grain. Here’s an example, using my favorite test clip.

In order to isolate the effect of the film grain on the improvement process, I stabilized the footage in daVinci Resolve before running the algorithm. A cut-out of the original scans (displayed for reference in the lower left) shows that the source (KodaChrome 40) is noisy all over the place, even in well-exposed areas. As expected, the noise gets worse in the darker image areas (this is due to the way these color-reversal films were engineered). Both the amplitude as well as the spatial extent increase. To the right, the same cut-out is shown after processing. There is still “pixel dancing” visible, no question, but the situation is improved from the results presented at the start of this thread. The recovery of structure especially in the darker areas of the source is quite noticable. Note that this is exposure-fused material (5 exposures into one) - the dark areas in this footage would be nearly black in the best overall single exposure.

So, in summary, it seems possible to recover image information from grainy Super-8 material beyond what is usually visible in a normal scan. I have other film stock (like Agfachrome and Fuji) which have even more film grain than Kodachrome and I have not yet tested these. However, for my goal resolution of 960 x 720 px, the results with Kodachrome stock are already usable.

2 Likes

That’s remarkable.
I do see a bit of dancing blocks, not sure if it is vimeo. But the improvement of the noise/details is remarkable.

:smile: - well, this is probably not vimeo, in this case!

I am still searching for the right settings, which is challenging within the avisynth environment. I can only guess the impact of most parameters available in the motion-estimation engine. They are basically not documented.

At this point in time, I am using the avisynth stuff to give me an idea on what might be possible; if the improvements possible validate further developement, I think in the end I will roll my own software so that I know what the different parameter are doing.

In the example above, I needed to cheat slightly - in order to make the pixel dancing visible, I had to stabilize the footage. Since after stabilization, the scene was mostly static (if you look closely, you see a slight perspective shift), the result above is very similar what super-resolution algorithms would achieve - given that the motion estimation was perfect. Of course, the motion estimation gets fooled by the film grain, and that is what I wanted to test.

Now, additional challenges to motion estimations are also large movements in the scene, as well as scene changes itself. The later introduces one or two initial frames where not enough data is available for the faithful reconstruct of these frames. So in restored scenes, you might notice a little pumping of quality between scene cuts. One way to get rid of this is of course to cut away the very first and last frame of each sequence, which is most of the time no big deal.

Much more challenging are fast and large motions within a scene. Here, chances are that the motion estimation fails, leading to visual artefacts. Yet other challenges lurk: one has to do with thin, elongated objects (they tend to be overlooked by motion estimation algorithms), the other with transparent objects (up to my knowledge, not motion estimation algorithm can handle this yet).

Whether the errors in the motion estimation are noticable or not depends on a number of things, most notably on the original content of the scene. In the end, it’s the viewer who decides. My current challenge is to test various parameter sets on various scenes in the hope to find a generic, balanced set of parameters which works with most material.

In this respect, here are current enhancment results of two scenes which contain large image motions and huge exposure variations. It’s from a 1981 Kodachrome movie, taken with a different Super-8 camera and a different scanning camera than the clip discussed above.

On the left is the original 5 exposure fused scan, on the right the enhanced version. Top-left is the best single exposure scan included for reference. You might want to set the playback quality to the highest setting and even reduce the playback speed to 0.5 for this one, as the movements are quite fast. Therefore, here’s an additional framegrab

The improvement is not so visible as in the previous example, but the difference between left and right image is quite noticable in man in the foreground. At least in this example which was processed with the same parameters as the clip posted above from Jordan, I am actually ok with the results so far.If you look closely at the very last frames of the first scene, you will notice some strong artefacts, due to the failling motion estimation there. However, when the sequence is run at the normal 18 fps, it’s hardly noticable.

Thank you for the complete explanation.
In the latest clip I could not see the same blocks, perhaps because of the movement. The improvements are noticeable and certainly worthwhile the effort.
A couple of observations.

  • In the latest clip what I do see is a flash of grain on the blue sky (upper left side) second 5 or 6.
  • Some of the very fine detail embedded in the noise is taken away. In the still there are faint powerlines visible, and in the bicycle wheel lines.

Understand this is a compromise between enhancement, denoising, and perceived quality. The above observations are certainly a good trade-off for the improved picture.

In regards to the previous clip, I noticed that the dancing blocks are more apparent in the dark areas. I played the click at 1080 at 0.5 speed.

I think one clue may be that due to the stacking, the resulting image would have different noise profiles in different areas, which would make it very difficult to have a setup to catch all. One way to confirm that hypothesis would be to apply your process on each exposure separately, and finalize with the stacking. That may not be practical for a final solution (for the times fold processing) but at least it would help you on locating the source. That is also apparent on the second clip where the noise ‘visibility’ is inversely proportional to the luminance of the area. Clear areas are clean, and noise increases with lower luminance.

If I understood correctly, the current process order is 1-stacking/merging 2-Davinci 3- Avisynth. The test to check the hypotheses could be 1- stabilize each exposure, 2 Avisynth to each exposure, 3- stack/merge.

One additional consideration, in the above you may have different noise profiles for each of the exposure tracks.

It is a bit of a rabbit hole, but it would help you understand the issue. Hope it helps.

For sure, in avisynth the denoising part is the most difficult to understand and to implement. I didn’t go as far as you did and only compared experimentally different plugins, among the most recent ones TemporalDegrain and TemporalDegrain2. I chose TemporalDegrain which gives me better results than TemporalDegrain2 and never worse. Then I experimentally adjusted the parameters of TemporalDegrain and my current settings are:
denoised=cleaned.TemporalDegrain(sad1=800,sad2=600,degrain=3,blksize=16)
Increasing sad1 and sad2 increases the denoising
Making three passes with degrain=3 improves the result
An example of deshake, clean, degrain and sharpen on a very noisy movie
https://vimeo.com/661809566

1 Like

Pablo and Dominique, thank you very much for your feedback! Always a pleasure to exchange ideas with you!

Dominique, your vimeo restoration result looks great. I can see some detail loss, for example the brick pattern on the brigde @ 00:23, and some noise pumping, for example @ 00:48, where the algorithm probably lost track of the motion vectors. Also, I can notice some “pixel dancing” (which might however be attributed to the vimeo recoding). But, this is really an impressive restauration, making lost history alive again!

The various scripts for degraining and denoising available are indeed amazing and, after the pain of installing all required libraries for a certain script, yield generally great results. I think a lot of these efforts to improve grainy Super-8 color-reversal material is based on the initial avisynth-script of Freddy Van de Putte. Later, Dideé and others introduced TemporalDegrain 1.23 (which is not aimed at treating real film grain - it was developed to handle artifical film grain introduced for aestetic reasons in the movie “300”), followed up with TemporalDegrainV2 (the old version I am using has some bugs which were supposably corrected in Feb 2021). There are various other restoration scripts around, most notably John Meyer’s version, which runs a little bit faster than the TemporalDegraining scripts.

Basically all of these avisynth-scripts are heavily based on a single motion estimation library, namely version 2 of MVTools. They differ mainly in the technology used for the spatial denoising and in the iteration level of the degraining operation (single or multiple degraining cycles).

I wanted to have finer control over the results so I came up with my own scripts. Let me show an example of what I mean.

To the left is the original source image, in the middle display the result of my current enhancement script. To the right, for comparision, the result TemporalDegrain v1.23 with the parameters stated above by Dominique (“TemporalDegrain(sad1=800,sad2=600,degrain=3,blksize=16)” is shown. For both script outputs an identical sharpening operation has been applied. Now, while I think that the TemporalDegrain result looks a little bit sharper overall, notice the loss of detail in the concrete paving. It is these tiny adjustments that I am after - and that is difficult within the context of the original scripts I linked above for reference.

Spot on Pablo! There are different noise profiles for differently exposed image areas. This is an intrinsic property of the film material. Every color channel (magenta/cyan/yellow) in those old color-reversal film stock is actually composed of at least three sublayers of different sized silver halogenide crystals. The tiny ones need a lot of light to get exposed, the larger ones just a little bit of light. So the spatial noise distribution of the exposed silver halogenide crystals and in turn the distribution of the dye clouds (this is what we are scanning) is different in brightly exposed image areas compared to the darker ones.

I actually went into that rabbit hole you suggested (processing each exposure separately before exposure fusion) a while ago. Up to my astonishment, visually, there was not really any improvement noticable, compared to just processing the exposure-fused result. Well, at this point in time, I was still using the Temporal Degrain script as a basis for processing and I might not have gotten the parameters right. I will revisit that topic once I have a better command of my restoration script…

Well, and finally: I was able to solve the initial issue I started this thread about, the “dancing pixel” issue. The solution is simple: the window size used for processing has to be large enough to average away larger spatial intensity variations due to film grain. Increasing the window size used for processing from previous 8x8 to now 16x16 solved the problem. I get about 10 fps processing speed with the source resolution used in the example below (1008 x 1212 px). Thanks everybody who responded!

3 Likes

I think we can trust TemporalDegrain, for me the version 2 gives me less good results.
On the loss of detail it must be said that in:
TemporalDegrain(sad1=800,sad2=600,degrain=3,blksize=16)
The sad parameters are probably a bit exaggerated, the default values are only 400-300
I had chosen blksize=16 to increase the fps, it’s interesting and finally logical to see that it made the “dancing grain” disappear! It must be said that all these scripts were designed at a time when the resolutions were lower.
Finally, note that in my example I applied a recipe from videofred for sharpening
sharpened=source.unsharpmask(30,3,0).blur(0.8).unsharpmask(50,2,0).blur(0.8)
you should try it, the result is really good.

yep, that is a good filtering approach, especially if you are aiming at lower resolutions, say 720p or so. Otherwise, I think I would adapt the filter sizes chosen a little bit to smaller values. On the other side, the filter sizes you listed are also quite effective in order to get rid of some of the remaining pixel noise. And one could always add some sharpening later, in post production, if needed…

Interestingly enough, most people, including videofred (Freddy Van de Putte) add as a very last step some small amount of the original footage back to the restoration result. This tends to cover up some of the restauration errors which will sometimes creep in. I remember some race footage of videofred were one of the (fast-moving) legs of a bystander was amputated - barely visible in the final version with a tiny amount of noise added… :upside_down_face:

Excellent results Rolf.

Personally, I don’t like the sharper/washed/cleaned results that make old 8mm film look like video. I know is a matter of taste, but I really like your results because the surface texture is not lost.

The last clip looks amazing (for my taste) just enough texture without loosing details, and a significant reduction of noise(grain). Excellent work.

Ok, I think it’s time to summarize some bits and pieces distributed over this thread.

First of all: I think everybody agrees that it is possible to enhance existing Super-8 color-reversal scans.

Mostly, that stuff is done with the help of avisynth-scripts and appropriate libraries. Here are again, for reference, links to various scripts which were developed over time: one of the first was the initial avisynth-script of Freddy Van de Putte. Later, Dideé and others introduced TemporalDegrain 1.23, which @dgalland and me are considering to be more stable than the newer TemporalDegrainV2. There are various other restoration scripts around, most notably John Meyer’s version.

Avisynth and the installation of these libraries is not easy, as there are multiple and non-compatible versions of the libraries floating around. I think the easiest way to get a working system together is described in @dgalland’s gitrepository (in french, google translate).

Below I represent restoration results on a very specifc footage. It is an over 40 years old Kodachrome 40 film stock which was developed more than a year after the initial exposure. That is probably the reason why it shows a somewhat more pronounced film grain than usual Kodachrome 40 stock. Also, little black speckles can be seen in some areas.

Many of the scenes in this short clip are backlit, so film grain is paired with reduced contrast in shadow areas. In addition, there is a lot of dirt visible in this scan - the film was not cleaned beforehand.

The frames were scanned at a resolution of 2880 x 2160 px, with five different exposures per frame. The best single exposure of the original scans is displayed in the top-left corner of the clip shown below. As you can see, my scanner is not particulary good at sprocket registration.

The left subframe marked “Source” is the result of sprocket-registration and exposure fusion. At that point in the pipeline, the image is scaled down to a resolution of 2016 x 1512 px. This is the resolution all further processing was performed. The final resolution was set to 960 x 720 px.

The right subframe is actually divided into three sections, displaying the results of three different scripts. The left “DeGrain” part is the current result of my own restauration script, still a work in progress. The middle “TemporalDegrain A” part shows the result of the following simple script (following @dgalland’s suggestion for the TemporalDegrain 1.23 filter):

amp = 4.0
size = 1.6

denoise =  source.TemporalDegrain(sad1=800,sad2=600,degrain=3,blksize=16)

blurred  = denoise.FastBlur(size )
TemporalDegrain_A  = denoise.mt_lutxy( blurred, "x "+String(amp)+" scalef 1 + * y "+String(amp)+" scalef * -", use_expr=2)

Here, “FastBlur” is an additional avisynth-library which can be downloaded here.

Finally, to the right, the result of the following short script

denoise =  source.TemporalDegrain(sad1=800,sad2=600,degrain=3,blksize=16)

TemporalDegrain_B  = denoise.UnsharpMask(30,3,0).blur(0.8).UnsharpMask(50,2,0).blur(0.8)

is displayed. This is the “sharpening”-filter proposed by Freddy Van de Putte (videoFred).

I think one can state that generally, some form of degraining with a little bit of post processing does enhance the quality of the footage. “TemporalDegrain B” seems to be as sharp as the original source footage, but with basically all the distracting film grain gone. So I think it’s fair to state that the post processing with the videoFred-filter (“TemporalDegrain B”) seems to be tuned to the actual resolution one can expect out of color-reversal Super-8 material.

However, if we employ a different post processing scheme (the one used with “TemporalDegrain A” as well as “DeGrain”), we actually recover more than what meets the eye in the original source. This is due to the fact that noise reduction and super-resolution algorithms are very similar at the basic level.

Of course, reconstruction errors become also more visible as you “enhance” the footage - so any final look will probably be a balance between “TemporalDegrain A” and “TemporalDegrain B”.

4 Likes

@cpixip
So that’s it for the denoise, what do you suggest for the other steps?
For stabilization I use the virtualdub plugin more efficient I think than the Depan avisynth for edge processing.
See a comparison deshaker/depan
http://www.pate15.eu/avisynth/depan/depan_deshaker.html
(in French but interesting)
For cleaning I use :
cleaned=source.RemovedirtMC(30,false)
like videofred I think, I haven’t studied much about it and I don’t know if there are better methods.

@cpixip thanks for the summary, very helpful.
One question on the workflow, actually a follow up of @dgalland above. And sorry to open another rabit hole.

I did some work with virtualdub (actually virtualdub2) and noticed that some of the filters limit the bit depth to 24/pixel (8 each channel). If I am not mistaking, that was one of the drawbacks of Deshaker.

Virtualdub processing supports RGBA64 (which would make it 16 bit per pixel). And the Virtualdub FFMPEG/x265 compression supports up to 12 bit. I was able to process video, and more importantly, play it it with the native Samsung TV using x265 and 10 bit depth. The source for these was a single exposure (12 bit NEFF).

I have yet to complete the stacking setup, which would likely be with the raspberry HQ. But one aspirational goal of the stacking/mertens -for me- would be to end up with -at a minimum- 10 bit per pixel… again, it is an aspiration, let’s see how reality ends.

Since I haven’t done any work with Avisynth, curious on what is the bit depth for some of these processes/libraries.

Thank you.

Well, here’s an overview of my current work flow. Remember that my scanner is mechanically quite unstable, so I need to have a few additional processing steps not necessary for other setups.

  1. Image Aquisition: a classical Client/Server-Setup, with a Raspberry Pi 4 running as a server, reading from a connected HQ camera, and a WIN10-PC as client, storing the five exposures taken into separate directories. No recoding is happening here, just the “raw” MJPEGs coming from the HQ camera are stored to the disk.
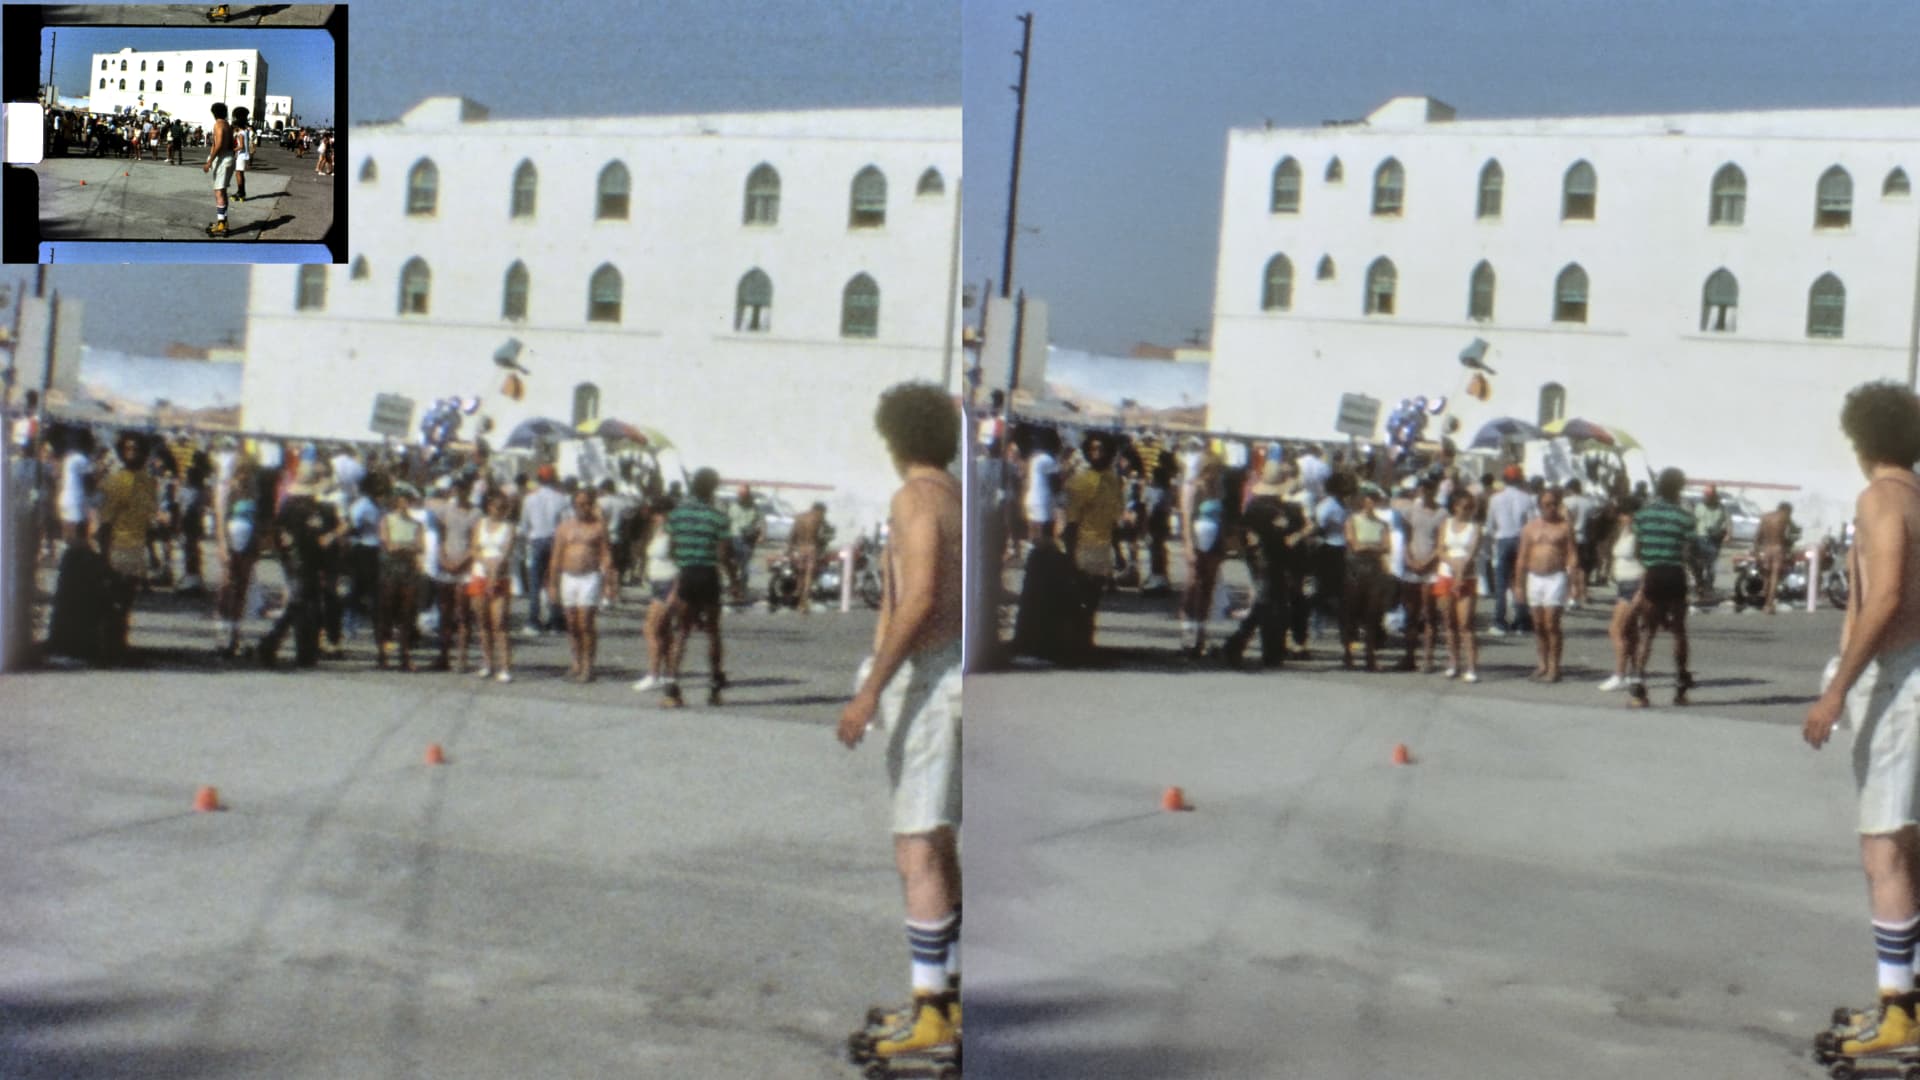
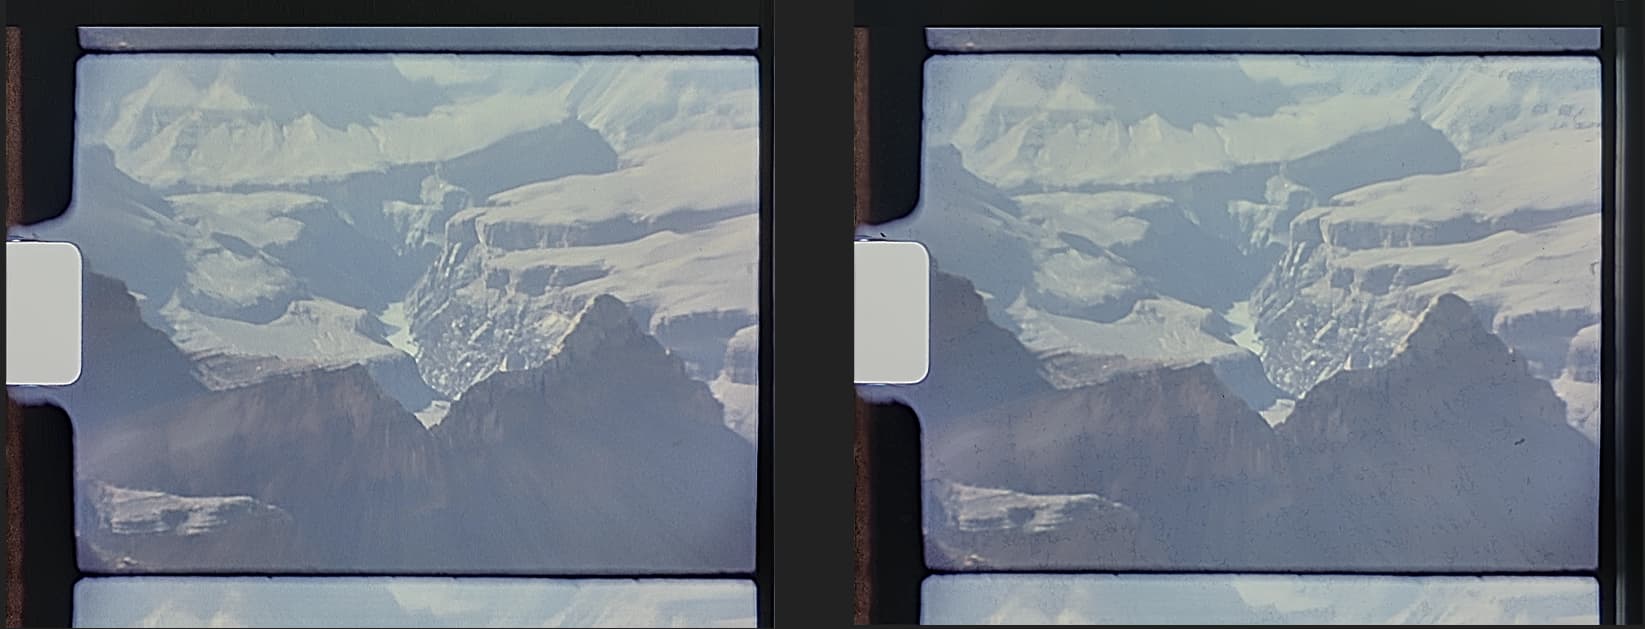
    The clip shown above was actually scanned with a different setup, namely a See3CAM_CU135 camera, connected to the RP4 via USB3 - that’s why the resolution of the raw scans is 2880 x 2160 px, not my usual 2016 x 1512 px. The client- and server-software is written in Python, with a little help from opencv and pyqt 5.

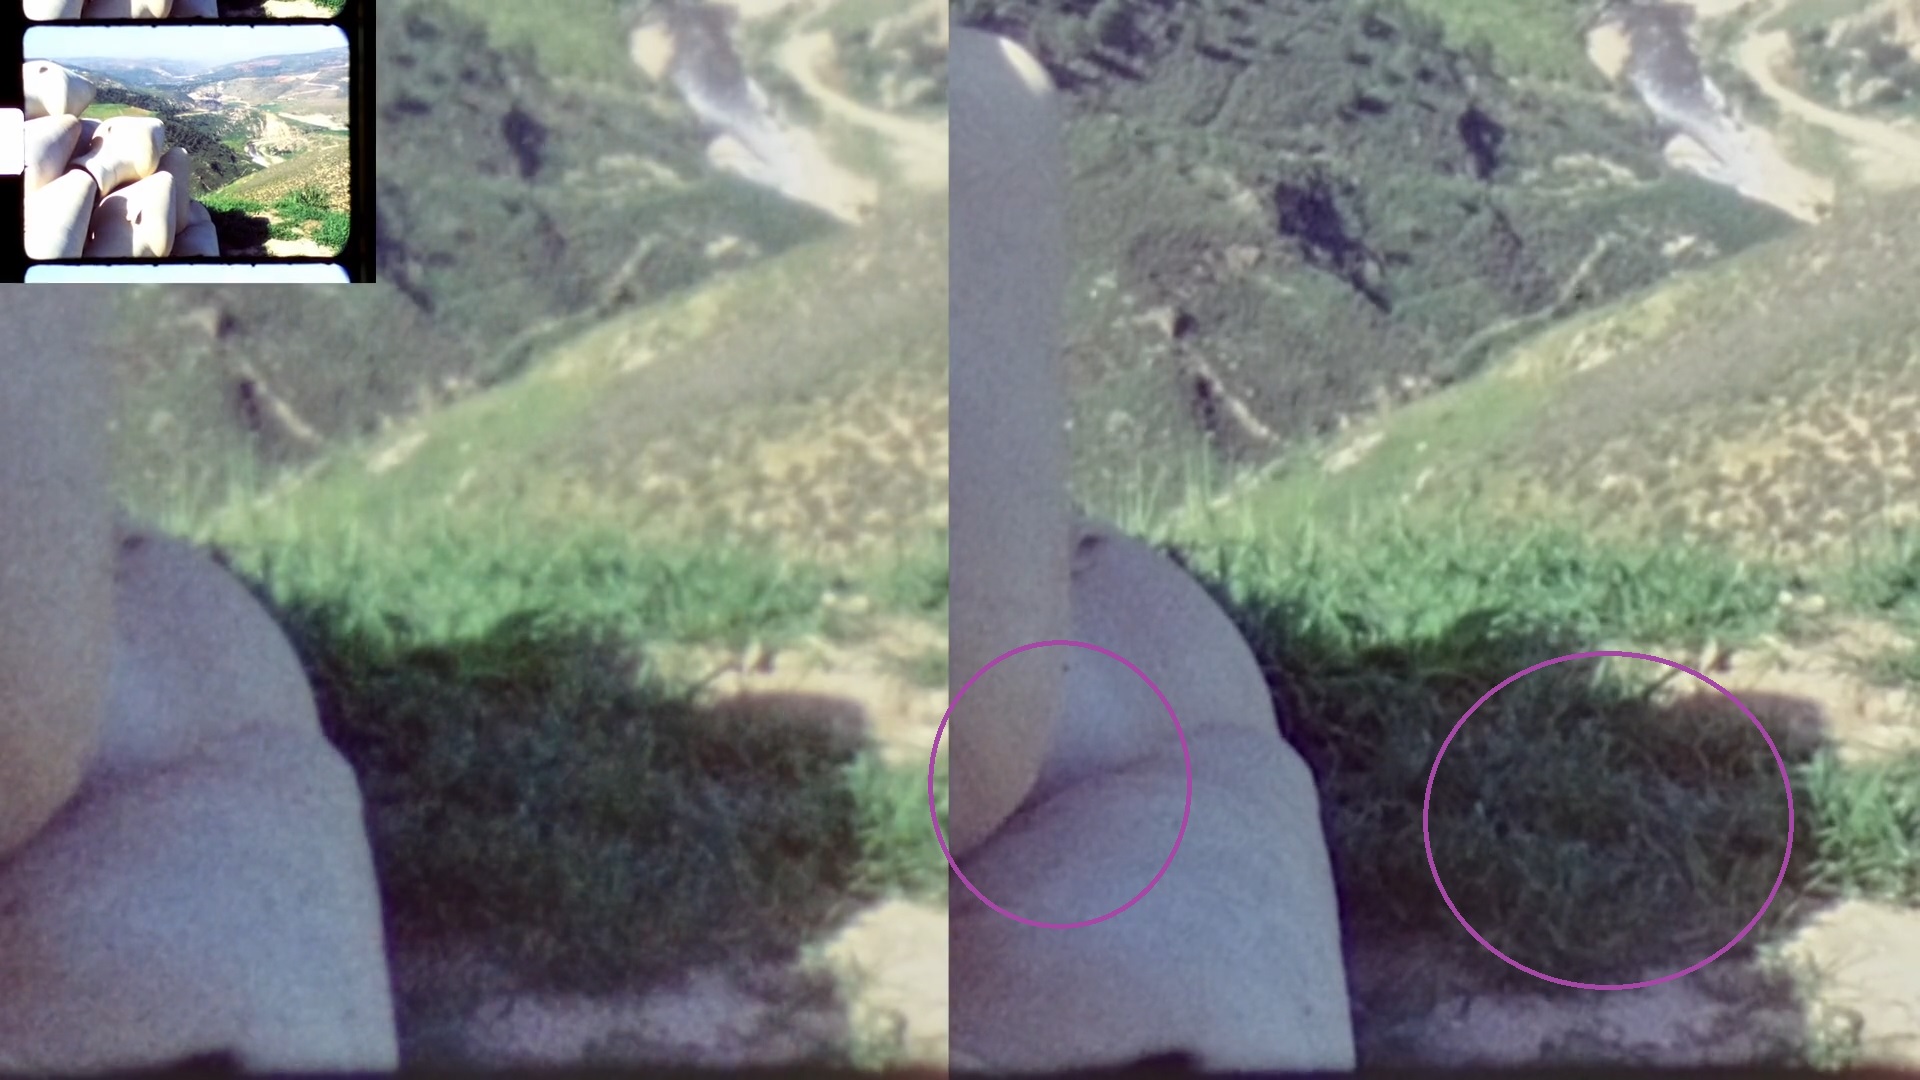
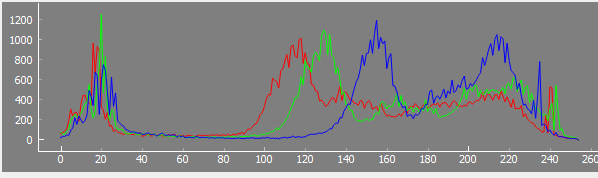
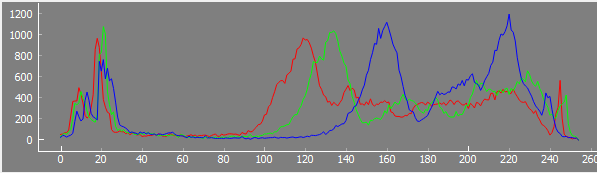
  2. Exposure-Fusion: again a python-script which reads the five raw exposures and converts them to a HDR/log-like image, as shown in the above clip on the left (“Source”). The exposure fusion script does the following steps in sequence: a) initial sprocket-registration b) subpixel-registration between the five frame exposures (necessary because the frame moves between exposures with my scanning setup) c) exposure fusion and finally d) saving the image data in a separate directory as 16 bit/channel .png-files.

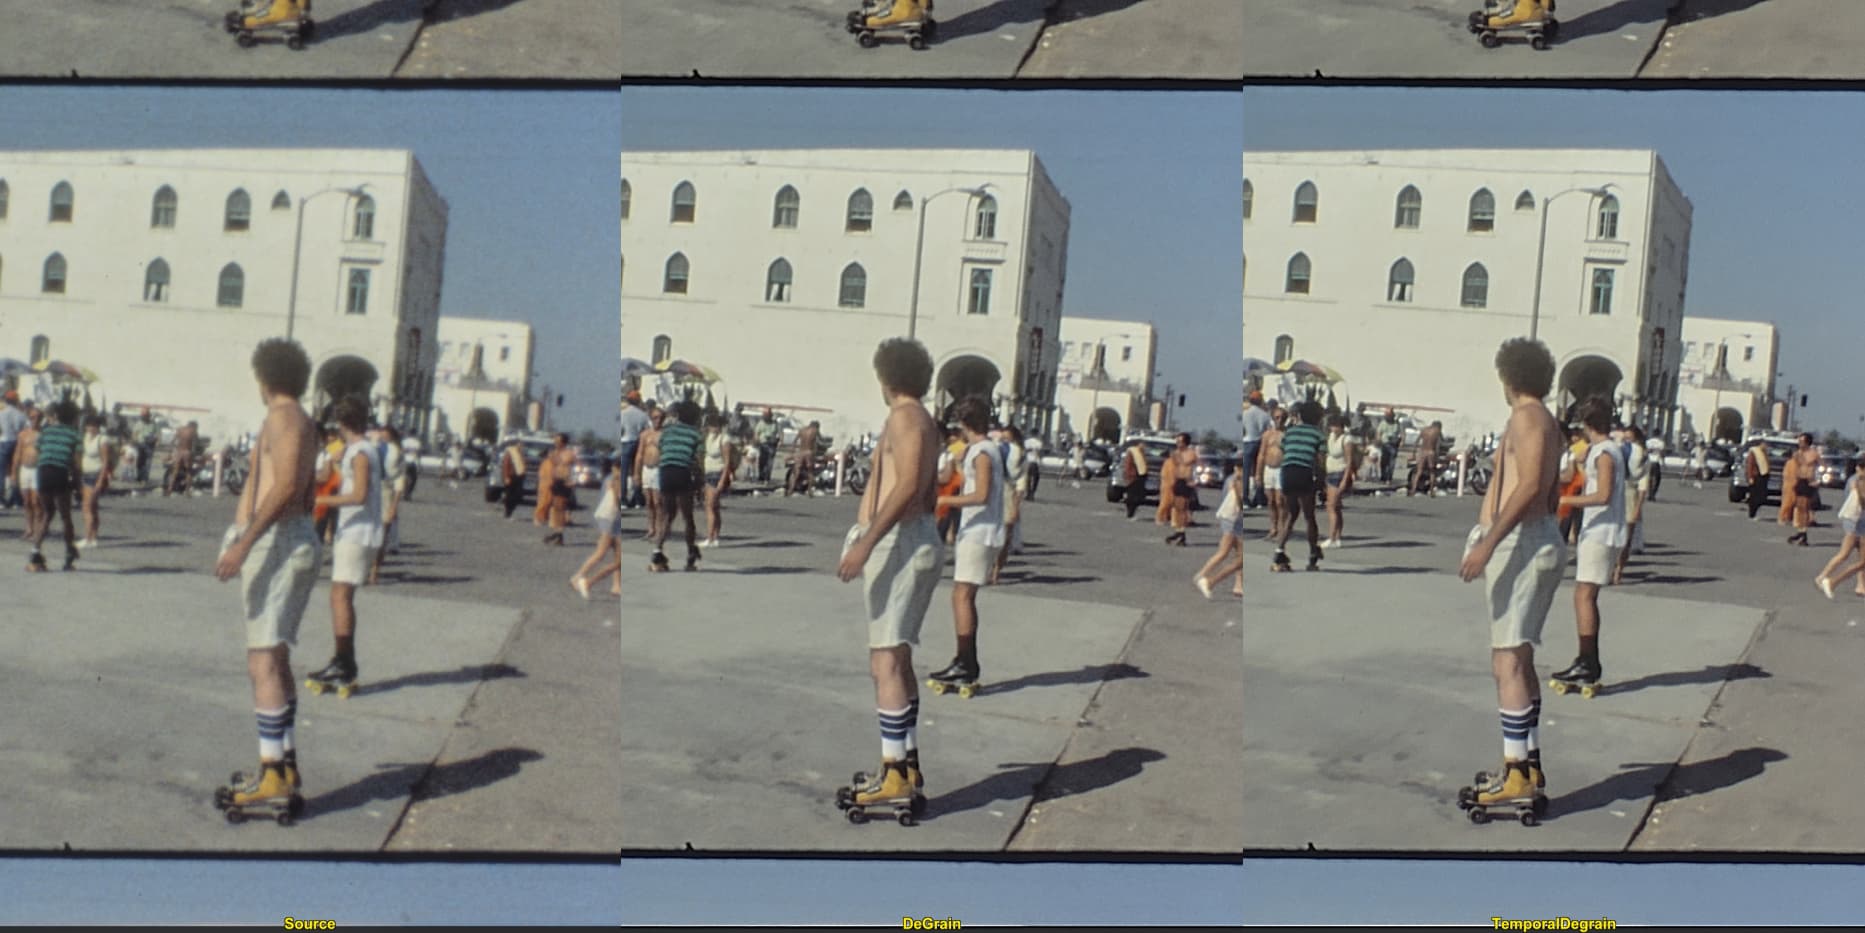
  3. Image-Stabilization: here, I was initially using the Deshaker-plugin + VirtualDub2, but I now I am using daVinci Resolve for this task. More details about this below.

  4. Enhancement: by using any one of the above mentioned avisynth-scripts, in combination with VirtualDub2. At this point, the images are reduced to 8 bit/channel images again - I haven’t yet succeeded in runinng any avisynth-script with 16 bit/channel (theoretically, it should be possible). That it is still a point on my todo-list to investigate.

  5. Cropping/Editing/Dirt-Removal/Color-Grading/Output: again, daVinci Resolve is used here. Note that I only crop the originally overscanned image to the output frame at this very last processing point. This gives me some space for further refinements, like additional image stabilization or other weird stuff I might want to do at that point. For cleaning, I use mostly the “Automatic Dirt Removal” plugin of DaVinci Resolve, sometimes also the more manual “Dust Buster” module. The “Automatic Dirt Removal” module works well most of the time, but it is only available in the paid version.

That’s about it. The reason for the image stabilization (3.) done before the enhancement step is that the motion-estimation algorithms have appreciably less to do than and less of a chance to fail.

As already mentioned, initally I used DeShaker in combination with VirtualDub2, for two reasons: first, it works quite well, and second, I had worked before with this plugin for a long time. But I switched quite a while ago to daVinci Resolve. One reason is that you need to stabilize each scene of your footage separately, for good results. It is a bit cumbersome with VirtualDub and DeShaker to separate the scenes of a whole film, but daVinci Resolve features actually a quite usable scene detection feature for this. Another reason for switching to daVinci Resolve are the two available, quite speedy trackers. One drawback here is that the standard tracker features just three modes, namely “Perspective”, “Similarity” and “Translation”.

Ideally, you would want for the image stabilization only three degrees of freedoms tracked - pan, tilt and rotation. The daVinci-mode “Similarity” would be ideal, but it tracks in addition the “Zoom”-property, which should be avoided at this stage.

So, with the standard tracker selected, your best bet in daVinci is to use the “Translation”-mode for pretracking your footage, with each scene tracked separately. It is good to tune some of the parameters for optimal performance for each scene. For example, “Smooth” lets you adjust how much of the original camera movement is canceled - you want to reduce irregular shaking, but keep the overall movement of the camera. Also, make sure that the “Zoom”-checkbox is unchecked and the timeline resolution is set to the real image resolution (in my case: 2880 x 2160 px), especially when outputting the stabilized frames.

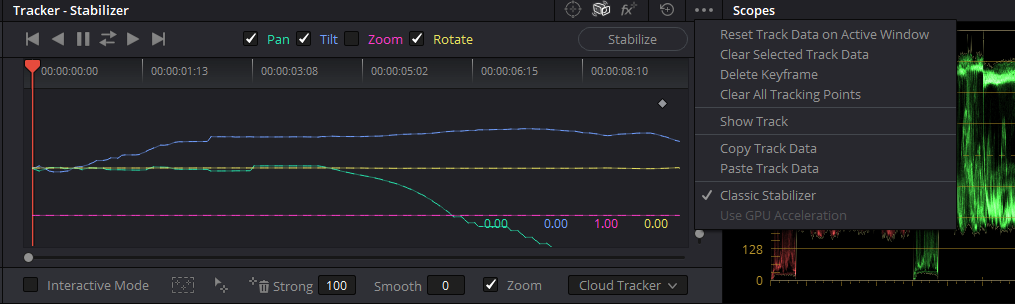
A better daVinci-option for pretracking is probably the older tracking functionality of daVinci, slightly hidden underneath the three bullets on the far right of the tracking window:

Place a checkmark on the second line from below, mark “Classical Stabilizer”. In the tracking window, you can now deselect the “Zoom”-checkbox, and you are all set for tracking. If you leave the “Smooth”-parameter at the default setting of 0, your frame will not move at all after applying the calculated stabilization. This is not what you want - you will need to use a non-zero value here. I use anything between 40 and 90, depending on the scene and my taste.

@PM490: if your base your image processing on opencv algorithms, most of the time you can use images of type np.float. Only a few image processing routines work only on 8 or 16 bit/channel data. So basically all my processing is based on np.float arrays. You will get much more than the 16 bit per channel (either 32 bit or 64 bit float per channel) when using np.floats.

You just need to remember that the results of the exposure fusion algorithm normally overflow the usual float mapping (0.0 = black and 1.0 = pure white). Because of this, I am using the following write function

def writeImg(fileName,img,*para):
    
    minimum, maximum, flip = para
    scaler  = 0xffff/(maximum-minimum)
    if flip:
        img = cv2.flip(img,0)
    imgOut  = np.clip( scaler*(img-minimum),0x00,0xffff).astype(np.uint16)    
    success, buffer = cv2.imencode(".png", imgOut,[cv2.IMWRITE_PNG_COMPRESSION, 9])
    del success
    buffer.tofile(fileName)

with the parameters and the write-call

outputMin        =   -0.30
outputMax        =   +1.30
writeImg(outputName,image,outputMin,outputMax,false)

Another, more advanced option is to use the OpenImageIO library, which nicely interacts with opencv. This library supports for example the imageformats OpenEXR as well as DPX-files (among many others). It has a Python interface.

I think I have installed that for my python environment simply with (albeit, I am not 100% sure of this)

pip install OpenImageIO

I am using this library mainly for reading .DPX-files like so:

if 'OpenImageIO' in sys.modules and os.path.splitext(self.fileName)[1]=='.dpx' :
  io = oiio.ImageInput.open(self.fileName)
  if io:
      self.inputImage = io.read_image()
  io.close()

As I mentioned above, I have not yet succeeded in running any avisynth-script with more than 8 bit/channel. The basic working horse of the scripts are the MVTools2, which should be able to handle higher bit-depths than 8 bit/channel. So far, with my material, I did not observe any issues when working with 8 bit/channel in the final editing/grading stage.

2 Likes

ok, here’s an update with respect to 16bit/channel processing.

The following script actually does the job, sort of

threads = 12
SetFilterMTMode("DEFAULT_MT_MODE", MT_MULTI_INSTANCE)

frameStart  = 0
frameStop   = 3450
frameName = "HDR\HDR_%08d.png"
#####################################################################################

# 8 Bit input, reading RGB24-frames and converting them to YUV
#source = ImageSource(frameName,start=frameStart,end=frameStop,fps=18,pixel_type = "RGB24")
#source = source.ConvertToYV12(matrix="Rec709")

# 16 bit processing, reading RGB48 frames and converting them to various YUV-formats
source = ImageSource(frameName,start=frameStart,end=frameStop,fps=18,pixel_type = "RGB48")
source = source.ConvertToYUV420(matrix="Rec709")
#source = source.ConvertToYUV422(matrix="Rec709")
#source = source.ConvertToYUV444(matrix="Rec709")

denoise = input.TemporalDegrain(sad1=800,sad2=600,degrain=3,blksize=16)

amp = 4.0
size  = 1.6

blurred  = denoise.FastBlur(size )
TemporalDegrain_C  = denoise.mt_lutxy( blurred, " i16 x "+String(amp)+" scalef 1 + * i16 y "+String(amp)+" scalef * -", use_expr=2)

TemporalDegrain_C

Prefetch(threads)

I needed to explicitly ask the ImageSource to read RGB48 and had to introduce the i16 qualifier in the mt_lutxy-call to get a similar output to the above 8 bit/channel script. Also, the needed conversion from 48 bit RGB to YUV requires yet another call (ConvertToYUV...()).

However, the output of the TemporalDegrain-Filter is not the same as in the 8-bit case.

[Update: ]

That is actually expected, as the SAD and other values will need to be adjusted. Also,
as the processing path also uses mt_lutxy-magic, I suspect that some of the parameters need to be adapted accordingly. You might want to experiment… :upside_down_face:

I ran this script on 16 bit/channel source files (.png) with VirtualDub2. In order to get 16 bit/channel output frames, I needed to store the results as .tiff-files.Also possible with VirtualDub2 was rendering out the footage with the “x264 10-bit” codec.

Reading the image files as RGB24 allows only internal 8-bit processing. With a source resolution of 1600 x 1200 px, I get 7.0 GB memory usage, 64% CPU, and 5.2 fps processing speed. Reading the image files as RGB48 gets you 16 bit internal processing. Depending on the YUV- colorspace used, memory usage and fps will vary. With ConvertToYUV420 (my best bet), you need about 8.5 GB memory, use 53% CPU and get 3.5 fps. ConvertToYUV422 (probably already an overkill in terms of color resolution) results in 9.7 GB memory, 61% CPU and 2.7 fps processing speed. Finally, ConvertToYUV444 gives on my system 13.2 GB memory, 44% CPU and 1.9 fps.

[End of Update]

The 8-bit/channel image looks fine, the 16bit/channel image not so - seems to me that some scaling in the TemporalDegrain-filter is not right. Left is the 8 bit/channel result, right the 16 bit/channel result:

Looking at the histograms, here for the 8 bit/channel image

Screenshot 2022-01-06 131239
and here for the 16 bit/channel image:
Screenshot 2022-01-06 131315
one can see that the 16 bit/channel result looks cleaner in the histograms, as expected.

So, I consider this a “mixed result”. While it is possible to run an avisynth-script with 16 bit/channel, it seems that a lot of detailed rework for the filters employed is necessary to actually succeed.

1 Like

@cpixip thank you for sharing the experience and posting the results.

1 Like