Take Up Motor System

Take-up Motor

In the original, the entire system was driven by a single motor at the take-up reel. This is impractical. This requires the motor to be very high torque and low RPM, making it big and heavy, which also affects the overall design and portability of the machine.

I did some research on projectors and reel-to-reel machines to see how they handle keeping a steady rate of travel at the gate and an adjustable rate of travel at the take-up reel.

Flickr Gallery of Existing Machines

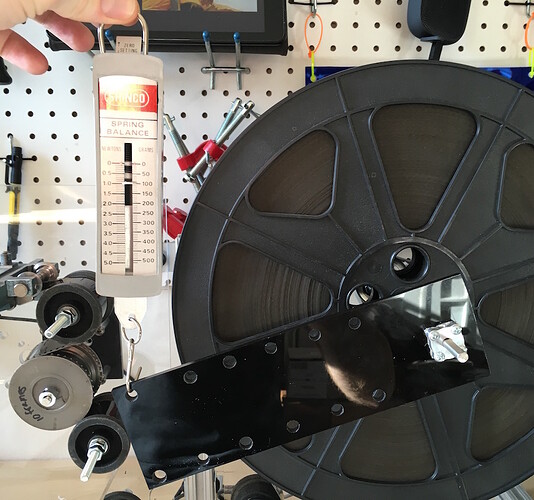
None of these options are concerned with monitoring tension in the film path. Here is an example I found online of a reel-to-reel tape machine that uses a spring-loaded arm to give feedback to the system to control take-up motor speed.
image

In the 8mm category, there seems to be a lot of reliance on spring belts.

The reel-to-reel video shows a flywheel option with a felt slip-ring (is that what itā€™s called) setup on the spindle. Iā€™m not sure how that would scale up for a heavy 35mm reel but itā€™s an interesting approach.

I also like the direct drive approach used by the Gugusse 16mm project. He uses a small radius drive on the edge of the take-up reel. We could do that on a plate that sits below the actual reel, and put a felt slip-ring on top to allow for slip when thereā€™s enough tension on the film. Would need to do a test of this. The plate would have to be a teeth-ed gear, which could be laser-cut or machined. Not entirely easy to do if you donā€™t have access to those kinds of tools, but a possible solution.

I think the best way to move forward here is to do a series of tests. I can re-appropriate the original Kinograph stand to do these if people can help me figure out which options seem the most promising and where I can source materials/parts.
There are some interesting setups on industrial film loopers as well: Examples here

They could be worth looking at as they are designed to reliably and safely move the film through the projector for hours/days/months/years at a time without damaging it.

For the toothed gear, access to a laser/cnc would certainly be hard for most people so Ponoko could be used for outsourcing a file or even using the model from Woodgears.ca where he prints the design out on paper and uses a bandsaw or files to create a gear without those tools.

Iā€™ve got one of those Akai tape decks. The spring-loaded arm doesnā€™t actually affect the speed of the take up motor ā€“ itā€™s just an on/off toggle that cuts power to the entire system when gravity causes the arm to drop to the bottom (i.e. when the tape runs out). While the tape is running the arm is always all the way up as far as it can go (it gradually lowers as the radius of the tape already on the take up reel increases), and thereā€™s always a fair amount of tension, more than on the 16mm projectors Iā€™ve used. Thereā€™s a demo video here:

But your idea would probably work if you basically invert what the tape deck does (i.e. cut the power to the take up reel whenever the arm gets near the top, and possibly do the same for the supply reel when the arm hits the bottom), to ensure that thereā€™s always a fairly constant amount of slack while minimizing the tension on the film.

Remember: we are controlling the motor(s). Speed of the motors doesnā€™t have to be 100%. By doing some calculations in the controlling computer we can adjust the speed accordingly. We must invent a way of picking up how full the reels are. Maybe some transparant plate to put the reels on and an array of reflective sensors.

[trying to follow your mech-technical english, Iā€™m not native, sorry]

I guess that is the method I encountered with an S8 projector, where the receiving wheel has a very soft pull and can be easily interrupted (ie by hand) while the motor turns ā€œlooseā€?
(as soon as thereā€™s no tension on film the motor ā€œgrabsā€ in and rotates the wheel as far as possible. this way transport at gate remains independant).

But this approach would mean one has to be able to adjust the ā€œgripā€ for heavy loadsā€¦ (?)
One more fantasy on this :wink: is to put the whole thing upright and place a weight in shape of a wheel on the belt of the take up motorā€¦ so to use gravity as a ā€œfriction-softenerā€.

Haha, hope this first post will not yet reveal the complete fool in me.
best, M.

Hello! 1st post here :seedling:

Matthew, Iā€™d like to thank you for starting this wonderful project. Iā€™ve been dreaming of digitizing my family heritage of 8 & S8 films for so long!

I was thinking about how I would implement the take-up side in my planned telecine, and idea that appeals me the most is using a torque-controlled motor instead of speed-controlled one. In theory, itā€™s as easy as running a PID controller with feedback on current and building an ESC that emits sinusoidal rather than trapezoidal phases. Things are always harder in practice, but there are some DIY projects of torque controllers out there. There is also a number of scientific papers on the subject. The motor shouldnā€™t be too torquey, maybe one salvaged from an old HDD would do, and the current sensor should be precise enough to allow for fine tuning of film tensioning.

This way the complexity of other approaches could be eliminated, especially the need to calculate the required speed in relation to amount of film taken up - it would be just a direct drive with a reel sitting on it, pulling the film up with constant force, even in case of intermittent movement. On the other hand, making a DIY torque controller might turn out to be a non-trivial task eitherā€¦

Some potential issues with it might be heating and motorā€™s ability to withstand certain continuous current (which shouldnā€™t be too high).

Here are some examples of torque-controlled motors:


A pro take:


A DIY take:


What do you think? :blush:

1 Like

Very interesting, @yukio. I didnā€™t know what this was called but it turns out this is what I was doing at one point with Kinograph. Unfortunately, the motor I had didnā€™t have enough torque at low cycle PWMs. Iā€™d love to hear how you would do this with a small motor. Perhaps Iā€™m not understanding it clearly? Could you help me by explaining a little more?

Well, currently my understanding is pretty shallowā€¦ Just saw that itā€™s possible, combined it with all the little I know about BLDCs and speculated a little bitā€¦ :slight_smile: But Iā€™ll try to explain, risking to be ridiculed by those in the knowā€¦ You surely might already know most of this, if not more, sorry if my musings sound too edifying or plain misleading)))
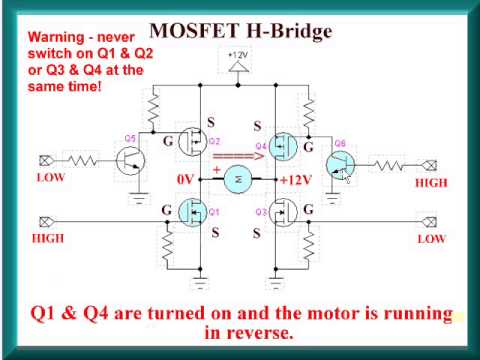
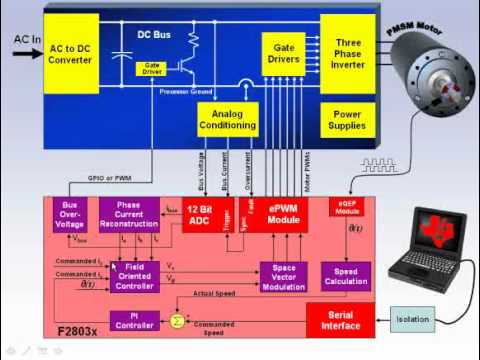
OK. Conventional speed controllers use some sort of detection of rotorā€™s angle, usually employing hall sensors that are spaced 120Ā° apart or sensing back-EMF from the motor. They switch phases as soon as thereā€™s an impulse from one of the sensors or some other indication that the rotor has turned 60Ā° (simplest controllers use block-shaped signal, more sophisticated do trapezoidal for smoother operation, or as they call it, lower torque ripple; the best do sinusoidal), forming six possible combinations of 3 phase voltages: [-+0] [0Ā±] [+0-] [Ā±0] [0-+] [-0+]. Also they calculate the difference between set and actual speed, and feed that error into PID controller (formulas might seem scary, but itā€™s pretty simple indeed, this is what I can tell for sure because I created a variety of self-balancing contraptions using PIDs in a physics sandbox game called Algodoo - which is free and awesome). PID responds by scaling the amplitude of phases, changing the PWM duty cycle. So if we try to impede the rotation of a speed-controlled motor, the controller will crank up the voltage and thus the current in windings to maintain the speed. In case of a stalled motor this current will be maximum and something will likely emit the magic smoke. Going slow is a challenge for this scheme, thereā€™s too little inertia to overcome the torque ripple, and using sinusoidal phases should be of help here.

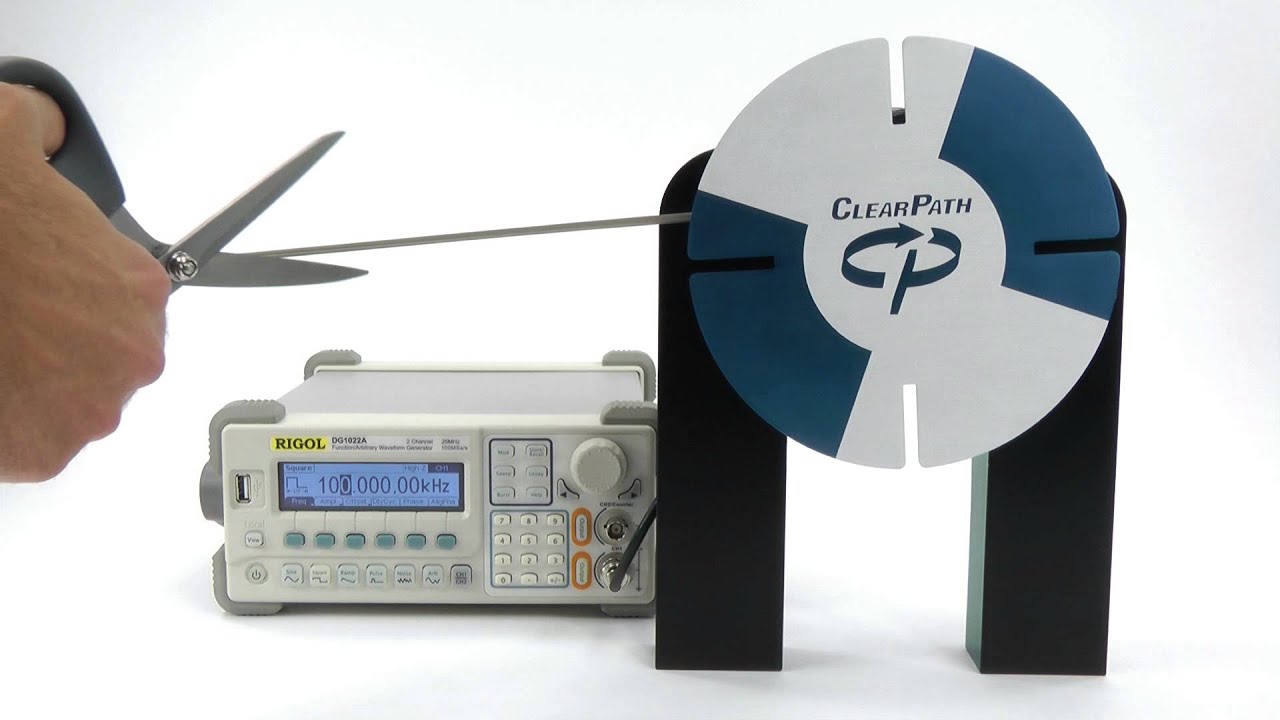
Enough with speed, now to the torque controllers: If we want constant torque instead of constant speed, we would similarly feed our motor with sinusoidal phases calculated from angular position of the rotor, measure the error between set and actual current the winding consumes and feed it to our PID. (If I got it right, setting precise torque in, say, N/m involves complex calculations of magnetic flux and whatnot, but for simple purposes some empirically deduced relation of current to torque should be enough). If thereā€™s some inertial load attached to the rotor, it will spin up the faster the higher the set current. If the set current is low, the rotor will stop accelerating as soon as thereā€™s not enough power to overcome friction and/or air resistance; if itā€™s high, it will spin up to the point where something is likely to fall apart mechanically - thatā€™s why thereā€™s a rev limiter in ClearPathā€™s motors. In this regard this type of BLDC control is more akin to controlling a car with IC engine with gas pedal.

If we stall such a brushless motor, nothing bad should happen - it would just stay at the desired current, applying a certain amount of torque to the load.

Here the challenge is knowing exactly the angular position of the rotor. When the motor turns slowly or doesnā€™t at all, how do we smoothly change the amplitude of phases in time in absence of information from Hall sensors, which only arrives every 60Ā° of rotation? Something much more precise must be used, maybe an optical encoder. So, if you tried going this way and had too little a torque at slow speeds, it must be because of said constraints - the control scheme you used might have been trapezoidal, thus giving you too much cogging, and you might have been unable to precisely detect the rotorā€™s angle. Just a guess.

Thatā€™s it, and if it doesnā€™t help, at least Iā€™ve summarized my scattered learning for myself and practiced a bit of technical English, which is not my native, so please bear with it :panda_face:

Cheers :slight_smile:

Thanks, @yukio that helps a lot. Some of it is still way over my head, but I think I follow the basic concepts.

Whatā€™s the easiest way to get sinusoidal signals out of a GPIO pin? Use a DAC?

I bought a couple of optical encoders and can test them and post the results. Other than using Arduinoā€™s Serial port for textual feedback (or itā€™s new handy graphing feature), do you recommend a test system that will give useful results?

M

Hi, Matthew,

I guess youā€™d want to

  • Calculate sin(angle), sin(angle+120Ā°) and sin(angle-120Ā°) (usually using lookup tables on MCUs that lack fast trigonometric functions). There are also more advanced waveforms that lend to better efficiency - check SPWM (sine PWM) vs SVPWM (space vector PWM)
  • Convert the current sensor output to digital, this is where youā€™d need ADC (cheap sensors would just give you scaled reference voltage, e.g. if a sensor is rated for 10 A while using 3 V reference, it would output 1.5V when it senses 5 A in the circuit, 0.3 V for 1 A, etc)
  • Calculate the difference between set (SP, setpoint in scientific literature on the subject) and actual current, pass it to PID algorithm. Multiply its output (modulated value, MV) by sine values per phase. The trickiest part with PIDs is picking the right P, I and D coefficients so that the system dampens and eventually settles down any oscillations in systemā€™s process value PV - in this case, measured current.
  • produce PWMs with high enough carrier frequency (somewhere around 10-20 kHz) from these calculated values on 3 GPIO pins 6 GPIO pins - 2 per phase, one for positive part of PWM, one for negative, and use them to drive respective H-bridges. You donā€™t need DAC here, the whole motor acts as a DAC averaging the rectangular PWM pulse out.

At this point thereā€™s a huge gap between my current (purely theoretical) understanding of the subject and practice - I canā€™t say anything meaningful about actual circuit design of such a controller. I guess itā€™s no small undertaking in itself ))ā€¦ This is why I canā€™t answer your question about a test system, sorry. Again, what I wrote is very basic, every part of it needs further research, the PID part being the most familiar to me - at least I could describe the algorithm when youā€™re up to it.

Here are some links that might be of help:

http://www.dnd.utwente.nl/~grit/modelbouw/escs.html

https://code.google.com/p/qut-brushless-controller/wiki/mosfet
https://encrypted.google.com/search?hl=en&q=spwm%20vs%20spvwm

Excellent info. Thanks, @yukio. It will take me a little while to digest all of this but it looks like an excellent start.

There is a very simple answer to this, which is worth looking into.

Firstly, constant torque is not what is needed, as film tension will vary as the takeup reel fills up (Tension = Torque/Reel_Radius)) . What we really need is something that gives a resonably constant tension.

Believe it or not, the (relatively) old-fashioned Permanent Magnet Brushed DC (PMBDC) motor has the characteristics to give us pretty much what we need. This is in contrast with the ā€˜modernā€™ brushless variety, that are extremely useful for many reasons in many applications, but not as far as I can see in this one. To use one of these for the take-up would probably need some kind of sensor/control system as talked about in this thread.

In a nutshell, the PMBDC motor has an inverse torque/speed characteristic. In other words, it provides higher torque at low speeds, and lower at high. This is just what we need. The reason for this is that the back-emf of the rotor decreases with decreasing speed, which increases the current it draws. Try stalling one of these motors with full voltage applied, and you could soon see smoke, but its torque will be at its maximum.

We, of course, only need to operate it at a fraction of its rated voltage (sufficient for the light tension we need), so that is unlikely to happen.

So, rather than using the motor as a speed-provider, we are operating it as a torque provider - when the reel is full, the speed is at its lowest, and the torque is at itā€™s highest (dependent on the voltage we applied), and the converse is true when the reel is almost empty. Also, when the reel is completely empty, it will be free to rotate at a speed determined by friction/windage etc, but at a very low torque so itā€™s speed will be limited, similar to that which we are used to with our old cine projectors.

For several reasons, the tension between empty and full will not be absolutely constant, but should be within about 10%. Also, unless you can get your hands on a precision multi-pole motor, I recommend using a low-cost one with an integral gearbox (about 10:1 - not critical). These can be bought on Ebay for less than Ā£10.

Anyway, this is what I have been using for several years, and it fits my needs perfectly without any need for sensors, circuitry, or micro-controllers. Also, the operation is very gentle, with a virtual absence of ā€˜snatchingā€™. It just works!

For more detail and to check it out for yourself, look on Wikipedia for the difference in characteristics of brushed and brushless motors (and stepper-motors too, which are also inappropriate)

Hope you havenā€™t found this too boringā€¦

Jeff

@VitalSparks, do you have a link to a motor that first your specifications? I did an ebay search and got a lot different kinds of motors with very high range of prices.

Also - how do you imagine this would like to the reel assembly? Currently Kinograph has a vertical shaft through the middle of the reel and the motor is directly connected to that.

Recently, however, Iā€™ve been thinking about moving away from that direct drive and considering systems that include:

  • slip friction plates
  • gear linkage systems to increase torque and
    allow for the more ubiquitous high RPM motors
  • spring pulley linkages

Any thoughts on how the PMBDC would interface with the reel assembly, mechanically speaking?

M

Hi Mattew,

The motor I used in one of my experiments was one that I have had in my junk box for a long long time. It is rated at 24v, and rotates very fast at that voltage because it does not have a gearbox. I ran it at about 3v, which gave me the tension I needed. At the low speeds I was running it at, it was very smooth, so I guess it had a lot of poles. If I was doing it again, I would probably buy one which had a gearbox, because many low-cost motors today often have only 3 poles, and were never designed to work at these low speeds and could be a bit jerky, and possibly stall.

I just quickly looked on Ebay and found this one
http://www.ebay.co.uk/itm/DC-24V-5000RPM-High-Torque-Cylinder-Magnetic-Electric-Gearbox-Gear-Motor/291552335079?_trksid=p2047675.c100005.m1851&_trkparms=aid%3D222007%26algo%3DSIC.MBE%26ao%3D1%26asc%3D20140122125356%26meid%3D907e28daec2e480baade15ca6d724ead%26pid%3D100005%26rk%3D2%26rkt%3D6%26sd%3D191746927725

It looks to be well made with a sturdy bearing for mounting take up reel directly, but there may be other ones out there too. I cannot guarantee that this one will be perfect because I havenā€™t tried it myself. Really, this sort of thing needs a trial and error approach - but it cant be far from what you need (BTW, 5000rpm is motor speed - shaft speed is 800rpm).

I expect you would use it at about 6v to start with, and vary the voltage up or down until you get the tension you need. Donā€™t use too much tension though on narrow gauge film - the film wonā€™t like it.

Remember how this works - DC brushed PM motors have an inverse linear torque/speed curve. This means that if you increase the load on the motor which reduces the original speed by a factor of two, then the torque will increase by a factor of two. If the hub diameter of a 180mm reel was 40mm, and when the reel was empty it rotated at 30rpm , when it was full it it would rotate at 6.6rpm (speed ratio of 180/40 = 4.5). The torque will also increase by a factor of 4.5, but because the diameter (hence radius) of the film on the reel has increased also by a factor of 4.5, the tension will remain the same.

As for mounting - direct drive, nothing else but that.

Jeff

1 Like

Any recommendations for measuring torque on a shaft? As we build, itā€™d be nice to have accurate measurements of the requirements for motors.

This is not an easy thing to measure without a special instrument called a Dynamometer, which tend to be very expensive and not readily available for small torque ranges.

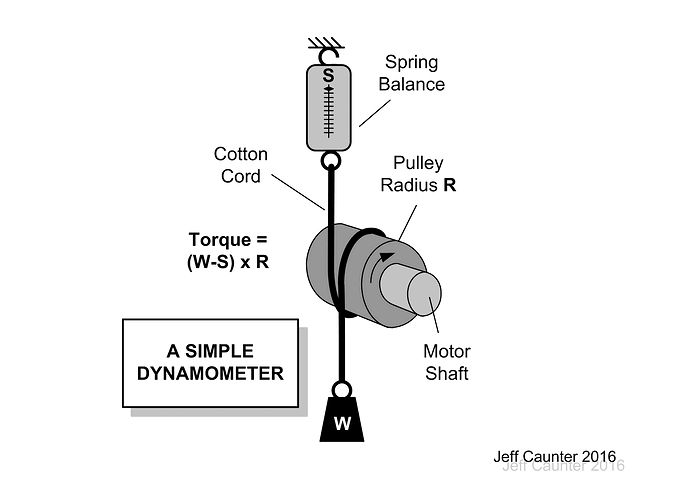
However, it is easy to knock up a temporary rig that does the job quite well and is fairly accurate. I have produced this sketch to show how it works -


The cord wrapped around the pulley (or anything else you may have to hand) provides a frictional load on the motor. If the motor is off, then the balance will read the same as the applied weight, but when the motor is rotating (note the direction!), the reading on the balance will decrease. This difference is the dynamic force being applied at the radius of the pulley (plus half diameter of the cord if being precise). The torque can easily be calculated from this force difference multiplied by the radius. To vary the torque, apply differing weights. The cord is best with cotton (get from haberdashery or hobby-craft store) - plastic is not so good, especially nylon.

I know this works because it is called a ā€˜drum brake dynamometerā€™ and when I was at college in the '60s we used a large scale version of this to measure the horse-power output of large (2kW) motors during lab-workshop sessions (the drum was partly full of water for cooling, but would boil after about 20 mins. - no such problem here with our tiny rig!).

Jeff.

2 Likes

I aught to point out that the torque produced by a dc motor is proportional to the current being supplied to that motor. So, once a motorā€™s torque is measured using the above rig, and note is taken of the current flowing into the motor when producing that torque then, when that motor is used to drive something for real, you can calculate what torque is being produced by measuring the current it takes and performing a simple proportional calculation.

Jeff

Replying with this link so I have it in the forums as a reminder. Going to try your method and this one. Just ordered the materials. Should be able to measure by end of this week.

http://homepages.which.net/~paul.hills/Motors/MotorsBody.html
(see section 3)

Got a chance to do some torque measurements. The results matched up with some calculations I got from one of you. Here are the results (also see question at bottom, please):

Conditions
Full reel on take-up side, film fully threaded through film path, ~1m wrapped around core of feed side. This is the strongest dead-stop load possible on the system.

Test setup
Spring balance, arm lever. Balances were tested with weights for accuracy. Margin of error: +/- 0.2N

Results
with NO MOTOR attached to shaft: 3.74 kg/cm average reading
with motor attached to shaft: 4.36 kg/cm average reading*

Question
Iā€™m new to this scientific measurement stuff. For accurate reading, should the motor be attached or not?

*NEMA 23 Stepper, type 57BYGH405A

Another layer of my confusion is this: the motor Iā€™m using is rated at ~6 Nm, or 21 kg/cm (this motor).

So why isnā€™t that enough to pull the film through the system?