Alpha-Release of new picamera-lib: "picamera2" ... - and beyond

I found a little bit more information on this. It seems that in “Single Exposure” mode some sort of temporal denoising algorithm is employed. The exposure for each image is reduced, so the highlights of the source are correctly recorded. But of course, that gives you quite some noise in dark areas. Here the RP5 employs a temporal noise-reduction process, averaging over several consecutive frames. Averaging is skipped when the pixel’s value differs too much from the previous frame.

According to statements from the RP-team, that works well in video mode. You do not get a reduction in frame rate, but dark noisy areas have much less noise than the raw imagery, and because the images are exposed towards the highlights, they also do not burn out. You will get some artifacts around fast moving edges and in highly textured areas.

The resulting temporal denoised image is than tone-mapped (no information on this, maybe histogram-equalized?) to the final output image.

The “Multi-Exposure” thing is more similar to the classical way of acquiring HDR imagery – they really take several exposures of a scene one after the other and combine them into a HDR image (how this is done is unknown currently, but I suspect it’s not as complicated as Mertens). In any case, you will encounter a reduction in frame rate in this mode. Therefore, the mode is recommended by the RP guys only for still images. Again, some sort of – yet unpublished – tonemapping is applied to the HDR image to arrive at the normal LDR (8 bit per channel) image.

@dgalland - the .dng-encoding on the RP5 still takes about 1 sec/frame? I measure about 980 ms on my RP4 for writing the raw data as .dng-file to an SSD…
1 Like

… continuing my exploration of the RP5.

The RP5 features an upgraded ISP – which leads in turn to a new tuning file format. So there are currently two different directories where the tuning files are stored. One is /usr/share/libcamera/ipa/rpi/vc4, this is for the RP1-RP4 models. The other is /usr/share/libcamera/ipa/rpi/pisp, and this is for the new RP5 unit.

At least currently, the imx477_scientific.json is gone in the RP5 tuning file directory. The new tuning file format has a lot of new entries – some of them are connected to the new HDR possibilities, some others need to be checked. For example, the temporal denoise seem to be working in standard mode – something I would not like to happen in a film scanner setup.

Furthermore, there are indications that even the raw image you get in the standard configuration is not a true raw image. The RP5 ISP works normally with compressed (packed) raw. This is described as “visually lossless”. You can switch to unpacked formats which are described as “bit-exact”, but that’s not the default. I asked on the picamera2 discussion page for a clarification, but I bet that the raw the RP5 spits out in standard configuration is not really the raw sensor image.

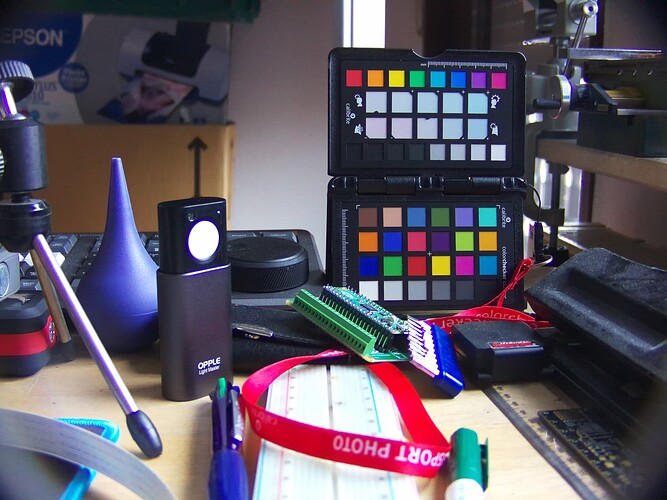
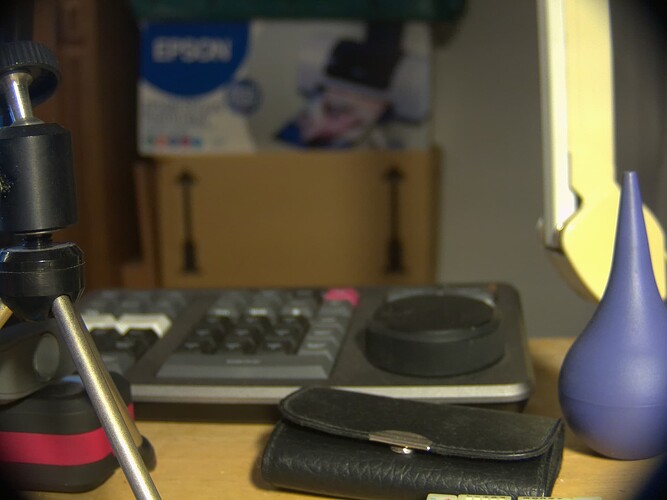
Anyway. I manually edited something similar to the scientific tuning file to work with the RP5 ISP. The results I got are interesting. Here’s a capture with the HQ camera and the standard RP5 tuning file:

The air blower to the right of the image is in reality not purple. Neither does the daVinci speed editor in the background feature a purple touch - it’s basically a greyish plastic unit.

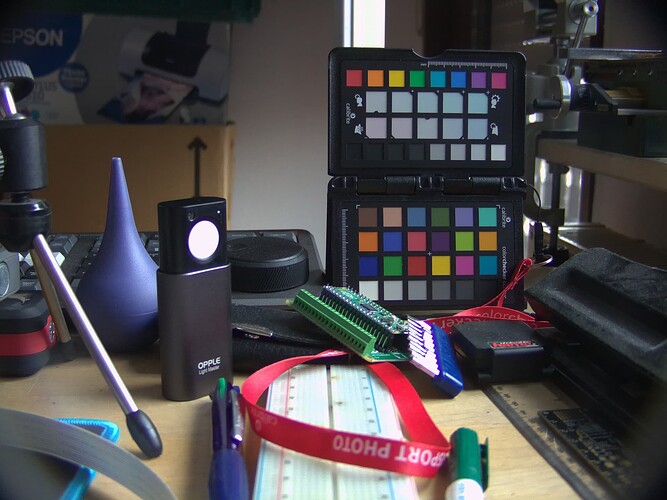
Here’s, for comparision, the same capture with my quick manual derivative of the scientific tuning file:

The air blower’s color is quite similar to the color my eyes see. A slight yellow-greenish cast can be noticed, but the colors are certainly less off than in the standard configuration.

Both captures were done with automatic exposure and white balancing. Illumination was with a desktop lamp only. Given, this is not a really good designed experiment, but I would have expected a better performance with the imx477 standard tuning file on the RP5.

3 Likes

Some further tests/information:

– the above images were taken under the illumination of a desktop lamp. This lamp is actually a flourescent lamp trying to mimic a normal “warm” light bulb. So a quite challenging illumination for testing. Below are other results using normal daylight illumination.

Doing the same comparision under daylight illumination conditions gives the following results:

  • Standard imx477.json tuning file, RP5-version

  • Quick-hack imx477_scientific.json tuning file, RP5-version

With the imx477.json tuning file the estimated color temperature was 4636 K, with the imx477_scientific.json tuning file it turned out to be a little bit more blueish, namely 5061 K.

A Opple lightmeter visible in the images gave me a color temperature of 7544 K.

– it seems that with the RP5, new compressed raw formats were introduced. There are hints that these new raw formats are not carrying the full raw sensor information through the image processing pipeline. Specifically, in the picamera2 manual, the compressed formats are labeled as “visual lossless” and the old uncompressed formats as “bit-exact”. If I read that correctly, the new compressed formats are not “bit-exact”.

Even worse, under the hood, if the RP5 is working with compressed formats (I think this is the default), when saving a .dng-file, the compressed format is first decompressed and than saved as .dng. In other words, your .dng does not have the real raw sensor values, but something which is probably coarser quantized (that would be a simple way to “compress” data). I think one can still get the real raw sensor values by explicitly forcing the RP5 ISP to work with an uncompressed format. Otherwise, with the same setup, you will get non-identical results between a RP4 and a RP5.

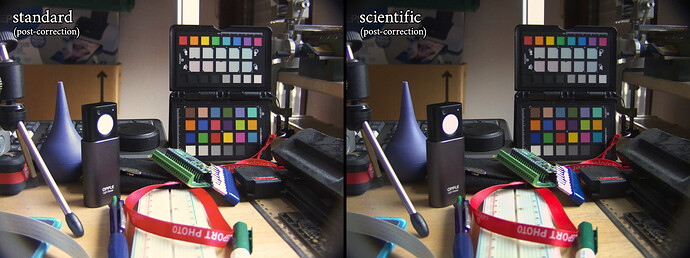
Just for fun, because there was a color card in the shot, I ran both of those through my favorite plugin for color correction. Both got pretty close to one another:

And here are the (48-way) .cube file LUTs that it was able to generate to convert from that particular setup to the results shown here: LUTs.zip (1.5 MB)

Just like your previous findings, the “standard” imx477.json file is quite far off in the blues and purples. Your imx477_scientific.json is very close and it looks like the only thing the color corrector plugin really did was nudge the white balance a little.

1 Like

As they should, given that you used the color chart in the image for calibration. :slightly_smiling_face:

The greens in the “standard” corrected version are a little too bright - the ones of the “scientific” corrected version come closer to the appearance of the real green things.

Interesting that your plugin was able to compensate the bad gamma-curve of the standard tuning file – which was deliberately chosen by the RP guys to get highly saturated colors.

Yes, I checked, we have 0.9s per frame for the dng conversion (maximum resolution, buffer only without write)
It’s very long because 100% python including that Pisp decompression

Did you see
https://forums.raspberrypi.com/viewtopic.php?t=358223

No, I did not see this. Basically asked the same question on the RP forum. This comment by David confirns my suspicion:

“performance for those wanting raw files will generally be much better if the application asks for uncompressed data in the first place”

Ran my bench again

4056x3040-SBGGR16
Metadata only Spf: 0.08499226570129395 Fps: 11.765776470938057
Make_array: Spf: 0.1462397575378418 Fps: 6.838085735619703
CV Jpeg encode : Spf: 0.20502793788909912 Fps: 4.877384078948822
DNG encode : Spf: 0.1687650442123413 Fps: 5.9253976714620675

4056x3040-BGGR16_PISP_COM
Metadata only Spf: 0.08107540607452392 Fps: 12.33419662530962
Make_array: Spf: 0.10425117015838624 Fps: 9.59221847084042
CV Jpeg encode : Spf: 0.18520433902740477 Fps: 5.399441531723668
DNG encode : Spf: 0.9441025495529175 Fps: 1.059206969066605

As expected it’s faster in uncompressed for raw but it slows down the main stream.
The uncomprres function in python should not be very efficient!

… this is crazy. Most annoying is that they change such essential things under the hood, without proper announcement or documentation. Oh well, getting used to it…

But the 5.9 fps for dng-encode look promising. If one gets the .dng somehow in memory, one could send this directly to a recording PC client…

Yeah, as far as I can tell, the plugin tries to be minimally invasive, doing as little to the image as possible as it takes to get the colors “right” (all by the single “find card in frame” button click; it’s completely automatic).

The standard tuning file image seems exposed a little more to begin with. It’s easiest to see on the breadboard at the bottom of the image. So after correction it’s brighter everywhere than the scientific version of the image.

Re: the gamma curve correction, those .cube LUT files are a plain text format that is easier to read than ICC files. This forum post gives a brief rundown of how to parse it. (The “cube” part is because the file is more or less a flat listing of a 48x48x48 cube of RGB triples. You just look at the index matching your pixel colors–mapped into the range [0…47]–and read out the triple that it should be instead. In any real implementation you’d want something like tetrahedral interpolation, but you don’t need it for just inspecting the data.)

So it should be straightforward to generate the kind of curves you did from the matrices in the tuning files to show how much correction is required to bring things back to neutral. The LUT for the scientific file should practically be an identity-style lookup where, say, the entry for [5][7][3] is equal to (5/48, 7/48, 3/48) plus or minus a little here-and-there for the color temperature correction.

Actually, the color matrices in the scientific tuning file as well as the whitebalance curve the AWB-algorithm is using were generated by requiring that color checker boards at a given set of color temperatures were imagined as perfect as possible with the HQ camera. To avoid taking real images (with problems arising through uneven illumination, imperfect lenses, etc.) I simulated the Bayer-filter and the IR-cut filter of a real HQ camera. The camera was assumed to have a perfect lens.

Of course, the usual lenses for the HQ camera are far from being perfect. However, the old Schneider lens I am using in my film scanner comes close, especially in the 1:1 setup of my scanner. Only a central little part of the whole area the lens is designed for is used in scanning S-8 film.

Libcamera’s AWB-algorithm does not work well and tends to underestimate the scene’s color temperature. At least that is an observation I often encountered. While I trust the AWB-curve in the scientific tuning file, I do not trust the automatic algorithms implemented in libcamera. So I always use manual whitebalance settings when scanning. Note that all images above were instead captured with libcamera’s auto whitebalancing algorithm. And the lens used on the HQ sensor was actually one of the less good ones…

Well, at least the first twenty first lines of the LUTs seem to point into this direction:

scientific				   standard
LUT_3D_SIZE 48             LUT_3D_SIZE 48
0.00000 0.00000 0.00000    0.00000 0.00000 0.00000
0.02129 0.00000 0.00000    0.01959 0.00102 0.00026
0.04259 0.00000 0.00000    0.03924 0.00203 0.00053
0.06387 0.00000 0.00000    0.05981 0.00326 0.00085
0.08516 0.00000 0.00000    0.08037 0.00485 0.00126
0.10644 0.00000 0.00000    0.10092 0.00681 0.00177
0.12772 0.00000 0.00000    0.12148 0.00916 0.00238
0.14901 0.00000 0.00000    0.14204 0.01193 0.00310
0.17029 0.00000 0.00000    0.16260 0.01514 0.00394
0.19158 0.00000 0.00000    0.18315 0.01881 0.00489
0.21286 0.00000 0.00000    0.20371 0.02294 0.00597
0.23415 0.00000 0.00000    0.22427 0.02756 0.00717
0.25543 0.00000 0.00000    0.24482 0.03269 0.00850
0.27671 0.00000 0.00000    0.26538 0.03833 0.00997
0.29800 0.00000 0.00000    0.28594 0.04432 0.01157
0.31928 0.00000 0.00000    0.30649 0.05031 0.01332
0.34057 0.00000 0.00000    0.32705 0.05629 0.01521
0.36185 0.00000 0.00000    0.34761 0.06228 0.01725

While the red component in the scientific tuning file gets data only from the red input component, in the standard tuning file, all three input color channels are mixed.

1 Like