Thank you! The software searches for the sprocket hole within the area defined by the user and stabilizes the frame when it finds it. If no sprocket hole is present or detectable in a frame, it cannot stabilize it. These frames are currently neither removed nor flagged individually.
Hello everyone,
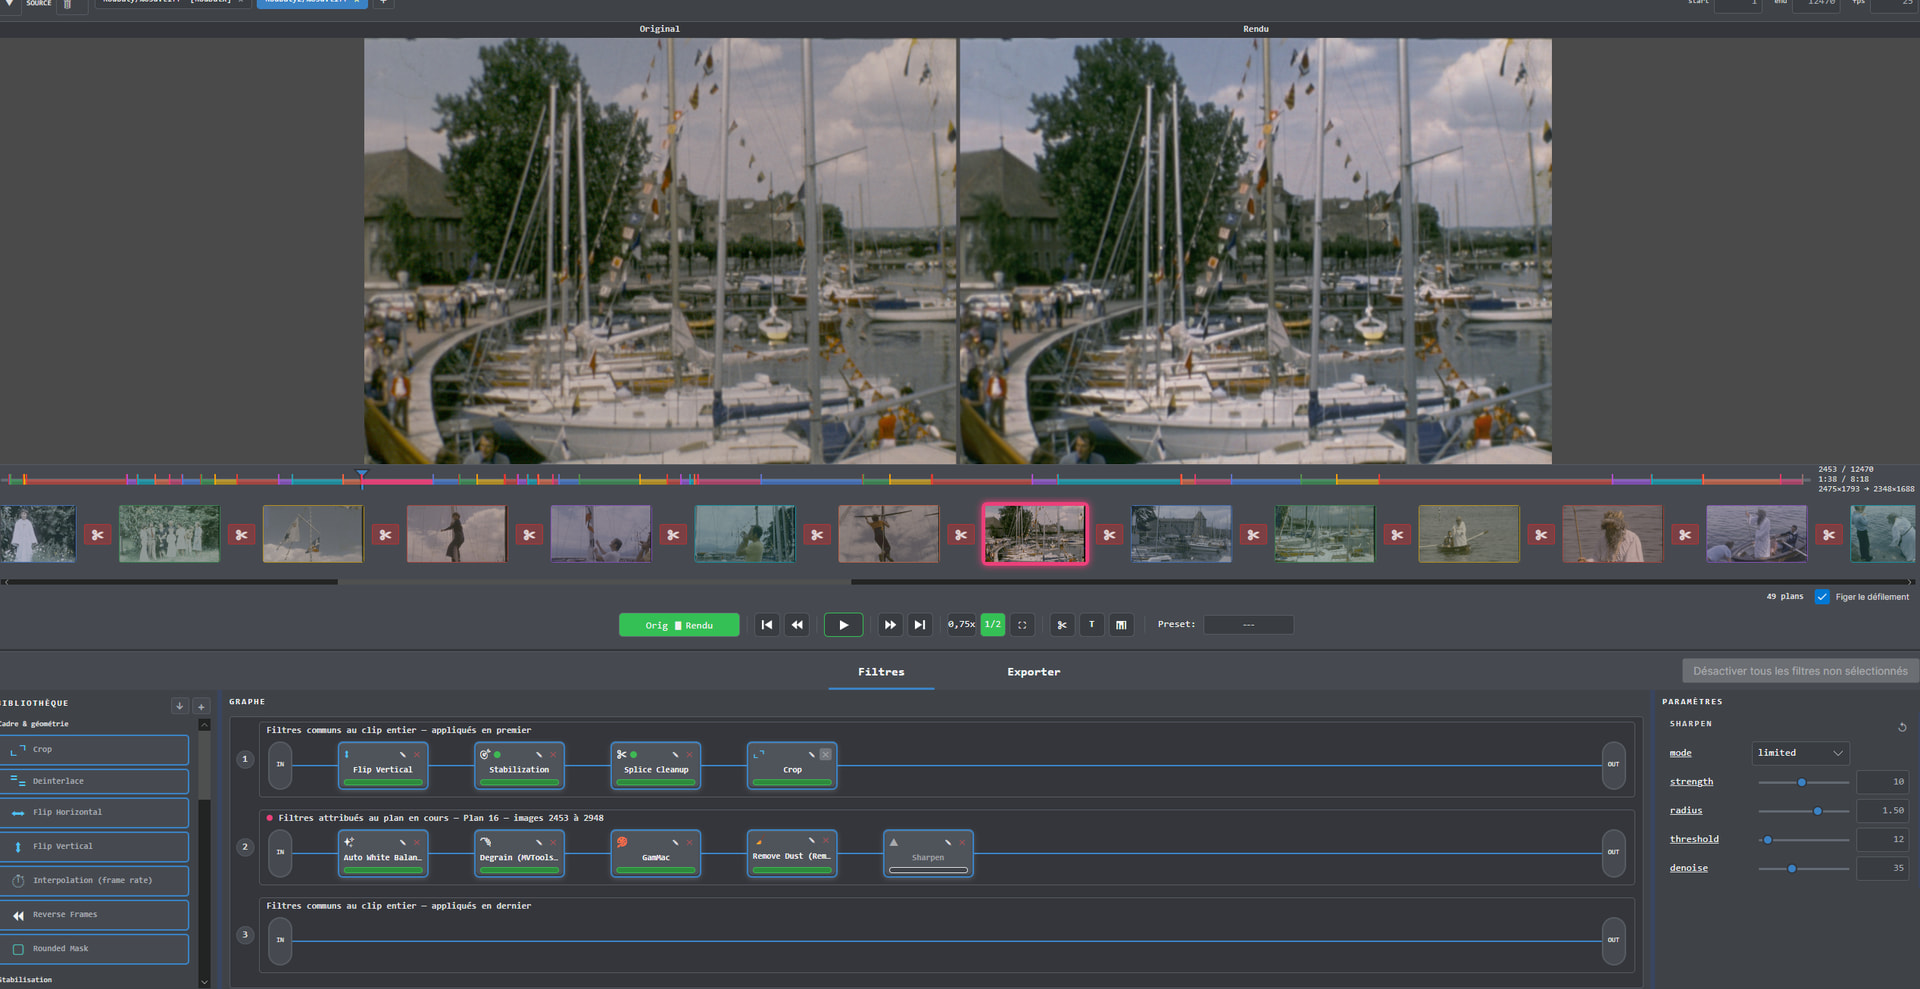
AvyScan Lab 3.0 is out, and it is by far the biggest update since the software was created. Until now, AvyScan Lab applied your restoration settings to the whole reel. Version 3.0 changes the very nature of the program: AvyScan Lab becomes an editing program dedicated to film restoration, where every shot is adjusted independently.
Why does it matter? An 8mm, Super 8, 9.5 or 16mm reel is dozens of shots filmed at different times: bright sunlight then dark interiors, handheld then tripod, film stocks of different ages spliced end to end. One single setting for the whole reel is always a compromise. From now on, every shot gets its own filter chain — colour, brightness, degrain, stabilization, crop… — and the film exports as one piece or shot by shot.
AUTOMATIC SHOT CUTTING
This is the heart of 3.0:
- The cutting happens by itself: splice detection analyses the reel and offers to cut it automatically into shots, one per stretch of film between two splices. You can of course refine the result with the scissors tool, frame by frame.
- The splices themselves — those overexposed, flashed frames that appear when one shot changes to the next — are spotted and automatically excluded from the export. They stay visible in the edit as small scissors marks: one click opens them frame by frame for inspection, another reincludes them if you want to keep them.
- A true editing timeline appears under the player: coloured sections per shot, splices in red, a synchronized thumbnail strip. Click or drag the timeline to scrub the whole film continuously with a live preview, including across shot boundaries.
- Every shot can be included in or excluded from the export with one click (excluded shots carry a veil and a badge), and In/Out points delimit the part of the reel to process.
- Crop adjusts shot by shot: on an old film, the position of the image on screen is rarely constant — it drifts from one shot to the next, with splices, reel changes or a different camera. Each shot therefore gets its own reframing, while the output size stays common to the whole film: the picture sits right everywhere, with no wandering black borders.
- Presets follow along: one button applies a setting to every shot of the clip, another to the selected shot only.
- At export time, two modes: the complete film merged into a single file, or a separate file per shot — ideal for archiving a reel sequence by sequence.
THE TITLER: TITLE CARDS LIKE IN THE MOVIES
If you remember Super 8 titlers, you will enjoy this: AvyScan Lab now includes a digital titler (Expert version). It inserts a generated card before or after any shot — film title, date and place of a sequence, chapters, end card — without touching the film frames: nothing is covered, nothing is lost, the original images stay intact.
A dedicated window adjusts everything live: multiline text, font, size, colours, position, fades, black frames, and a text slide that enters and leaves the frame with eased motion and motion blur, like a cinema title sequence. The preview shows exactly what the encode will produce.
For the archivist it is a real time saver: identifying every reel of a family collection, dating sequences, chaptering a long edit — all in the same tool as the restoration.
ALSO IN THIS 3.0
- Programmable end of encoding: do nothing, put the computer to sleep, or shut it down once the batch finishes without errors — on wake, the summary is waiting for you. Handy for long overnight encodes.
- Hover-based crop editing: with the Crop node selected the preview shows the cropped result; hover the viewer and the full image reappears with the editable red frame.
- Shrinking the end of the image range no longer throws away your analyses or detected splices.
- Simpler support: a complete diagnostic report is generated in one click (log, edit state, configuration, machine specs) — and after an abnormal shutdown, the application offers to send it at the next start.
- Locked-down updates: before launching an installer, the application verifies its Windows digital signature (ScanFilm SNC certificate) and rejects any altered or unsigned file.
- A fully redesigned guided tour for newcomers, available like the whole application in 6 languages (French, English, German, Spanish, Italian, Dutch).
- Plus a series of fixes: playback and counter exact to the last frame at 18 fps, original frame rate properly restored when removing the Projector Capture filter, better proposed splice-detection sensitivity, non-destructive project migrations…
All of this comes on top of the existing toolbox: stabilization (perforations, image edges, picture), automatic colour correction, degrain, splice cleanup, resynchronized soundtrack, frame-rate interpolation…
TRY IT
The update is offered automatically in the application, or as a download at www.avyscan.com (Windows, 64-bit). The free version lets you try shot cutting with up to 3 shots per clip; the Expert version removes the limit and adds the titler.
Your feedback is welcome — it is what keeps the software moving at this pace.
Happy restorations!
Hello everyone,
Version 3.0 came out at the end of August and deeply changed the software: shot cutting, the titler, the editing timeline. An update that size is judged in daily use, and your feedback along with that of the first 3.0 users filled a notebook. Version 3.0.1 is the result: eight requested additions, and above all twenty-three points fixed, several of which really matter when you archive reels.
CUTTING WITHOUT LOSING FRAMES
This is the request that came back most often since 3.0. Until now, cutting a film into shots went hand in hand with excluding the flashed, overexposed frames that surround every splice. That is what you want in most cases — but not when you are after complete fidelity to the original reel.
- The “Keep all splices” button, in the Splice Cleanup panel, keeps the film cut at exactly the same places but no longer excludes any frame from the export. The edit stays organised shot by shot, and the film comes out complete.
- On every splice cell, alongside the usual reinclusion, a second option: “Include in the edit, keeping the cut”. It restores the splice frames without merging the two neighbouring shots — you get the frames back without losing the cutting, nor the settings belonging to each shot.
INTERPOLATION: A “DUPLICATE” MODE
The Interpolation filter (Expert version) gains a fourth mode. No frame is computed: existing frames are duplicated to reach the target frame rate.
This is the mode to pick when you simply want to move from one frame rate to another — 18 to 25 frames per second, say — without a single invented frame: maximum encoding speed, no possible artefact, film duration and soundtrack sync preserved. The “Protection” parameter is now called “Mode”, with all four modes gathered in one place.
KEYBOARD
- The C key cuts the shot at the playhead, exactly like the scissors in the transport bar, and without marking a splice.
- Tab and Ctrl+Tab move to the next and previous shot.
- The Info menu gains a “Keyboard shortcuts” window listing everything available: player, splices, editing, inspector, graph. It is not modal: the application stays usable next to it, with the list in plain view.
COMFORT AND STARTUP
- The user guide no longer blocks the application: you can read and work at the same time, and reopening the guide brings back the window already open instead of stacking a second one.
- The guides in all six languages are aligned with the 3.0 interface: the “Export” tab replaces the old “Record” button everywhere, the encoding chapter has been rewritten, and this version’s additions are documented there.
- At startup, the interface only appears once the session is restored and the layout has settled. A veil in the application’s colours covers the window during those adjustments instead of showing them.
- If the screen is too small for the interface — under 1920 × 1080 at Windows 100 % scaling, a 1366 × 768 for instance — a notice says so at startup, dismissible with a checkbox. Parts of the interface then overlap: that is not a malfunction, it is a lack of room.
- The support report now contains a licence section (state, last successful check, cause of the last failure) — never including your key. A licence problem becomes diagnosable from the first report.
A SAFER EXPORT
This is where most of the work went, and these are the fixes I recommend reading:
- A render interrupted mid-film — AviSynth error, failed shot — is no longer reported as successful. ffmpeg now stops on any error, and the output is compared with the expected duration or frame count: an incomplete output is flagged and kept for inspection.
- Finalizing a large file, an mp4 in particular, is no longer interrupted while the file is still being written, and a finished file is never deleted afterwards.
- The progress bar follows the real output duration — film frame rate, Projector Capture, Interpolation, title cards — instead of hitting 100 % far too early.
- Encoding settings are restored at startup even if the application was closed with no clip, or if no source is reachable (external drive unplugged). They no longer fall back on the stored “Default” preset, which could silently bring CRF back to 0 and produce enormous files.
- A batch refuses any output that would overwrite the source of another clip in the project, and overwrite confirmations show the full path.
- The “source and output folder are identical” warning no longer appears for a clip whose output was renamed in the “Renamed” column.
- Overwriting an exported image sequence first purges the old numbered frames from the folder: a shorter export used to leave the surplus frames of the previous one behind.
- The audio silence of a title card follows the output frame rate after Projector Capture — the soundtrack came loose and the export came out mute.
EDITING, ANALYSES, SOURCES
- On a cut clip, “Beginning” returns to the first frame on the first press. It used to take two.
- Merging shots — reincluding a splice, removing the Splice Cleanup node — asks for confirmation, with the “keep the cut” variant offered: merging discards the settings, the title card and the exclusion of the absorbed shot.
- The graph refuses to add, move, enable or delete a node when the active cell is a splice, a section that is never exported anyway.
- Ctrl+Shift+D detects splices at source size, like the node’s own button: the shortcut worked on the reduced preview and gave different results.
- In Edge line mode, the search area you draw is really used. It was silently discarded.
- A Perfo Lock analysis cancelled midway is no longer recorded as complete: stabilization stopped dead at the cancellation point on export.
- On an image sequence, the reference frame of a Perfo Lock or Edge analysis is the one displayed when you click. It used to be taken too far into the film, often on another scene.
- The drawing frame (crop, stabilization areas, mask) follows the viewer when you move a splitter or enlarge the player while drawing.
- A YUV 4:2:2 or 4:2:0 video with an odd width or height — a 2439 × 1800 ProRes, for example — finally opens: AviSynth refused any frame of that size.
- Closing the active clip no longer copies its settings into the neighbouring clip that takes its place. A cut clip could lose its crop margins and become unopenable until a restart.
The complete list, thirty-one points, is in the application’s “What’s new” window and on www.avyscan.com.
TO UPDATE
The update is offered automatically in the application, or as a download at www.avyscan.com (Windows, 64-bit). Your projects, presets and settings are preserved.
Thanks to those who took the time to describe precisely what they were seeing: several fixes in this version come straight from their messages.
Happy restorations!
On this forum, the subject seems to generate few reactions. However, despite the silence, we can see that the posts are being read — so we are giving it a try and would really appreciate your feedback.
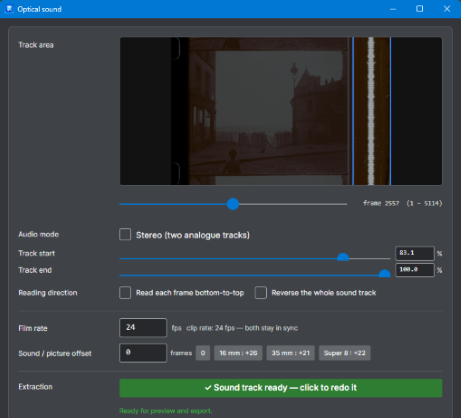
We are currently developing a new module for AvyScan: direct decoding of optical soundtracks.
The goal is to scan your film with its optical soundtrack, then let AvyScan automatically convert it into a WAV file perfectly synchronized with the images — including splices and removed scenes.
This is a significant and fairly substantial development, which is why we would like to better understand the real level of interest in this feature and its potential impact for users.
Would this feature be of interest to you?
Please leave a  or a comment to let us know. Thank you!
1 Like
Coming soon in AvyScan Lab 4.0: optical sound decoded right inside the app
Your 35mm, 16 mm or Super 8 reels have an optical soundtrack? Until now you needed a
dedicated reader or a separate tool to hear it. Version 4.0 reads it straight
from the scanned image.
- Select the soundtrack area on the scan - the app does the rest
- Hiss reduction, level and sync adjustment, with instant listening and
before/after comparison
- Mono or stereo, spectrum display to check the result at a glance
- The soundtrack goes straight into your export, without leaving the software
#filmrestoration #opticalsound #16mm #super8 #film #telecine #archival #avisynth
@Roland you keep doing an impecable job. Very amazing
1 Like
Could you restablish the feature that eliminates misaligned frames from the sequence? @Roland
I’m really sorry, but I don’t see what you’re talking about. Can you give me a better description?