Hi folks,
I have just finished creating my first version of a 16mm Kinograph, based on Matt’s deisgn, and borrowing from ideas shown in Mike O’Reilly’s AACA machine, and many more.
It was a month of two steps forward and one step back, but now the machine works, in a basic manner.
Main characteristics:
Stop movement (O’Reilly) for image capture,
Three motors- one to drive each reel, and one for the film gate/capture,
tension arms on both reels, reels are intermittent motion, driven by switches,
3D printed rollers with attached GT2 timing belt (idea from from Josh Sheldon)
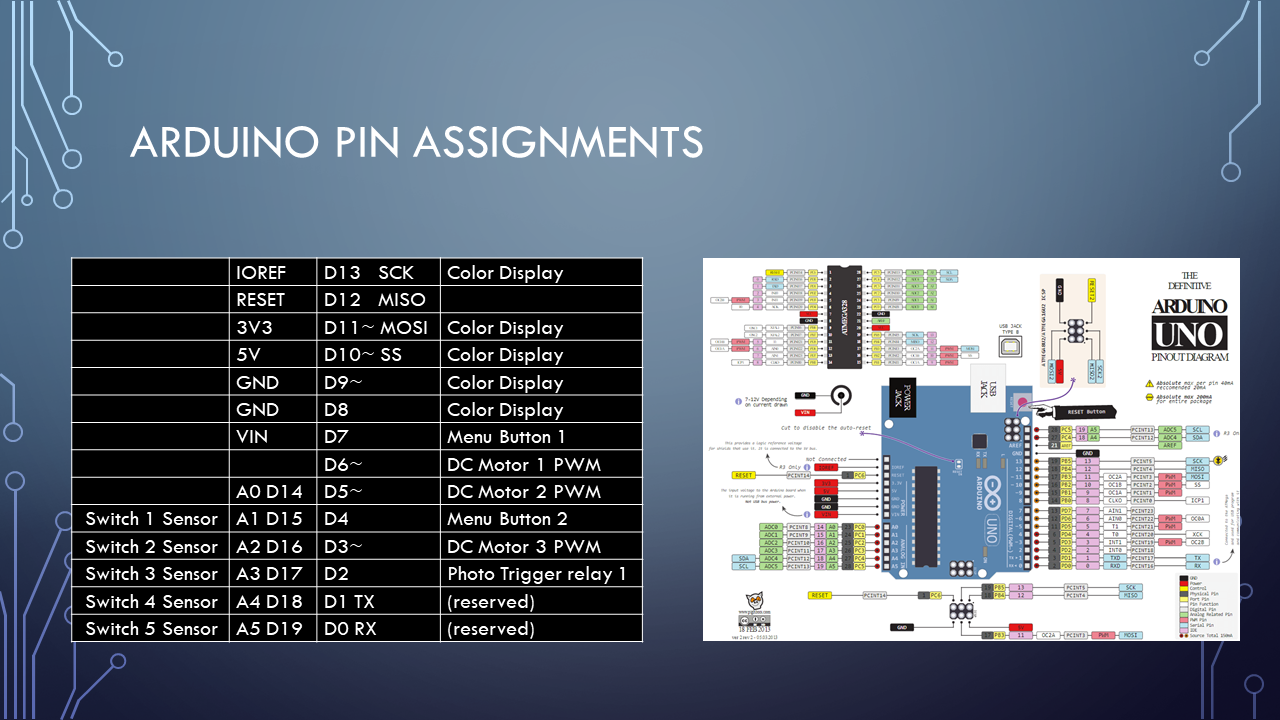
Arduino uno control, with a basic display for machine status- it controls the display, 5 switches, three DC motors and the camera remote shutter (through a relay).
I will post a video soon, but here are the pictures.
Regards,
Pranab
(oops, new user- I cannot post pictures. Will post them later, when allowed).
I can’t tell you how happy this makes me. It’s a beautiful build, @majumder! I can see you’ve significantly reduced the price of materials with some ingenious solves. I love the simple platform, the swinging arm and the belt-driven system. Really fantastic.
Congratulations on a spectacular contribution to the community! This is very exciting.
Congratulations! Great work with some important simplifications too. Very well documented too. I look forward to additional videos/info that you might share (I just subscribed to your youtube channel). Thanks!
Thanks, Matt, Greg. Could not have done it without this community.
Matt, price-wise I estimate that I actually used up about $350-$400, although I bought about $750 worth of stuff, including false starts (not counting the Panasonic GX7 camera, which I had lying around, and the 60mm macro lens which I bought).
My next step is to address the variance in where the film stops, so I plan to replace the middle DC motor with a stepper motor.
I suspect that part of the variance stems from the change in tension at the various positions of the two tension arms. I will think up ways to even out the tension between the extreme positions of the tension arms.
One step at a time. After all, a month ago I did not know the difference between an M3 and a #10…
Greg, that channel is filled with a lot of stuff- community, family, film-making, band practice
Cheers,
Pranab
“Fast, cheap, and accurate- You can only choose two out of the three.” - Anonymous
Pranab, I really enjoyed your video, it was very pleasing to watch (and I subscribed to your channel ). I would love to see some results of digitized films if you decide to post some. Also, if you decide to try using a stepper motor for the film transport, I would be curious to know how that works out. Thanks for posting!
Very nice, I’m jealous! Where can we get the 3d model for the roller you created and the gate? Did you share them somewhere by any chance? Planning to build one and that kind of part are kinda preventing me of starting to experiment.
Thanks, SkinnyV. I will share everything, with a timeline of about a month. I want to do the stepper motor modification first, and then clean up all the documentation- it always lags reality .
For the 3D parts, I will share the stl and the OpenSCAD files. For the Arduino, the code itself. For the stripboards, the Fritzing files. Finally, a PPT to tie it all together.
Changed the central (drive) DC motor with a stepper motor. I could not figure out why it seems to be using a few more steps than the number I get from calculation. (drive roller- 20 frames, with a 60-teeth GT2 gear, which means 3 teeth per frame. The stepper motor has 200 full steps per revolution, and a 20-teeth GT2 gear, so it should use 200/20 X 3 = 30 steps. However, I get 32 or 33 steps).
The stepper motor is much faster than the DC motor since it stops on a dime. Frame registration is still variable, by about a quarter of the sprocket distance, about 4-5 time less than with a DC motor. The remaining variability comes from the resolution of the 3D printed ramps on the drive roller. I tried running the stepper with 1/2, 1/4 and 1/8 steps but the variance remains (which is what makes me think it is the 3D print resolution). (This variance is a separate issue from the extra stepper motor steps).
For undamaged film I have been able to get 100 frames per minute (1.6 fps) on capture. It still needs post processing (stabilization, cropping). The GX7 captures beautiful images at 16 megapixels, so that is more than enough to zoom in and still get 4K video, if desired. I have been using DaVinci Resolve 14 for post.
Here is one of the sample output from the process- I post the first minute of the film. It was almost completely faded to red, so I am proud of the crumbs of other colors that were still hiding in there.
As far as rewinding the reel goes, we can do it (in a clunky sort of way). First, of course, the 3D printed film gate is one closed piece, so I can rewind only after the film runs through completely. Second, the DC motors on the two reels are each powered with two disconnectable wires, mainly because there are three separate 2’X1’ boards.
Well, at the end of scanning, I realized that if I reverse connect the wires to the empty source reel motor, it can serve as a rewinder. It is rather slow, since I picked slow DC motors (25rpm), and geared them down even more. If you want to think of it was a feature, well, it is better for aged films .
At this moment I am not thinking of a revision- that may have to wait till summer. My current priority is to fix up my post process. I did get some footage, but the stabilization is rather poor.
Folks,
Apologies for the long silence. Life.
I have posted all the assets possible in this dropbox folder. It is not completely documented- will work on that over time.
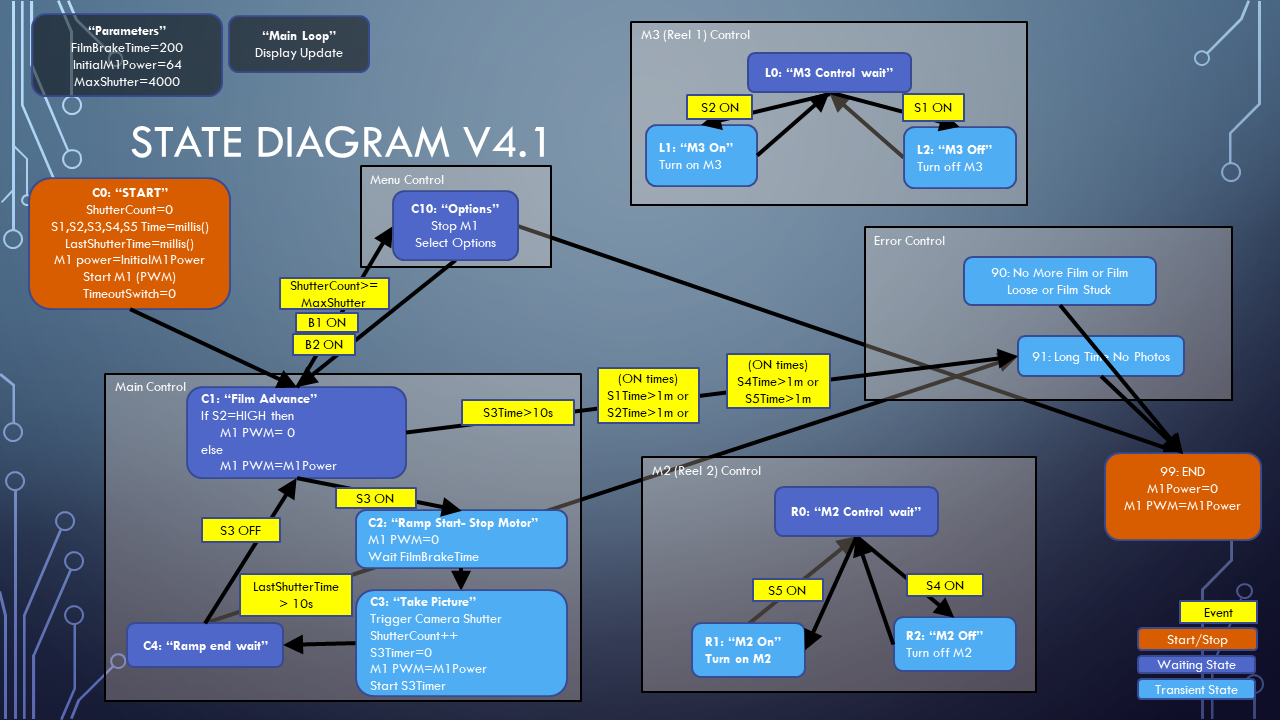
It has the 3D prints (SCAD files, which you can compile to STL using the OpenSCAD program), the arduino code, and the PPT and parts list.
I suspect that the 3D printing files (code, rather than STL) may be useful to some folks- I did not find anything similar during my search.
Regards,
Pranab
 Introduction")


 Film Division of India- Udaipur City of Lakes (1 minute)")