@Roland - amazing result! At least on my mobile phone’s screen. (Watching it on big screen has to wait until tomorrow.)
Interesting idea to blend different versions together. This would also enable to mask out distracting artifacts selectively.
@Roland - amazing result! At least on my mobile phone’s screen. (Watching it on big screen has to wait until tomorrow.)
Interesting idea to blend different versions together. This would also enable to mask out distracting artifacts selectively.
I was tinkering with motion estimation for a different stage of processing a few months ago, but I learned that most Nvidia GPUs have dedicated hardware for motion estimation. Like, it’s not a shader and doesn’t use normal GPU resources. If you’re not using it for motion estimation, that part of the die is idle. It can run on 4k frames at real-time (60+ Hz) speeds. I think they use it for frame interpolation in games, so it has to be fast.
It’s been present in GPUs released since 2014 but it got even better with Turing in 2018. The keyword to search for is Nvidia’s “Optical Flow SDK”.
Even better, they already have a nice wrapper for it in OpenCV. Here is some example code. (There is an inconvenience: you need a CUDA-enabled OpenCV build, which is not the default pre-built library you can download from their site. That said, I was surprised how little fuss it took to build the library myself. Usually building monolithic libraries like this is a huge pain but this one wasn’t.)
This looks great! Nice work.
When I saw someone show Topaz AI used on 8mm footage here a month or two ago, it looked too good to be true. I grabbed the demo and tried the new Starlight mini model… and I hated it. It works magic on things that aren’t people. But… the blurrier the input (and this wasn’t a particularly high quality camera, used indoors, often poorly focused), the more it kind of “generates” a human. Across just a few seconds you could watch someone’s face sort of oscillate between three or four different looking “people”, none of which resembled my actual family member. It was a creepy AI nightmare and totally unusable.
I stopped my experiment there, but I wonder how your strategy of dialing it back down by blending the various outputs together would work on people. It works so well here that it might be worth reopening the experiment.
The difference in perception is really interesting. To me it looks like someone is emulating Super Nintendo games on 2xSaI engine. ![]()
I guess the one truth you can take away from this thread is that the amount of editing entirely depends on the audience. Admittedly, I also prefer it when footage from e.g. world war documentaries is made to look a little more contemporary as it brings the people and events closer to the present, but the character of the original film still has to be present to make it real or true, so to speak. I feel close enough to the times of Super 8 that I don’t “need” that step, but please keep posting edits like these. I love seeing what’s possible. ![]()
Really great results!
I’m a macOS user, and I know that AviSynth isn’t available on the system I’m working with. Maybe I can set something up through a Bootcamp-like system to run Windows on my machine. My main goal is to remove dust.
The question is: in what quality is it exported? My master files are often ProRes 4444 or DNxHR files because I value quality. For distribution purposes, I use Handbrake to make them smaller. Is it possible to maintain that level of quality when it comes to Avisynth?
Oops, I just realized I converted my file to 25 fps, which is slowing the clip down. The file was already at 18 fps, which is different from my usual workflow.
As for Topaz, I’m using an older version that doesn’t include the AI option. I have mixed feelings about this program: I don’t like it because it’s far too aggressive, difficult to configure, and produces a lot of artifacts. Paradoxically, it impresses me because it can “clean” and increase sharpness in a spectacular way, but it favors certain shots regardless of depth of field, which can lead to strange results. When I stack my file versions, it only contributes maybe 10% to the final result—but it does bring something extra.
I’m not a great Avisynth specialist, but I know it’s finicky about the formats it accepts. That doesn’t bother me too much, since I work exclusively with uncompressed .tif files, and Avisynth handles that format without issue. I wrote scripts to apply stabilization only, but in the end I use an off-the-shelf application (no longer available) called Film9. It’s an application that Gilles Houssard and I wrote a few years ago. I haven’t found anything better than these filters for dealing with dust. If you have other options, let me know.
You can find some old discussions about this and avisynth in this post. Summary: avisynth can be set up to work with 16 bit throughout its processing. Note the “Update” section of the post for some details.
Yep, your clip is more than 4 min long - it should be 3:24 min. ![]()
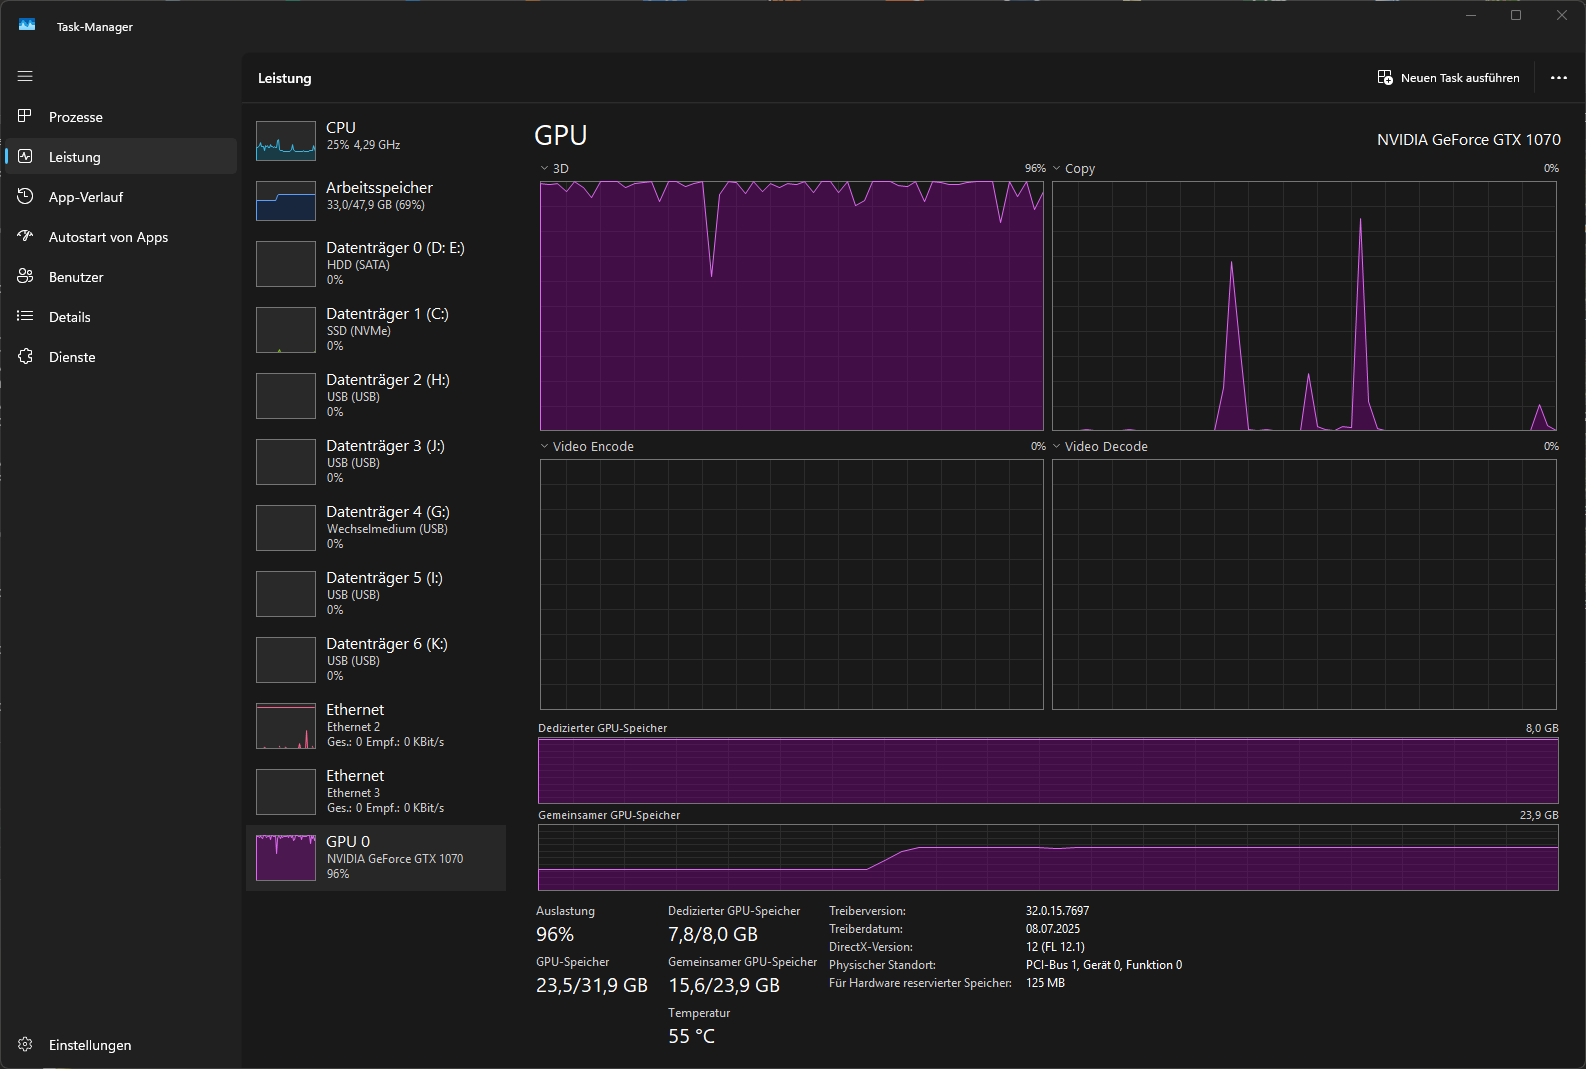
Well, as you might assume, I am tinkering around these things as well. My machine is a little bit dated, with a CPU classified as “Intel(R) Core™ i7-8700 CPU @ 3.20GHz (3.19 GHz)”. As GPU a modest “NVIDIA GeForce GTX 1070” is doing its works.
Currently, I am using the optimized avisynth-code for my processing, but it is rather limiting in two ways: first, the important options are hidden deep below a lot of clutter. Secondly, access to intermediate results is difficult - so certain optimizations necessary for fast motions cannot be implemented.
I have looked into CUDA-enabled OpenCV, but it seems kind of difficult to install. There is a third option to speed things up, namely AI-frameworks like TensorFlow or PyTorch - which can also be used as simple image processing tools - just drop the “AI”…
Well, these “AI”-approaches have the advantage that you can decide were processing is taking place - either CPU or GPU. And they are increasingly used for those tasks we are interested in. Just browse github for some approaches.
Specifically, I want to limit myself and report here on the task of frame interpolation, as this is the core functionality for improving the visual appearance of scanned S8-material.
For a start, I have done some simulations with a rather recent neural network approach to frame interpolation, specifically "Frame Interpolation for Large Motion (FILM) ". The following results are not based on the original authors code, but on another implementation using PyTorch - that was easier to set up for me.
Now, first interesting thing is the running time; I rendered out a 18 frame interpolated sequence between two frames with image dimensions 1300 x 975 px. While the GPU processing took about 27 sec (that’s 1.5 sec/frame), the CPU processing needed 8:03 minutes (that’s 26,8 sec/frame). For comparision, my CPU-based avisynth-script needs about 3 sec for a larger 2600 x 1950 px frame.
So while the speed-up between CPU- and GPU-based processing is not too surprising, the comparision between “AI”-based GPU processing and CPU-based avisynth processing gives testimony to the effectiveness of avisynth-code. Running the FILM-implemenation on the large image dimensions of 2600 x 1950 px maxes out my GPU
and results in a whopping 3 min/frame processing speed - GPU-based.
Now, what about the visual quality of the results? There are certain challenges for frame interpolation approaches like occlusion, transparency, fast motions. Therefore, there is quite some research ongoing in new neural network-based approaches for frame interpolation in order to optimize this situation. The one approach I picked for closer examination is one of the better ones, especially with large image motion.
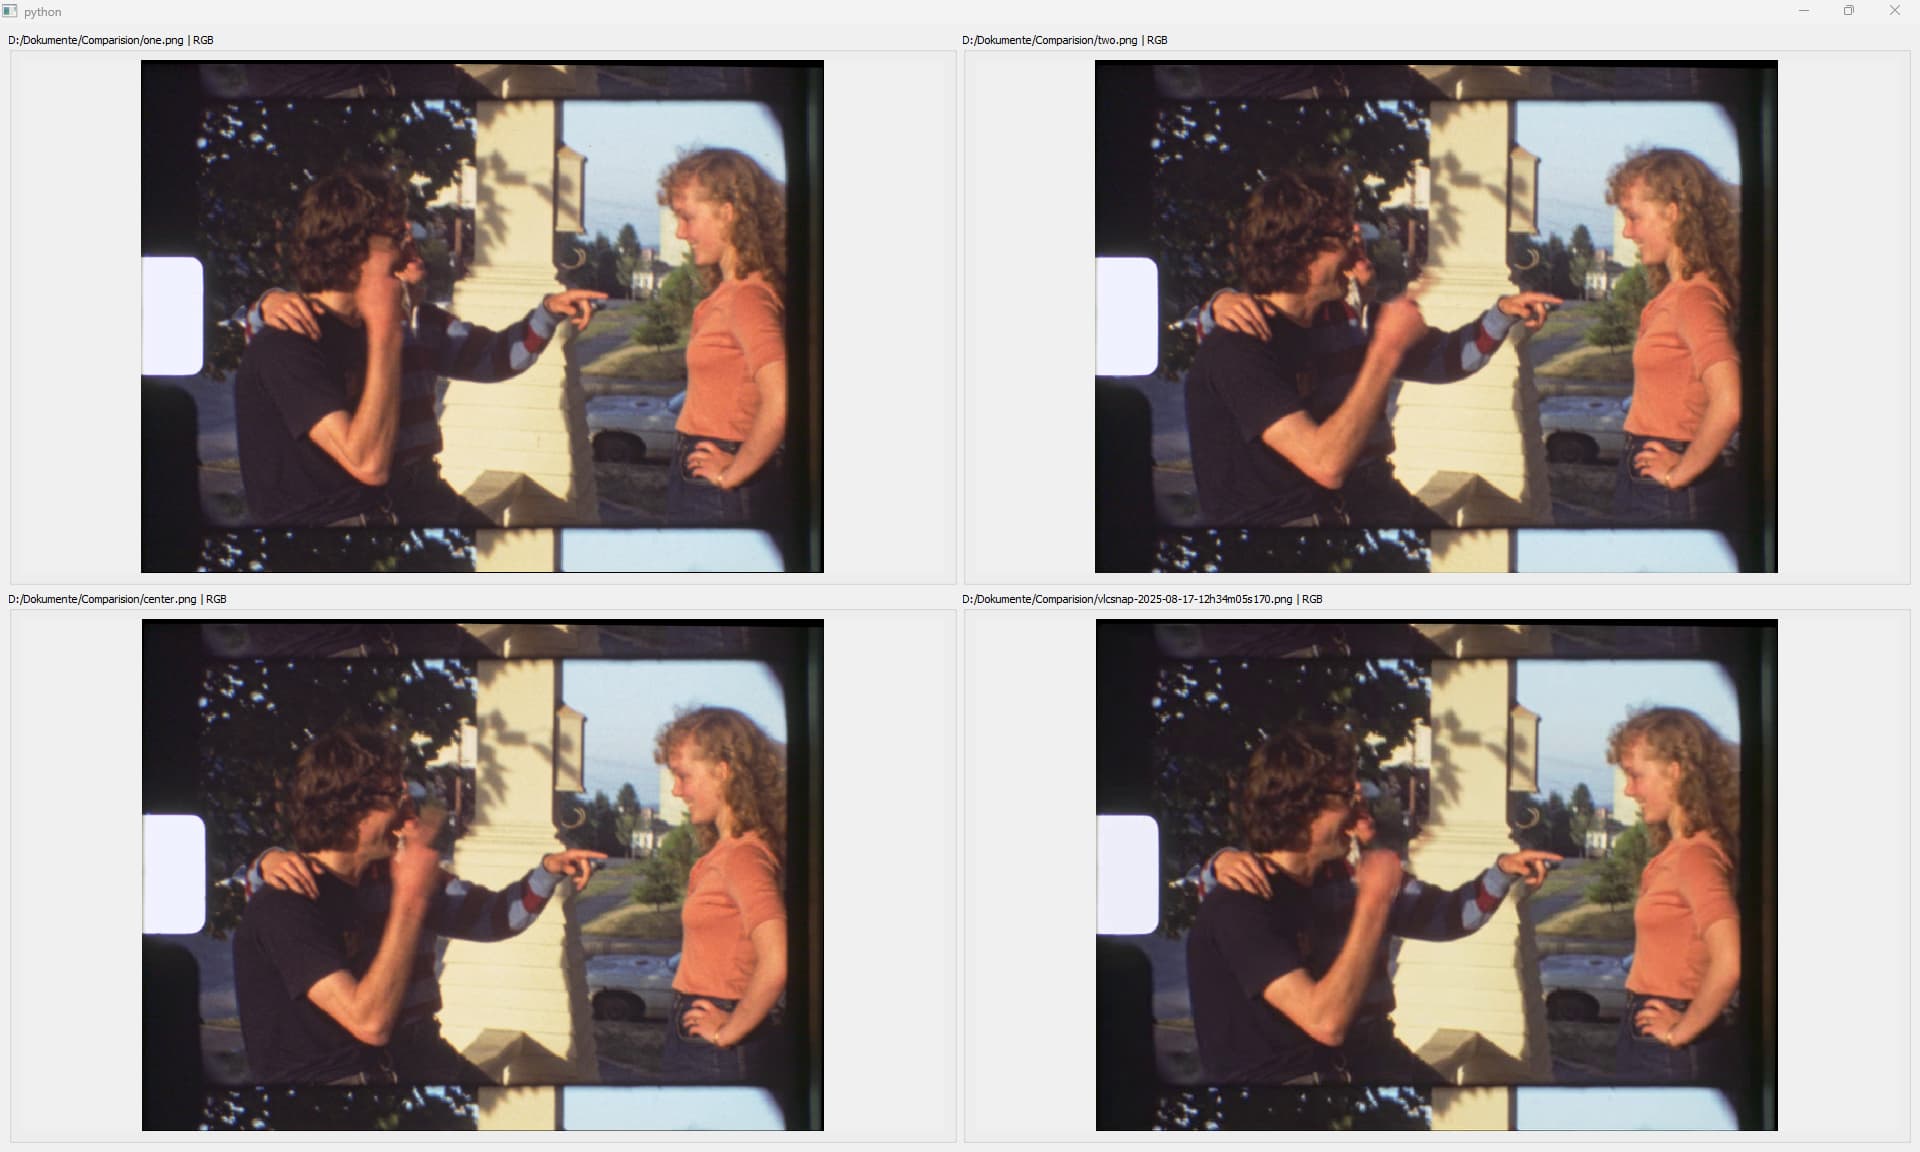
Anyway. Here’s the result of a test run. [TL, “one”] is the first reference frame, [TR, “two”] the second one. [BR, “vlcsnap”] is the neural-network result of an intermediate, interpolated frame. [BL, “center”] is the actual real intermediate frame for reference:
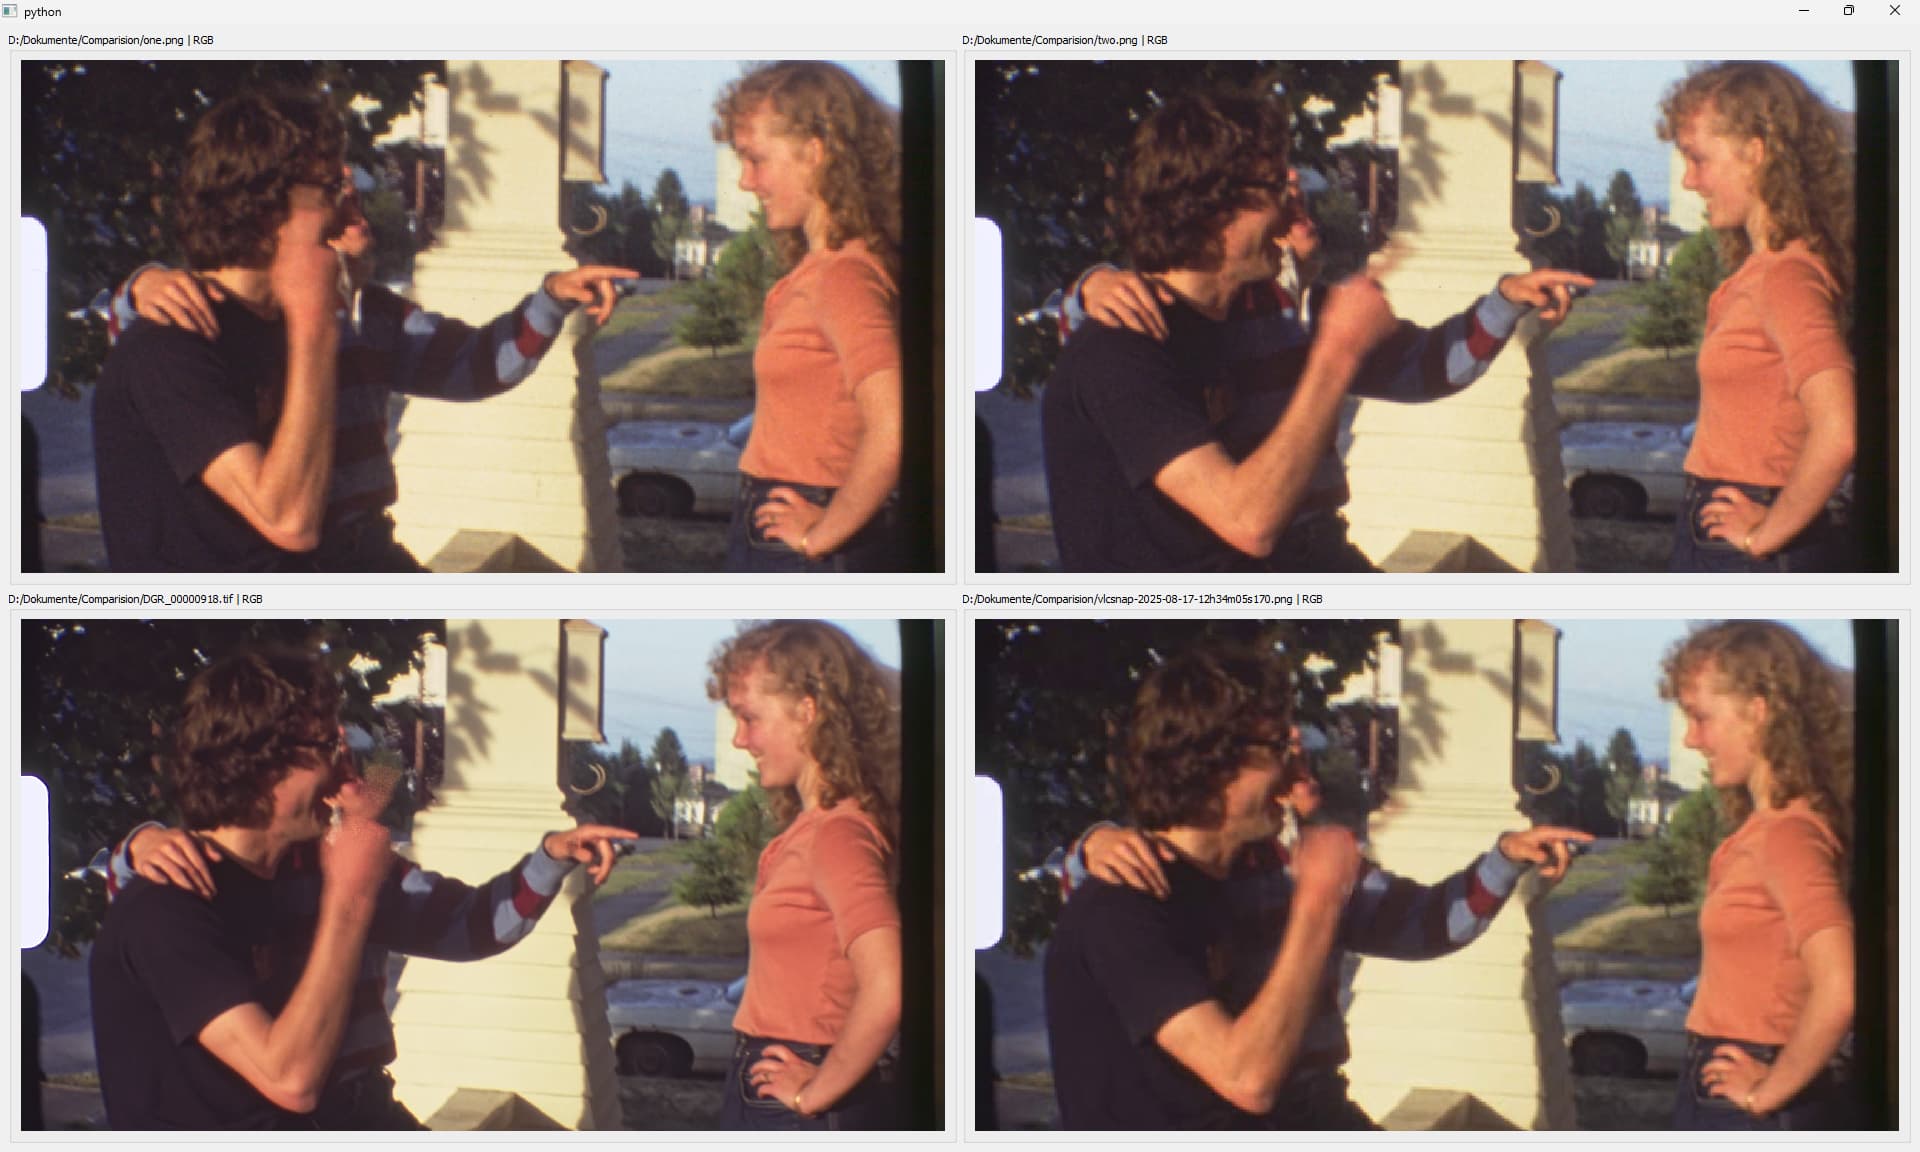
Overall, the interpolated frame looks fine - safe from the fast-moving finger of the leftmost guy. For a better comparision, here’s a cut-out. At [BL], I have exchanged here the result of my avisynth-script. Note that the finger of the guy is rendered better, actually quite close to the reference image. But: the motion area is displaying a fine pattern created by the algorithm,if you look closely. A similar error area can be seen on the other guys hand. Basically the dark blob which should not be there. It is here where the avisynth motion-estimation algorithms failed on two occasions:
In summary: GPU-processing can speed up things substantially. The rather large image sizes we use in our postprocessing pipeline might overwhelm older graphics cards. Any neural network-based approach seems to create a lot of overhead with common software-approaches - which tends to slow down processing as well. It might be of advantage to utilize classical image processing based on GPU-code. A straightforward non-“AI” implementation should outrun any neural network-based code.
As usual, it’s quite difficult to assess the performance of a neural network - these things tend to be quite hallucinatory.
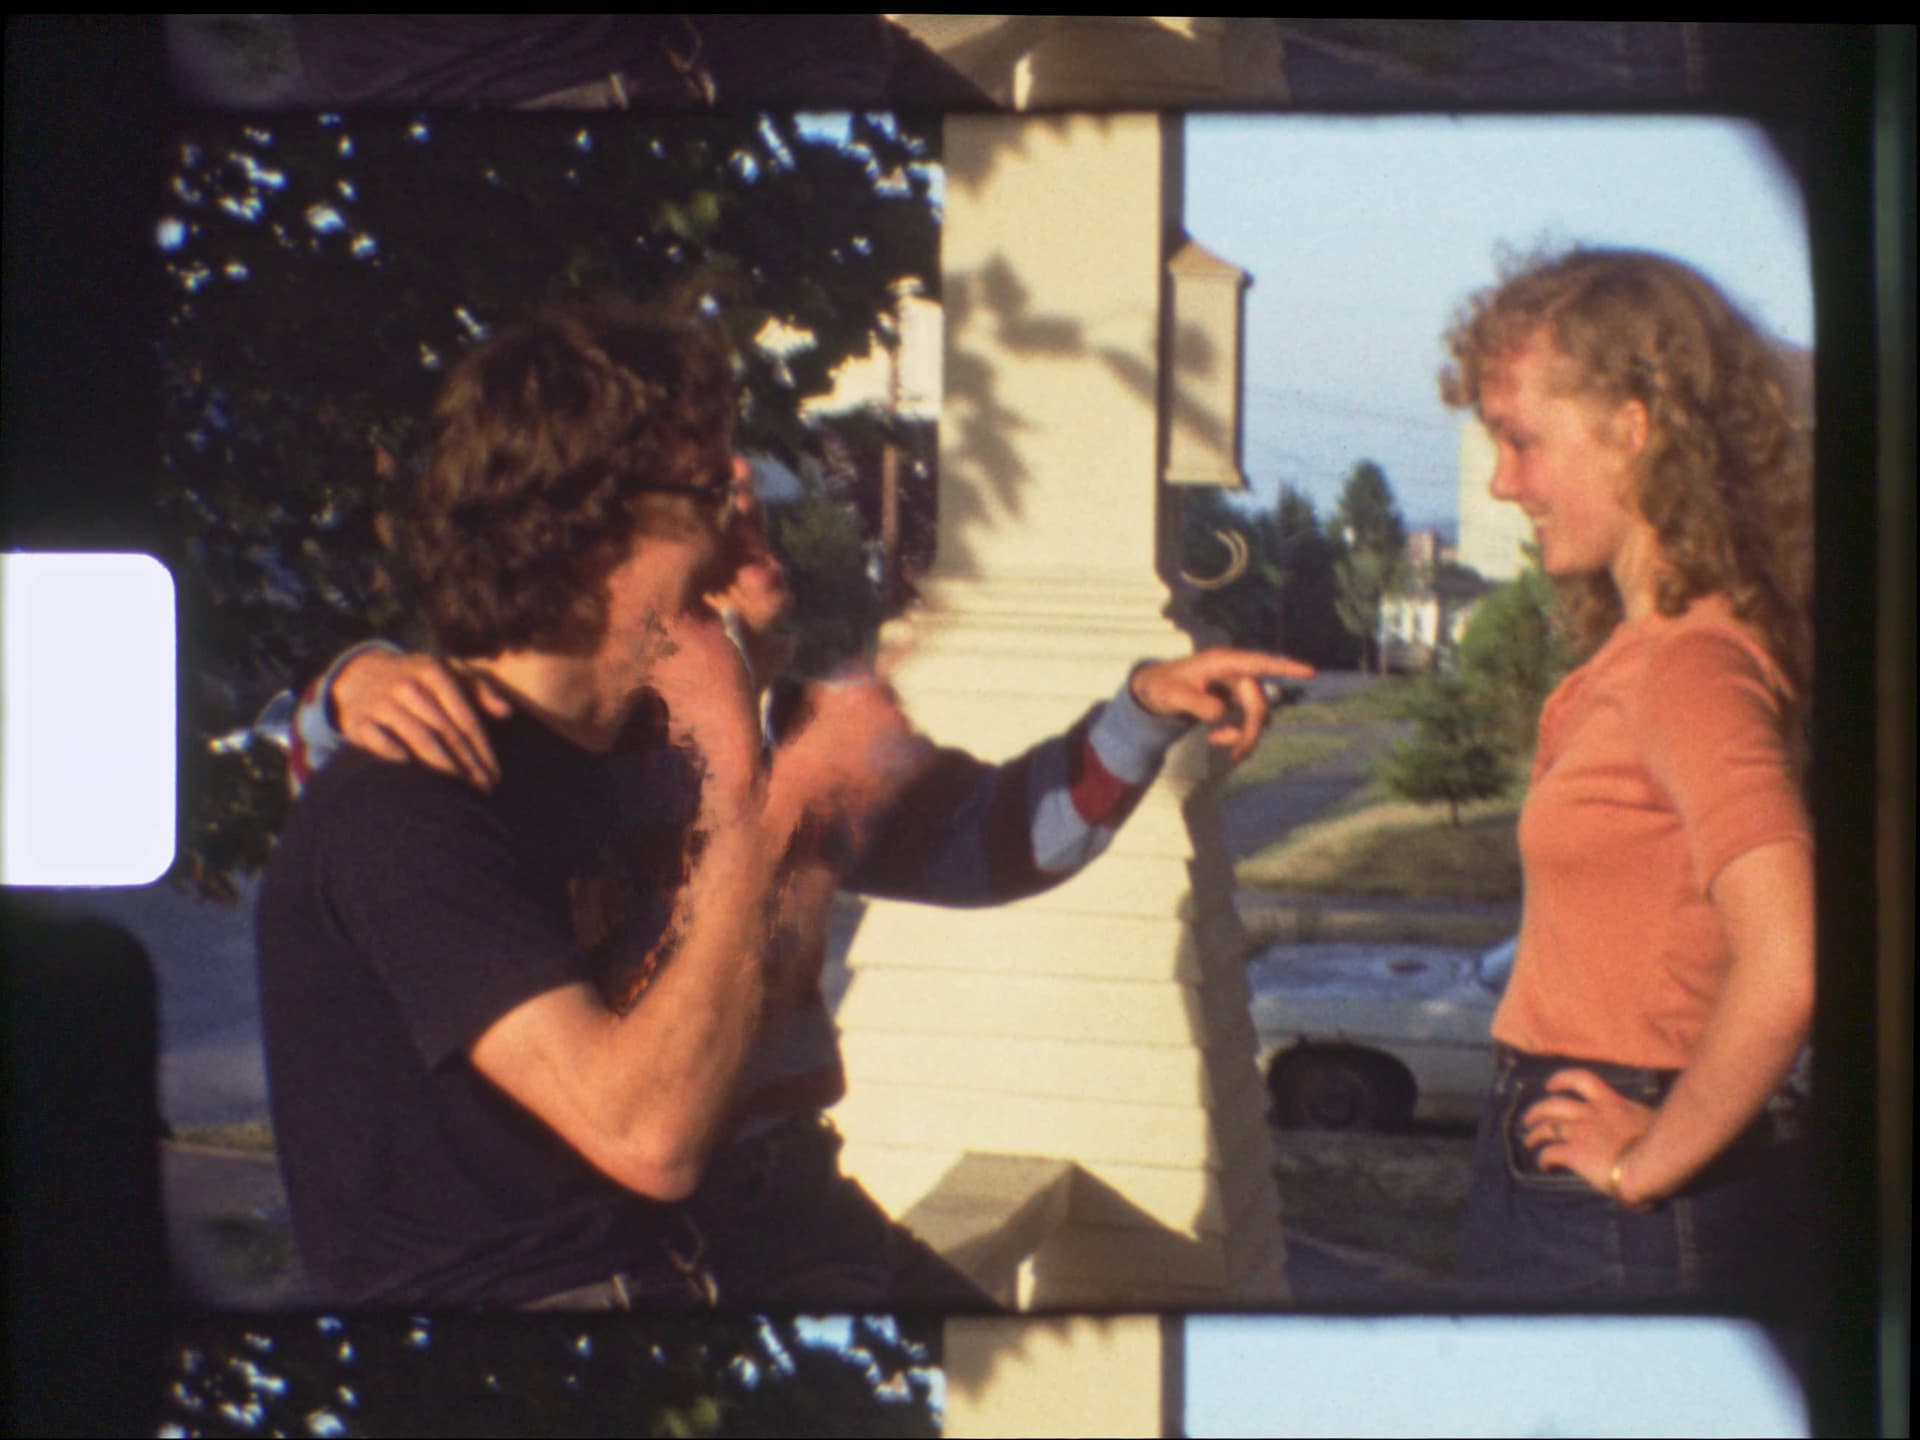
One further comment: the neural network simulation resolution failed completely at the large 2600 x 1950 px run. Here’s the result:
Probably because the motion was too large in terms of pixel movement for the neural network to capture this correctly (it employs image pyramids for large motion estimation, but only up to a certain level).
Finally, note that the task examined here was only frame interpolation. No other image enhancement techniques were performed - for this reason, the results lack the plastic appearance of Topaz and other consorts.
One last point - the neural network used here was trained with clean digital image content. One of the challenges of cleaning S8-material is the excessive film grain which tends to throw off most motion-estimation algorithms. I can see here advantages if the neural network is trained on S8-data instead of crisp digital data.
I’ve been using RIFE for frame interpolation and getting reasonably good results. This GitHub branch has a bunch of fixes that aren’t in the official branch and the pre-built binaries aren’t debug builds (like the official binaries) so they end up almost 10x faster. The RIFE researchers have released many models over the last couple years and the executable can work with any of them. It also uses your GPU if present, which means very fast frame times. (I haven’t measured it very carefully, but a full reel’s 3600 frames are usually done being interpolated to 7200 frames in something like two or three minutes. I guess to make that mean anything, these are usually around 1720x1200 and I have an RTX 3070.)
Once you have a folder set up like this:
rife-ncnn-vulkan.exe
rife-v4.18/
   flownet.bin
   flownet.param
images/
   00001.tiff
   00002.tiff
   ...
output/
You just run it like this:
rife-ncnn-vulkan.exe -i images -o output -j 8:8:8 -m rife-v4.18
The -i is the input (folder or MP4), -o is the output path. It writes 8-bit PNGs. (It does floating point processing internally and it doesn’t look like it’d be too hard to maybe modify the source to get 16-bit file output, but this is my very last step before running ffmpeg.exe on the output folder and I’ve been doing final delivery in 8-bit, so it hasn’t bothered me too much yet.)
The -j argument is how many threads should be used for loading/processing/saving. So 8:8:8 means 8 threads for each of those tasks. (I’m running on a Ryzen 5950X, so I’ve got a bunch of threads.) Finally, the -m is for the model. I’ve tried a few of the newer ones but seem to have had the best luck with 4.18. The output folder will have twice as many frames as the input. The odd numbered output PNGs are identical to the input frames. The even numbered frames are interpolated.
Like FILM, the results aren’t perfect, but I’ve had entire reels where I haven’t seen a single artifact.
There is actually one more intermediate step I do between running RIFE and packaging it up into a video file with ffmpeg: I go through the folder looking for bad interpolation and delete those frames. Similarly, if you export your Davinci timeline’s “edit decision list” or .edl file, it’s easy to parse and you can write a script in a couple lines that will automatically delete all the (always bad) interpolated frames between scene cuts! That means being able to do this in a single pass instead of lots of separate interpolation operations. Very convenient!
Once the folder is clear of bad interpolation, I have a little script I wrote that generates a frame list for ffmpeg. For “holes” in the file list, it writes a duplicate line in the frame list. So, even if there is a whole section of fast movement or panning across a repeating pattern (like a brick wall) that was interpolated poorly, the output video just sort of falls back to 18fps for that short section and then resumes 36fps afterward.
So then, instead of calling ffmpeg with the interpolation output folder as the input, you just call it with the framelist.txt as the input.
Here’s an example video from 1974. Between 1:44 and 1:50 there is some panning that was much too fast and RIFE got confused by both the curtains and the repeating pattern on the wallpaper. By deleting the poorly interpolated frames and telling ffmpeg to double-up the original frames, I picked the lesser of the two evils: instead of distracting artifacts, the frame rate just drops for a half-second here and there. Yes, it’s still a little distracting, but not as bad as the sometimes very strange artifacts that the neural net comes up with.
EDIT: I’ll be the first to mention the other artifacts. My judgement call was just that they weren’t bad enough to drop the frames. Again, keeping the lesser of two evils in mind.
There are little things like that here-and-there, but on the whole the interpolation feels like a (huge) net positive.
Thanks @npiegdon - that is an interesting link!
Nice approach!
In reality, I actually do film interpolation to increase frame rate directly in DaVinci, with the tools given - they are actually not bad. I usually stay with Optical Flow, as it gives you a smoother result in pans. Only for difficult parts where the Optical Flow does not cut it, I switch to one of the AI-models. But it is important to cut the footage into separate scenes for that approach to work correctly. Also, I switch on Playback → Render Cache → Smart. Anotherwise, my hardware is not up to the task…
Exceptional good result! Wow. I actually was looking for the algorithm to fail on the curtain and was surprised it didn’t… ![]()
Yes, small objects, especially when moving fast, do not work well. For example flocks of small birds. Things magically disappear.
Again, your example footage is an outstanding example of what one can achieve nowadays, transfering historical footage into current times…
Sidenote: I do occationally test screenings with unsuspecting subjects. I display the same footage side-by-side, with the left side usually occupied by the best the raw footage can achieve (that is: film grain still present, fps not increased) and on the right side the best all tools and whistles can achieve (degrain, pushing up fps). The color-grading of both sides are the same. The footage is shown on mobile phones, laptop screens or TV-sets. I have yet to find a person which prefers the film grain version… (although my sampling size is small - about 7 to 8 people…)
Thanks! I have a bunch of other strange ideas I haven’t seen elsewhere to share when I get a chance, too. (One good example: the sprocket hole area is completely present throughout that whole example video… if you look carefully!)
Not if you use the EDL trick I described above. It saves all the separate-scene work by automatically deleting the bad transition frames, all at once. So you can just apply it to the whole timeline and not worry about a bunch of tedious intermediate steps. (I guess this does assume you have a cut between each scene change but Davinci’s “Detect Scene Cuts” usually does 95% of that work for you.)
Haha! I am not surprised, but it’s good to hear the results anyway. Thanks for checking with various people.
I had originally intended to deliver the final footage to my family with a choice of several “levels” of processing (sort of like the side-by-side comparison you just described) but eventually decided to cut the complexity of the final web page and only offer the fully-processed versions. Half of my target audience are approaching or are in their 70’s already and beginning to struggle to even use their various phones and tablets, so it seemed like keeping the page’s complexity down to the absolute bare-minimum was the right call.
I’ve wanted to keep the direct URL unlisted for the sake of keeping it out of search engines and avoiding bot traffic so I won’t write it out explicitly, but if you view the example video again and walk the URL path up two levels you’ll get to see the page. ![]()
My favorite features there are the little buttons at the top, the histogram, and the tiny face pictures that appear when you choose a person. (It works on phones but it’s better on tablet or larger screens.) I have a whole workflow that supports choosing/saving the thumbnail and faces conveniently, along with a little tool that generates the page from a flat folder that just contains one text file per video with the metadata for each.
Those 58 videos (from 66 reels) were shot with my grandfather’s camera. Shortly before I sent this out to my family last month, one of my aunts reported “oh, I have a bunch of that old film, too. I didn’t want to bother you with it though…”. I’ve since got my hands on her 47 additional reels and am feverishly processing those now. ![]()
Hey, didn’t notice before. But having this hint, I see what you did here:
Some sort of infill is happening here on the very left side of the frame.
![]()
Nice setup! Haven’t been at this phase yet… - too much tinkering with image improvements…
Well, that is familiar to me as well. Good stuff and thanks for sharing!
Huh ![]()
Without knowing the original material, this does indeed look very pleasing.
Is this just for frame interpolation or did other things happen like noise reduction and dirt removal?
Instead of removing the badly interpolated frames during scene cuts, couldn’t you just batch-interpolate scene-by-scene? Or is the first and last frame always buggy?
This was the first feature I noticed on your webpage. Very nice! Second thing I noticed: all the film titles with cities near me.
Question, how did you generate the metadata originally that is used to create the webpage. Is there a method for face tagging videos automatically. If the original media doesn’t have a date written on it what reasoning do you use to assign a date. For scanning photos, I have used the following categorization process: I try to best estimate date by ages of children and then I assign a month based on what the season is. Everything wintery is always Jan 1st, everything summery is July 1st, etc…
Have you considered adding a comment feature or something similar to crowdsource information about the movies from your older relatives. Some mechanism to allow them to share what they remember about the movie.
It’s not just the very left side of the frame. ![]() If you can find a scene with a sudden camera direction change that would normally throw stabilization off and make a large portion of the film border appear… it won’t.
If you can find a scene with a sudden camera direction change that would normally throw stabilization off and make a large portion of the film border appear… it won’t.
I hate losing details, even at the frame edge, so my goal was to crop as little as possible (while still getting some stabilization), so I’ve inpainted all of the border. When it needs to squeeze into the picture for a few frames, it is often imperceptible. When you can see it, it’s still much less distracting than having the black frame border appear.
And the way I’ve automated the step of detecting the frame border seems relatively novel. Or, at least I’ve never heard anyone talk about it before. I can’t wait to share all of it!
It’s all of the processing. ![]()
DaVinci Resolve’s stabilization helps to make NeatVideo’s temporal noise reduction work better. By the time the frames even reach Resolve, they’ve already gone through about half of the final color correction and a cool, custom dirt removal step that I’m excited to share the details, a video, and the source code for when I get a chance. I have Resolve write out a folder of TIFFs so I can do a sharpening step using ImageMagick (I prefer their “adaptive-sharpen” operation to anything Resolve has) and then delete the poorly interpolated frames before producing the final h.264 MP4 using ffmpeg.
To batch them scene-by-scene in an automatic way, you’d still need to know the cut point between each shot, so it kind of works out the same either way.
Because the interpolated frame inserted between two unrelated shots is always a horrible AI nightmare that tries to blend/merge them in unnatural ways, it’s always safe to delete. (It’s even worse when the cut was only a slight pause or slight camera position change between similar shots. Then the AI’s attempt at blending makes things kind of slide or fly around unnaturally and it’s even more distracting, somehow.)
Because the final video will be running at 36 fps, in order to not disturb the length of the video or pacing of the frames, my little hole-filling script will repeat the final frame of the previous scene one last time before the next scene begins.
Original frames (after RIFE’s interpolation/renumbering) showing a scene change between frames 5 and 7:
1 3 5 | 7 9
With the (even) interpolated/AI frames:
1 2 3 4 5 6 7 8 9
After checking the EDL file exported from Resolve and calculating that frame 5 was the final frame of one shot and frame 7 was the beginning of the next shot, the little script would write out a framelist.txt for FFMPEG to give you something like this:
1 2 3 4 5 5 7 8 9
The bad interpolated frame 6 is gone, the doubled-up (at 36fps) frame 5 is absolutely imperceptible because the next thing your eye sees 28ms later is a completely different scene, everything works, and the timing of everything else is unchanged.
I went down the path of automatic face recognition for maybe 45 minutes before I realized it was going to be hopeless. Here are some “faces” that are literally the best frame in the whole reel for that particular person:
If there is a face detection algorithm that can pick those people out, I haven’t seen it! (That first one was the camera operator’s reflection in a mirror, who is otherwise never seen during the reel. I still haven’t decided if it’s disingenuous to claim that they’re “in” the video.) ![]()
Notice the inpainting at the top 1/5th of the middle face. They weren’t even all the way in the frame (and, really, they were trying to escape being captured on camera ![]() ) so to even get a square image, some of it had to be made up.
) so to even get a square image, some of it had to be made up.
What’s even funnier, because these are mostly members of the same family, the face recognition would get confused between family members because of how similar their faces were! (Especially for the younger kids.)
There really wasn’t any other choice. Picking the faces is a manual process. But, there is a silver lining: if you’re picking them manually, you can pick the best face instead of just any face. You can capture the best smile, their goofiest expression, the most memorable moment, etc.
The point of having the faces on the website is to help you track down that one video you’re looking for where uncle so-and-so was doing that wacky thing, but you just can’t seem to find it. So targeting the “most memorable” version of the face from that reel should hopefully go a long way toward being able to locate it quickly. It’s also why the green highlight circle appears around their face in the list. You can click uncle so-and-so and then just skim down the filtered list of videos looking at the green circled face until you find what you’re looking for.
The sleuthing was one of my favorite parts. Like your collection, the info written on the little boxes was scant at best. Maybe half of them had reliable dates. The merged-into-a-400’-reel reels had no information at all or maybe just a “1971” written on a sticker (and a few reels from 1973 tacked onto the end anyway). A couple of the reels had their boxes swapped, making it a little trickier.
I used everything I could! I counted candles on birthday cakes (and learned that my family had a “and one extra for good luck” tradition ![]() ). I actually tracked down jerseys and end-zone writing of the football games that were incidentally playing on the TV in the background. That’s a good way to tell Christmas Eve apart from Christmas Day or New Year’s Day.
). I actually tracked down jerseys and end-zone writing of the football games that were incidentally playing on the TV in the background. That’s a good way to tell Christmas Eve apart from Christmas Day or New Year’s Day.
There was a remarkable amount of footage of Christmas trees (various holiday visits across December along with the holidays themselves), so one way to match years is by comparing the sort of “ornament fingerprint” on the trees. If you can find patterns in the lights or ornaments (or even just the shape of the tree if it’s a live tree) that match between reels, you at least know it’s the same year.
My mother had kept pretty good genealogical records for all of these people so I had a reliable list of birthdays and anniversaries. With that you can kind of use babies in a “counting tree rings” sort of way. If someone was born in June and you see them during one of their first Christmases, they’re either going to be 6 months old or 18 months old… and there is a world of difference in the size of a child between those ages, so that can be a determining factor, etc.
I don’t think there’s any silver bullet here. It’s just a lot of fun (or alternatively, frustrating) detective work!
I had. I still want to. I just haven’t figured out the best way to do it. It’s a good idea and the people that were present in the video are brimming with stories about the footage anytime you show it to them. I’d like to capture some of that somehow before it’s too late. Again, many of these people are getting on in years and some of them are already gone, so if I’m going to do something like that, I’m going to have to do it soon.
My brother had actually suggested throwing a kind of “watch party” when I was done processing everything and connecting microphones to everyone. ![]() Then, later, I could add the new “commentary track” to each video. It’s just getting a little tricky to gather these people in one place now…
Then, later, I could add the new “commentary track” to each video. It’s just getting a little tricky to gather these people in one place now…
Ohh. I was actually wondering if RIFE was doing everything all at once. That was very helpful!
So you’re essentially batch-manipulating individual TIFF files along the way? Super-interesting!
The page is really playful, too ![]() I’m sure your family appreciates it.
I’m sure your family appreciates it.
Now I’m curious what your post-processing routine would do to one of my scans. I’ve made another attempt with NeatVideo, but didn’t have the kind of “hey, there’s a pattern in the wallpaper” revelation that you had in an earlier thread. If you have the time, and haven’t done so before, I’d love to read more about your post-processing steps.
Why does this have to be true, argh! ![]()