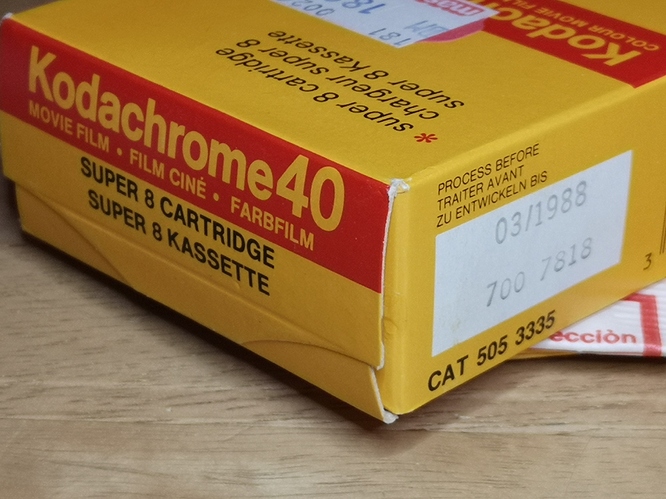
@bainzy - concerning “Kodachrome 25”… - well, my memory was twisted a little bit here. The Super-8 film stock I was actually using was Kodachrome K40. The Kodachrome 25 was the stock I used for 35 mm photography at that time. I do mix that up occationally…
Actually, I still own a a single Kodachrome 40 catridge from 1988, at that time priced about 19 DM, which is more or less equivalent to about 10 € nowadays:
Too bad there’s no lab any longer available to process it. There was still a lab in Switzerland, but this closed around 2006…
Anyway. From my experience, the exposure fusion algorithm (Mertens/Kautz/Van Reeth) is the best bet on combining different exposures of a single frame into something which is “viewable”.
Most importantly, it is basicallly a parameter-free approach (there are parameters, and for optimal results, you want to tweek them together with the specific camera you are using). Once you find a sweetspot, it does not matter much if you scan differently exposed scences or even different film stock - the results look ok. Great advantage in my view.
The original authors of the exposure fusion algorithm did not discuss too much how their approach actually works. Here’s my take on that: if you come from a photographic background you know that it was usual stuff in an analog photography lab to brighten and darken certain image parts which would come out too dark or did not show enough texture. You would select a main exposure time for the print and place your hand or appropriately cut-out paper pieces over certain image areas which would come out too dark otherwise. After that, you would do an additional exposure to further locally darken image areas which would otherwise be too bright in the final print.
In a way, exposure fusion automates this technique: they devised certain image operators looking for regions in each of the exposures of a scene which are
- well-exposed
- have a good color saturation
- or a good local image contrast
Now, for combining these areas of interest, they choose a well-know image combination algorithm which is pyramid-based and was initially proposed by Burt/Adelson in 1983. That is more or less the basic idea behind exposure fusion, as far as I understand it.
In any case, the best part of all this is that you do not even have to bother to understand or implement this algorithm by yourself (well, I did that anyway… ![]() ) - it is implemented as " cv.createMergeMertens()" in the opencv computer library. If you want to look at exposure fusion and all the other options (HDR-creation + tone-mapping) the opencv library has available: the following link shows you example code in C++, Java and Python (OpenCV HDR algorithms) which you can use as a starting point for your own software.
) - it is implemented as " cv.createMergeMertens()" in the opencv computer library. If you want to look at exposure fusion and all the other options (HDR-creation + tone-mapping) the opencv library has available: the following link shows you example code in C++, Java and Python (OpenCV HDR algorithms) which you can use as a starting point for your own software.
Concerning the exposure lag and so. There are two different points here which are important. For one, the image which is taken by the camera at a specific point in time is first processed in the camera, then transmitted to your computer and there basically processed again by the device driver. All this happens before your software even sees the data. That pipeline introduces a fixed temporal delay, which however could be taken into account by a proper software design.
IF you are working with low cost hardware, you are going to meet another challenge when attempting HDR-captures: your camera does need some time to actually reach the desired exposure level.
I specifically looked at three different low-cost cameras: the Raspberry Pi v1, the Raspberry Pi v2 and the see3cam_cu135 camera.
The Raspberry Pi cameras have all sorts of automatic stuff running which is difficult or even impossible to deactivate for full manual control. Specifically, you can not immediately switch to the requested exposure. It takes at least 3-4 frames until the actual exposure time is even close to the requested one.
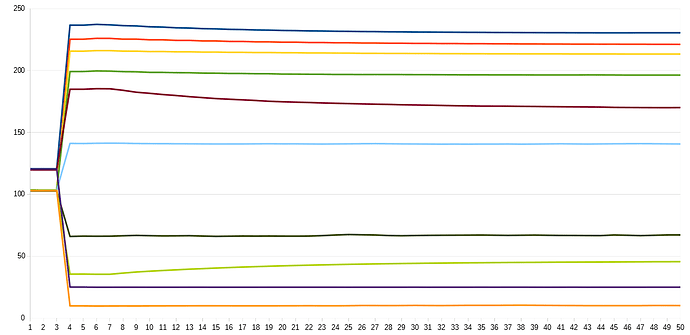
The same is true for the see3cam_cu135 camera I am currently using. Here’s a plot of see3cam_cu135 data showing that behaviour:
What you see here vertically is the mean brightness of a fixed film frame. Horizontally, the frame number after an exposure event is displayed. As you can see from the traces, it takes 3 frames until the camera even reacts to the new exposure time (I started with two slightly different intial exposure settings, one close to 100, one close to 128 - that explains the two different lines at frame position 1-3).
This inital dealy is most probably the delay introduced by the camera+device driver pipeline.
After this inital delay, the camera switches to the vincinity of the exposure value requested, but not exactly to that value. Mostly, the exposure values seen at frame 4 and 5 do not match the requested exposure values. Even worse (look at the brown trace!), sometimes the exposure only decays very slowly to the value requested.
To make matters worse, how long that relaxation lasts depends heavily on both the inital and the final exposure values - and, as these traces show, you might have to wait more that 40 frames with that specific camera for the exposure to settle. It is clearly impractical if you are scanning thousands of film frames. If you do it anyway, you will notice some flicker in the exposure-fused imagery.
Actually, exposure fusion has the nice property of equalizing shortcomings of your camera images, provided you are using more images than necessary to achieve a certain dynamic range: errors in camera exposure will be reduced and camera noise will go down as well in the exposure-fused image.
With your FLIR camera, you might have a much better setup available than I have. I worked with such cameras when the guys were still “Point Grey Research”, long before they were bought by FLIR. But rapid exposure control was not something we needed and looked into at that time. I think it would be interesting for the forum if you can report your results here!

