My Super 8 film Scanner

Hi there!

My quest was to find a good way to digitize my father’s Super 8 footage. I have about 3 to 4 hours of material lying around. So, I started browsing this forum and began exploring how I could shape it in my own way.

I bought an old Super 8 viewer and only used the mechanism that I needed. I control the motor using an Arduino, programmed to shift every frame. Then, a signal is sent to my left mouse, which presses the remote button of my remote control program, and this process repeats. Initially, I considered sending a signal directly to my camera’s shutter but was concerned about damaging it. I aligned the sprocket holes with Davinci Resolve, accomplishing this in Fusion using a Tracker. After that I used the Neat Video denoise & sharpening. I need to experiment with that with creating a sweet spot, I love grain! These are the results!

System:

Digitalised Super 8 film:

6 Likes

Hi @Utrecht, interesting setup. Congratulations with the results. In what format do you capture the frames?

Thank you! The machine is put together in a very DIY manner as you can see, but I’m satisfied with the results for how it runs. I’m very pleased.

I scan with a 24MP camera, and the cropped resolution of the frame is 4125 × 2939.

I am curious how people set their camera functions with a digital camera. I photograph each frame at 100 ISO, with an aperture of 5.6.

When I photograph, I get a very strong contrast. Lots of highlights, few shadows. I know that Super 8 generally has fewer shadows. But when I apply a picture profile to my Sony camera, it gets a lot better.

Do people have experience with this? How do you get the best contrast to make the digitized image look as natural as possible? And what does your histogram look like when you photograph a frame?

Generally, you want to use the lowest ISO setting available, as this minimizes camera noise. The aperture setting depends on your lens. Most lenses have the sharpest image in the mid-range of the available aperature settings. For specific lenses, like the Schneider Componon-S, you can find information here on the forum and elsewhere on the internet (“Makrophotography” sites).

That’s a general characteristic of color-reversal film. There are at least two ways to handle this: either capture a stack of images of the same frame and exposure-fuse this (a lot of posts about this here on the forum. Search for “exposure fusion” or “Mertens”) or simply taking a raw image (which should have at least a dynamic range approaching or exceeding 12 bits) and tweeking the shadows and highlights during raw development. For the later you can use Lightroom, RawTherapee or you can pipe the raw images directly in DaVinci - the raw reader features shadow and highlight settings. Again, search this forum for more detailed instructions.

Your result look great, by the way.

Thanks for your answer. I’m going to shoot now on my lowest ISO setting, 50 ISO.

All the material that my grandfather and father shot was on Kodachrome 64, so I assume the contrasts will be like this.

I corrected this image in RawTherapee and it turned it out like this. Forgive me for the funny shot of my grandfather chugging a beer. :grin:

1 Like

Great results on your scan, very nice pictures.

To complement @cpixip recommendations here is a quick cookbook guide:

  1. Set the lens aperture for best sharpness and resolution. If unknown for the lens, experiment around one or two stops from open. For example, in the f2.8 enlarger lens, the best is between f4 and f5.6. That does not change.
  2. The ISO knob becomes the “noise level”. Setup light so you can afford a low ISO.
  3. The resulting shutter speed is the “freeze knob”. Work at a shutter speed that minimizes any image movement from the system.
  4. Sometimes it is best to have a bit more shutter speed, even if one is not operating at the lowest ISO.

If you can afford the time and storage, shoot in raw. There is a good latitude in the dark areas to be adjusted with Resolve.

If shooting raw, keep the sprocket hole unclipped in the histogram. It is ok to be slightly underexposed, that can be corrected in Resolve.

Happy scanning!

3 Likes

Thanks for the information, it’s really helpful! :slight_smile:

I edit the raw files in Lightroom because I can’t open the .arw files in DaVinci Resolve. After editing the raw files, how should I save them? Should I use the JPEG format?

One reel of footage is around 21 to 25 minutes, which takes up about 400GB in storage for the raw files. If I also create .tiff files, it would require a lot of additional storage. What’s your advice on that? :slight_smile:

Completely understand your predicament. I ended up with a total 8 TB of raw files for my first scanning.
Get yourself a USB-C enclosure a decent NVMe SSD for the storage, and process one reel at the time.

In general, I prefer to do the final grading in Davinci Resolve, since you can pick the color space that you wish to work with. I had a similar problem, in the beginning of my project Resolve did not import .nef. If I recall correctly, I used XnConvert (which also has support for .arw) to convert to a 16bit Tiff intermediate. This uses massive storage. To reduce storage a bit, XnConvert can do a rough cropping too.

UPDATE: In reviewing my notes I think that XnConvert (at least for .nef) would generate an 8bit TIFF. So not sure what converter did I use to go from NEF to 16-bit tiff.

When Davinci was later able to import .nef sequences, I did notice that it was significantly slower than with the 16bit TIFF intermediate.

The final video product was a 10-bit h265 file (with virtual dub because then resolve did not have it). Was it an overkill? probably, because not many tv players handle 10bit h265.

Is it really necessary? well it will depend on the film exposure and scanning capture. The point is to try preserving the maximum range at the sensor (light/exposure) and then keep that maximum range through the processing and color correction pipeline up to the last step when the sequence is converted and compressed to video. That gives one the most latitude at correction.

My suggestion is to find a sequence of a few seconds where you have in the same shot very high light and very low shadows. This is an example of that kind of sequence. To a test converting with XnConvert to jpeg and 16bit TIFF.
Import both in Davinci Resolve in a side-by-side effect, play with the gain, gamma, and offset, and see if more than 8 bit (jpeg) is worth the time and storage of handling 16bit files.

Thanks for the detailed information about this.

This material was recorded at the time with a Pallas 318 Soundmatic camera. Super low-budget and it would not match the quality of a Canon camera from that time. The shot from Turkey was sublimely filmed by my grandfather (these were jpeg 8 bit files straight from the camera). But all the holiday movies we have from 1979 to 1983 were all filmed freehand & messy.

What I am saying here is that I have to make the choice for myself how well I want to digitize this. My father once did this with projection and then digitized it with a 480p camera. And that quality was, to be honest, pretty bad. I’m doing this project as a tribute to my grandfather who passed away last year and also to my father who loves the old material he shot on Super 8.

Anyway, I’m going to figure this out. I don’t really care about the file size, but it is more about the storage capacity that I have to buy for this. I have to look at how I’m going to do this. The thing is that I work on a fairly new MacBook Pro laptop and I need to work with external SSD/HDDs… Besides that, the detail that I got right now, it’s freaking insane to my eyes. This method is way more detailed then projecting it on a wall! :slight_smile:

Thanks for all your advice. I really appreciate this! :smiley:

1 Like

Glad the information is helpful.

Certainly anything is better than projecting to a wall.

Basically, the camera resolution will give you the image detail. Bitdepth into Resolve will give you the color detail. I quickly tested with Darktable and it will take the .nef (12 bit) into a 16 bit tiff. So should probably be able to do lightroom.

It has been a few years since I did the processing, but I think by the time I began processing the .nef Resolve was already capable of importing directly.
The processing would then have been, .nef into Resolve, color correction and cropping, then 16bit tif intermediate. Bring these into virtualdub2 and do noise reduction (neatvideo) and then export to 10bit h265. In my notes (poor notes) I reference that the deshaker in virtualdub2 should not be used since it would produce an 8 bit output.

Keep in mind that at the time there was no .h265 10 bit in resolve. Now a days, all of the above can be done in resolve (with .nef), so you just need to figure out if an 8 bit jpeg is good enough. My suggestion is make the decision looking at the darker color details, that is where the extra bits would make the difference.

Happy scanning!

1 Like

I did a test with jpeg and tiff. I’m going for the tiff files. It does take more time in the process, but the result is much better. I’ll have to see how I do in terms of storage. But at least it will be in .tiff format!

1 Like

tiff is lossless compression, jpeg not. Only use lossless compression schemes.

Some software has difficulties reading certain tif-compression schemes - be sure to select a format compatible with all your software. png 16 bit might also be an alternative to try. Again, depending on the lossless compression scheme selected, some software might refuse to read your images.

Keep your signal path to at least 16bit if possible. jpeg uses normally only 8 bit. Be careful as some software can handle internally only 8 bit - be sure to check. Otherwise 16 bit image do not make much sense. VirtualDub plugins as well as avisynth modules are main culprits here. Try to keep your signal path at least to 16 bit, if possible. It gives you head room you might need with difficult scenes. Otherwise, for most purposes, 8 bit works as well, provided you handle shadow and highlights already at the raw development stages. Throwing in a log encoding will get you yet more head room without too much visual impact.

Generally, to get file sizes down, the most effective factor is your image size. From my experience, Super-8 has at most a real resolution comparable to HD 4:3 sources (1440x1080). So an easy way to reduce demands on disk space is to scale the images down a little bit.

There are two camps here: one operates under the statement “grain is the film”. That is, the appearance of the film grain specific to the footage is important. If that is your goal, you will need to work with the highest resolution possible to capture the grain structure as good as possible. Real film grain has a much finer texture than the optical information imprinted in the film which is basically limited by the lens used to record the scene. If you are more in the “film grain” camp, you will want to work with the highest resolution you can afford throughout your pipeline.

The other camp is more interested in transforming historical footage as best as possible to todays standards. That is, get good digital colors, even if the source footage has strong color casts. Ideally, get rid of all the grain, as this allows you to sharpen the original footage quite noticably. Finally, push the frame rate from the meager 18 fps most Super-8 footage was shot with to at least 30 fps. This will improve perception of pan and tilt movements dramatically in the final result.

I am (currently) more in the second camp. Here’s a breakdown of my signal path - all image formats are 16bit images:

  • Capture: 4056 x 3040 px, .dng raw file, 23.5 MB per frame
  • Raw-development via DaVinci: 2400 x 1800 px, tif, 23.2 MB
  • Cutout, stabilization, initial color correction and zoom-down: 2124 x 1594 px, .png-file, 18.3 MB per frame
  • denoise and enhance algorithms: 2124 x 1594 px, .tif-file, 18.1 MB per frame
  • final editiing: 1440 x 1080 px, arbitrary video format

The final .tif-file are piped into DaVinci which handles the 18 fps → 30 fps upscaling. Also at that stage, the central portion of the frame is cut out to the final 1440 x 1080 px resolution. The slightly larger intermediate frame size is utilized in the degraining operation (an avisynth/VirtualDub based software, full 16bit pipeline) as well as in a deshaking operation. The later gets rid of some annoying camera shakes usually found in handheld Super-9 footage and helps also the degraining stage a little bit.

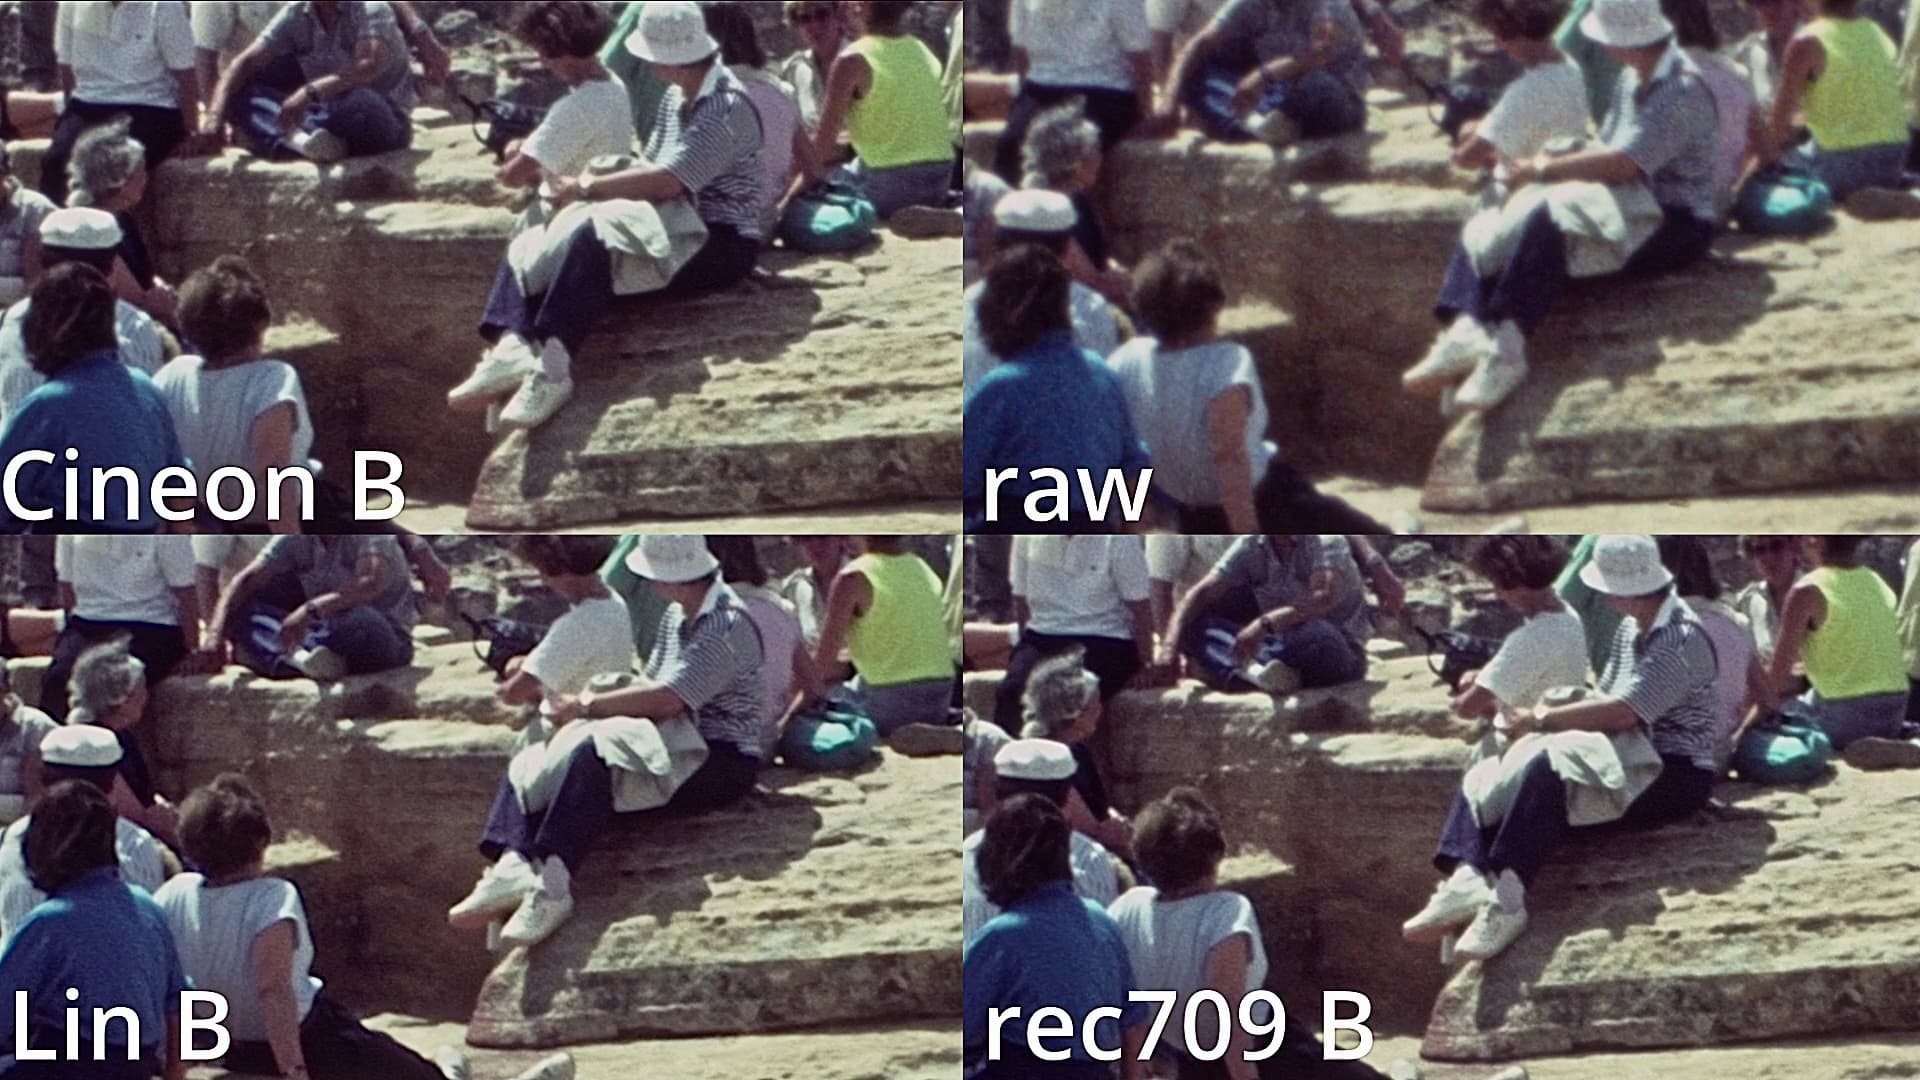
Well, the resulting footage has lost all what generally is considered “film look”. Here’s an example of the current state of affairs.

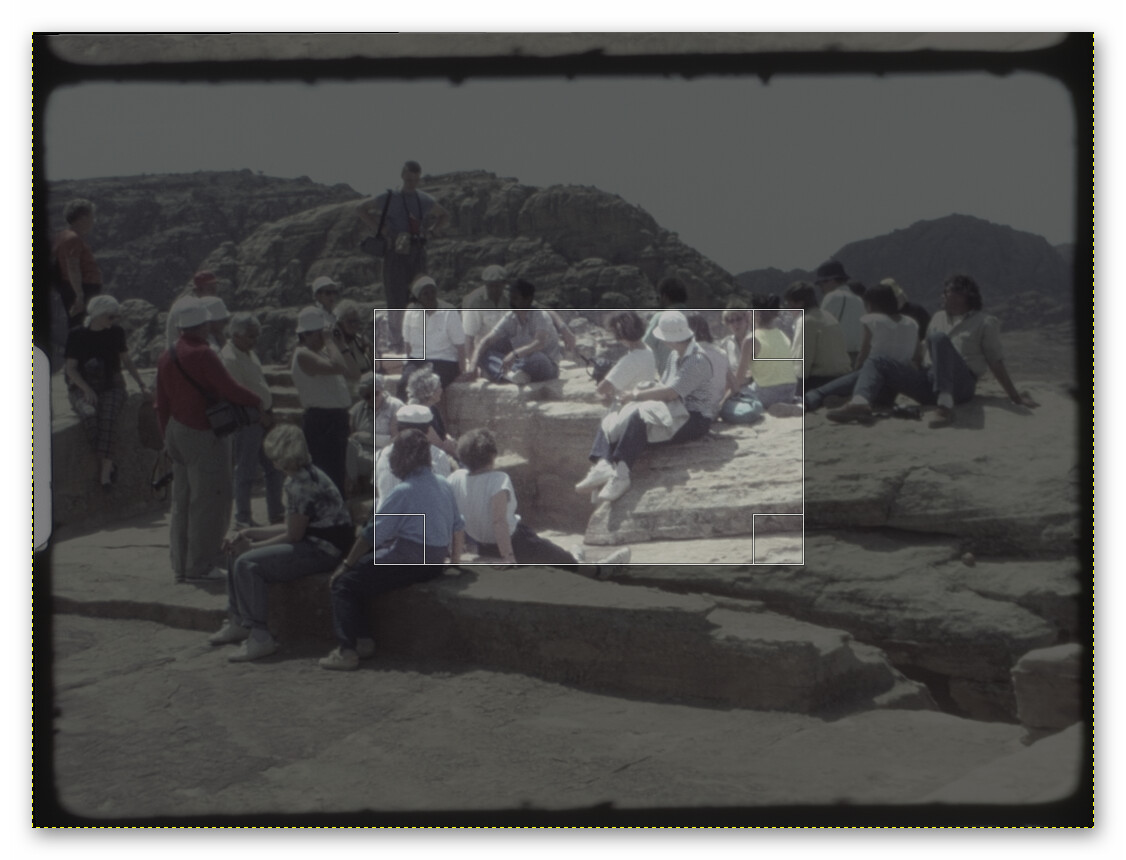
Compare the cutout labeled “raw” with any of the other three. The cutout correlates approximately to the full frame like this:

For certain scenes, the improvement of the details in the footage is quite noticable, for other scenes not so much - that is my current area of interest. If for esthetic reasons I want a more film-like output, I add artifical grain, flicker and scratches in post. (no, I am not really doing this :innocent:)

Incidently, that is an active area of research - grain pushes up the bandwidth demands on digital transmissions. So one idea people are researching is actually to separate film grain from the original footage, send only the cleaned film over the transmission line together with the noise characteristics of the orignial footage - which does not need much transmission capacity. Only at the viewer’s side articifical noise mimicing the detected noise characteristics is added, just before displaying the stuff. Funny times…

3 Likes

Good to know this information. Do you shoot on Cineon log encoding for example? I got that on my Sony camera.

Generally, to get file sizes down, the most effective factor is your image size. From my experience, Super-8 has at most a real resolution comparable to HD 4:3 sources (1440x1080). So an easy way to reduce demands on disk space is to scale the images down a little bit. There are two camps here: one operates under the statement “grain is the film”. That is, the appearance of the film grain specific to the footage is important. If that is your goal, you will need to work with the highest resolution possible to capture the grain structure as good as possible. Real film grain has a much finer texture than the optical information imprinted in the film which is basically limited by the lens used to record the scene. If you are more in the “film grain” camp, you will want to work with the highest resolution you can afford throughout your pipeline. The other camp is more interested in transforming historical footage as best as possible to today’s standards. That is, get good digital colors, even if the source footage has strong color casts. Ideally, get rid of all the grain, as this allows you to sharpen the original footage quite noticably. Finally, push the frame rate from the meager 18 fps most Super-8 footage was shot with to at least 30 fps. This will improve perception of pan and tilt movements dramatically in the final result.

I’m not exactly sure which “camp” I wanted to be at. I aim for the best possible resolution (I’m currently shooting with a 6000 x 4000 pixels camera, and the final result is 3040 x 2160 in DaVinci Resolve), some cleaning (like dust removal and a bit of denoising), but I don’t want an over-processed video. In my view, it’s still Super 8. There’s a charm in maintaining that vibe.

I tried to shot the pictures with the “Cin2” profile from my Sony camera. A shot with not of a lot of light. I don’t know what I think about it exactly with the LOG profile. Because I have also a lot of headroom with the RAW files that I shoot on ISO 50 and correct it with RawTherapee. But here is the result without any post processing:

And here is some test footage that I did with no logging, just setting the ISO on 50 and edit the RAW files in RawTherapee. This was with .tiff 8 bit and a bit of Denoising.

(Maybe I like the result of the last two footage more with no LOG :grin: I feel that I have more freedom with correcting the frames without a LOG profile)

– great results you have here. And it certainly carries the specific Super-8 vibe with it.

Thanks a lot! When you scan your frames with log encoding, does that mean the log encoding has low contrast and is desaturated? This is unfamiliar territory for me. Is this similar to a “flat scan”?

I scan in raw. The different encodings in my example image above (Cineon log, linear and rec709) were used as intermediate image format between different software stages. In the example above, there are only tiny differences. But for other footage, differences become more visible. And yes, a log format generally has low contrast and decreased saturation. All cutouts in the image above look the same, as they are mapped into a common output color space. DaVinci was operated in color managed mode.

Thanks for your answer. Understandable.

I experimented with those image profiles and found that Rec709 provided the best flexibility for working with high and low contrasts. There is a significant difference with that in these films. I can upload an example when I am finished.

EDIT: I misunderstood your comment. You add the Log correction in post-processing. I thought on the camera. When I did it on the camera, the range of shooting the shadows and highlights gets way easier.

This is the result. I have some raw files without a log that I am gonna edit tomorrow. I will upload that too.

EDIT:

I think with no profile shooting in RAW and with good exposure is the best.

probably, as it will be “raw” image data your camera sensor is seeing at the time of exposure. Due to physics, this raw image is a linear image (pixel intensities are linearly correlated with exposure values). If you would display such an image directly on your computer screen, it would show very dark shadows; nearly half of the range of values a raw image can encode is ending up in quite bright image areas.

In a log format output, the initial raw values of the camera sensor are adapted in such a way that shadows become brighter and the larger intensities (occupying about the upper half of the value range in a linear raw image) are squashed to make room for the darker values. This allows to encode a pixel’s intensity with less than the standard 16bit a raw file usually uses. That is: a log format safes you disk space, usually without any noticeable visual impact.

Neither raw nor any log format is intended to be viewed on a monitor. Displays work yet in other color spaces, often in sRGB or rec709. So in order to view a raw file or a log-encoded file, you need a transformation from raw or log into your screens color space. Usually, this can be done for example in DaVinci right from the start, by selecting the appropriate input color space of your footage (in the media page, for example).

Coarsely speaking, a color space is defined by the positions of its three primary colors, the white point and a transfer function for pixel intensities. Some color spaces are quite narrow (sRGB and rec709 for example), some are wider in scope. DaVinci has a color space node (CST) available in the color space page - this would be another way of adapting certain footage’s input color space to your timeline color space (instead of the media page thing I mentioned above).

By the way, that is just the opening of Pandora’s box. For example, DaVinci has also a timeline color space - and how adjustment sliders work in DaVinci depend at least a little on the color space chosen here. Also, DaVinci can be run in color-managed mode (which I would recommend). Googling “DaVinci” and “Colormanagement” should bring up quite a lot of tutorials about that subject.

I do a lot of intermediate processing outside of DaVinci. For that purpose, you need to decide on what output color space you are using for your data. Could be 8 bit tif files (small and fast but imprecise) or floating point OpenEXR images (huge and slow, but with more color grading head room). Or anything between (a Cineon log file, for example). As long as you stay in DaVinci, all of this does usually not really matter, as DaVinci is keeping the precision normally at 32 bit float during processing and is able to transform from one color space into another one if needed. Again, googling “Colormanagement” should give you quite some information about all this.

2 Likes