Ok, some more remarks.
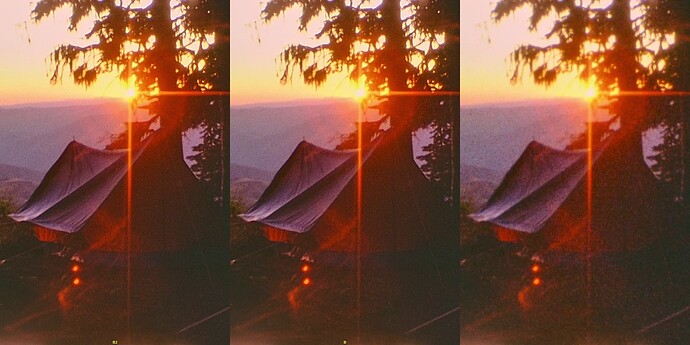
The 12-bit per channel dynamic range of the HQ sensor/camera is not sufficient to cover the range of densities one will encounter in small format color-reversal film. You will have problems in the very dark areas of your footage. Here’s some footage from the above scan to show [Edit: replaced the old clip with a clip using a higher bitrate] some more examples. (You absolutely need to download the clip and play it locally on your computer. Otherwise, you won’t see the things we are talking about. You should notice also some banding in the fish-sequences and a somewhat better performance of the raw in highlight areas.)
As remarked above, this scan was not optimal for raw capture. Improvements possible:
-
Work with an exposure setting so that burned-out areas of the film stock in question are at 98% or so of the total tonal range. One can get very close to 100%, as we are working in a linear color space (RAW). This is different from .jpgs which are non-linear by design and thus you have to be more conservative with the intensity mapping (I personally use the 93% mark, which is equivalent to a 240-level on an 8-bit per channel image).
-
Don’t push the shadows that much in those critical scenes. That’s an easy measure as you just have to accept that this limit exists in RAW capture mode. Done.
-
Employ noise reduction. There are two opposite positions out there: one states that “the grain is the picture”, the other one that “the content is the picture”. The later one potentially opens up the possibility of drastically enhancing the appearance of historic footage and should help with the low intensity noise of the RAW capture method as well. I will have to look into this with respect to RAW captures; here’s an example of what is possible on exposure fused material:
(To the right the original, noisy source, left and middle section slightly differently tuned denoising algorithms, A 1:1 cutout of an approximately 2k frame.)
Another option to tackle the just-not-enough dynamic range of the HQ sensor is to combine several RAW captures into a higher dynamic range RAW. Two options have been discussed here:
-
@npiegdon’s suggestion of capturing multiple raws with the same exposure setting and averaging out the noise. The above example of @npiegdon shows that it works. The left image shows, if you look closely, the horizontal “noise” stripes, the right, averaged picture misses that “feature”.
-
@PM490’s suggestion of combining two or more raw captures with different exposure times to arrive at a substantially improved raw.
Both approaches might be quite feasible, as the HQ sensor delivers 10 raw captures per second, so there is plenty of data available for such procedures. Only writing the raw data finally as a .dng to disk slows down the whole procedure, taking about 1 sec per frame.
While you need quite a few captures for approach 1. (I think the 5 exposures @npiegdon used in his examples are somewhat a sweet spot), potentially, you only need 2 appropriately chosen exposures for approach 2. And the digital resolution achievable in the shadows would be better than in approach 1.
I’ve been running tests along these lines, albeit some time ago. Can’t really find any detailed information right now, have not kept enough records. Anyway, here’s the attempt to recover this:
First, the noise reduction in @npiegdon approach is related to the number of captures (assuming independent noise sources) to scale like one over the squareroot of the number of captures. So initially, you get an noticable advantage, but to improve things further, the number of captures increases. If you get a lot of images fast, that’s a great way to get rid of sensor noise. In the case of the HQ sensor, things are moving substantially lower - we get only 10 fps out of the sensor at 4k.
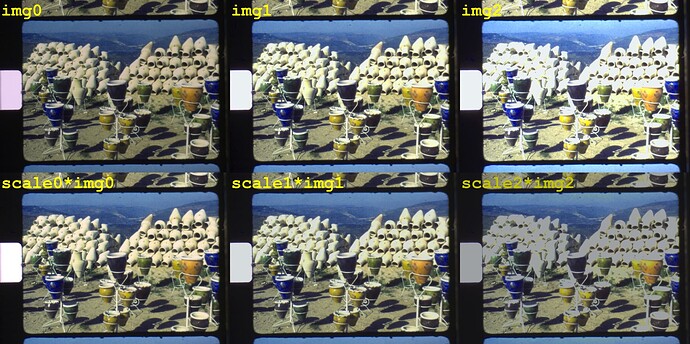
Secondly, with a few tricks the HQ sensor can be persuaded to rapidly switch exposure times. This opens up the possibility to capture a raw exposure stack and combine the captured raws somehow. The upper row of the following image shows three different raw captures (transformed with wrong color science to sRGB-images - that was done some time ago)
img0 is the classical “don’t let the highlights burn out” base exposure, the two other raw exposures are one f-stop brighter.
Since raw images are in a linear color space, alignment the data should be trivial, by appropriately chosen scalers. That’s what the lower row shows.
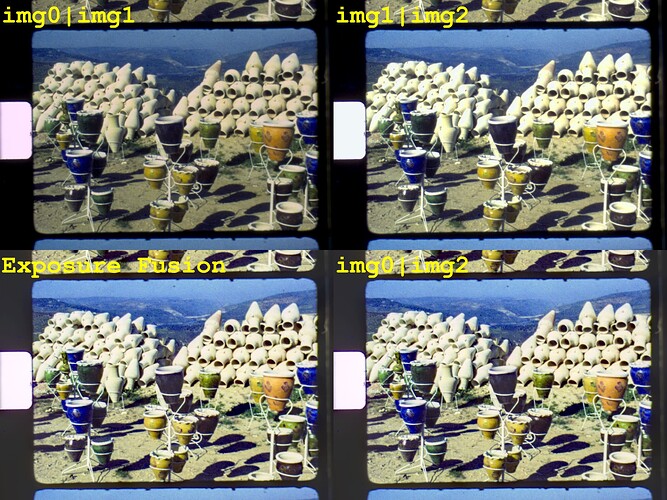
Here are the results I obtained at that time (note the exposure fused result in the lower left corner for comparision):
“img0|img1” indicates for example a combination of raw image 0 and raw image 1. You can not simply average both images together, as the blown-out areas of image 1 destroy the image structure in those areas. The images were combined differently: if the intensity of a pixel was above a certain threshold, data form the dark image was taken, if it was below that threshold, data was taken from the brighter image.
In this way, a good signal was obtained in shadow areas of the frame, with only two captures. However, in the vincinity of the threshold chosen, there was some slight banding noticable. Therefore, a second approach was tried - namely blending in a soft manner over a certain intensity range.
That blend needs to be optimized. You do not want shadow pixels from the dark raw image and you do not want highlight pixels from the bright raw image. I did get some promising results, but at the moment, I can’t find them. As at that time the color managment/raw handling of the picamera2 lib was broken, I did not continue that research further. One issue I have here with my scanner (because of the mechanical construction): there is a sligth movement between consecutive exposures, and I need to align different captures. Not that easy with raw data. This might not be an issue with your scanner setup.
Anyway, I think it’s time now to resurrect this idea. Getting two differently exposed raws out of the HQ sensor will take about 0.2 sec; storing that onto an SSD attached to the RP4 will eat up 1 sec per frame, but because of my plastic scanner, I need to wait anyway a second for things to settle down mechanically after a frame advance. Potentially, that could result in a capture time of 1.5 sec per frame. I currently need about 2.5 sec for a 4 exposure capture @ 4k, so in fact the raw capture could be faster.
As far as I know, in the .dng-files picamera2 creates the color science is based on forward matrices Jack Hogan came up with. These are actually two matrices for two different color temperatures, one at the “blueish” part of the spectrum, one at the “redish” part.
In your raw software, once you select “camera metadata” (or a similiar setting), the raw software looks at the color temperature the camera came up with and interpolates a new color matrix from the extreme ones stored in the .dng-file. Not sure whether the color temperature reported by the camera in the .dng-files is the correct one when using manual whitebalance (red and/or blue gains). I have to check this. That might throw off the colors.
For people who are familiar with raw processing, there are additonal .dcp-files specifically for the HQ camera you might want to try when going from raw to developed imagery. You can find and download them from here.
If you use either the color matrices embedded in the camera’s metadata or the .dcp-profiles Jack came up with, you will always get an interpolated matrix, based on the current color temperature. Ideally, you would want to work with a fixed color matrix calibrated to your scanners illumination. That’s what I did until recently, when the Raspberry Pi foundation changed without annoucement the format of the tuning file. Currently, I am using the “imx477_scientific.json” tuning file for .jpg capture which features optimized color matrices for a lot more intermediate color temperatures. So, color science with the HQ camera seems still to be a mess - I did not yet have the time to sort this out.
So, wrapping up this long post: raw capture seems to have some advantages compared to exposure fusion, as well as some drawbacks. It seems that several raw captures combined in a super-raw might be the way to go forward. Raw captures record colors more consistently than the results of an exposure fusion; manually tuning highlight and shadows in raw captures seems to deliver the same or better results than the automatic way exposure fusion is doing. There are issues in the dark parts of raw captures - they limit what you can do in the post. Alternative approaches like combining several raw captures into a super-raw might be feasible, depending in part on the mechanical stability of your scanner.


