Picamera2: jpg vs raw-dng

:clap: :clap: :clap:

@cpixip,

The explanation is impressive.

Thanks again for sharing your knowledge and experience.

Cheers.

… continuing the journey.

For the record, let me remark that others have already developed some python software for creating HDRs from raw files. It’s a kind of complicated software to set up and it is probably not going to have a direct use in our case, but anyway - there has been work done in this direction.

Now to another set of visual examples. In the following, frames from a film scan will be displayed. They are labeled:

  • RAW. A frame captured in raw format via picamera2 and stored as a .dng-file. That data was directly input into daVinci with the use of the “Camera metadata” selected. Only lift and gain were adjusted to cover the full dynamic range of the raw file. Specifically, no shadow or highlight enhancement was performed.

  • EXP. Simultaniously with the RAW, four differently exposed .jpgs were captured. The exposure times of the jpgs scale like 3594, 7188, 14376 and 28752. That is, they are spaced one f-stop apart. The shortest exposure time, 3594, was also used to create the .dng-file for RAW.

    This jpg image stack was aligned and subsequently exposure-fused into a png.-file with 16 bit per color channel. This file has thus a slightly better dynamic quality than the .dng-file, which has only 12 bit per color channel.

    The EXP-footage was loaded into daVinci and lift and gain adjusted so that the minimal and maximal image intensities became identical to the RAW footage. Not other adjustment was made.

  • LIN. Here the dng-file was processed into a linear, 16 bit per channel png.-file. There are two reasons for such an approach. I hope that such files load faster in daVinci (not checked yet, might be the other way around), but more importantly, I need to stabilize and process the footage independently from daVinci, and a 16 bit linear png is a good choice here.

    As my timeline in daVinci is set to rec709, these linear pngs should actually be input into daVinci with a LUT called “VFX IO: Linear to Rec.709”. Most interestingly, this did yield a different result color-wise than the reference RAW image. Basically, the colors were more vivid. Thus, for this comparision, I switched to “VFX: IO Linear to sRGB”, which basically gives me colors very similar to RAW. Don’t know what happenes here…

Now on to the first frame:

Comparing EXP with RAW, one sees that the EXP image has slightly more brilliance, as previously remarked. It’s similar to a dehaze algorithm. Small details are slightly enhanced, as is the film grain. Especially dark areas have a better image definition.

There are color differences, but they are minor. They are more recognizable in the following frame:

Here, the brownish fabric roof of the tent (both LIN and RAW) drifts into the red with the EXP. With this frame, daVinci had somehow trouble to properly display the RAW during editing - the highlights of the man’s yellow shirt (right bottom) were clipped on the display - but rendered out correctly.

Personally, I like the LIN result (with the VFX IO: Linear to sRGB LUT) a little bit better than the RAW - however, the differences are tiny:

Here’s for comparision the LIN result of the same frame with the - what I think - correct LUT, namely “VFX IO: Linear to Rec.709” (that is the color space of my timeline):

Clearly, the saturation of the LIN-colors have increased. Seems to be a gamma issue…

2 Likes

@cpixip

you’re quite optimistic about the fps of libcamera + picamera2 !

My yart project is dormant and not yet ported to picamera2.
However, I’m still doing some tests, especially speed tests.
The first thing is that an 8GB PI4 seems indispensable for at least two reasons

  • For proper performance, libcamera needs at least two request buffers
  • All processing, e.g. jpeg encoding, is carried out by the CPU without the help of the GPU as before.
    All this is impossible with my PI3B+ 1GB, so I switched to a PI4 8GB

Next, for fps speed tests, you need to distinguish between several levels

  1. The speed of the request loop without any processing, ideally the speed of the sensor.
  2. Then the necessary copy of the request buffer into an RGB888 or RAW array.before releasing the request
  3. Then process this buffer, e.g. encode the RGB888 to jpeg or the RAW to dng.
  4. Then, if necessary, writing to disk or sending to network.
    Note that steps 3 and 4 should, if possible, be performed in threads and not in the request loop.

So here’s a comparison table

Remarks:
At least two buffers are essential, beyond which the gain is marginal.
The libcamera request loop is efficient: you get almost the same fps as the sensor.
jpeg or dng encoding are time consuming and should be taken out of the request loop

The last two lines concern the capture of five exposures of an image using the trick proposed by @cpixip.
For example, at maximum resolution, 15 requests in 2.5s (with make_array) are enough to capture 5 images.The trick is effective

That is essential. The tasks are done in my implementation in a different thread. Also essential: use as much buffers you can afford, at least 4 or so.

And yes, the old way of doing things worked better.

I use a RP4 for scanning, but I am using RP3 as well with the HQ or GS sensor. I am away this weekend from hardware and software, but I will report some framerates in a few days. I think request + jpeg-encode of 3.5 fps for 2k images can be speeded up a little.

@dgalland First update. Have a look at this post, especially where I talk about increasing CMA-memory for getting stuff to run on a RP3, and the configuration option to turn on the queue of libcamera. Both options help in increasing fps.

I’m quite sceptical about the possibility of obtaining from a 12-bit raw image an image equivalent to the result of an exposure fusion.
If we adjust the exposure so as not to burn the whites, I don’t see how simple post-processing can reveal the dark parts.
In my opinion, don’t confuse the sensor’s bit depth and sensor’s dynamic range. For an exposure, what is black will remain black whatever the bit depth ??

Below is an exposure fusion with picamera2 (the merged image is the last one).
If we take as a basis the second image, which correctly reveals the whites, I don’t see how we’ll be able to reveal the dark parts?

Hi Dominique (@dgalland) - here are some comments.

  • the “trick” with the rotating exposure times came actually out of a discussion with David Plowman, the maintainer of the picamera2 library. He’s the one who came up with the basic idea.

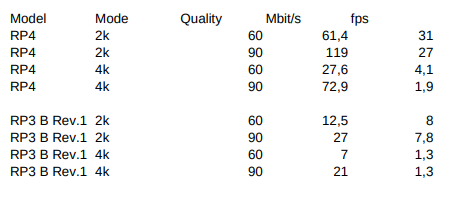
  • I timed a RP4 and a RP 3B, Rev. 1. Here are my results

    grafik

    Mbit/s is the amount network traffic; the RP4 is actually my scanner unit and the camera was looking onto a film frame. The RP3B camera was just looking out of the window, and I did not bother to focus precisely. My fps clocking is not too precise and sways a little bit. But overall, I consider the numbers not to bad. At least it did not trigger me to try to optimize my code.

    The code is really simple. In the main loop, it looks like this


    camera is an object derived from the Picamera2 object, with the two subroutines

Well, that is exactly the topic of this thread. The short answer for me: a 12-bit-raw image is preferable to a multi-exposure capture for several reasons:

  • for most scenes, the results of expose fusion and raw-capture are comparable. To my own surprise, that was already the outcome of a test I did in July 2020. And the discussions and test results in this thread point to this as well.

  • capturing a single raw is much less demanding than capturing several exposures of a single frame, which needs to be non-moving to sub-pixel precision - or does require elaborate post-processing.

  • if the multi-exposure capture is used in an exposure fusion setup, you are going to experience tiny color-shifts which will make you a lot of work in post processing.

  • the drawback of working with only a single 12-bit raw is hidden in the shadows. There, sensor noise is spoiling the image, especially in the red channel (as this is usually the one with the highest gain). For all practical purposes, this can be resolved by applying a denoising step. But: again, this noise is hiding in the shadows - normally not image parts the attention of viewers is focused on. If you need to boost severly underexposed footage into a viewable result, a single raw capture probably won’t make you happy.

A little bit more detailed discussion. First, it is absolutely important to understand that exposure fusion is a way to create nice-looking images from an exposure stack. There is nothing in the whole algorithm that ensures proper colors. In fact, I have given above a few examples where the exposure fused result (EXP) differs from the real colors the developed raw displays (RAW). Exposure fusion even enhances colors and texture to a certain level. All fine if you like what you achieve with exposure fusion. It’s a personal decision.

Well, things are complicated. First, there is no concept of “black” in a color-reversal film. Only a concept of “very dark”. And even that very dark area can be pushed by a large enough exposure time to a medium gray level. I assume that with “black” you mean pixels which are zero in value, or at least close to zero? Well, these pixels are indeed mostly useless, but more because sensor noise and quantization noise will overtake the signal you are interested in: namely the image structure in those dark areas. So in reality, a 12-bit sensor will not give you a 12-bit range to work in. The upper limit is at 4095, and the lower limit depends on how soon you are going to say: “this looks aweful”.

As you are mapping a 12 or so-bit range into the smaller 8-bit range of your output, you still have some headroom in the shadows which you can use. It’s not large and might not be sufficient for your footage or your taste, but I think I will switch to single raw captures in the future. Before I finally do this, I need to establish the color science behind RP raws - there are still some questions unanswered here.

PS: capture your example image above as a raw (exposure time in such a way that no highlights are burned out) and load it in RawTherapee. Click on the left-most tab in the right column and reveal the “Exposure” tab. Play around with the controls. Especially, click on the circle symbol of the section “Shadows/Highlights” - this will turn on that processing step and the symbol will change to an “On”-symbol. Move the slider called “Shadows” (which is initially zero) to the right and watch what is happening to your scan.

2 Likes

Yes, with jpeg encoding in a thread (with opencv or similar). values become reasonable again, similar to yours :
4K request + jpeg encode in thread 4,8fps
2K request +¨jpeg encodes in thread 18fps

Some points can be made:

  • Don’t use picamera2 functions such as capture_file… which are executed in the context of the request. Instead, call make_array and send it to a thread or process as you do in your example.

  • In your example, it may not be optimal to start a thread each time, but it would be better to use a Queue.

    image = request.make_array(“main”)
    queue.put(image)
    And in the thread mainloop
    image = queue.get()
    jpeg, send, …

  • We’re still in a simple case with only one thread. There’s concurrency because the GIL is released when you call a C/C++ library like opencv or simplejpeg. This would be more difficult with PICAM2DNG in Python.
    This case should be studied, as raw/dng conversion seems time consuming.

Finally, I’m still skeptical about the Merge/dng comparison (You haven’t answered my question about camera dynamics) I’m going to try developing the second image in my example in DNG, but the background seems dark enough to be recovered by increasing the shadows.

  • that is exactly what datastream is: a queue. Sorry, I should have pointed that out more clearly. I thought the “put”-fct makes it obvious. The queue is watched by yet another thread which sends out data as soon as the queue is non-empty.

Not sure what you mean by this. Can you elaborate?

OK datastream is a Queue, but why start a Thread to call sendLive?

I’m not a specialist in these questions but it seems that sensor dynamics is a physical characteristic, its ability to correctly capture a certain range of intensity, so not exactly the same notion as bit depth?

Because of the simplejpeg.encode_jpeg() call in this subroutine - this is where the work is done. The output queue does not eat any noticable CPU-load (and is in another thread anyway).

Well, again, it’s complicated. On a camera sensor, you have a lot of light-sensitive elements; they have their very specific characteristics. The temperature the sensor has is a major source of noise - that’s why astromoners usually cool down their sensors. You have pure analog electronics up to the digital-analog-converters (ADC) - which basically define the scale and precision the analog signal is digitized to. Furthermore, in modern sensors, you have on the digital side (behind the ADCs) some digital image processing going on - what you as a user sees as a raw image is normally not really a raw sensor image.

Now, when changing exposure time, you basically change the intensity the brightest pixels are corresponding to. That might be a moon-lit field in the dark or a blistering dune in the desert. Two very different light conditions - in the moon-lit field, a long exposure will be used, and a firefly, for example, might be mapped to the highest value a pixel can deliver - in the case of the HQ camera, with 12 bit per channel, somewhere around 4095. The same firefly sitting on the desert dune will be mapped by the different exposure to a far lower pixel value, say 512. The exposure time of the desert image needs to be much shorter. But with the right exposure time, the brightest sand corn of the dune will land on the proper exposure values just below 4095.

A digital camera is in this respect very similar to a classical analog camera loaded with color reversal film. In that situation, the camera operator is exposing the film to the highlights, ignoring how deep the shadows are. This is because you will be able to recover shadow detail, even so poor, in such a proper exposed image in the lab. But there will be no way to recover burned out highlights.

By the way: when working with negative film stock, the situation and exposure is just the other way around. With negative film, you will expose to the shadows, not the highlights.

Coming back to digital sensors. So you have chosen your exposure in such a way that your highlights do not burn out. What about the shadows? Well, they are getting digitized and are still there in the raw - only you might not necessarily see them without “developing” your raw appropriately. In this specific case: apply an appropriate tone/contrast curve.

The major difference between a 10 bit raw and a 14 bit raw is the precision the ADC can work on these low digital numbers which will define the detail in the shadows. The quantization error/noise of a 10 bit ADC is worse than that of a 12 bit ADC. Try to recover shadow detail in an 8 bit jpeg copy of a raw, and then do the same with the original raw (say, in 12 bit). You will notice the difference. There might even occur banding with the jpg because of the low bit depth. Of course 8-bit ADCs are normally also paired with more noisy sensors than the 14 bit ADCs now common in consumer-grade DSLRs, so more sensor noise is expected as well in a 10 bit sensor, compared to a 12 bit one. Summarizing: the higher the bit depth of a digital sensor, the better the shadow detail is resolved. Once you decided on an exposure time, both the highest and lowest usable intensities are fixed; the range between them depends on the bits per channel your sensor is able to work with.

On the same full res image I compared (images in order)

  • Mertens merge
  • dng development with RawTherapy + increase shadows
  • Lightroom dng development + increase shadows,
  • dng development with dcraw
  • dng development with dcraw + contrast processing
    The aim is to achieve roughly the same rendering in the shadows.
    The merge and rawtherapy images are virtually indistinguishable even at the pixel level, while the Lightroom image is quite different even at the pixel level (to be studied).

The DNG solution therefore seems possible.
The remaining advantage of the merge solution is that it adapts automatically to scenes of varying luminosity, and even very underexposed scenes.frequents in amateur films
dcraw is for testing purposes, but we’d have to untilize libraw through rawpi.

I also measured the fps DNG full res in a thread with file write without compression 6.5fps → 18MB and with compression 4.5 fps → 11MB. Faster than JPEG conversion!

4 Likes

… picking up this remark, here’s an update on the color science things:

tl;dr: color-wise, processing raw-image within the Raspberry Pi context works now. That was not the case some time ago. While still some things are not 100% optimal, the differences are in the end minor and will be hard to notice when scanning old Super-8 film stock.

Now for the details. Taking raw imagery in the context of Raspberry Pi software was broken for a long time. For example, manual color gain settings were not taken correctly into account with early versions of libcamera. I am describing in the following the status at the end of summer 2023 - things have changed and probably will change in the future.

At this point in time, you might encounter two different versions of DNG-files when using Raspberry Pi software. They work quite differently when processed by a raw-converter.

  • DNGs with two sets of color data. This is the classical case. Just about any DNG you might stubble upon will have at least two different sets of color data. Normally one for stdA (Tungsten lamp, warm, low color temperature) and one for D65 (shadows in daylight, slightly blueish, high color temperature). A single data set consists of a “color matrix”, a “forward matrix” and a “calibration illuminant”. The two sets enclosed in the DNG are on extreme ends of the spectral variation you normally would encounter. The color matrix used to convert the raw data in the DNG-image file to the image your raw-converter or -software is displaying is calculated from the color matrices of the stdA and D65 data sets, using an estimated color temperature which is guessed with the help of the “As Shot Neutral”-tag in your DNG-file. The “As Shot Neutral” values correspond to the reciprocal of the color gains used during capture.

    One example of such a file is Jan’s image (@jankaiser). This image was actually captured in the old “JPG+attached RAW” image format of the old days and than converted via PiDNG into a DNG-file.

    The color information contained in such DNG-files comes from the work of Jack Hogan - he created three input profiles (DCP, DNG Camera Profiles) for the Raspberry Pi HQ sensor. The simplest one ( PyDNG_profile.dcp) is used by PiDNG.

  • DNGs with only one set of color data. These are the DNG-file you will normally encounter these days. Every libcamera-app as well as picamera2 creates these sort of files.

    One example of such a file is the image Manuel (@Manuel_Angel) posted above. They contain only a single “color matrix”, no “forward matrix” and a wrong “calibration illumination”.

    The “calibration illumination” is fixed to D65 and that is the reason why you see such color temperature close to 6500K when opening such a file for example in RawTherapee. This does not matter to much, as the image is developed by your raw-software by using the “As Shot Neutral”-tag (these are the color gains at the time of capture) and the “Color Matrix 1” contained in the DNG.

    Now, this color matrix is interesting. It is the color matrix libcamera came up with during the capture of your image and the one which would be used in creating an accompaining JPEG. And this color matrix is computed during capture by using the data in the tuning file! So if you change your tuning file, you will end up with a differently developed DNG. Not an ideal situation in my view. You better use the best tuning file you can find…

Now, let’s compare these two different types of DNGs. To do this, I took the raw image data contained in the image as well as the “As Shot Neutral” tag data (remember, these are the color gains) and processed it as either as a “Two Color Set” file (DCP below, left) or as a “One Color Set” file (SCI, right). For the “One Color Set” result, I assumed that at the time of capturing the frame, the “imx477_scientific.json” tuning file was used.

Here is the result of @jankaiser’s image:

As already remarked above, any differences are hard to spot. The estimated color temperature was 2696 K for the DCP result (“two-color-set”) and 2495 K for the SCI result (“one-color-set” + tuning file “imx477_scientific”). RawTherapee estimates a color temperature of 2889 K on this image, using a color picker to set whitebalance on one of the buildings in the background gives me varying color temperatures of 2600K - 2800 K.

Now the same exercise for @Manuel_Angel’s image:

Again, hard to spot any differences. My software estimated DCP color temperature to be 3749 K; the color temperature estimated on the basis of the “imx477_scientific.json” was 3146 K. However, loading this file into RawTherapee, a color temperature of 6500 K is displayed - which is the color temperature of the wrong “Calibration Illuminant 1”-tag in the DNG-file. Using the color picker on the white clouds in the background, I do get color temperatures of around 6700 K - which seems wrong to me as well. However, the image is developed by RawTherapee just fine.

In fact, the same happens when you load these two images into daVinci. Selecting as “Decode Using” the “Camera Metadata”-entry, you will see an estimated color temperature of 2772 K for @jankaiser’s image and a color temperature of 6521 K for @Manuel_Angel’s one. One small hint: if you change the “Decode Using” from “Camera Metadata” to “Clip”, all the grayed-out settings become active. So you can change the “color temperature” and the “Tint”; besides this, the most interesting options to try out are probably “Highlights” and “Shadows”, “Exposure”, “Lift”, “Gain” and “Contrast” and finally “Midtone Detail”.

Does all this matters in terms of scanning Super-8 material? Probably not, as in the old days, you did not have such a fine control over color temperature (at least as an amateur) as nowadays, in the digital age. You could either decide on “Tungsten” or “daylight”. Your actual illumination was probably something else. So colors were already off at the time of recording the footage. In addition, I have seen evidence of color shifts between different rolls of Kodachrome, exposed under the same illumination. So in reality, you will probably need to color-grade the footage anyway. A consistant color pipeline will lead to less work, however. In this regard, note that the results you will get from a DNG will depend on the tuning file used at the time of capture - a somewhat unexpected result from this investigation. In a raw-converter like RawTherapee, you can get rid of this by using explicitly not the camera metadata, but one of the DCP-input profile of Jack mentioned above.

4 Likes

What do you suspect is the limiting bottleneck for capture fps? Is it the CPU, io communication with the camera sensor, or the camera sensor itself?

Would you expect much of an improvement in capture fps with the new raspberry pi 5? Benchmarks suggest image processing is twice as fast on v5 compared to v4.

Well, it is always nice to have a faster machine. The RP5 is rumored to be about 2 times faster than the RP4 - which will ease the challenges of proper software design, i.e., to do things fast and efficient.

At this point in time, the HQ sensor is still the best available sensor for film scanning. In its highest resolution, the camera will deliver no more than 10 fps - that’s currently the bottleneck with respect to the image processing pipeline. I am sure we will see new and better sensors coming along, but they are not there yet.

There might be other bottlenecks as well - that depends on your setup. Do you do multi-exposure capture? Do you use raw or .jpg-images? Are you transferring the data to a host-PC? Or are you storing that data locally on a USB-3 attached fast SSD?

In fact, with my 3D-printed plastic-based film scanner, the mechanical setup is the limiting factor. After each frame advance, I need to wait about a second until the frame has its position stabilized.

The RP5 will be available for the general public only by the end of October or so. Prices I have seen indicate that it will be not substantially more expensive than the RP4. So it is probably a good alternative as a basis for a film scanner.

2 Likes

The Sony IMX477 sensor specs, the sensor used by the HQ, indicate a maximum frame rate higher than what the processing pipeline can deliver

Don’t know enough to point what is the limitation, it maybe the interface or processing pipeline on the Raspberry Pi side.

Good point. The CSI-lanes are the limiting factor. Whether these lanes in the RP5 are faster is unknown to me. They might. If so, the missing register setup for these faster modes needs to be done. So there is a possibility the capture speed might increase. We will see…

1 Like

Recently, an RP engineer remarked on the RP forum

We’ve had an IMX258 module running at 4k30, and are looking at getting IMX477 and IMX708 doing the same.

So that is kind of interesting. The IMX477 is the sensor used in the HQ camera and it seems that they are looking into ways to speed things up. However, the current HQ camera uses only 2 lanes per hardware design. So 4k30 will only be possible if a new HQ camera is published which supports 4 lanes, or by using alternative hardware, for example by Arducam. But again, the software support is not there (yet?).

1 Like

Thanks to @Manuel_Angel I’ve captured regular 8 with modified Bauer T192 projector and the newest (draft) version of DS8 software simultanously in jpg and dng format. Made .mov’s using Compressor and imported both in a FCPX 16fps project without any (color) corrections.
It was a surprise that (both) Compressor (and FCPX) imports .dng files from the Rpi HQ camera. Need to find a better workflow to allow to use the improved DNG image quality. Perhaps first need to edit the DNG files with something before importing into Compressor? https://youtu.be/gWeE-qIr2eI?si=1Sy7pBnMsNHniDtr I’ve seen the posts about DavinciResolve Studio and tried to work with it but it will probably need a lot of effort to make it work. Any hints on tutorials with info on editing HQcamera DNG’s are welcome.

2 Likes

In order to use the DNG files, you need to brighten up the shadows and push the highlights a little bit. That can be done in dsVinci relatively easy with with the shadow (“Shad”) and highlight (“HH/Light”) controls which every node in the color tab features. You might also want to play around with the contrast tab (“Contrast”) while you’re there.

Before you do this, it’s generally a good idea to use the horizontal dials (which affect all color channels equally) to adjust “Lift” and “Gain” so your material covers the whole dynamic range available. Use the scope “Parade” while you do this. This first step is a kind of initial adjustment.

The shadow and highlight adjustments (first paragraph) are already on the creative side of the processing.

Judging from your footage, I assume that your “Compressor” and “FCPX” simply read in the DNG and do not map the color values, save of applying a generic gamma-curve.

That would be in daVinci equivalent of simply loading the DNG files into the editor. Quite generally, your digitized data values will probably not be spot on in terms of exposure. So you either need to adjust the exposure value or play with lift and gain (both things can be done on the “Color” tab). If fact, you should be able to recreate the jpg you captured - as these are the major processing steps applied to the DNG data in order to arrive at the jpg libcamera outputs.

The shadow and hightlight adjustments described in the first paragraph are not happening in the context of the jpg-creation. That’s why especially highlights are burned out in your footage.

I do not know the software you are using, but I really can recommend daVinci for that purpose: the controls available at the color tab are mighty instruments, especially when used in conjunction with the scopes and the real-time preview of the footage.

1 Like

I actually didn’t know Compressor or Final Cut were able to import DNGs. I thought that neither one supports them.

Generally, I think there are two possible workflows and your choice is very much one of preference:

  • Import DNGs directly into your video editor. Davinci Resolve seems to be the tool of choice here as it can import DNGs and has very powerful colour correction tools. This obviously has the advantage of using one piece of software to do everything, meaning also that you always have access to all the image information in your original DNGs. I believe the disadvantage of this might be Davinci’s performance when editing a video file that is actually hundreds to GBs of RAW images, but I’ve never tried it, so maybe this is a non-issue thanks to proxies and such.
  • Edit the frames in a raw converter like Adobe Lightroom first, export them, for example as PNGs, use something like Compressor to to render a video file and then continue your edits on that file. The disadvantage here is that you have to edit the colours from only seeing the frames as single images, meaning you have to find some general edit that fits the entire roll or at least gives you enough room for minor adjustments done on the generated video file. I’ve found this not to be a problem, but it likely depends a lot on the film stock you are scanning. The advantage is that editing the generated video file is fast and can be done in any video editing software. Unlike with the original DNGs, it’s also becomes way more feasible to archive the generated “master” video file thanks to its much smaller file size. This is all assuming you would use a high quality intermediate format like ProRes.

For examples of the latter workflow, I would point you to my own project or the post processing video by Scott Schiller.

3 Likes