Drifting/floating around a few grams-worth of tension readings is normal. It looks scary because lots of digits are changing in the raw data readings (like, the lower 12-bits practically seem random), but the upper bits–at least with the load cell I have–are quite stable.
One key here was that I didn’t use the little HX711 board that came with my cheap Amazon load cell. I swapped it out and used SparkFun’s HX711 board which seems to be known on forums as having better noise characteristics. (If you compare the two, you’ll see more and larger capacitors on the SparkFun board vs. the generic pack-in boards.)
The code isn’t in quite as shareable/public a state as I’d like, but here is what I’m using. Eventually this will be on GitHub and more complete.
For all of these snippets, assume these are defined someplace. (I prefer reading the shorter names.)
using s8 = int8_t;
using u8 = uint8_t;
using s32 = int32_t;
using u32 = uint32_t;
// etc.
Arduino code for reading it fast (minus the part that resets the other controller if it hits an extreme limit).
I took basically ALL processing and extra serial data out of this part to keep the reading-rate as high as possible. I don’t believe it starts the next measurement until you’ve read the previous, so the faster you can shift the data out of the HX711, the sooner the next reading will begin. I routinely see 92Hz readings using this despite their claim that it maxes out at 80Hz:
constexpr int DataPin = 3;
constexpr int ClockPin = 2;

void setup()
{
  Serial.begin(57600);
  pinMode(ClockPin, OUTPUT);
  pinMode(DataPin, INPUT_PULLUP);
}

void loop()
{
  // Wait until the HX711 tells us it has finished a reading
  while (digitalRead(DataPin) == HIGH) { }

  noInterrupts();

  static u8 reading[3];
  for (u8 &r : reading) r = shiftIn(DataPin, ClockPin, MSBFIRST);

  // Selecting Ch.A with 128 gain just requires a single clock pulse
  digitalWrite(ClockPin, HIGH);
  digitalWrite(ClockPin, LOW);

  interrupts();

  // Write an arbitrary delimiter and our raw reading
  Serial.write(0b10101010);
  for (u8 r : reading) Serial.write(r);
}
So, there’s zero processing going on there. Just handing off the raw data directly through the serial port as fast as the HX711 can generate it (plus a delimiter byte so we can tell where each reading starts/stops).
Then, on the PC side:
Interpreting the signed 24-bit response as signed 32-bit. (This is a little more pseudocode’y because I had to pull it out of a larger response-parsing framework):
    while (we read any byte that isn't 0b10101010) keep reading bytes until we do...

    u32 sensor = 0;
    for (size_t i = 0; i < 3; ++i)
    {
        u8 byte = readAByteFromTheArduinoSerialConnection();
        sensor = (sensor << 8) | byte;
    }

    // Pad out the negative sign through the 32nd bit
    if (sensor & 0x800000) sensor |= 0xFF000000;

    return std::bit_cast<s32>(sensor);
That’s still a pretty straightforward, direct conversion that hasn’t massaged the data in any meaningful way.
Now we’re on a fast PC with a plain int value that we can work with. Before we can convert it to a tension reading, you need two experimentally-determined values:
The zero point (“tare”) seems relatively stable at a given temperature. I used to measure it each time I started my scanner software but I’ve noticed that it’s usually around the same value. To get this you just take a few thousand measurements (as above), average them together (in a double), and call it your zeroOffset.
The load cell’s slope was determined using the little classroom scale I showed in an earlier video. It’s presumably different for each load cell. Here is my lab notebook entry from that day that shows how I determined the value for my load cell:
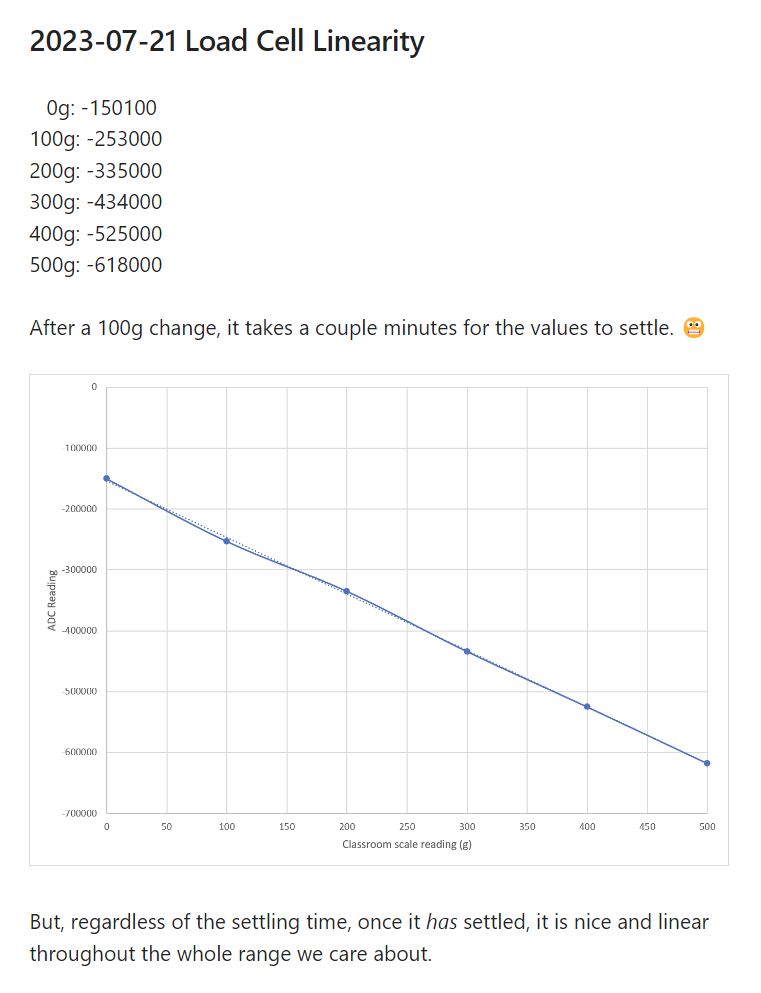
Same situation here. Put the load cell under some fixed, known tension, wait a couple minutes, then average a few thousand readings to get each data point. Mine (using the data above) happened to come out as -929.86, where the negative sign means I probably have it mounted “backwards”, but that doesn’t matter so long as this value has the correct sign.
Once you’ve got those two per-load-cell values in hand, turning the raw sensor reading into a tension value (in whichever units your known values were in) is just:
double tension = (reading - zeroOffset) / LoadCellSlope;
And from there you can do whatever you like with it. In my own software I display that value directly in the UI (rounded to the nearest 2g), but in some of the other processing steps I keep a running average of the last three data points I’ve seen. So it’s still coming in at around 90Hz, but it’s got a little bit of smoothing (sort of like reading at 30Hz) so it’s not as jittery.
Almost all of the noise is down below the decimal point and fractional grams don’t really matter for our purposes. The smallest tension window we might need to consistently hit is on the order of 10g or so.
Now, all of that said, this has been my experience with the single load cell I have sitting next to me. I don’t know anything about the variability you might see across a whole population of the things. Hopefully your sensor will be able to give you useful data, too!