May: Sinusoidal Acceleration, APO Lens, Better Movement
It’s nice to be back in the swing of things! I had built up a list of small things I wanted to try and was able to knock out quite a few of them this month.
Acceleration
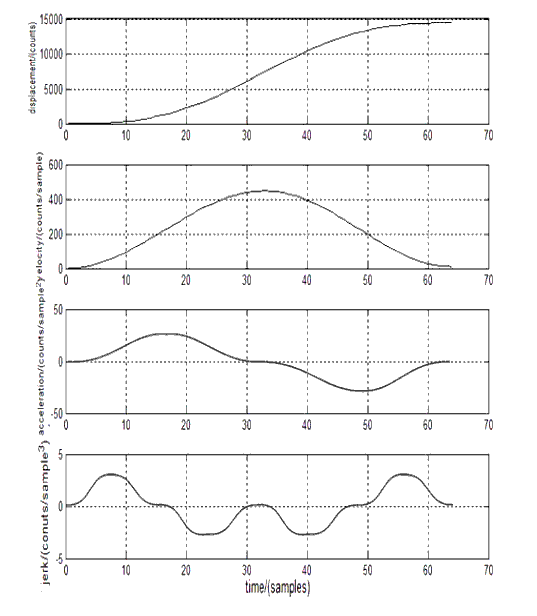
I was inspired by @PM490’s post demonstrating his new acceleration control. For unrelated reasons, I’d recently learned about the classes of curvature (C0, C1, C2, etc. and G1, G2, etc.) so I was on a smoothness kick. I found a paper that described an acceleration curve that enforced G3 curvature (continuous “jerk”) by using sine curves everywhere.
Here’s the relevant diagram from the paper showing each derivative:
I only needed to use 2 of the 28(!) formulas given in the paper to build a little lookup table and now my film transport moves are smooth as butter. ![]()
Vibration sensor integration
It took as little work as I’d expected to get the “clear the vibration flag, capture an image, check the vibration flag” behavior I described before, retrying as needed. It works amazingly well and I can’t seem to take a blurry picture anymore.
850nm IR
Something I’ve been dragging my feet on has been capturing each channel in its best focus by moving the camera along ReelSlow8’s ball-screw Z-axis. There were still lots of challenges: making sure the repeated movement was consistent (not losing steps) and the image registration to correct any slight transform between channels. I had observed all three: rotation, translation, and scale for just a couple hundred microns of Z-axis movement.
The R, G, and B channels haven’t been much worse off by the camera sitting still. But, without moving the camera, the longitudinal chromatic aberration defocuses the IR channel into uselessness. I didn’t want to start the bulk of my data capture without that 4th channel, but now that I’m more or less sprinting for the finish line, I decided to rethink my approach a little.
The graph at the bottom of Wikipedia’s Superachromat page describes mythical lenses with 3rd-order correction that even bring the IR light range into sharp focus. Those lenses are (tens of?) thousands of dollars though and not made for our type of enlargement.
But the orange, “3. Apochromat” line there made it look like some of the lower, near-IR range might not be so far off. My first experiment was “Does 850nm IR work for the purposes of IR cleaning?” I temporarily installed an 850nm through-hole LED in my integration sphere to perform a quick test:
The answer: No, no it doesn’t. ![]() Compared to the ~920’ish nm LED I’ve been using, the dyes on the film are apparently quite sensitive to 850nm light and the results almost look like one of my red channels.
Compared to the ~920’ish nm LED I’ve been using, the dyes on the film are apparently quite sensitive to 850nm light and the results almost look like one of my red channels.
Changing the light so it’s closer to the other channels isn’t going to work.
APO Lens
Maybe a different lens then? If there isn’t a suitable (or reasonably priced) superachromat lens, lets look at the lists of enlarging lenses that were advertised as having at least 2nd-order apochromatic correction. Maybe that would be close enough?
I was surprised to see an almost identically spec’d Schneider lens pop up: the Schneider APO-Componon HM 45mm f/4.
You can pit them side-by-side using coinimaging’s comparison tool. The short answer is that they are virtually identical with the slightest resolution win going to the APO lens and the corner sharpness going to the usual 50mm f/2.8.
Really though, it looks like they’re based on the exact same design but with the second corrective optic changing the focal length a little on the 45mm. The best aperture on both is f/4.7 (which I use exclusively during all testing) and their physical dimensions are the same.
I decided to try my luck and order one. This would essentially be trading my software development time/effort for money by using an off-the-shelf solution that didn’t require any Z-axis movement. My 50mm was $50. After the shipping from Spain, this 45mm APO was $350. ![]()
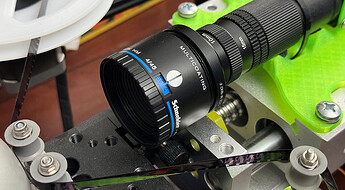
If you’re used to seeing the 50mm lens, this one is blue instead of green.
The 45mm focal length means you’ve got a little shorter working distance. (I should have reverse mounted it but that would require a 3D part redesign that I haven’t gotten to yet.)
To begin testing it, I moved to the best focus position for white light as my baseline for both lenses. Then, I measured how much Z-axis movement was required to bring each color light to its sharpest focus. So the 3rd and 4th columns here are “deviation from best white focus in mm”:
| Color | λ (nm) | 50mm f/2.8 | 45mm f/4 APO |
|---|---|---|---|
| IR | 915.3 | -0.862 | -0.299 |
| Red | 659.5 | -0.120 | -0.048 |
| Green | 528.2 | 0.108 | 0.072 |
| Blue | 452.4 | -0.084 | 0.024 |
The focal planes for the APO lens are all much closer to center. All but the green channel require less than half the movement to make them sharpest. The others are all around 1/3 to 1/4 the focal error, which was better than I was hoping for.
(I haven’t observed any of the corner sharpness decrease mentioned at coinimaging. Granted, it was supposedly something like 0.13% difference between them.)
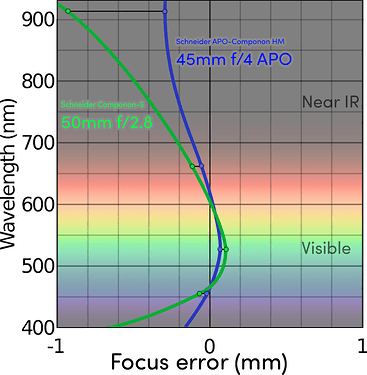
I really only have those four data points, so there is some hand-waving in this graph between them, but this gives a better impression of how much closer to the “white light” center line things are:
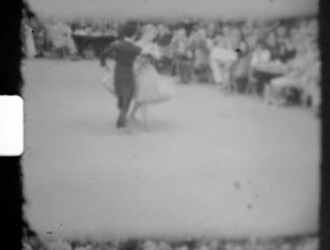
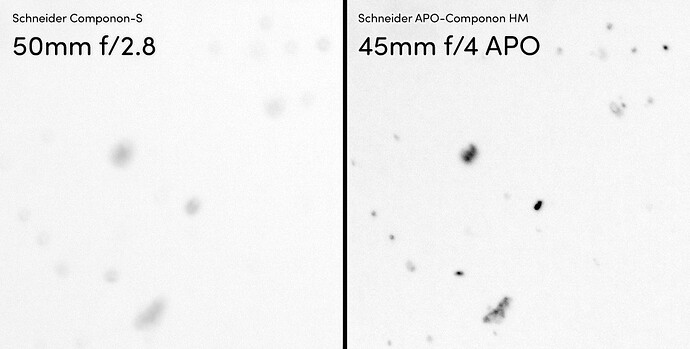
Look at how much closer 915nm is! It’s not completely in focus (because this isn’t a Superachromat lens) but it is now totally workable. Here is some dirt on a Super8 frame:
There is a bit of blur on the right (while white/blue are in focus), but that is almost the amount of blur you’d add before thresholding it to use as an inpainting mask.
This made me very happy and made the extra cost of the lens completely worth it. Besides initial focusing, the ReelSlow8’s Z-axis is now more-or-less vestigial and could be replaced by something simpler/cheaper (a hand-operated micrometer stage?) in the next iteration, dropping a stepper motor and stepper controller board in the process.
Software understanding of continuous film position
To enable the next thing I had to add the notion of “sprocket permanence” to my software. Before, the way I was keeping track of things was quite brittle and could only measure distances based on sprocket holes that remained in the frame before and after. If one scrolled out of the viewport, the app wouldn’t have any idea what happened.
By teaching the software that sprocket holes are spaced more or less uniformly from one another, it can handle things scrolling off without losing its place. Now it keeps track of frame IDs as they scroll by, incrementing each time a new sprocket hole appears (and decrementing correctly when moving in reverse). That opened the door for…
Simultaneous position and tension
Almost a year ago I showed the math I was using to maintain tension while moving. Equation (1) there showed a relation between the number of steps taken by the supply & take-up motors and how that would change the tension.
It worked great for holding tension constant but my simplistic “we seem to be moving X pixels for each supply motor step” didn’t always land where it was supposed to. That is because the motion doesn’t only depend on the supply motor but also the take-up motor. If the tension algorithm was making up for some slight tension deviation, the amount of movement would be different.
I’ve been curious whether the steps of both motors could be related to the film motion in the same way I’m handling tension. After some testing to see how much things moved at various tensions and for various step counts, I was pleasantly surprised to find things behaving quite linearly. Maybe it was worth a shot. So–introducing new constants, c and d with units of pixels/step–we can say something about how the number of steps (S for supply motor steps; T for take-up motor steps) affect the movement of the film (in pixels, Δp) in the viewport:
![]()
If you combine equation (1) from a year ago and (6), you can do a bunch of substitution and get direct answers for S and T that will maintain tension over an exact-length move:
The dimensional analysis works out nicely: the units all agree.
Now the general scheme is to update our constants a, b, c, and d after each move (where we provided S and T and can read the resulting Δτ and Δp from our sensors) by doing least-squares/RANSAC/etc. across two separate linear equations (see (2) from a year ago).
With the updated constants in hand and a desired Δτ and Δp for the next move, we can use (7) and (8) directly to get the number of steps for each motor to simultaneously achieve our desired position and tension in a single move.
This replaces the “make a guess at S and then solve for T using (4)” in a neat way that has been working even better in practice. With very little training it can move entire frames (now accelerated smoothly ![]() ) and land within a couple grams and a couple pixels of the target, every time.
) and land within a couple grams and a couple pixels of the target, every time.
I was on frame 37 and told it to navigate back to frame 33 and in less than a second it landed so closely that the “sprocket center” and “target” lines in my UI overlapped, all while the tension was held fixed.
It can still suffer from the same degenerate/singular matrix problem I described before: once you’re making the exact same move every time (because it’s so precise), the solutions to the equations collapse in dimension. But I’ve got some ideas for circumventing that including “maybe don’t update our constants if the move was within some threshold of being perfect”.
What’s Next
Things are very close now. I want to do a little cropping to the frame bounds before writing images to disk. This is to both limit the amount of drive space required for a reel but also to maybe help out the image stabilization algorithms with a bit of pre-stabilizing.
I also haven’t done a good tilt/yaw stage calibration since I finalized the film path to make sure everything falls inside the imaging plane and one side of the frame isn’t in better focus than the other.
It’d also be nice to generate a sidecar metadata log with the steps taken, film tension, frame positions, crop boundaries, etc. just in case something goes wrong. I learned a lot the last time I tried to scan an entire reel. I suspect I’m going to learn just as much this next time.
