Well, due to time reasons, I guess it will take a while until I will work on modifying hardware. So I think at this time it makes no sense to do a 10x10 PCB.
Changing subjects a little bit: the discussion whether narrowband LEDs should be preferred to wideband LED illumination is still not solved. Like @npiegdon, I was initially pushed into the corner of a narrowband setup after reading the DIASTOR paper, overlooking the warnings of @friolator. The comparision of a wideband scan vs. a narrowband scan (on page 15 of the paper) were too convincing.
Well, if you accept the fact that you have to do anyway a little color grading after the scan, here’s an interesting outcome of a little experiment I made:
The rightmost image (I added to the show) is the “Image a)” (wideband image), with just with a little push of saturation applied. Skin tone-wise and as well with respect to brown tones, I think it easily beats the narrowband result. So the main claim of the paper at this page, “no processing would retrieve those colors from the image captured with white light”, I would not underwrite.
Using a LED setup quite similar to the Swiss one, I did further encounter funny effects: with certain film material my scanner was seeing structures in the scan which were simply not noticable by human observers. Here’s an example showing a red glow around the edges
(I have no better image left - this was years ago.):
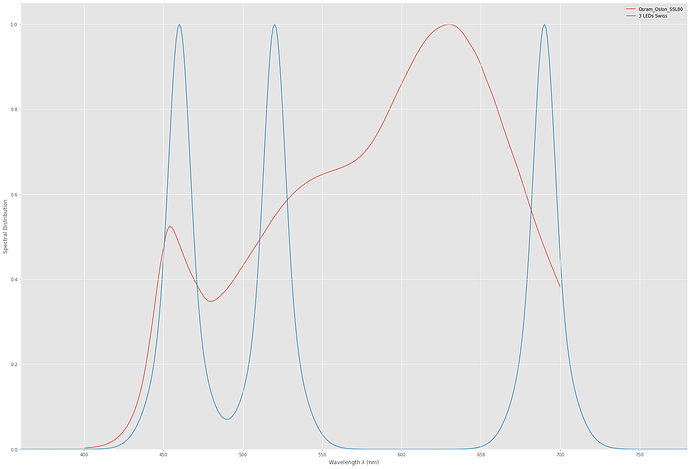
This spill was only present with that specific S8-camera. I traced the issue down to an too extreme selection of the red LED. Here’s the spectrum of the Swiss setup compared to my currenty broadband illumination:
The initially chosen red LED was really at the edge of the visible spectrum and that caused most probably this issue.
After replacing the red LED with a one shifted closer to the green channel, this issue was gone.
Anyway, I learned that way that you sometimes might not be interested in an illumination having too much color separation between channels.
Since the colors did not come out very well from the scanner even with the red LED adapted, no matter what I tried, I finally gave up on narrowband LEDs. The way @npiegdon went with his setup (calibrating with a known color checker slide) is not possible with my scanner design (not enough space).
So in the end, I abandoned the narrowband setup and switched to a broadband illumination. My thinking was the following: originally, the S8-film would be viewed by a human observer, projected with a Tungsten lamp-like illumination source. Using in the film scanner an illumination source as close as possible to the old projectior’s lamp, the frame in the film gate should be close to what a human observer would have seen in the old times. If in addition I could come up with a camera setup recording such an image as faithfully as possible, I would be done. That was the birth of the scientific tuning file.
At that time, I was using still multiple captures because of the large dynamic range of color-reversal film. The disadvantage of such an approach is the increased capture time compared to a single capture. After raw capture was available in the RP-software, I switched to single raw captures, in turn speeding up the capture process substantially. Immediately it became obvious that a single raw capture is scratching on the border of being usable, at least with the HQ camera. Horizontal noise stripes limit the usability. I convinced myself that that with my film material, this was managable, due to the postprocessing I am employing. Other solutions were proposed by @npiegdon and yourself (@PM490). My current plan is to stick to my current whitelight illumination; as another project I am after (monitoring small movements between film and camera gate) anyway requires the capture of multiple raws (this can be done without too much time penality). I will try to implement averaging several raws like you and @npiegdon already suggested.
Great idea, I think!


