Capture with stacking on Raspberry HQ: Experiment - CORRECTED

CORRECTION: The posting information is mistaken, please see correction below.

One of the disadvantages of stop-motion scanners is no doubt speed. But if it is already slow, why not make the best of it…

I captured these shots under the same lighting conditions, captured raw at full resolution, and binned to 2032x1520.

The difference is one is a single sensor 12 bit capture at 16 bit (RGB captured separately), and the other is the additive stack of 16 captures at 16 bit. Both files were saved as TIFF 16bit, and processed in Davinci Resolve with the same settings.

I thought it is remarkable to see how what is actually less noise (the result of stacking), visually appears as a better resolution and/or better focus image.

These were captured with Tingopix (aka snailscan2), using a RPi4 with the new capture gui/software, which includes the option of capturing with stacking of 2/4/8 or 16 shots.

…and yes, this scanner is not winning any speed competition :slight_smile:

1 Like

Interesting experiment. I assume that your stacking means averaging for example all 16 captures of a frame, with each capture featuring the same parameters?

An alternative approach would be to do several captures with different parameters. Specifically, different exposure times. I tried that once, but merging the raw captures into something useful did turn out to be non-trivial. For example, you need to get rid of overexposed areas, and the linearity of the raw captures was not too good to easily handle the merge.

Anyway - what I find interesting are the horizontal stripes visible in your capture. Is this real image structure or are these stripes those stripes from the HQ-sensor in low key areas, as discussed elsewhere on this forum? If these stripes in low key areas are only noise-related, one would expect them to fade away by averaging several captures. If they are caused by algorithms running on the sensor, they might be image-related. That is, they would change position whenever the image content changes (this is what I observed). Of course, the horizontal stripes could also be just in the object you scanned…. - that’s the reason why I am asking what you exactly scanned here.

Again, great experiment. And working with 16-bit raw will give you no limits with respect to grading even challenging material.

Again, great experiment. And working with 16-bit raw will give you no limits with respect to grading even challenging material.

Thanks Rolf. 16 bit range is a game changer for correcting faded films indeed.

The approach was to have a poor man’s “monochrome” 16 bit sensor

Each color channel is captured separately with its own light setting (for both the single capture and the 16 bit stack).

The beauty is that the illumination is not narrow-band RGB LEDs! It is the wider-band defined by the bayer filter for each color channel.

Going back to the discussion on The Backlight, if one believes wide-band color illuminant is better than narrow band LEDs, this approach is the best of both worlds: separate light/exposure levels for each channel, for color balance, without needing narrow-band color LEDs.

Yes, the sums average into a 16bit depth total. That is done in the full resolution raw.

For the 16 captures, all are added together to fill up the 16 bit.
2^12 = 4096 * 16 = 65536 = 2^16

For the single capture, it is shifted to the most significant 12 bits of the 16 bit raw array.

2^12 = 4096 << 4 = 65536 = 2^16

The idea of stacking came from seeing how astrophotography uses the approach to cancel noise.

These are in the film itself. They look like defects on the die layers deposition or maybe cracked layer with age, although not every frame has it.

The unexpected result was the perception that the 16 bit image has better spatial resolution, when in fact what it has is less noise, especially given that the capture resolution is halved by the debayering (binning).

Again thanks for the feedback.

2 Likes

It would be interesting to see whether the HQ sensors stripes in low key areas “survive” with your 16bit raw capture. Ideally, one should expecet that they should be reduced similar to the pixel noise. But I am not sure this will happen - if time permits, I think I start my own experiment.

Thanks for your feedback!

1 Like

CORRECTION

It turns out that when doing the overlay in Resolve, I mixed the cropping and the resulting labels (and subsequent comments) are switched. Here is the corrected picture.

What I believe is happening is that Davinci Resolve scaler is averaging the underlying noise, providing the perception of a higher resolution texture.

This became evident when applying sharpening, which makes the colorful pixels pop out in the 1 capture, while not in the 16 stacked capture.

Afterall the unexpected perception above is explained by my mistake.

@cpixip apologies for the mixed up. Also I discover it while trying to generate the red banding issue, but was not able to have reproduce it.

1 Like

@PM490 - there’s a lot going on here. Let’s try to dissect the stuff.

Averaging several raw captures will indeed increase the signal-to-noise characteristic.

And actually, as the HQ sensor can operate at 10 fps with 4k raw resolution, the drawback for 16 captures amounts to “just” 1.6 additional seconds per frame. Depending on your mechanical scanner setup, this is comparable to the time you have to wait after a film advance (as my scanner is made out of 3D-printed plastic, I have some experience here…. :slight_smile:).

Which brings me to another point: simple pixel-based averaging will only work if the frame does not move during the different captures. If there is movement, your averaging process will reduce the spatial resolution of the capture. Do not underestimate that challenge when working with small formats like S8 or so. There’s a reason why @npiegdon came up with this nice design.

Basically, if your scanner isn’t mounted on an optical table with sufficient mass, an ordinary house floor will move when people are using the staircase nearby. If the linkage between the sensor and the film gate is not really rigid, you will see spatial shifts between consecutive captures of the same frame - especially in a 4k/S8 setup. You can check whether this is an issue with your setup by actually subtracting captures of the same frame from each other. Ideally (no noise, no movement) the difference should be zero….

One way to counteract this is to run an alignment process before averaging the frames. I think standard astronomy software is doing this when stacking images. They do a lot of other computational stuff too, which increases actually image resolution dramatically.

(Side note: in my 3D-printed plastic based setup, I am actually capturing raw in 4k with 10 fps, with the picamera-lib outputing simultaniously 2k “proof-prints”. Two consectutive 2k frames are subtracted from each other and only if the difference image is below a certain threshold, the associated 4k raw is stored as capture. Normal capture time is 0.2 sec per frame, but I can extend that to 20 seconds or so per frame just by running around the house…)

The noisestripes mainly found in dark areas in the red channel and discussed here for a while, are still an unresolved issue. As that stuff is not or barely visible in the final graded image, I never bothered to look into this any further. It might be coming up in your averaging approach again, especially because you have to give the raw converters a decent black level to work with.

The standard approach (HQ sensor combined with the picamera-lib) just works with a fixed blacklevel value. That plays a role in the occurance of these noisestripes. The thing is quite involved technically, but the raw image of an HQ sensor features occationally pixels with negative intensity values once the blacklevel is subtracted - which can enhance the visual appearance of the stripes.

From your description, you are actually doing the averaging in DaVinci - so the blacklevel is already taken into account by DaVinci’s raw decoder. Technically, I do not know what the DaVinci raw decoder is doing when encountering negative pixel values. It might just pass them through (which I assume the BlackMagic-guys are doing) or clip them. In the later case, your averaging process would be different from the one you actually want to perform, especially in dark image areas.

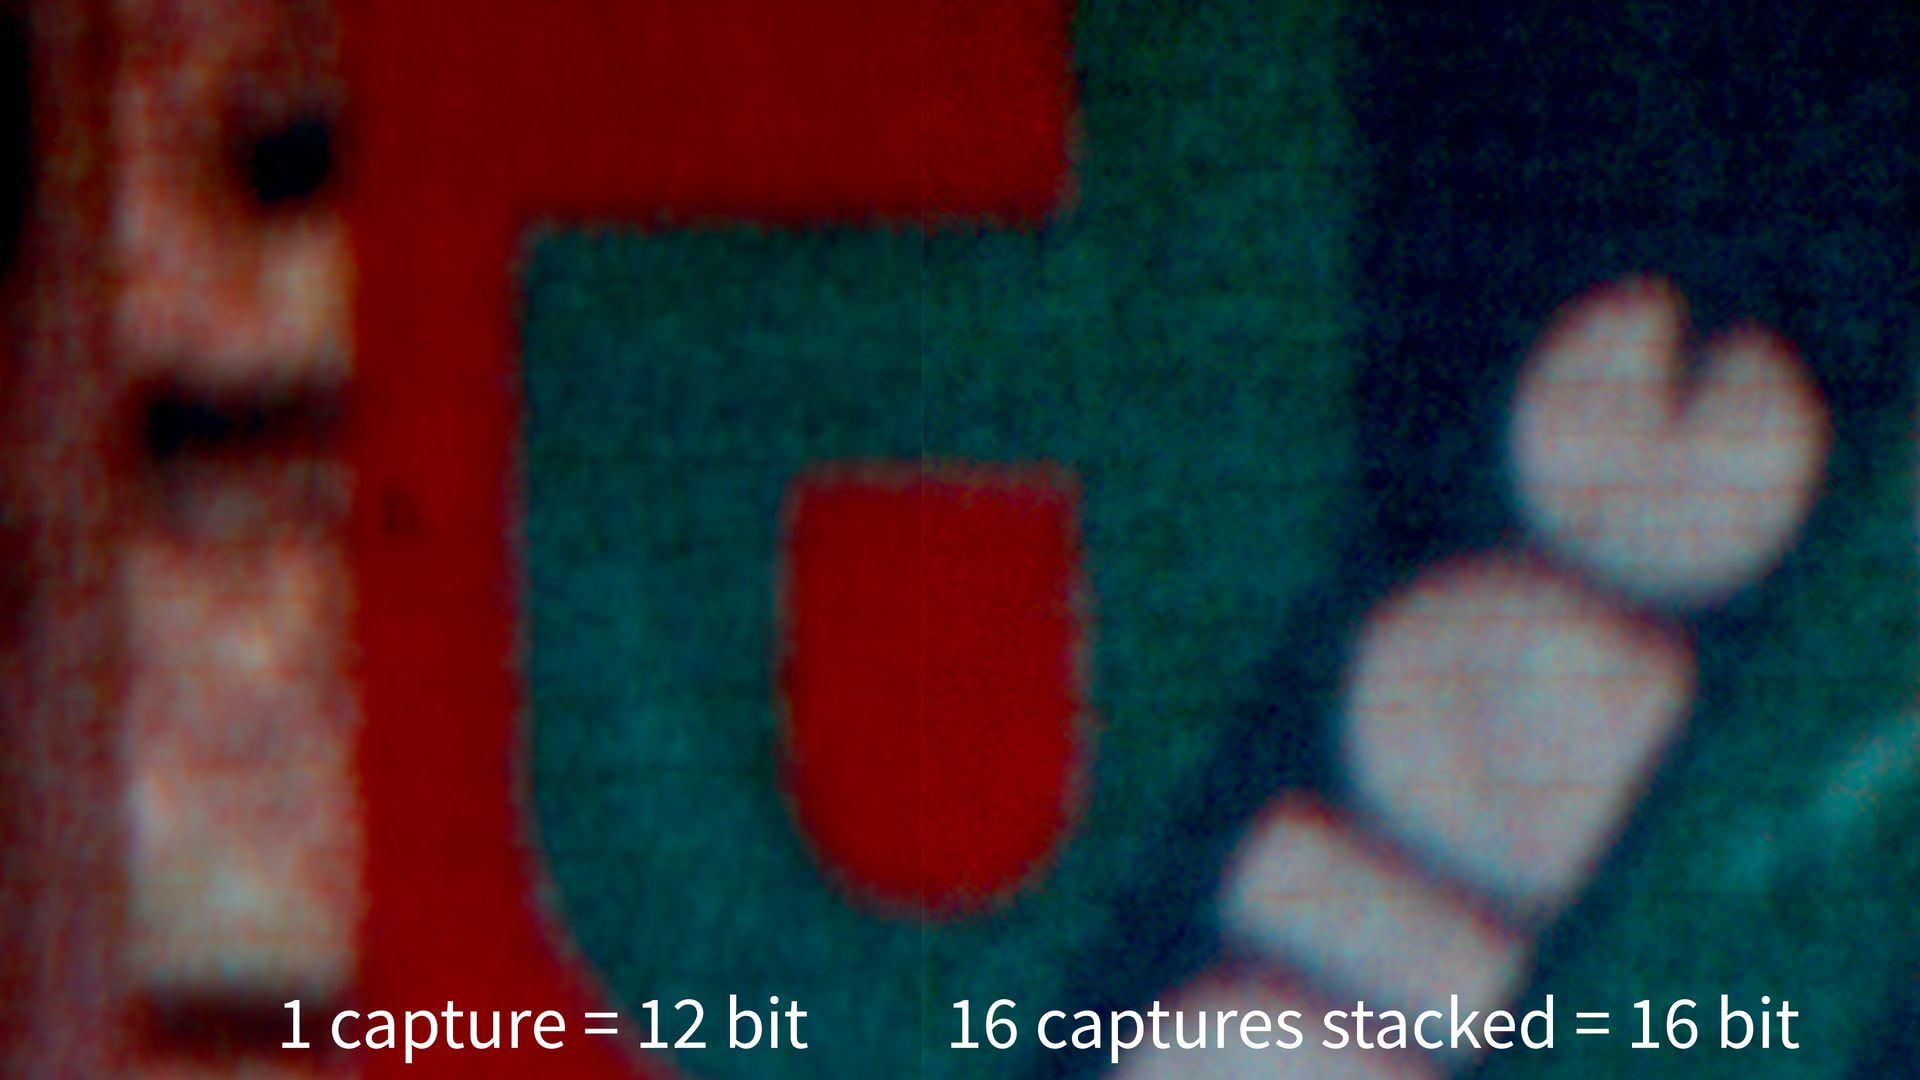
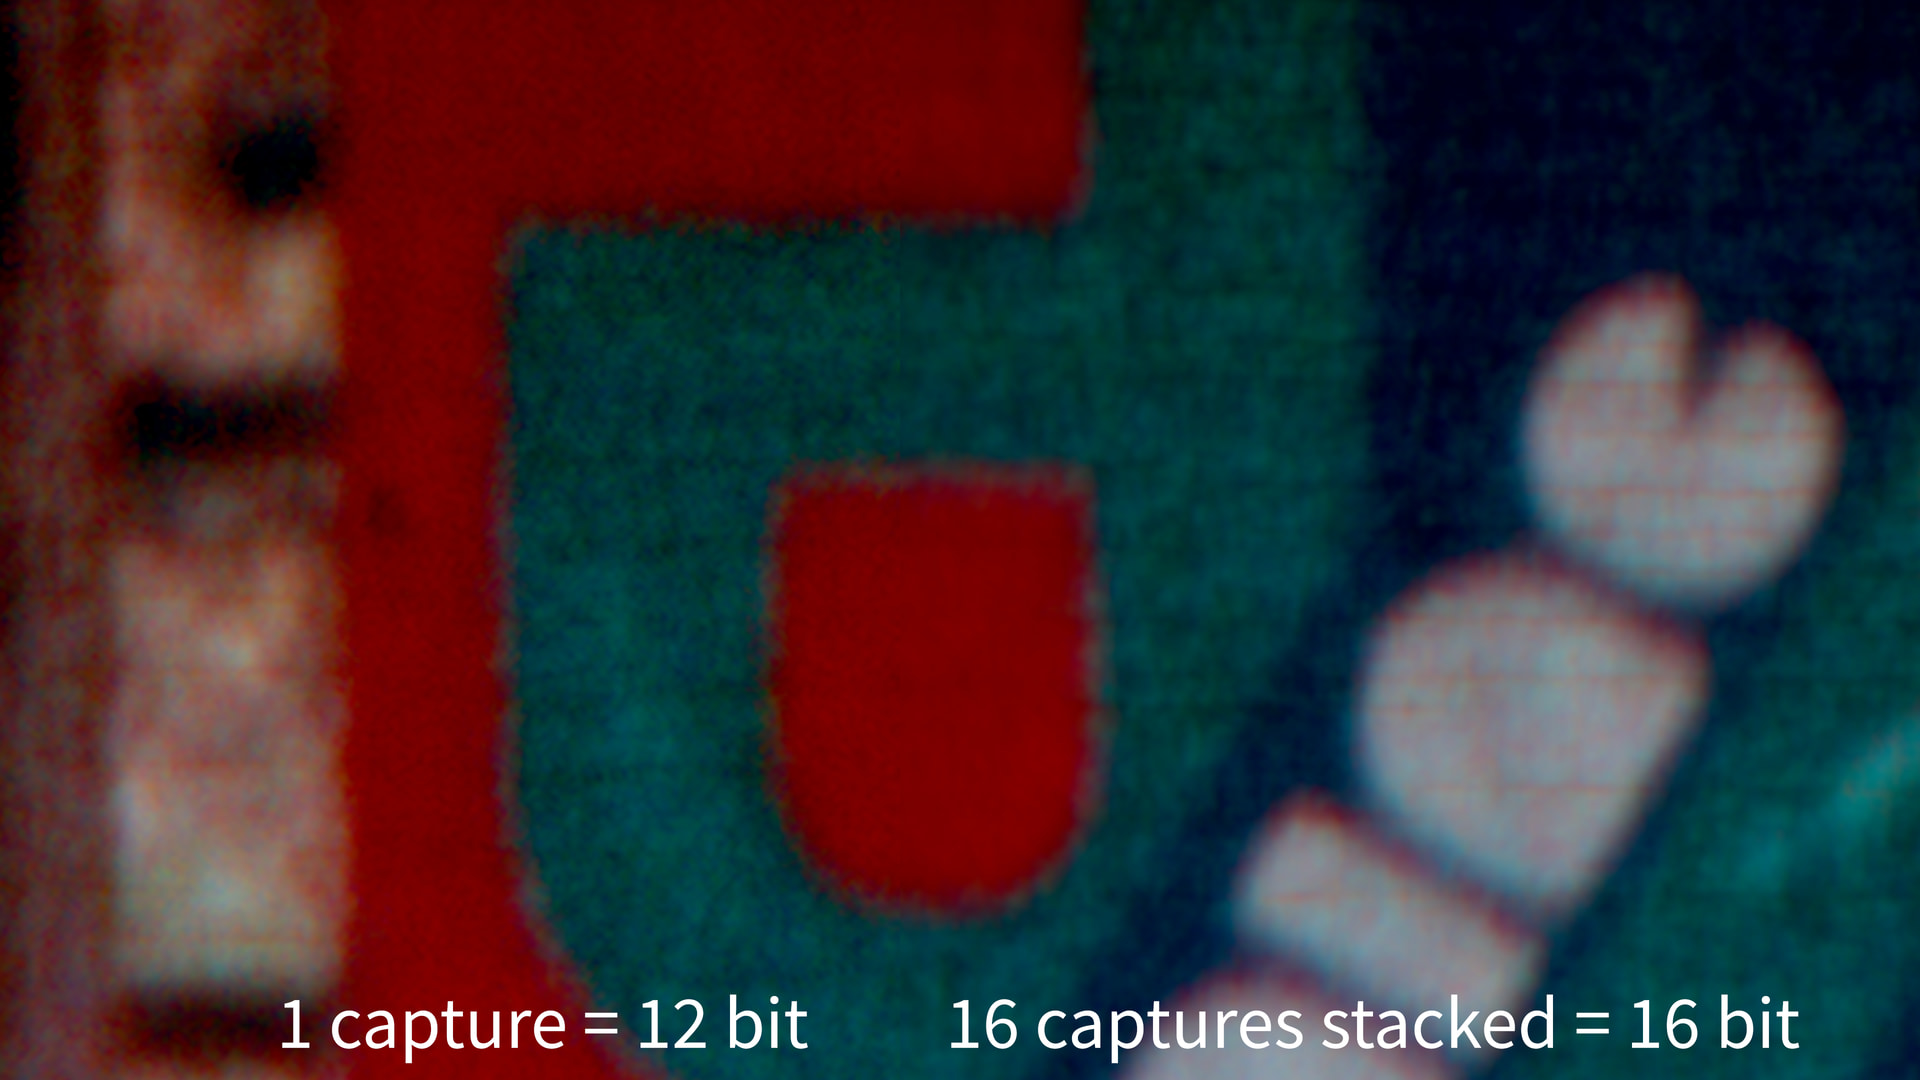
Whether all this is worth the effort is an interesting question. One would need to capture a frame like this (single capture)

and compare it with the combination of 16 captures into a single 16-bit raw.

Thanks for the feedback Rolf, and again apologies for the mixed up on the initial post.

Yes, and here.

I was able to replicate the noise stripes then, and was trying to replicate with the current setup, but did not get them to show… yet.

Yes absolutely. I do not have an optical table for sure, and I am well aware of the issue. While my setup is not perfect, it is workable.

And I know the issue with plastic… so had to add some weight to the camera. Again, not perfect setup, but workable.

Great suggestion. The captures are presently stacked as they are captured. I am thinking this could be a capture error detection check.

The averaging is done pre-resolve. What I meant was that when the image is scaled 8 times, the resolve scaler is effectively doing spatial blending of adjacent spatial pixels. That is what I initially perceived as more detail in the single capture 12 bit, as blending of the noise reduces it and is perceived as a higher resolution texture… when in fact is just reduced color noise.

On the next snailscan2 update, I will go deeper into the current software and pipeline.

Thanks for the feedback and the great suggestions.

1 Like