My Super8 film scanner

A few years ago I bought the Wolverine film scanner. I was hoping the frame scanning would produce great quality film, but I was very disappointed. And that’s where my search for a do-it-yourself scanner began.

This forum has been great source of information, and I now have a Raspberry Pi HQ camera with a 50mm schneider componon-s lens. Right now I’m at the stage of grabbing singe images, and trying to get the best image quality. If I’m satisfied with the image quality then I’ll move on to the mechanical part.

Here’s what my current setup looks like:

As you can see, I’ve re-used the Wolverine as a basis. The light source is powered by 5v (+50 Ohm resistor). The stepper motor I will try to control later.

But back to the image quality, I noticed this wolverine scanner scans the inside of the super8 film. This means I do not have to vflip the image, but does this produce the same focus / image quality as scanning the outside of the film?

This is the command I’m using for capturing:
libcamera-still --tuning-file ~/dev/imx477_cpixip.json --viewfinder-mode 4056:3040 -f -q 95 -o image.jpg

Here’s 1 frame, shot from the back/inside with backlight on:

Same frame with backlight off, and a light shining onto the surface:

Same frame, shot from the front/outside v-flipped, backlight on:

Same frame with backlight off, and a light shining onto the surface:

Amazing to see how such a scratched surface can still produce a good looking image.
But my question is, does it matter (quality wise) if I shoot the front or the back of the film?

Another question I have is about the capture parameters. As you can see in the command line I’m using @cpixip camera profile. This has improved the look of the image a lot, so thank you for that :slight_smile:. I’m also planning on using a fixed shutter speed and (analog)gain for capturing, so the brightness of all images in sequence is the same. Also I would like to get as close to raw as possible (or even use raw/dng for capturing), and do any after editing needed in Davinci Resolve.
But when not using raw/dng, do I need to disable more functions like denoise, sharpness and white-balance to get a pure image? Or is that already disabled when using the camera profile?

First - welcome to the forum and thanks for your post!

Yes, it does. The emulsion is only on one side of the film. That’s where the image you want to sample is. You can see the emulsion layer when the light falls from the side - then you notice slight surface modulations that follow the image content. I think that is your “front/outside v–flipped” case.

In that case, your lens is directly facing the image content. That’s what you want. In the other situation, your lens is seeing the image content through the thin film carrier - potentially through all the scratches you noticed. This is not the image you want. I attach a little drawing to make things maybe a little bit more explicit.

_Super 8 Format with Sound 2.pdf (211.2 KB)

Thank you for this feedback! :+1:

That is what many people do, but some have obtained quite viewable results by switching on autoexposure and autowhitebalance.

You are aware that with the libcamera apps, you can capture both a jpg created by libcamera (through the data which is contained in the tuning file) as well as a standard raw .dng-file? The following command will do the trick

libcamera-still -o test.jpg -r 

It will create a test.jpg, but also a raw file test.dng which you could load into DaVinici or any other raw-converter. When working with raw files, you might want to look into the color profiles Jack Hogan created; they can be downloaded here.

Well, the tuning file you are using is actually switching off some internal automatic functions which would be active when using the normal tuning file. Other automatic functions like autoexposure and autowhitebalance are by default active when using libcamera, but are de-activated when specifying shutter speed (autoexposure) or color gains (autowhitebalance). Denoise and sharpness is left unchanged between the standard tuning file and my take on the tuning file. You will normally want to keep that at the defaults to get a decent image quality.

I thought that would be best, and I think the capture from that side looks slightly more in focus, thank you for confirming. This does however make me question if choosing to modify the Wolverine transport was a good idea, since that scanner is aparently capturing the wrong side of the image :frowning: .
Also, in this transport, the film can only go from left to right, so my options are limited.

Yes, I know. I’ve been experimenting a little with using a raw/dng workflow. The dng files created by libcamera-still can be imported directly into Davinci Resolve as an 18 fps raw video with very little effort. This also enables its raw editing options. If this has not been done before then I can provide a few screenshots and a small description of how to make this work if anyone is interested?

Thanks! I’ll try these.

I’ve been trying to calibrate these two parameters to the light source I have. If the max RGB value in the image is 254,254,254 then I know for sure there is no overexposure (255,255,255), and that white = full RGB white.
After the film has been captured I guess the best option would be to cut to the film into separate scenes, and do white balancing per scene.

However, I’m now also experimenting with another interesting idea posted here on the forum; capturing multiple exposures, then trying to make a better looking image with mertens merge or some other algorithm. With my tests so far the results are only slightly better, but at the cost of losing raw/dng capabilities, and also taking up a lot of time on a rpi.

I’d approach that a little bit different. The reason is that any camera does not perform than well if the output numbers are too close to the maximum.

So, I am usually adjusting shutter speed of the HQ sensor in such a way that the RGB-values in the center of the image are around 128 or so. Than the red and blue color gain are adjusted in such a way that all color channels show the same amplitude. That should fix your whitebalance. Do not forget to set the shutter speed back to its normal value before scanning.

That really depends on your goals/taste. From my experience, there are color shifts between different rolls of the same film stock. Some Super-8 movies are even cut together with changing film stock. Furthermore, classical Super-8 film stock did feature only two color temperatures (3400 K Tungsten and “daylight”) - which were practically always not the actual color temperature of the scene.

This boils indeed down to requiring some color work in post production. You might opt to retain a bit of the color variation which is noticeable in the original stock - in this case a single color adjustment applied to the whole real might be sufficient. Or: you might opt to really “perfect” the viewer’s experience - in which case you will certainly end up dealing with every scene separately. In fact, I remember a case where a Kodachrome film did show a noticeable greenish color variation in only two frames of the original footage - probably some mishap during development. Of course you can take that color variation out of the footage with modern digital methods - but: you might opt to stay close to the source and original viewing experience and leave this in the footage. It’s a question of personal taste/style.

Well, that’s how I do my captures (exposure fusion via Mertens). And yes, the necessary multiple exposures increase scanning time. In my current setup I am taking four different exposures of a single frame. The complete scanning time for a single frame amounts to about 2.4-2.5 seconds/frame. 500 ms of this time is needed for advancing the film, a further 500 ms is spend (on purpose) just waiting for the mechanical vibrations to die out, and the actual picture taking requires the additional 1.5 seconds. Thus, scanning a classical 15 m roll of Super-8 with about 3 min running time (18 fps) leads to a scanning time of slightly less than 3 hours.

The reason I am using this approach (as compared to just capturing raw) is that the dynamical range of color reversal film is huge - in order to capture details in the shadows, you occasionally need more than the 12bit/channel the HQ sensor can deliver in raw. A stack of 4 differently exposed images covers a larger dynamical range than a single raw.

However, other people obtained quite good results with a single exposure and utilizing the exposure automatic of libcamera. Another aspect why I am using the Mertens algorithm is my laziness - I do not want to spend too much time in developing/optimizing the raw image file into something which displays nicely. Exposure fusion by the Mertens algorithm does here a decent job automatically. There are numerous examples about capturing raw and using exposure fusion here on the forum. In the end, the way to do it depends on your personal taste.

I think we must not forget that these films were made to be seen with a cinema projector.
However, if you brought the projector too close to the screen, the white areas were burned and if you moved the projector too far away, the blacks were too dark.

In fact, there was not a good distance between the projector and the screen, because the exposure variations of the amateur cameras were important.
The projections were often an alternation between too dark blacks and burnt whites (I’m exaggerating a bit anyway).

In fact, everything depends on the possibilities of the camera used to scan your film, and I never felt the need to explore multiple exposure, perhaps simply because the result obtained is already much better than what was possible the screening of the film in the past
.
But I understand that we like to look for challenges, it’s always interesting.

Well, other factors affecting the viewing experience were how dark the room actually was, as well as the properties of the projection screen. Some people put quite an effort in optimizing the viewing experience. And it is still an art practiced in many cinemas world-wide. Burning out of highlights typically occurs when the room is too dark, whereas insufficient projection lamps combined with an image projected too large or a not-so-perfect projection screen (think of a bed sheet) lead to too dark shadows.

There is no camera on the market which is able to scan reliably the full dynamic range contained in a Kodachrome or a Moviechrome stock. Whether you want to scan that full range is another question: usually the film grain in the shadows of the image is quite prominent, so you need some heavy image processing to make these dark shadows viewable by modern standards.

To give an example, here’s on the right side the scan of a typical Super-8 vacation movie. This was done with the best exposure one can come up with for this specific frame, and it is using the HQ sensor which is able to digitize up to 12 bit. Most of the scene is not blown out, obviously. The brightest highlight is found on the bus in the background, which has about the same brightness as the sprocket hole.

However, some really dark shadows are cast, and it is difficult for the viewer to see any details here.

On the left side, the result of exposure fusing five different exposures is shown. You now notice the color of the jeans of the tourguide, which are undefined on the single scan on the left. Also, the viewer now sees that the guide is in fact holding a briefcase in his hand - do you see that on the single scan on the right?

(In addtion to the exposure fusion step, the image on the left has been further enhanced by a temporal degraining algorithm, combined with a mild sharpening step. The filmstock is Kodachrome.)

1 Like

I’m talking about amateur cinema with amateur equipment.
We can mention many factors that influence the projection, but it will not change the quality of the film itself. Believing that the art of projection is going to work wonders all the time is not an my experience. And I come back to the fact that the scans are very often of better quality than the projections.

Do you have a screen or a video projector that allows you to reproduce all these colors?

I think for comparison, you could start by lowering the gamma on the image on the right.
You will obtain a less contrasted image which will allow you to better see the details in the dark part without burning the whites. Then I’ll play with exposition and maybe with the black level and the contrast. The result of the scan will be a bit bland image, but I will restore the balance as much as possible in post-processing. I’m not saying I could do as well as you, but not having your film with me for testing, we won’t know :wink:

But again, I find it great to test these options, well done. But as long as it will take 3 hours of treatments for a 15m reel. It’s not playable for me right now.
But later, when the cameras do this directly in their hardware, it will be great.

@Roland: Well, we all have different opinions, emphases and experiences. I worked with Super 8 in the 70’s and 80’s of the last century and high quality cameras and projection equipment were used then - admittedly not by everyone.

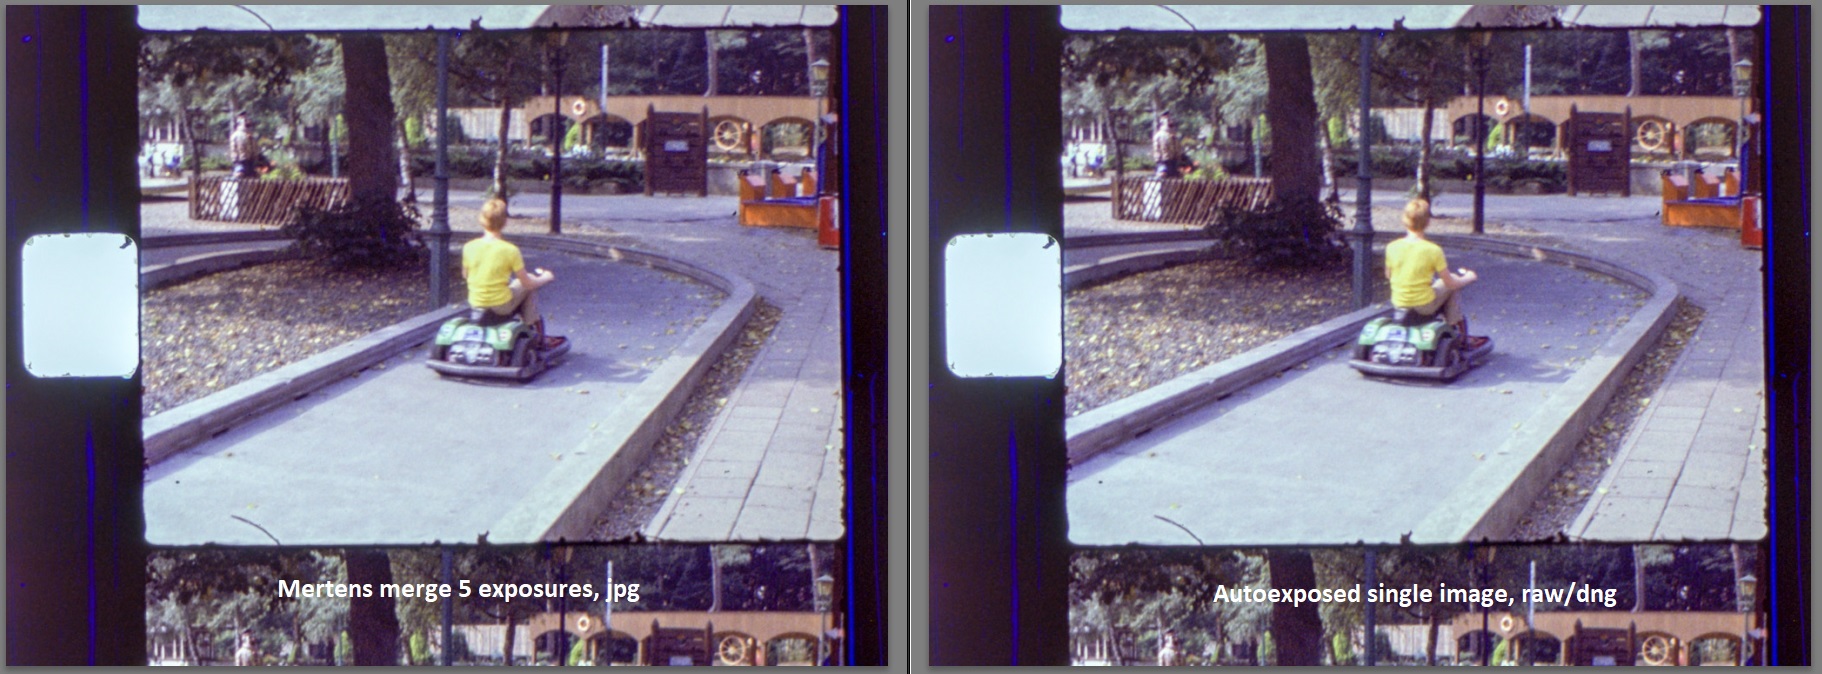
Now to the issue of scanning. As certain types of film stock are fading away over time, one of my goals is to preserve what’s left - 100%, today. Ideally, such an archival scan should be able to digitize the content of the film in question in full glory. That is not possible directly, with current hardware. As most camera sensors max out at about 14 bit/color channel, you will need to work with multiple exposures - or at the very least with precisely chosen exposure settings, metered to every frame individually, while utlizing the full dynamic range of a 14 bit camera. Anything less will leave parts of frames either blown out or pitch-black, with the image information in these frames missing.Or, quantization effects become noticeable (see below).

Any of the more elaborate approaches mentioned above (plus a few more) is able to deliver an archival scan. That is, the available information of the scan is sufficient to reconstruct the full HDR data contained in the movie frame (there are additional other conditions on such a setup like scan resolution and so on that I won’t discuss here).

In any case, the ultimate goal is to get a true HDR (unlimited dynamic range) for every movie frame.

For me, this is important: that my archival scan is future-proof. I do not plan to rescan a film sometime in the future. It might already have faded away.

Note that the archival scan is not intended to be used for presentation. This is the purpose of a secondary output, let’s call this the presentation scan. The presentation scan might have colors corrected, unsteady camera motion compensated, film grain added or removed, and so on.

From a technical point of view, the presentational scan needs to adapt to the limits of current display technology, transmission and distribution channels. Todays standard are 8-bit/color channel displays, being slowly replaced by displays and other technology approaching the contrast ratios you need for true HDR. But we are not there yet.

So generally, one of todays goals is to map the archival HDR (or a pre-representation of that) to the limited dynamic range (usually 8-10 bit) available in todays transmission formats and display hardware. This goal is known as the magical area of “tone-mapping” within the HDR context. There has been a lot of efforts spend in developing approriate algorithms for that task (i.e, adapting true HDR to be displayed on limited contrast displays) and I guess I studied ( = read the original papers) and tested most of these algorithms.

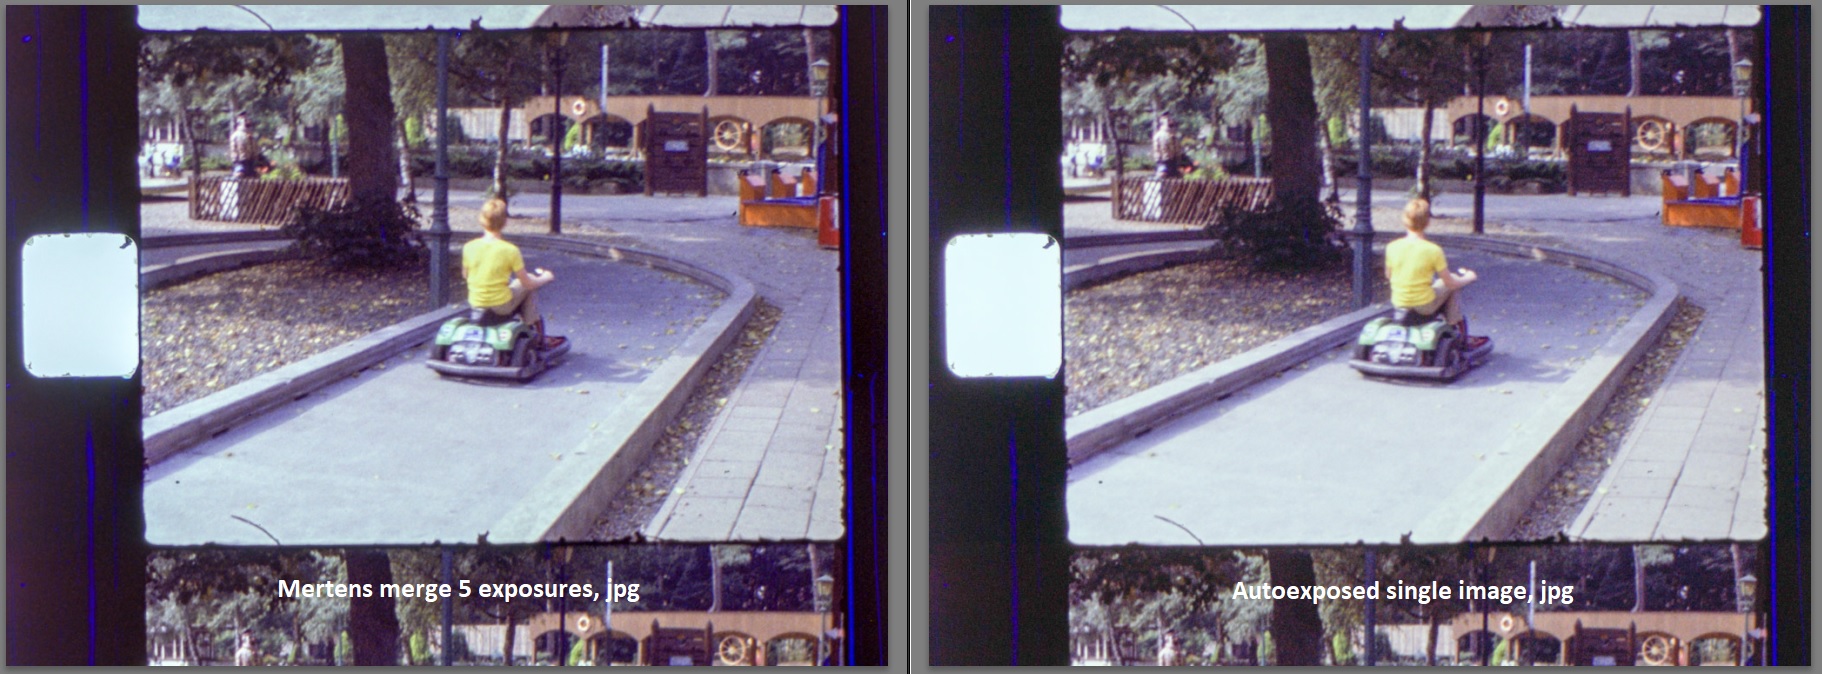
With respect to non-manual operation, the Mertens algorithm outperforms every other algorithm known to me.This can be directly traced back to the structure of this algorithm, which mimics processes similar to those of the human visual system (I worked over 10 years in researching neural algorithms of the human visual system). However, my favorite point is again: exposure fusion is fully automatic, no manual tuning required.

Of course, once the technological threshold of full HDR display and transmission has passed, tone-mapping won’t no longer be necessary. As from the archival scan described above (a stack of multiple exposures for each frame) actually a true HDR can be computed, this process is as future-proof as it can be.

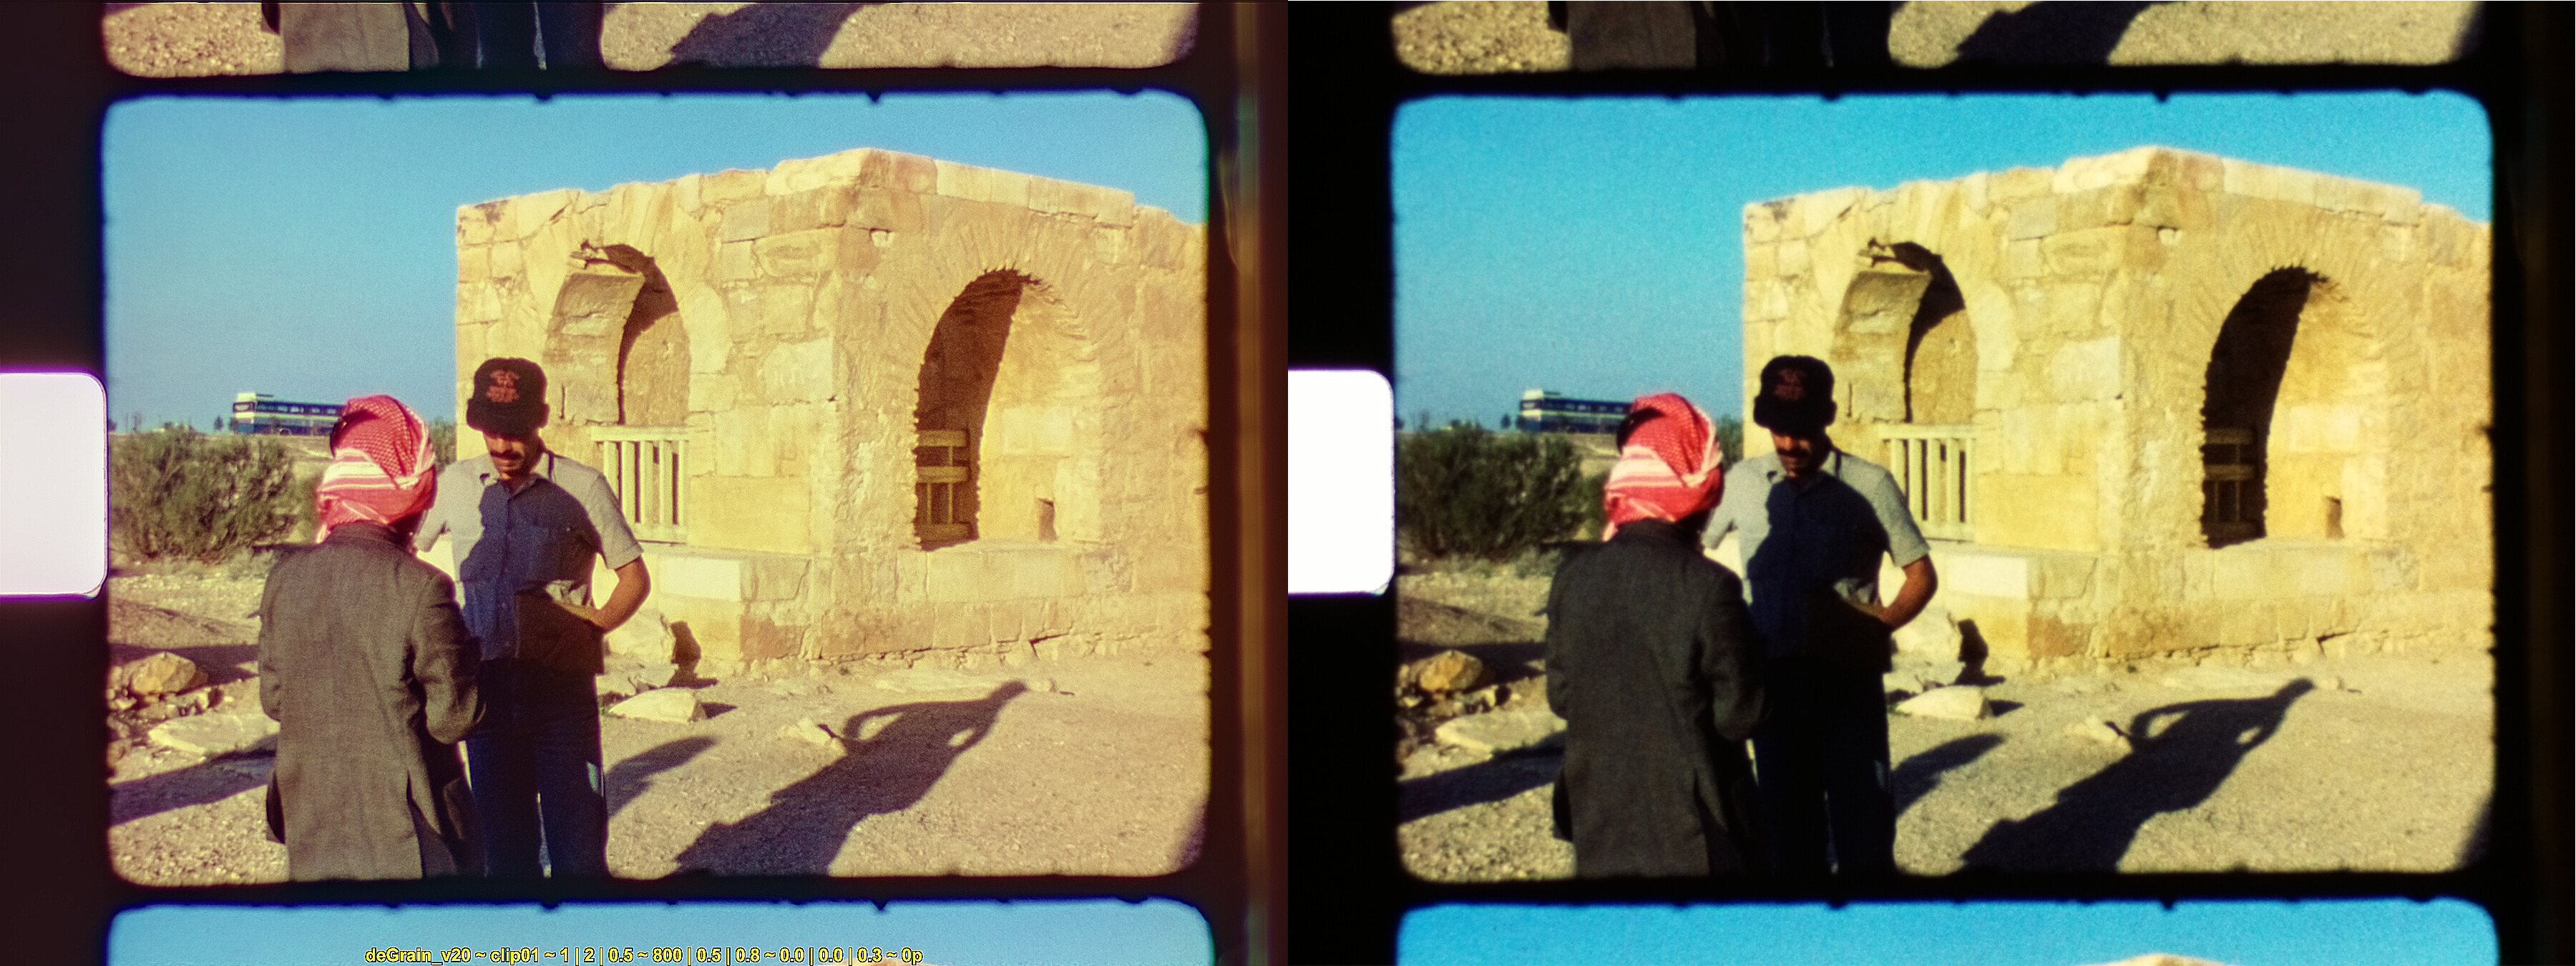
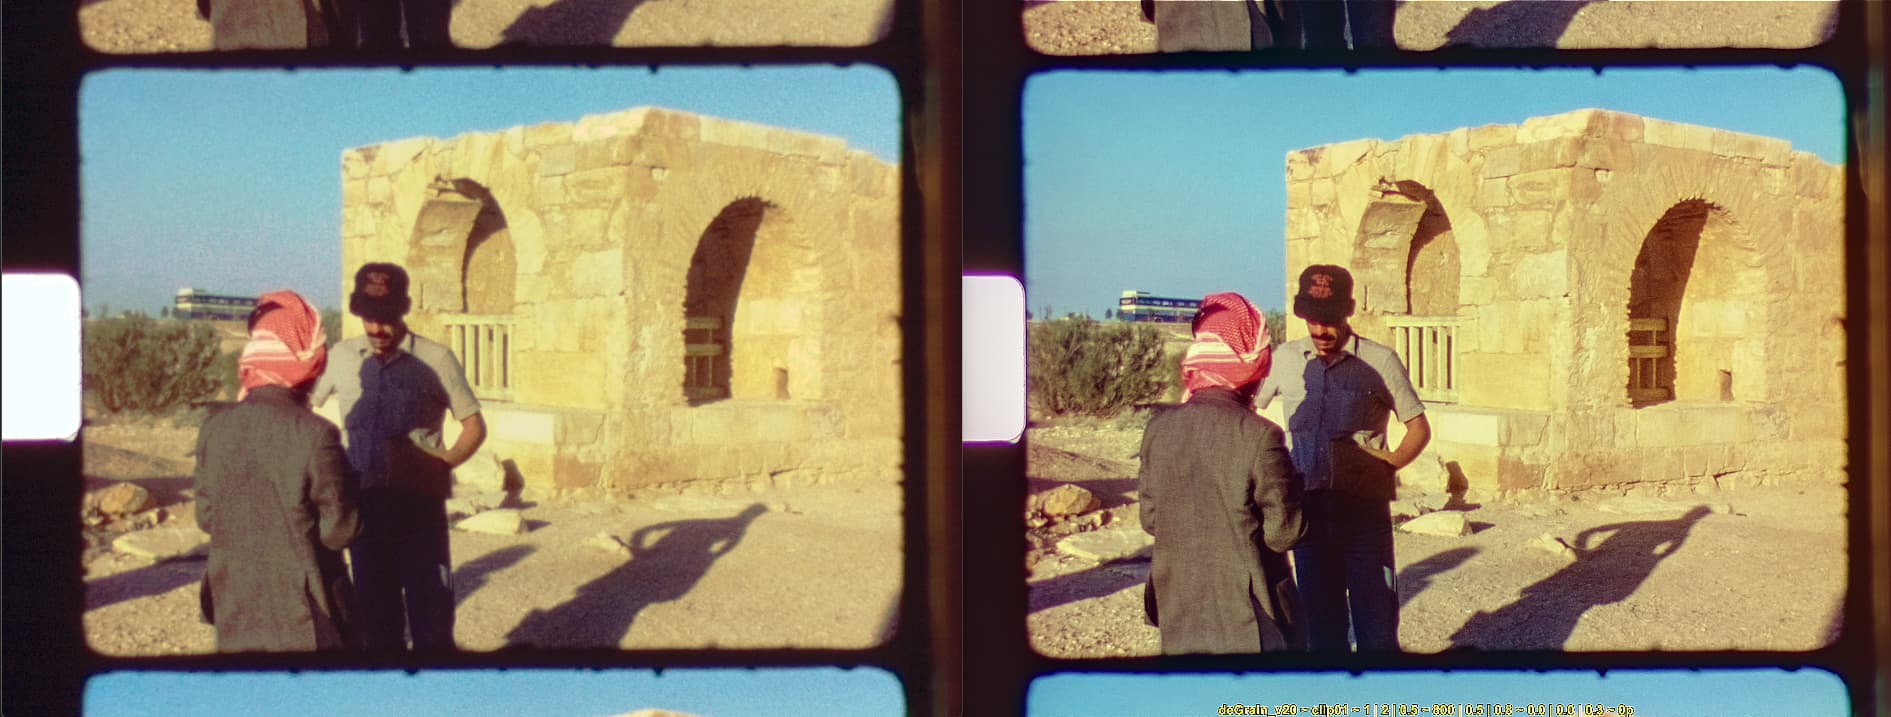
In closing, thanks for your nice description of manually tuning the original scan towards the automatic exposure fusion result. I do have a program which does exactly this (it matches a source histogram to a reference histogram) automatically:

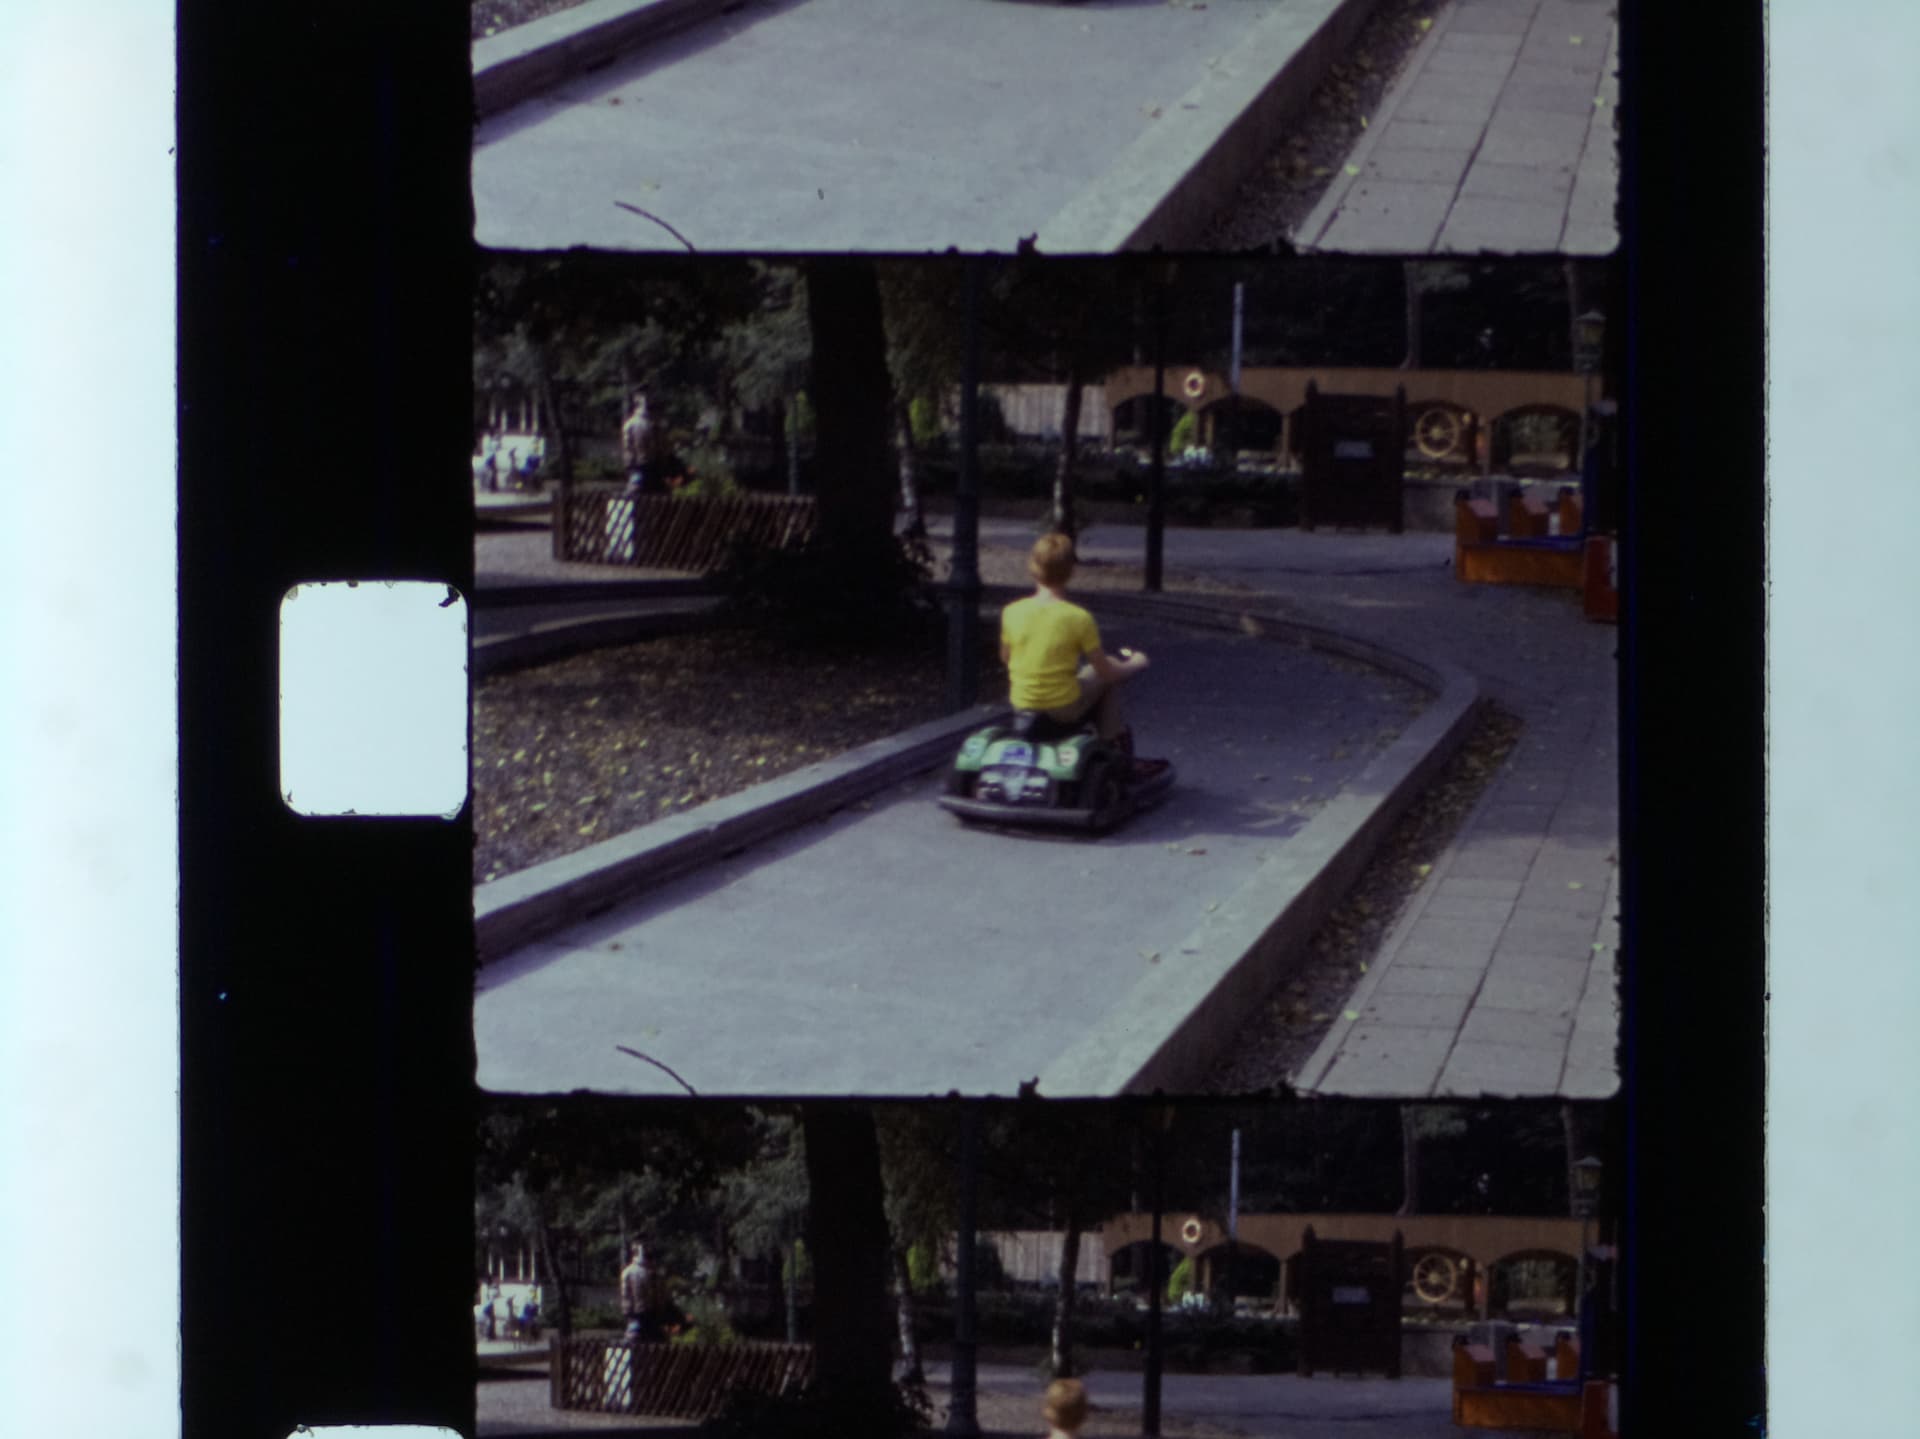
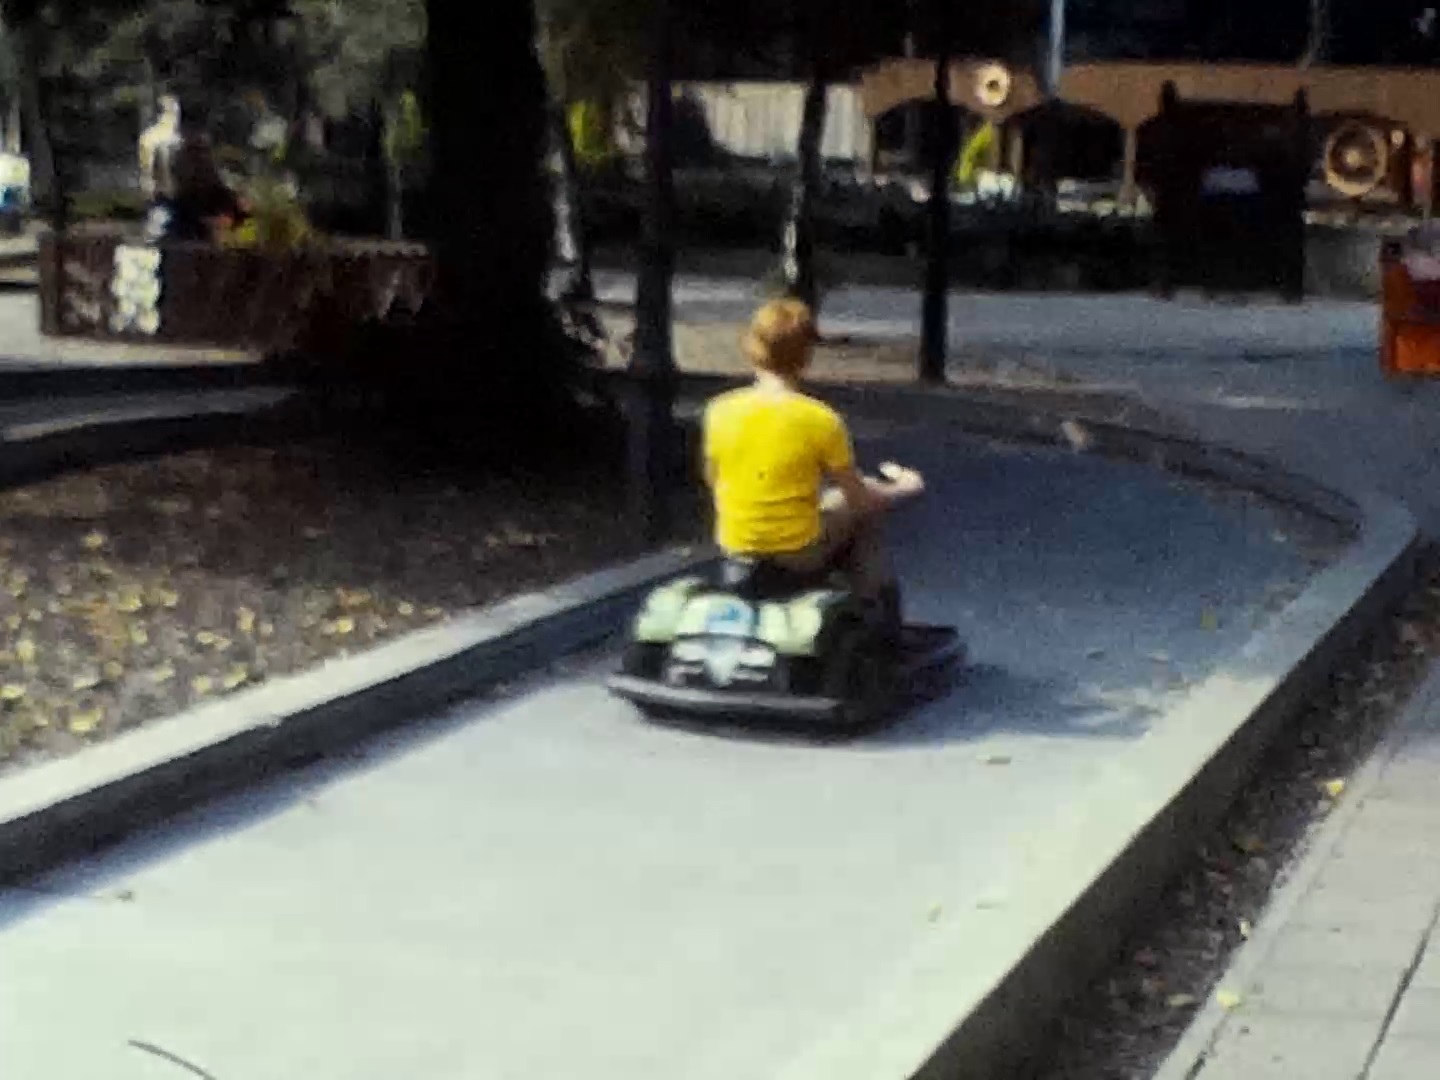
The single exposure scan is now on the left, the exposure fusion reference is on the right. While the intensities of both images are now aligned, you may notice quantization errors in the left image, most notably on the jacket of the man speaking to the guide. Also, the texture of the sand in the shadow is barely visible in the single scan result. Given, the quality on the left can easliy be achieved with real-time scanning (i.e. 3 min for a 15 m roll), but for the quality on the right you need to throw in more machine time (a little less than 3 hours on my system). I am choosing the right side, mainly because a single scan per frame is not future-proof and the results are visually more pleasing without manual interaction.

1 Like

For a fair comparison, the same after effects should be applied to both images, like the degrain and sharpening you mentioned.

I’ve been trying all evening to get mertens merge to produce a better looking image than a raw image. For this comparison I’ve used the following code:

import cv2
import numpy as np

from picamera2 import Picamera2
from libcamera import ColorSpace
from libcamera import Transform

# Camera + tuning
# - can we add a color profile here?
tuning = Picamera2.load_tuning_file("/tmp/imx477_cpixip.json")
picam2 = Picamera2(tuning=tuning)

# Capture configuration
capture_config = picam2.create_still_configuration(main={"size": (2028, 1520), "format": "RGB888"}, raw={"size": picam2.sensor_resolution}, transform=Transform(hflip=1))
picam2.configure(capture_config)

picam2.controls.AnalogueGain        = 1.0
picam2.controls.FrameDurationLimits = (10, 2000000)

# Auto-exposure image
picam2.start()
request = picam2.capture_request()
metadata = request.get_metadata()
request.save_dng("output/01_auto.dng")
request.save("main", "output/01_auto.jpg")
print(metadata)
baseExposure = int(metadata["ExposureTime"] / 2)
request.release()
picam2.stop()

# 5 exposures: 1 underexposed, 1 normal, 3 overexposed
images = []
for i in range(5):
	exposure = baseExposure*2**i
	print(i, exposure)
	picam2.controls.ExposureTime = exposure
	picam2.start()
	request = picam2.capture_request()
	metadata = request.get_metadata()
	images.append(request.make_array("main"))
	request.save("main", "output/02_fixexp_" + str(i) + ".jpg")
	print(request.get_metadata())
	request.release()
	picam2.stop()

# Mertens merge the 5 images
merge = cv2.createMergeMertens()
merged = merge.process(images)
merged = np.clip(merged * 255, 0, 255).astype(np.uint8)
cv2.imwrite("output/03_merged.jpg", merged)

Then opened the resulting images in adobe lightroom, and press the auto lighting button. The reason I did this is to get comparable images, with exposire, shadows and highlights automatically restored in the same way.

Here’s 5x exposed mertens jpg versus the autoexposed jpeg:


To me the mertens version looks slightly better, but most shadows and highlights seem equally recovered by lightroom.

Doing the same compare using the raw/dng image, the difference is even smaller:


Note that I’m ‘cheating’ a little becouse the raw image has 4x the resolution of the jpeg image. Which of the images you think looks best?

Am I doing something wrong with the mertens exposure times perhaps (see code)? I’m using the autoexposed image as the base exposure time, and then:

  • 50% exposure time
  • 100% exposure time
  • 200% exposure time
  • 400% exposure time
  • 800% exposure time

Or perhaps my film is not hdr ;). I don’t know what film stock it is.

@PixelPerfect, Welcome to the forum. I have been around the forum long, but finally getting into the camera section of my project, much to learn for me.

Understand there are different point of views, and I certainly respect yours @Roland.

I would point out that even professional 35mm film was meant to be projected, yet it is now scanned for presentation at HDR displays. I am delighted to watch decade old movies on my tv, in much better quality that they were ever presented at the movie theater!

In regards to resolution and dynamic range, in my opinion more is more, and go with whatever one can afford. By affording I mean, the cost of the lens, sensor, illuminant, storage, and, more importantly the time to capture and process.

After scanning all my films at 24MP RAW 12bit, I am building a new scanner only for the purpose of capturing higher dynamic range. Would every film require it… certainly not, but for those few precious ones, it is worth every second and every bit (I am going for low $).

Again, I find your research great and I appreciate your point of view, but I am not convinced by your demonstration.
I imagine the details in the man’s shadow come out the same in both images.
Only the right image has a corrected sharpness (the grain also of course), but not the left image.
For all films in general, it is difficult to tell the difference between the details of an image and the grain of the film.
It’s often a mix of the two, especially in dark areas.

Totally agree

I’m often amazed at the ability to light up dark areas with post-processing programs

Agreed. It’s a slightly unfair comparision… :innocent:

Well, certainly the specific frame you use for testing does not pose a too great challenge. It seems that it was taken on a sunny day with overcast sky. Besides, you are using the modified tuning file for the IMX477 for capture - which was developed in order to improve these things.

For some examples on the difference between single scans and exposure-fused footage, have a look at this post. These scans were taken in the early days with the standard tuning file of the IMX477. Since than, things have changed; I now use only 4 different exposures while scanning.

I did here a comparison between the results of exposure fusion and raw development. In summary: if you get your exposure right, the raw capture is mostly equivalent to an exposure fusion approach. However, while the later automatically creates a visually pleasing image, the former requires some kind of raw development - at the time of the test, the color science of developing raw images from the IMX477 was not present (this has changed in the mean time), so it was no option back then.

I think if you compare your scans closely , you still notice some tiny differences especially in the dark shadows of the tree. For such areas, the camera signal from an exposure-fused stack just has a finer quantization level than the raw image file. Given, usually you will not need that precision, as these areas are anyway rather dark - but sometimes, you might want to get these areas brighter in the post, and than you will notice a difference.

With respect to your code - nicely done and I guess a great example for the forum. A few remarks: it takes some frames until an exposure value requested is actually realized by the camera. And sometimes, a shutter speed of 9600 is realized with a shutter speed of 4800 and a digital gain of 2. So you might want to check the metadata returned with the frame both for the correct shutter speed and digital gain value. Or: just wait for about 15 frames between the setting of the shutter speed and the actual capture. Another issue is hidden in the line

merged = np.clip(merged * 255, 0, 255).astype(np.uint8)

This tactically assumes that merge-process does deliver a float image in the range [0.0:1.0]. At least in older versions of the opencv software, this was not the case. So you might try instead something like

minimum = merged.min()
maximum = merged.max()
merged = np.clip( (merged -minimum)/(maximum-minimum) , 0, 255).astype(np.uint8)

agreed - that was a bad choice for an example. Maybe these old examples here here tell a better story.

And you are right - once you scan your footage perfectly, you discover how much film grain is present in dark areas. It has a much higher amplitude and size, compared to normally exposed areas. Here again you can find two positions: some say “grain is the film” and leave it in the footage, some try to get rid of the film grain in order to recover small image details which would be not be noticeable otherwise (I’m in this party).

@PixelPerfect this is interesting. I’ve bought recently a Reflecta scanner (same as Wolverine) and compared it to my T-Scann 8 and T192/DS8 scanners. I was surprised about the ease of use of the Reflecta scanner and the sharpness of the images. The negatives are the Auto White Balance (can not be switched off) and the poor compression mp4, no single images can be stored. The most worrying part is the mechanical movement of the film. Reflecta has limited the waranty to only 400.000 frames. So this could be not a could base for a film scanner? But still a very interesting approach. I’m a beginner in the field of 8mm digitizing and still need to learn a lot. These kind of projects helps to gain knowledge. Good luck with the project! Best regards, Hans

Ah yes, I’ve seen that topic before. The dynamic range on some of those images is huge.

For every different exposure, I’m doing:
picam2.start()
picam2.stop()
This is a little slow, but it does give the expected results. That being: the digital gain close to 1.0, but unfortunately it is never exactly 1.0, and I haven’t been able to fix this.

I am manually checking the metadata. The entire metadata is printed to screen for each image captured with:
print(metadata)

Thanks!

Do you know if there is a way to put these into the DNG file? Preferably in python before writing the file to disk. But if there’s a command line tool that can do this that would be great too.

My box does not say Wolverine actually, I just call it wolverine becouse that’s the name everyone seems to know. For the fun of it, here’s the exact same frame, in full resolution, captured by the wolverine 2 years ago:

I didn’t know that. But if it can digitize my family films, then I’m done, and happy. The only thing I’m not happy about is capturing the wrong side of the film, becouse I see no easy solution to filming the right side of the film with this scanner as a base.

1 Like

Well, I do not think that there is a straightforward way to do so. The .dng-files which libcamera/picamera2 create are not perfectly following the standard, as far as I know. That’s why at some point, I stopped following this development. You would need to investigate by yourself, maybe ask on the Raspberry Pi Camera forum about the current state of affairs.

What a difference! Wow.

To my surprise, I see in this thread that there are fellow forum members who, regularly and normally, use the Picamera2 library.

I say to my surprise because every time I search for information about the current state of the Picamera2 library, the first thing I find is warnings that the library is still under development and subject to modifications.

For this reason, I continue to use the venerable Picamera library in my software.

In short, my question is: Has the time come to use the new Picamera2 library permanently?

Thank you in advance for your answers.

@Manuel_Angel - because the Raspberry Pi foundation does support only libcamera/picamera2, in the long run, you just do not have any choice. While I still think libcamera is an aweful software design, picamera2 abstracts somewhat. Lately, the API-changes have been minor. So in a certain sense, picamera2 is usable.

I came up with my own tuning file for the HQ sensor, and this is giving at least me and a few other people better colors, more aligned with the old way. I reduced my scan to four exposures per frame (it was five). As elaborated above, scanning a single frame takes at the full resolution of the sensor 2.4 seconds, with 1 second needed for film transport of each frame.

Organizing the pieces for the HQ sensor to file puzzle. In regards to the output file, resulting for the 4 exposure and Mertens, what file type/bit depth do you use?

Rewind the film on another reel with the emulsion (glossy) side to the outside. Then scan in reverse and reverse the mp4 in post. Succes, Hans