My 16mm film scanner

Hi Marco, excellent work! The results look promising. I’ve been thinking about modifying an Eiki projector like this for a while but have been hesitant due to the fact that I have very little knowledge about electronics and programming and would not want to make it a project that spans over years (rather invest that time into filming). Did you have a lot of knowledge on those subjects going into the project or did you pick it up along the way? If so, do you have any recommendations for good resources (books, tutorials, etc.)?

Thx!

Dear Thomas,

actually I have tried to search help in the literature, but I ended to find thousands of different projects and always delayed the start of the works, because I did not have time or because I was afraid not to be able. Then I have decided to buy the Siemens projector, from somebody who was selling it at a cheap price, and once I started to work on it, everything was coming more or less natural. For example: I have never used Arduino before, it was not complicated at all to program it. Of course I had troubles, but with the present offer which we have (motors, sensors, microcontrollers, components…), everything is much easier compared to 15-20 years ago. My suggestion is: to study several projects which are already done and then to search a projector and start to modify it. Buy the camera as one of the last step. Good luck!

Hi Marco,

Thanks for getting back to me!
Well, your words are both what I feared (just go do it! there is no clear tutorial!) and encouraging (because you had success!).

I actually already have a projector that runs well (an Eiki), actually it’s such a beautiful projector I would hate to tear it apart haha! Maybe I can make a reversible conversion.

I guess I should just get going with the Arduino and motor. Wish me luck!

Best,
Baltasar

Dear Thomas, unfortunately there cannot be a straightforward guide, because there are so many projectors which one can modify. Each projector is different from another one and so on.
I can give you some more specific suggestions:

  1. first buy a NEMA 23 stepper a TB6600 driver, an Arduino Uno. Mount the motor on a wooden plate with a dedicated adapter, learn how to run it in both directions and different speeds. Experiment with switches.

  2. if your Eiki projector works, keep as it is and don´t work on it. I also had a working Bauer projector but I preferred to search another one. Therefore, try to search for a projector, which is in good state, but on which you would not regret to modify. If you dismount something it will be very difficult to return to the initial conditions! You can search a candidate to convert in a telecine machine in parallel while you are making experiments with Arduino and the motor.

  3. When you have experience with the motor and you have found a projector, try to open it and remove everything you don´t need. Then you need to install the new stepper motor, a new light source, ecc.
    This is also a good starting point:

  1. When you are confident with your machine search a proper camera.

You will see, little by little you will realize that the whole thing is something possible!

2 Likes

Thank you for the advice and suggestions!

@Marco_Leoncino I’m not sure if you’re still active here, but I have a question. Anyone else can answer if they wish. You mentioned using a hall effect sensor and a neodymium magnet to detect perforations. You say that the sensor is “mounted on the projector.” My question is: where? I’m heavily considering converting an old 16mm projector I have into a scanner, but I don’t know where to put the sensor and magnet.

Hi @DPXTIF,

I have also modified a projector to digitize old films, in my case Super8.

Personally, I am of the opinion that using a projector it is not necessary to use any sensor to detect the correct positioning of the frame to be digitized.

When a film is being projected, no type of sensor is used. The projector’s own mechanism correctly places the picture to be projected and the image remains perfectly stable on the screen.

It is about taking advantage of this mechanism to do the same by digitizing frame by frame.

I don’t know the mechanism of the projector that you intend to modify, but there is usually a main axis that in each turn makes the film advance exactly one frame.

With a software controlled stepper motor we can at our convenience advance the film frame by frame with total precision without the need for sensors which, on the other hand, must not be easy to install and adjust, not to mention the additional complication of software.

Here are links to my device and the software I use:

Regards

@Manuel_Angel Thanks for the info and links! Both are extremely helpful. My confidence has never been higher. Plus, based on some transfers I’ve seen with a Pi HQ, such as Denis-Carl’s (creator of the Gugusse Roller) transfers, it looks like my transfers are going to look close to how I’ve always wanted them to look. That makes me very happy. His transfers look amazing. In my opinion, his transfers look very similar to my lone two 2K transfers of prints I sent to Film-Tech in Richardson, TX.

I have two projectors, both Bell & Howell: a 545 (purchased in December) and 2585 (purchased in November 2017). The 545 is out of commission, while the 2585 works great. The thing is, the 2585 looks like it has much simpler circuitry than the 545. The 545 runs on lots of belts, while the 2585 runs on plastic gears. If I have to, I’m willing to sacrifice my 2585 for this project. I’ll work on the 545 first, of course, but at least I have it at my disposal. I’m sure the main film advance axel is in there somewhere, not sure where. I’ll probably have to find an owner’s manual and look through it.

What Pi board should I purchase? Would the Pi 4 Model B suffice? How many GB of RAM should it have?

Additionally, what lenses, mounts, and extension tube should I purchase to use with the Pi HQ?

1 Like

Hello again @DPXTIF ,

What Pi board should I purchase? Would the Pi 4 Model B suffice? How many GB of RAM should it have?

At home I have the following Rasperry Pi models:

-Raspberry Pi 2 Model B 1 GB RAM
-Raspberry Pi 3 Model B 1 GB RAM
-Raspberry Pi 4 4 GB RAM.

I have tested the server software on all of them and in all cases it works correctly.

There is no noticeable speed advantage to using the Pi 4, so I am currently using the Raspberry Pi 3 on my device.

Additionally, what lenses, mounts, and extension tube should I purchase to use with the Pi HQ?

I have to tell you that I am not an expert on the matter.
In another thread you make reference to an EL-Nikkor lens, but you don’t mention the focal length.

Above, in the same thread, you have examples of the use of 50 mm enlarger lenses even to digitize 16 mm film, where you can see the assembly of the optical system with a Raspberry PI HQ camera.

Good luck.

If I understand correctly, typically they use the sensor to synchronize the main axel of the projector with the stepper motor. Since projectors typically have the sprocket or claw synchronized with the main axel, that makes the turns synchronous with the advancing of the frame.

Another alternative, and a bit more precise, is the use of photointerrupters. That is the method I used on my first built to synchronize the main axle and the stepper position.

The schematic is for 5V output to Arduino, and it is quite simple. Resistor values may vary slightly for the sensor you choose, and 3.3V.

Actually, I got the photo interrupter from an out of service inkjet printer, the part number is below.

The focal length is f/2.8. That’s what someone else in another thread was using, so that’s what I looked for.

By the way, I saw the video linked in your post. That looks like it captures a frame every two seconds or so. How come it was going so slow? Is there any way that could possibly be sped up? I’m not looking for 24fps, I know the Pi hardware has limitations, but even something like 2-4fps would suffice. Granted, that’s still between 2.5 and 5 hours for a 900’ reel, but that’s something I’m willing to compensate for. The 1,800’ reels, however, those will be a nightmare to scan. If 2-4fps, they’ll take anywhere from 5 to 10 hours to scan. Oof, but you’ve got to take what you can, and if I have to settle for a frame every two seconds, that’s fine with me.

If I go this route and use a photo interrupter, how does the connection differ is Pi is used?

In your photo, I can’t make out the flag that rotates with the coupler. How would that be mounted? I originally thought the use of a photo interrupter was to detect perforations. I thought the photo interrupter is what the film perforations would pass through. I guess since a projector has a claw mechanism that precisely advances one frame, that’s not needed.

@DPXTIF,

The f/2.8 figure does not actually refer to the focal length, but to the maximum aperture of the lens. Focal length is related to the size of the image that the lens produces on the film or image sensor. The maximum aperture refers to the brightness of the lens.

Typical focal lengths for enlarger lenses are usually 50 mm (the most common) or 28, 80 and even 105 m. The different focal lengths were used to produce enlargements of a wide variety of film formats.

There are several users on this forum including myself who use 50 mm enlarger lenses.

The EL-Nikkor 50 mm f 1:2.8 lens can be a very good option.

Regarding the speed of film scanning, I have to tell you that unfortunately, using the Raspberry PI HQ camera logically connected to a Raspberry Pi nanocomputer, if we want to achieve good results, it is very difficult to go faster.

In my case, currently, in order to obtain HDR images, I am taking 6 photos of each frame with different exposure times.

The problem is that due to the behavior of the HQ camera, it is not possible to change speed instantly. The camera needs a certain time between photo and photo to stabilize the exposure time and give correct results.

Each photo must be sent via LAN to the main computer, an operation that also takes time.

In short, under the aforementioned conditions, the average digitizing time for each frame is approximately 4 seconds.

A typical 15 m Super8 film contains about 3600 frames and takes about 4 hours to digitize, for a duration of 3 minutes and 20 seconds.

I hope you won’t be put off by these time estimates. On the contrary, he thinks that very good results can be achieved with very cheap and relatively modest means.

You also don’t have to be looking at the device while it works. On occasions I have left the machine working while I dedicated myself to other matters or simply went to sleep at night.

Best regards

I got aperture and focal length confused. I saw my mistake in my last post.

I did a bit of math myself to figure out how long it would take to transfer a 864 foot reel, 24 minutes, of film… I got an estimated scan time of 38.4 hours. :neutral_face: That number doesn’t sound right; it sounds too high. I’m sure my math is wrong because I, somehow, calculated that it would take 4,800 hours to scan an 1,800 foot reel, 50 minutes, of 16mm.

EDIT: I went to Pi’s site to purchase a Pi 4, but every retailer is out of stock. With that, I went to buy a 3; out of stock. Maybe I can get a 1? Nope, out of stock. Am I basically out of luck here?

The Raspberry Pi uses 3.3V logic, some Arduino use the same, others use 5V (like the one I used). Where you see +5V instead use +3.3V.

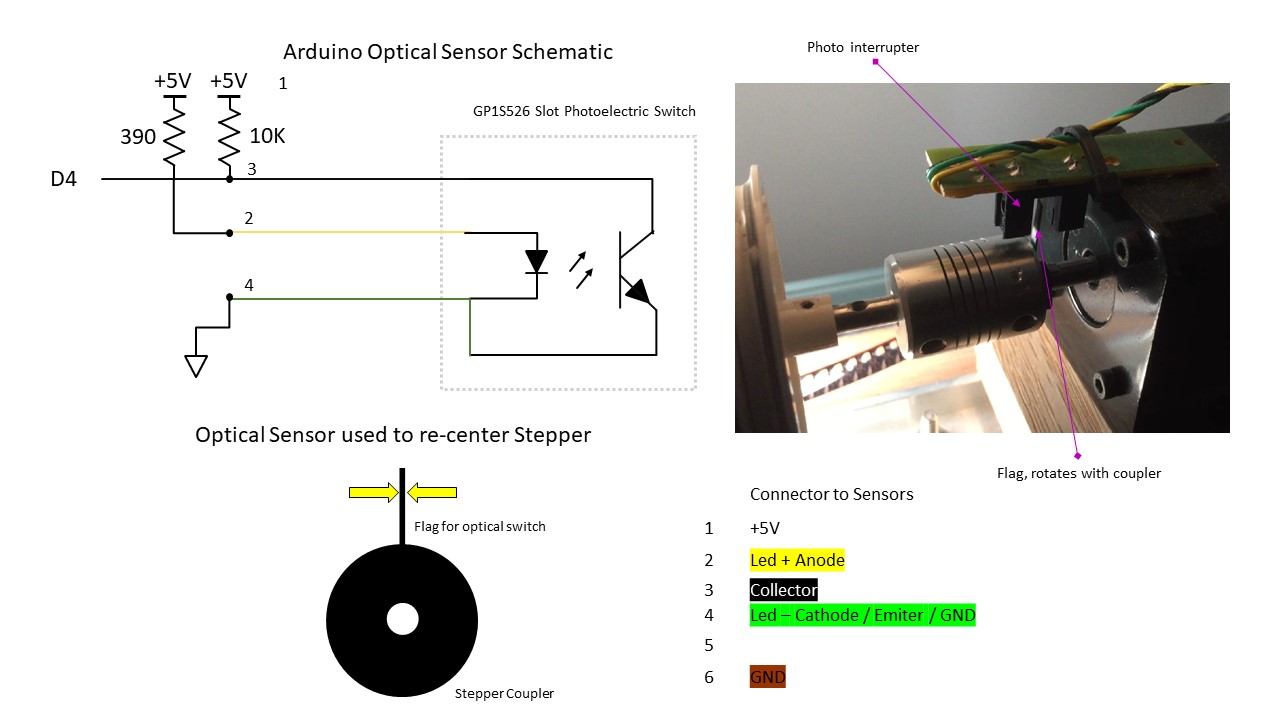
Depending on the actual part number of the sensor, the resistors may vary.

Note that if the mechanism of the projector is completely based on gears, you may not need a position sensor, since the stepper, by design, gives you a precise one turn.

Position sensors are needed to detect that the motor is skipping steps, or when the mechanics of the projector are based on anything that may slip a bit over time.

15m S8 Reel ~ 50 ft S8 Reel
To make the right math, what is the film fps?
In the case of 16 mm, the frame size is also larger. In other words, less frames per m or per ft. Google says it is about 40.

The math from @Manuel_Angel info.
3600 frames ~ 4 hours
3600 frames / 40 frames/ft (for 16mm) ~ 90 ft ~ 4 hours

1800 ft is 20 times that, so the time would be 4 hrs x 20 ~ 80 hours.

But… and it is a big one. It assumes that your setup is capable of doing one frame every 4 seconds. Small variations, multiplied times 1800 ft x 40 frames/ft = 72000 make a big difference.

Sellers are gouging the Pi disguising it as “Starter Kit”. You can find some in Amazon, and if you are in a hurry, that may be an option. A Pi 4GB retail price is $55, a starter kit with video cables, box, power supply, fan, and SD card is about $200.

@DPXTIF I first used the Nikkor EL f2.8 50mm (reversed mounted) for 8mm scanner. It is a good lens. If you are looking for a bit better lens, suggest you consider the Schneider 50mm f/2.8 Componon-S. It has a slight better performance on areas other than the center, when compared to the Nikkor.
If you do decide to go with the Nikkor, make sure you buy the newer version.

I bought both on ebay, patience for the right listing paid off.

Note that in my case, the film size (8mm / S8) was smaller than the sensor (Nikon D3200). The difference may not be as significant for 16mm film and the HQ camera sensor.

That sounds a lot better. I knew my math was wrong. I realized that earlier. Still, that’s quite a long time. Looks like I’ll either have to reserve 1,600+ feet films for a weekend or skip them altogether for now.

I looked through Amazon and count find anything cheap. I saw a few on eBay that were cheaper, though still expensive. Looks like I picked a bad time to start a project like this. :expressionless:

I didn’t know there were newer versions. I purchased one a few hours ago; this one, to be exact.

You purchased the newer. Here is a listing of the older version.

Saw that after I replied. You can also try giving your email to a few resellers like digikey, mouser. But it may be a wait.
I am not yet using the raspberry pi. @Manuel_Angel would 1GB be enough? I did see a posting where you indicated that HQ requires 256MB for the GPU (in the context of the pi zero).

PS. Vilros has some “starter kits” in stock Pi 4B with 2GB ($130) and 4GB ($140).

Hi @PM490,

Indeed, I confirm that I am currently using a Raspberry Pi 3 with 1 GB of RAM.

To use the HQ camera it is essential to reserve 256 MB for the GPU of the Pi, with less memory it gives an error of lack of resources.

The operation of the server software is correct under these conditions.

Regards

1 Like

I saw in another thread, somebody posted what kind of lenses they used with the Pi. Along with an EL-Nikkor, they used, “a C-Mount extension tubes (~20€ from China) and then a C-Mount to M42 adapter, including a M39-M42 adaptor ring.”

Will this work for me?

Here are the links for the extension tube, C-Mount to M42 adapter, and M39-M42 adapter ring.

EDIT 08/09/2022, 01:36: I just noticed that the extension tube in the link ships from China. Is there any other extension tube I can order? Preferably none from China due to the increased shipping time. While looking, I stumbled upon this listing from Newegg. Would this suffice?

1 Like

The Nikkor EL 50 has a 39mm lens mount (the filter ring is 40.5mm (1) ). The Schneider Componon S 50 is also 39mm lens mount (the filter ring is 43mm).

With the HQ camera, and a 16mm size target, is there a need to reverse mount? There may be different views, my guess is no need to. So the items below are for normal (not reversed) mounting.

  1. Starting the the lens mount 39mm male.
    M39-M42 adapter ring
  2. What is the spacing needed ? that will vary 16/8 and full film or only exposed image.
    T42 is common, so I am buying to have flexibility set of extension tubes to be able to change/adjust as needed. (2)
  3. Lastly, move from 42mm to CS mount (HQ removing the C to CS ring).
    42mm to C-mount adapter will do.
  4. Mount directly to the HQ sensor.

This thread has good examples of results with the Schneider, but for extension purposes the Nikkor EL 50mm is similar.

EDITS

  • (1) Filter thread of the Nikkor EL that I have is 40.5mm, although some spec sheets indicate 39mm.
  • (2) T42 is 0.75mm pitch. Other 42mm items are 1.0mm pitch. See posting below for sequence with adapters for thread pitch.