Strange encounter in the red channel/RPi HQ Camera

Rolf, thanks for the great cookbook on working with raw values, doing some studying to come up with more educated questions later.

In the meantime, I had some unusual captures (not yet doing any raw processing of my own), and think these fit into your previous strange encounter with the red channel. I think there is some there there.

The film that I have been using for testing is a copy, not a camera original, and for whatever reason it has limited content in the red channel mid levels.

For context of my capture setup, using RPi4 bookworm with latest updates, and using your tunning file (imx477_scientific.json distributed with the library). The HQ IR filter was removed, and is presently using a UV/IR filter. The sensor is installed at 90 degrees, so there is no rotation of the image, and is captured from the emulsion side. An hflip transform is set to active to address the emulsion side capture. AwbEnable/False, and ColourGains/(R1.62, B1.9).

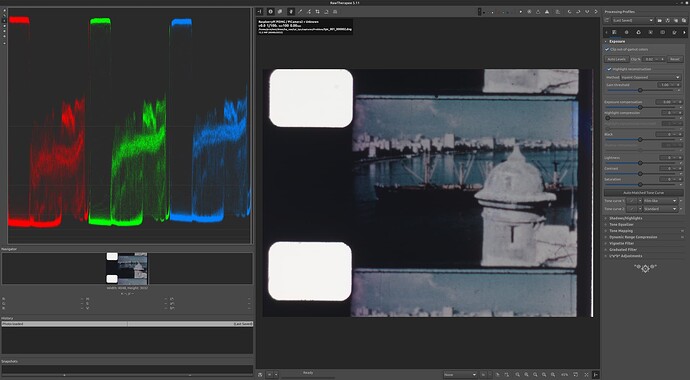
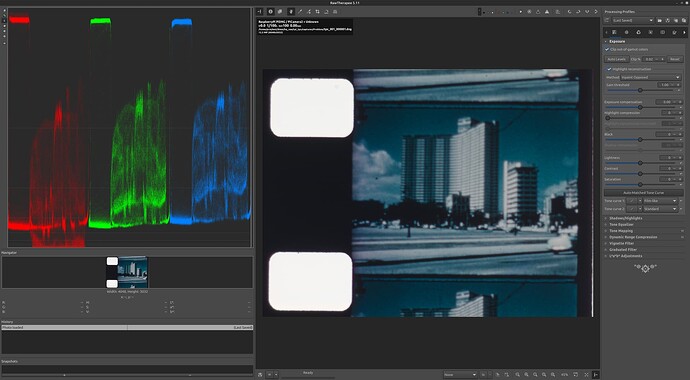
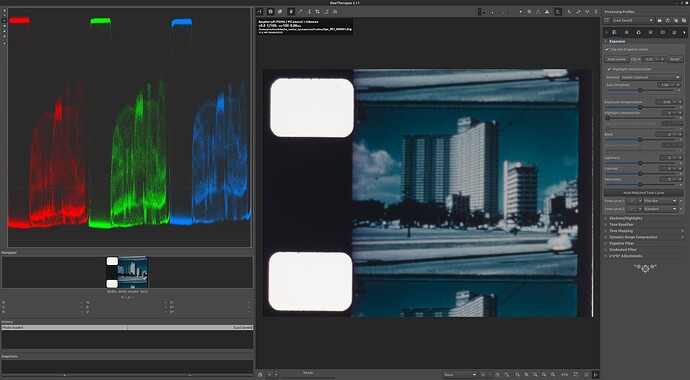
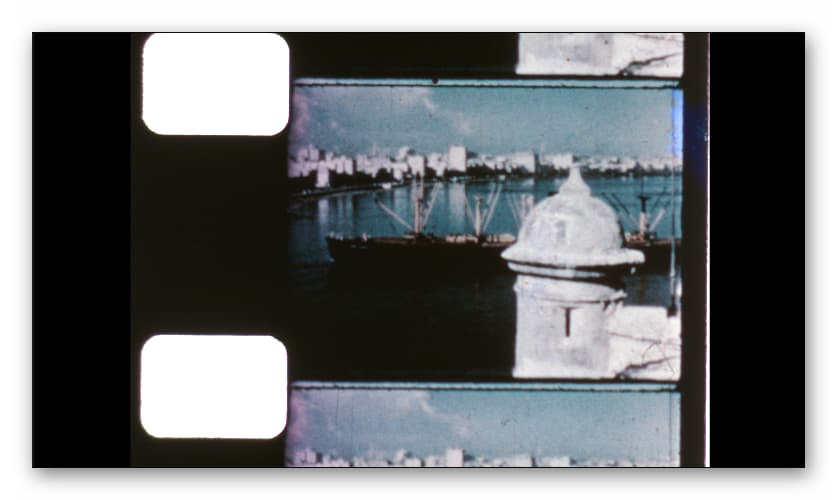
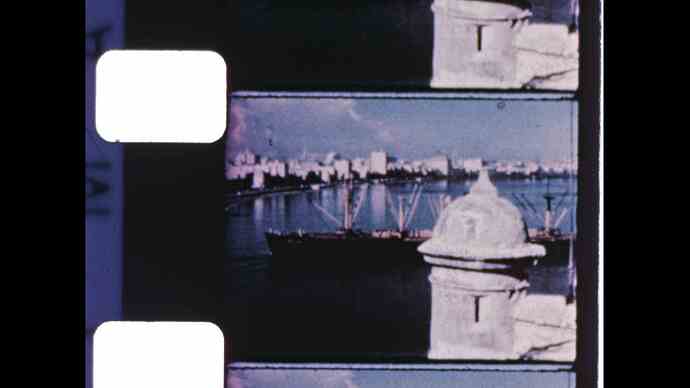
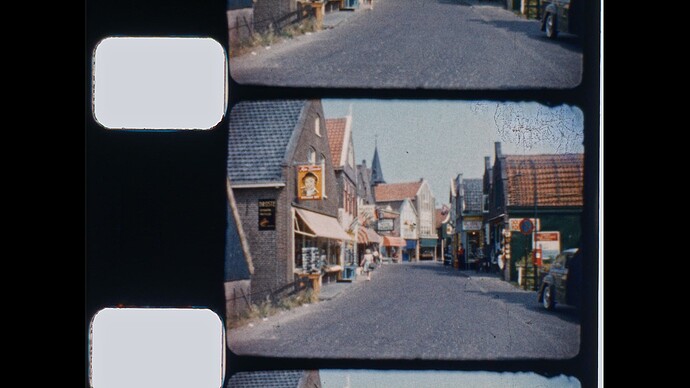
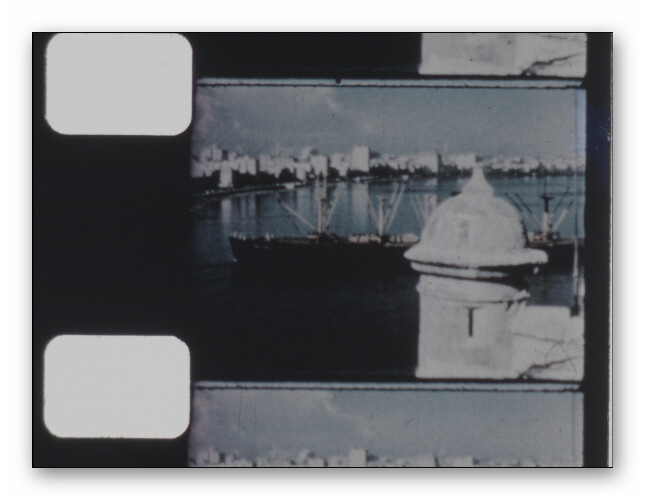
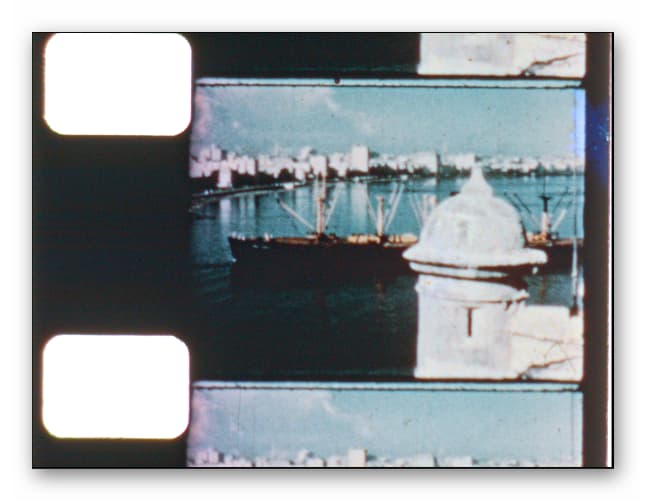
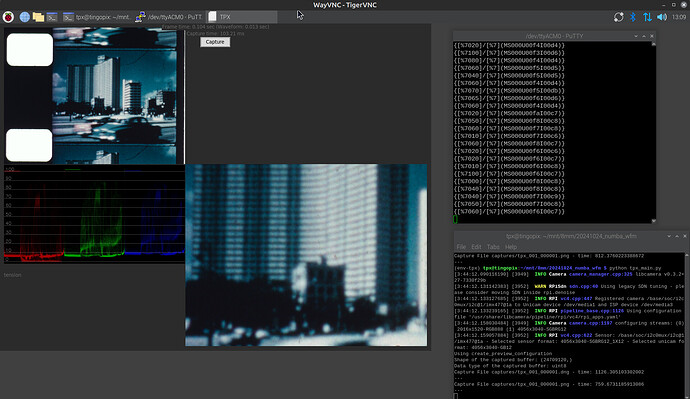
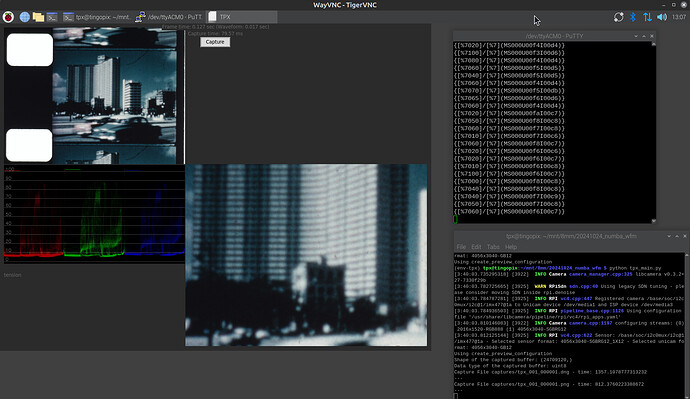
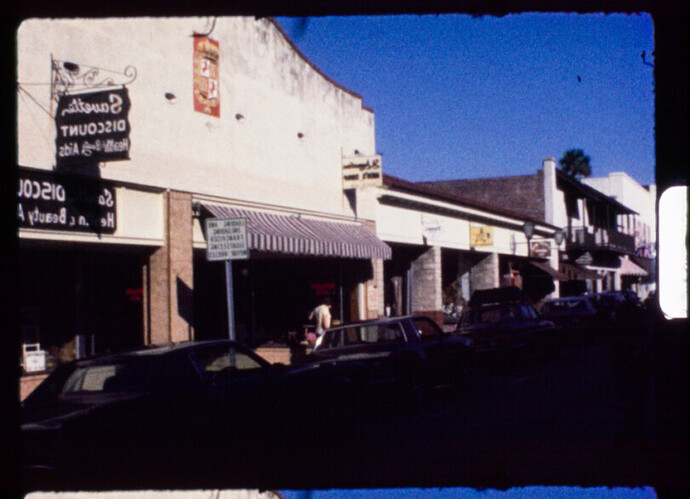
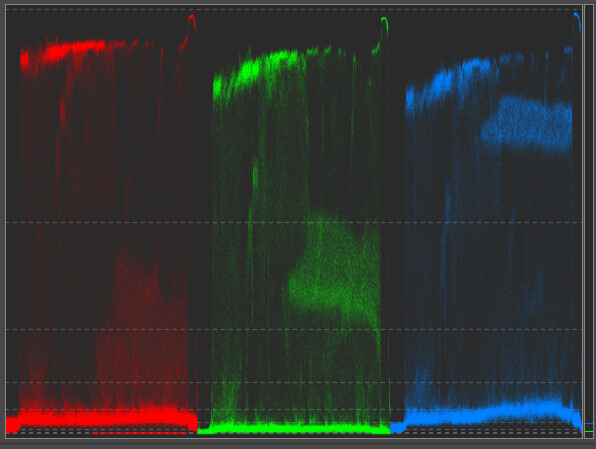
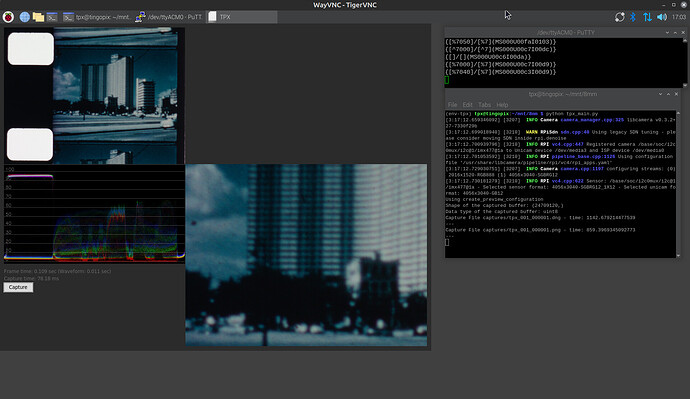
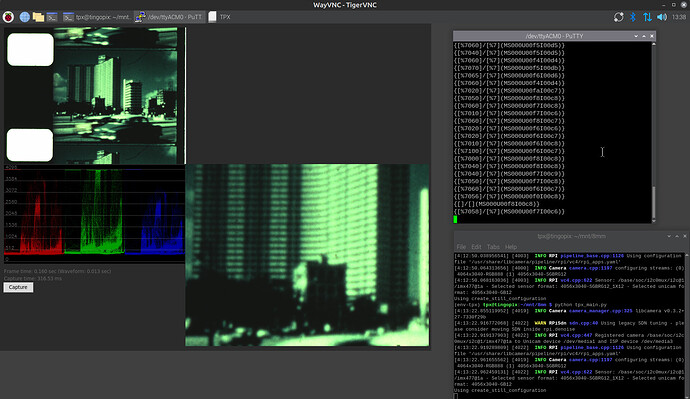
Both captures below were taken under the same lighting and camera settings, only a couple of frames on the scene change.

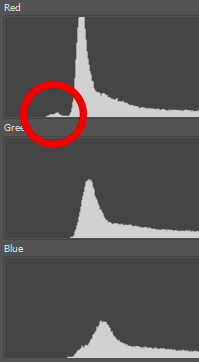
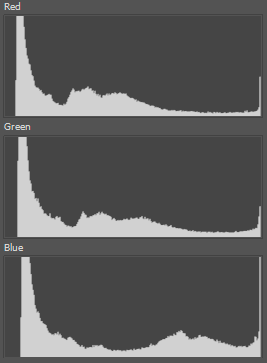
Notice the red channel black level fallout when the scene changes.


There are now red readings below the black of the film, but only for the portion outside the sprocket.

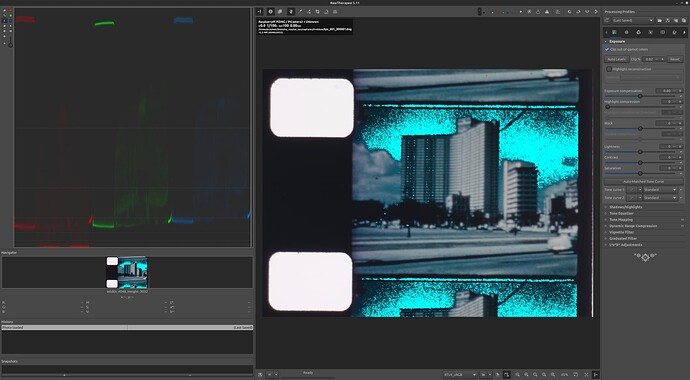
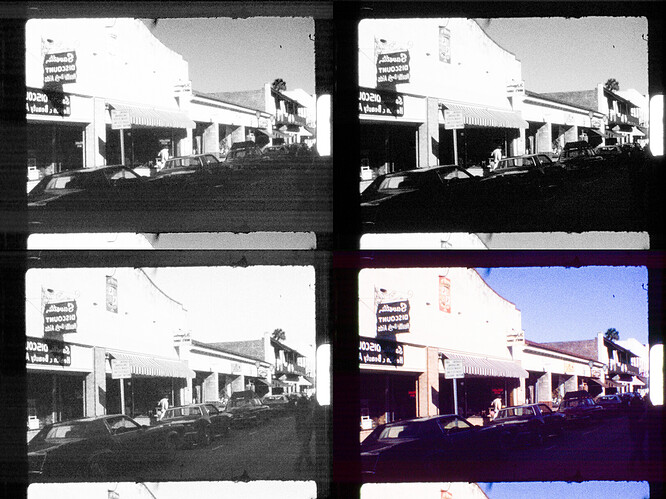
At first I thought I had an issue with the waveform monitor in my capture software, but the strange red blacks are also visible when developing the DNG using Rawtherapee.

From the little I could troubleshoot, the issue appears to be the libcamera2 working profile/processing.

When using rawtherapee, and selecting the gamma corrected output profile (instead of the dng), the red channel black level distortion is gone.

I don’t know enough about the pipeline processing subject to adequately convey the issue in the raspberry forums, but since I have a very noticeable result, let me know if I can help with any specific testing.

At the minimum everyone in the forum using the raspberry HQ should be aware of the issue, since it would be triggered/present -and unfixable- on any files saved through the main stream of libcamera2 (png, jpeg, etc). For those using DNGs, the issue is in the image profile, and using a different color profile on the developing software may be the workaround.

1 Like

Well, I think the issues you are encountering are related to what I described at the start of this topic.

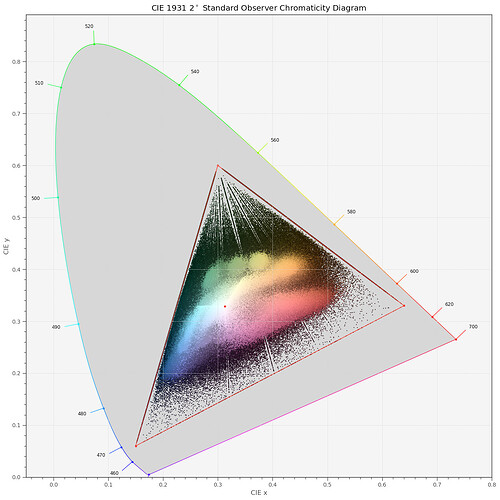
Basically, our cameras see colors which are outside of the color gamut of, say rec709, and this leads in turn to some funny behavior in further processing. I still do not have a good answer how to treat this in a sensible way, but using for example rec2020 instead of rec709 helps. Also, try to play a little around with these controls of RawTherapee:

image

These controls are handling various adaption strategies for different color gamuts - but again, I have yet to look into this in more detail.

Sadly, your capture has an additional issue I stumbled over some years ago as well. In an effort to improve the rendering of red colors, I ripped off the existing IR-filter and replaced it with a “better” one. The same you did here:

Bad idea. At that time, I did not know that this will dramatically screw the color rendering of the camera. The reason is that the sensitivity curves of the sensor, which are a combination of the native sensitivity curves of the Bayer-filter and the UV/IR-blockfilter, will change. Most dramatically the curve of the red channel.

Now: the color science embedded in either the normal tuning file or the scientific tuning file rests on the normal stock IR-blockfilter. This color science of the stock IR-blockfilter is simply wrong for a camera sensor modified as described above. One would need to redo the complete color science to get decent colors again.

Note that this affects the color science of any raw development software as well, as these guys work with the embedded color matrix of the .dng. Which is right out of the tuning file you have used when capturing the image.

So, I am afraid you have two issues here. First and foremost - do not replace the stock IR-filter with anything else. Otherwise the color science of the tuning file will not be correct. This applies to libcamera-generated data (“.jpg”) as well as raw data (“.dng”).

Whether this is relevant with old, degraded film stock is another question…

Secondly, if you get out-of-gamut colors, use a larger color space. In the end, you will need to map values into your smaller display color gamut - there are various options available for this and I think you can experiment with them using the controls I showed above in RawTherapee.

2 Likes

Thanks for the hints on Rawtherapee. Here are some findings.

The only way to fix the waveform is to select a profile different than the camera. Looks like in the software, the color space does not address it.

Using sRGB, and highlighting pixels outside the color space, it shows that the problem is the rendering of the blue.

Selecting rec2020, as you suggested, does address the issue.
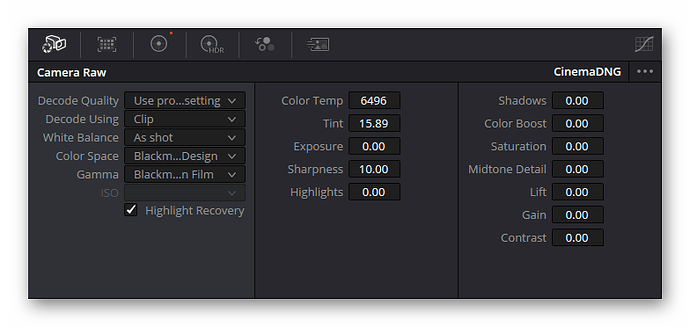
In Davinci Resolve, setting the project to rec2020 and changing the DNG settings (which can be done at the project settings or individually on the image section of the clip inspector) addresses the issue. There are many good options to customize the dng development.

Actually it was not my idea, the filter had developed spots (now I now these are apparently fungus). I tried cleaning with alcohol, and it didn’t work (as the linked article says). The UV/IR filter currently used is a bit sharper, than the original.

Certainly -as you mentioned- the sensitivity of the system is completely different than the sensor with the factory IR. Certainly the color calibration is no longer there, but other than that I have not seen any negative effects of the sensitivity change. If anything, the filter image quality is a bit better.

Something that I did not mention above is that the illuminant (white led) temperature is 5000K, so it would certainly contribute to the readings of blue channel, and may be a contributing factor on the red channel results.

Here is a link to download the dngs and pngs above if anyone, both generated by libcamera2.

@PM490 Hi Pablo, thanks for providing the dngs. I had a look at them - there seems to be barely any color information in them?

This here is the best I could come up within the DaVinci-context with one of your frames:


Your other image seems to have no color information at all?

Also, the footage seems to be very dense - for example, there is no difference between the black frame border and the dark areas within the image. Difficult material, to say at least.

Thank you for taking the time to look into this.

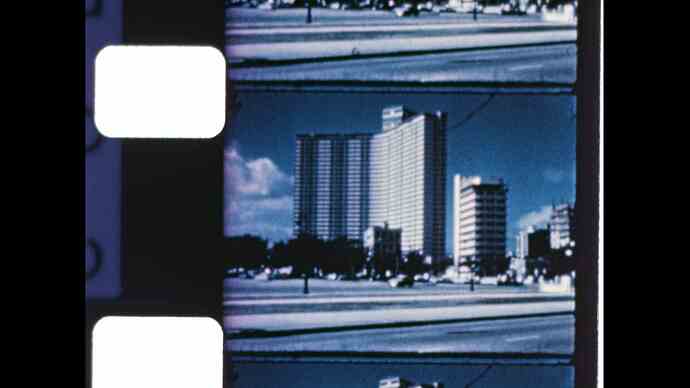
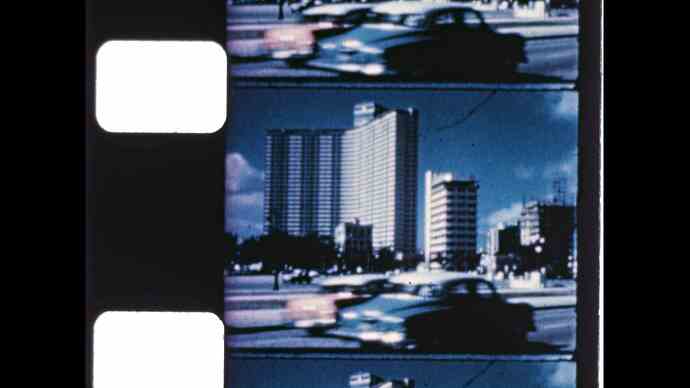
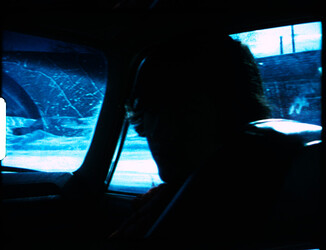
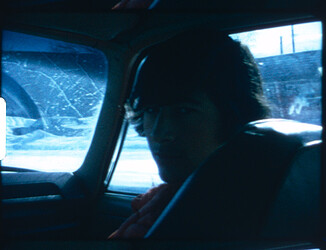
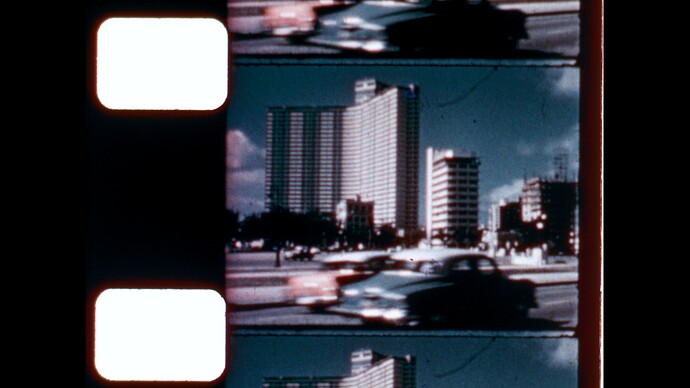
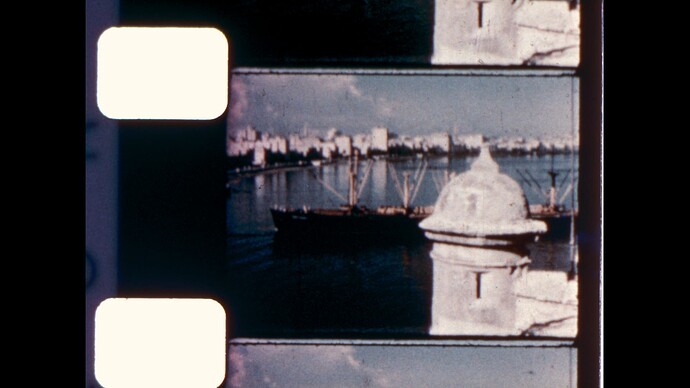
Yes indeed. I don’t know the reason, it is a commercial copy by Castle Color Movies titled Havanna Holiday. It looks like the issue is the copy, in the following images one can see the markings on the side, still quite dense.

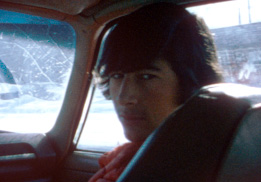
There is very little, but there is some. See frame with car of a different color.

This film is a good test for working with underexposed and limited color info, most of the films I have are in good color shape, although some Ektachrome have significant fading, hence my interest in a workflow with the best color depth information.

Here is an experiment. Instead of getting a DNG, I captured a raw array (16 bits, shifting the 12 bit content to the most significant bits, and doing a simple debayering and downsizing to half the full resolution (2032 x 1520). It is worth noting that while the spatial resolution is reduced, the dynamic range of green is slightly increased by combining Green1 and Green2, of the bayer filter -each sampled at 12 bit- into a single pixel.

The resulting 16 bit RGB (12bit-R 13bit-G 12bit-B ) was saved as 16bit-tiff, no other processing was performed. In other words, no gamma correction, no black adjustment, nor clipping. A linear TIFF saving a close representation of the raw sensor.

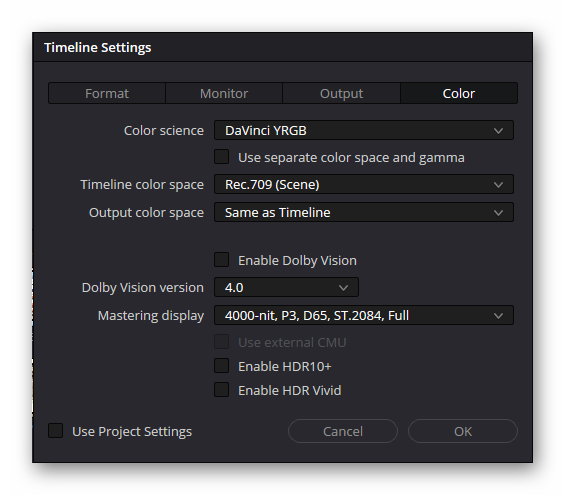
All the processing for the test was then done in Davinci Resolve (black offset, gamma, gain, and clipping. The project settings chosen were:

  • Color Science: Davinci YRGB
  • Timeline Color Space: Rec. 2020 ST2084 1000 nits
  • Output Color Space: Same as timeline

All the images use the same grading/gain/offset/gamma. The output of Resolve was saved as 16bit TIFF which was then converted to JPEG for the forum.


Given the difficulty of the source material, the process shows remarkable results. Needless to say, no strange encounters in the red channel.

The controls in Resolve become very sensitive though, so this issue may be addressed by setting offset and gamma before creating the 16 bit TIFF source.

The 16 bit captured source files, and 16 bit resolve output results, are available here.

Once I get some time (and sleep), I would like to change the waveform monitor in my capture software to use raw values.

Have some work to do to confirm if this is a viable alternative to DNG, especially when working with faded or underexposed film source materials.

This is in line with another experiment I wish to perform: With a white illuminant (what I have), customize the light/exposure for each channel, making 3 raw captures each with the best lighting to use the full range for each channel, and then combine the 3 captures into a single TIFF, similar to what was done above. While the colors will be uncalibrated, each channel will have the best quantization/dynamic range within the limitations of the 12bits of the HQ sensor, and my hypothesis is that the final image would have better overall signal/noise (Again, in the context of faded or underexposed colors.)

Rolf, I am very grateful for your help and willingness to share your know-how. Truly appreciated!

Edit: Here is a quick capture of what I believe is Kodachrome, just to show the process results with a less challenging source. This one converted from 16-bit resolve tiff to 8-bit png with rawtherapee for the forum.

3 Likes

Your experiment is approaching what I do with my monochrome sensor + colored light setup. Having an exposure for each channel to take the best advantage of the dynamic range of each can reveal details in dark areas you never knew were there! In heavily faded material, watching all of that color come back is a little like magic.

I’m excited to hear the results of your experiment. Good luck!

1 Like

@PM490 / @npiegdon: …as I remarked several times, I am still in the experimental phase on the issue which started this thread. Nevertheless, I think it’s about time to summarize my thoughts so far. The title of this thread is:

“Strange encounter in the red channel/RPI HQ Camera”

This was specifically discussing .dng-files and the answer is hidden in the way these .dng-files work. The short answer: the camera sensor is able to see colors which are non-valid colors in any given color space. These out-of-gamut colors cause the issues discussed here.

A .dng-file contains a lot more information than the sensor’s raw intensity values recorded. This metadata is used by raw development software to get a good guess on what colors the sensor actually saw, in an effort to come up with mostly “life”-like colors when capturing a normal scene. When we capture old, faded film stock, we are actually operating the camera in a way which is very different from capturing normal photos. More on that later.

Coming back to the normal use case of a camera - capturing for example a market scene on a sunny morning. There are two ingredients here which define the colors we as a human observer would notice: the spectrum of the light (early morning sun), interacting first with the absorption spectrum of the vegetables on the market stands, producing yet another spectrum which is interpreted by our visual system’s sensitivity curves to be of a certain color. Due to the nature of this process (complex spectra are reduced to only three independent color informations “per pixel”), quite different spectra will yield identical colors.The goal of an ideal digital camera/display combination is to produce exactly this color impression we human observers would have when watching this scene. Of course, that’s not possible - especially current display technology falls below the necessary capabilities - both in terms of the available color gamut as well as dynamic range. But we can get quite close, for practical purposes.

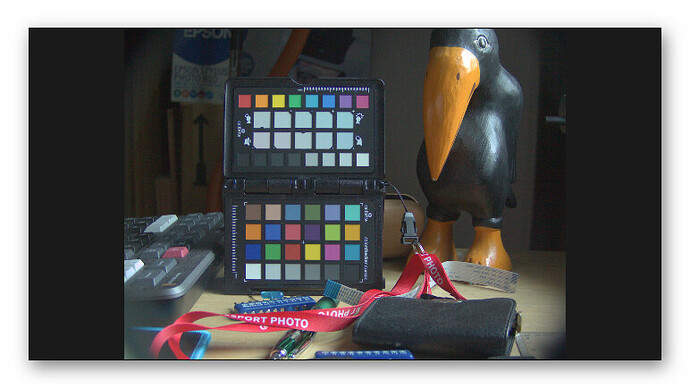
In order to achieve that goal, the camera needs to be calibrated. Simply speaking, you introduce a bunch of colors of known appearance (spectral responses), image the scene and try to come up with a way to obtain matching colors in your digital image. For this, typically images like this are used:


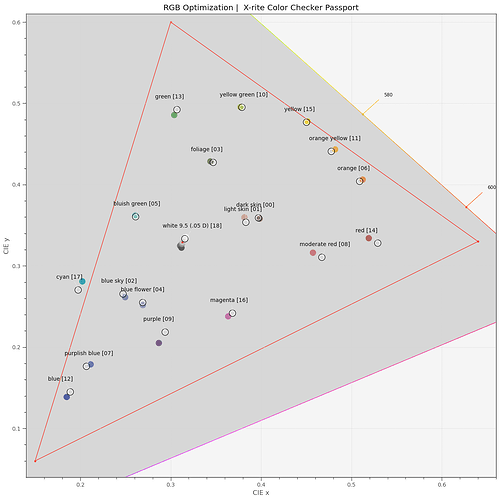
As the precise color appearance of all the color patches are known, you can optimize a color matrix in such a way that all patches end up more or less where they should end up. Here’s the result of such an optimization:


The dark circles indicate in an abstract color space how the colors of the color checker should look like, and the colored filled circles indicate actually where they ended up. Not too bad, in this case.

The red triangle in the plot above indicates all the colors a sRGB/rec709 display can faithfully reproduce - note that the “cyan [17]” patch actually is outside the rec709 color gamut!

Now, this color matrix is valid only for the specific illumination spectra with which the image was taken. For perfect colors, you would use another color matrix in the evening than in the morning, for example. This is where in our use case the libcamera tuning file comes into play. The tuning files contain usually a full set of different color matrices, indexed mainly by the color temperature of the illumination source. If it’s a candle light, another matrix will be used than when it’s simply daylight. The important point here is that the color matrix libcamera/picamera2 comes up with at the time of capture is one of the important metadata entries in our dng-file. And it’s going to be used in your raw developement software!

That is, by the way, the reason that, even when capturing in dng, you want to make sure to use the correct tuning file for your purposes. The color matrix contained in the tuning file is chosen on the basis of your red and blue color gains (or, if you are working with auto whitebalance, on the basis of your image content) from the color matrices embedded in the tuning file.

The color matrices in the tuning file are the result of the above sketched optimization - and the color matrix embedded as metadata in your dng is a derivative of these matrices. Most notable for our discussion, they mix the camera’s original color channels in additive, but also in subtractive ways. So you will end up with extremely saturated original colors (colors outside of the color gamut you are working in) with RGB-components which are negative (less than zero) or oversaturated (larger than one). This causes the “Strange encounter…” issue this thread did start with.

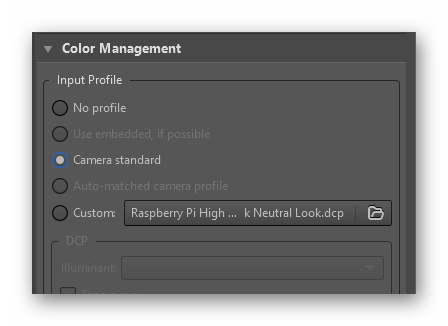
One obvious way to deal with this is not to work with this embedded matrix. How to do this depends on your software; within RawTherapee, it’s this section

grafik

“Camera standard” refers to use the color matrix which is embedded in the dng. @PM490 - what you are doing with your .tif-based approach is probaby equivalent to selecting here “No profile” when using dngs.

Now, after this rather technical detour, let us discuss this a little bit more in detail. The color matrices in the scientific tuning file have been optimized based on various daylight illuminations with varying color temperature. They should give you nice colors when taking outside images under normal daylight conditions. However, for starters, not a single one of our scanners will work with such a daylight spectrum. Given, a nice whitelight LED with a high CRI will get pretty close to this. (Not so sure about the combination of three narrowband LEDs (red/green/blue) with this respect…)

So, having a good film stock with negligible fading (Kodachrome), we might actually get rather close to the actual colors of the scene recorded ten’s of years ago. But that is probably not the standard case we are dealing with when digitizing old footage (various reasons have been discussed at the end of this post).

From my experience, I usually end up with color grading each and every scene of a given footage according to my taste, trying to equalize colors at least across scenes belonging together. With the kind of faded scenes @PM490 displayed above, there is not even a slight chance of getting colors correctly - you can only improve the overall appearance in such a way that the results looks ok. One way is certainly the way Pablo (@PM490 ) described above with tif-files. In DaVinci, one might get close to the same result by setting up the raw input like so:


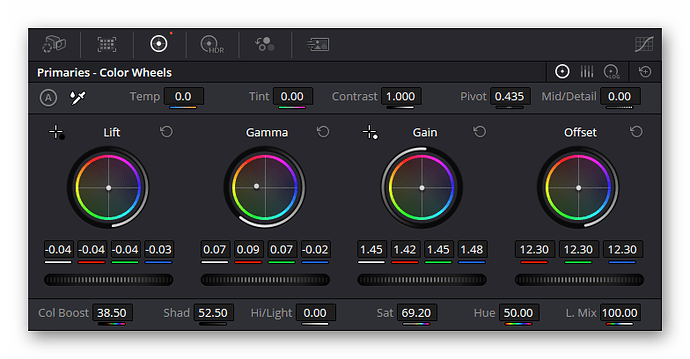
which is only possible in unmanaged color science - so your timeline should be set up with something like
grafik

In doing so, I get initially the following data:
grafik
A quick node adjustment results in the following:


Here are the settings I came up with:

Of course, there’s no color science involved here at all - only our own visual system (and personal taste)…

(Note: I do not usually work like this. I use a whitelight LED with a sufficient CRI, my film stock shows usually no fading, so I simply load the dng-files into DaVinci using the embedded camera matrix for a rec709 transformation. Works most of the time ok and get’s me already very close to a final grade.)

Finally, let me comment on the way to set up the camera’s exposure and/or the light source for such severely faded material. If you have separate red/green/blue LEDs (a setup which I used previously, but transitioned away from), you can and should use this facility to set up the illumination in such a way that your color signals all use the maximum dynamic range possible. Colors in the capture will look weird, but you should be able to recover that in post, at least when using DaVinci (the internal processing of DaVinci is based on 32bit-floats).

Try to set your exposure as best as you can. For example, the dng of yours I used above features a maximum intensity value of 3859 in the green1-channel. It could easily be ramped up to 4095 - otherwise, you are missing in your capture a tiny piece of dynamic range. As this maximum value occurs in the sprocket hole - and nobody is interested in this part of your capture - you could ramp up your exposure even more. The goal would be to place burned-out parts of the original image just below the 4095 limit. This will give you a few more bits where you need them, in the dark shadow areas, but will of course also burn-out the sprocket area. Which again, nobody should be interested in.
1 Like

Thanks @cpixip @npiegdon

There is a key difference.
In a RGB led (narrow band leds) with monochrome sensor, the spectrum collected by each channel is set by the led.
In the RGB sensor and white LED, using different light settings for each RGB sensor channel, the spectrum collected by each channel is set by the sensor-channel filter (bayer filter).
Without opening the can of worms of the Backlight, there are some advantages/disadvantages to each.

The best of both worlds would be to have the library limit the range of the values to keep all generated colors within a standard gamut. he Picamera2 Library manual references “colour_space”. It indicates:

create_preview_configuration() and create_still_configuration() both
default to Sycc(). create_video_configuration() chooses Sycc() if the
main stream is using an RGB format. For YUV formats it will default to
Smpte170m() if the resolution is smaller than 1280x720, otherwise
Rec709().
For any raw stream, the colour space will always implicitly be the
image sensor’s native colour space.

Unarguably the dng file and the capture_raw may include non-valid colors.
However, I tried setting the main color space to Rec709, which according to libcamera:

const ColorSpace ColorSpace::Rec709 = {
	Primaries::Rec709,
	TransferFunction::Rec709,
	YcbcrEncoding::Rec709,
	Range::Limited
};

My expectation would be that having a limited range would avoid passing non-valid colors in the main stream. To test

# ColorSpace is not in picamera2, import from libcamera
from libcamera import ColorSpace

capture_config = pihqcam.create_preview_configuration(
    colour_space = ColorSpace.Rec709(),
    queue=False,
    main={"size": global_shape_main, "format": "RGB888"},
    buffer_count=1,
    raw={"format": "SRGGB12"},
    transform=Transform(hflip=True),
    )
pihqcam.configure(self.capture_config)

Libcamera allows for creating a combination of primaries, transfer fuction, YcBcR Enconding, and range, but my limited python knowhow could not come up with the syntax to do with libcamera2.

In summary, the DNG and raw captures would always have non-compliant colors. If/when color space is set, in theory, the main stream (and derived files like PNG or JPEG) should comply with the color space. Further test needed to see if the red anomalies can be addressed with a colour_space configuration.

Exactly. Additionally, every image pixel has -at the cost of resolution- has true component values.

With the startup color components predefined by the IR-and bayer filter.

Thanks for the tip on how to do something similar with the combination of DNG files and Resolve.

Agree. For me the next step is to do a waveform monitor of the raw capture.

1 Like

… what libcamera is operating in should be irrelevant when working with raw sensor data.

You cite it by yourself:

I think we have two extreme use-cases (when working with color-reversal film):

  • The colors of the film are good and very close to the original colors of the scene recorded. If so, you have the chance of getting overall good digital colors (in whatever color space your output media will be) by using
    • employing a whitelight LED with high CRI for capture
    • using the color knowledge implemented in the scientific tuning file to ensure that basically all colors end up already ok in your digital copy
    • refrain from too much color grading (which would spoil the colors captured again). Or,
  • If the footage is faded, there is no chance of recovering the original colors in any conceivable way. To recover anything at all,
    • use narrowband LED illumination, preferably tuned towards the original RGB-Bayer-Filter of the camera’s sensor
    • releasing that there is no sensible color science happening at all in your capture - it’s purely signal driven (with the hope to construct (not: reconstruct) something out of the data
    • so it’s fine to optimize camera settings as much as possible to reduce noise and extend digital range (all gains, including color gains close to 1.0, for example?, use your illumination controls rather than the camera’s controls, etc.)
    • you end up with something totally uncalibrated, showing weird colors - adjustment to something viewable is difficult (not so much the dark shadows and highlights, but the intermediate intensity values can be quite a challenge - the simple “Gamma” dial of DaVinci might not be sufficient here).
    • your calibration reference will be your eye and your taste.

Obviously, I tend to work more in the former territory than the later one…

That is one world, the other world is PNG and JPEG.

… yes, but the 8-bit per channel stuff is not relevant to this thread. It’s about full dynamic raw imagery which exceeds color- as well as dynamic range-wise any 8-bit per channel format.

And this thread turned out to be a little bit about ways to condense faithfully the larger working areas of the camera into the smaller ones of common display and encoding technology.

We have not touched too much on this aspect, but color grading needs to scale down sometimes a too wide color-gamut into a smaller display gamut. And color grading also enhances image content typically by lifting up shadows and reducing intensities non-linear in highlight areas (think of the typical S-curve) in order to show high contrast images on non-HDR displays. That is, after capture comes an adaption step, squashing the too large input data space into something one can encode, share and display on current technology. How to handle that without loosing too much detail (or worse: introduce artifical detail, as visible in the very first image of this thread) was in a way the main topic of this thread.

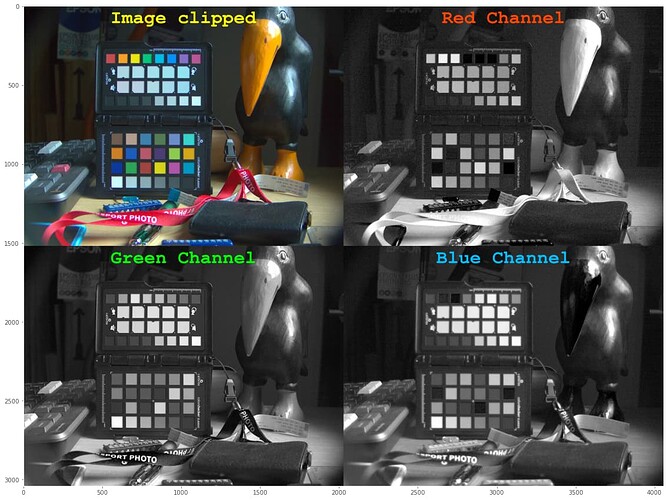
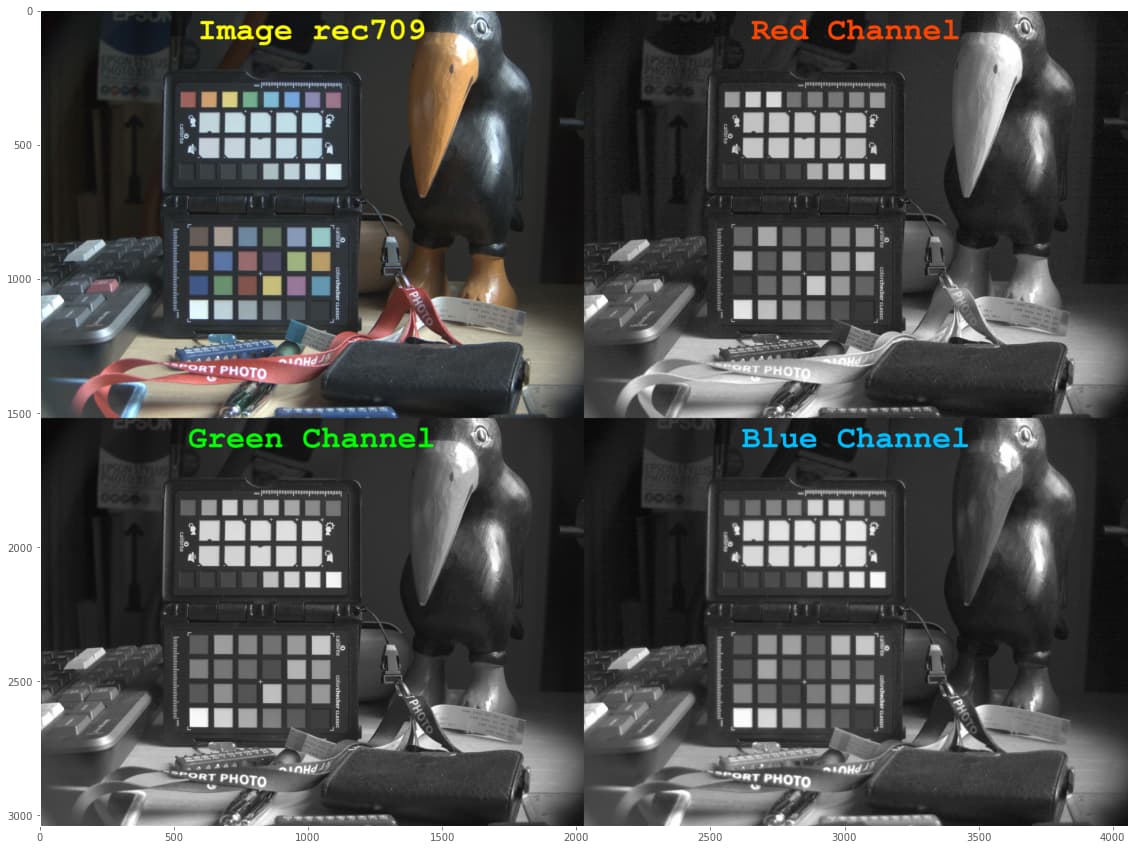
– they do. The components outside of the color gamut are simply clipped. Not too much an annoyance usually. An example was discussed above, I repost here for convience:

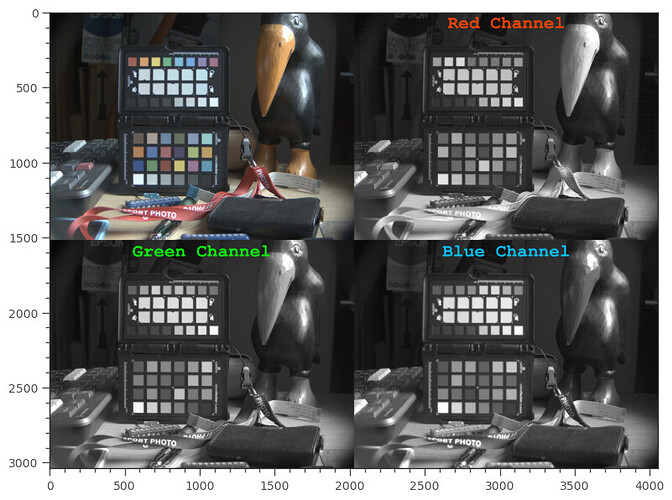
Notice how the beak of the wooden bird is clipped in the blue channel? Did you notice this in the original RGB-image? In fact, if you inspect this image closely, you will notice some color clipping in all three color channels (green channel: the color checker’s “red” carrier ribbon, red channel: the cyan patch of the color checker). Only very seldom this clipping is noticable in the material - and that’s probably where the trick switching to the Blackmagic color space in the raw developer helps. I’d say the full RGB-rec709 example above is perfectly fine evenso clipping is certainly occurring (I have set up this image this way :wink: )

Well, for clarity, the red channel strange encounter, for me, was first manifested in the 8 bit channel main stream. First I was not yet saving the DNGs, did so to troubleshoot the issue. More over, opening the DNG without any changes in rawtherapee shows the same waveform distortion than in the waveform of the main stream.

We have since learned the workarounds to circumvent the issue with DNGs.

But I do not know yet how to address the distortion on the live mainstream by libcamera2, which shows on the waveform monitor and any files derived from the main stream.

Hmm… - that’s an interesting challenge. One way to handle this would be to use the raw data to drive your histogram directly. Difficulty here: the huge amount of data (4k) to handle - the update frequency of the histogram would be no fun to watch.

Another option would be to misuse the “main” or even the low res image stream for that purpose. You would need to take the main culprit, namely the already discussed color matrices, out of the equation. The relevant section in the tuning files starts with something like this here:

			"rpi.ccm": {
				"ccms": [
					{
						"ct": 2000,
						"ccm": [
							1.6564872670680853,
							-0.36969756274013368,
							-0.2867897043279514,
							-0.4247450786701745,
							1.542991437580725,
							-0.11824635891055065,
							0.24901133306238788,
							-1.5422051484893296,
							2.2931938154269417
						]
					},

Note the negative entries here. They are the ones which spoil the fun. That is, these are values which cause the mapping of raw data values outside of the bounds given by libcamera’s processing pipeline - which are most probably limited to 0x0000 to 0xffff. If you set these values to the unity matrix (that is, either 1.0 or 0.0) , there should be no out-of-bounds values occuring during processing. Just a guess/suggestion for an experiment. The following examples were not produced by libcamera, but simulated with my software. But libcamera is performing these steps as well, based on the data in the tuning files.

If you modify the color matrices, you would still have the rec709 contrast curve applied. For this to “go away”, you’d would need to replace the section starting with

{
			"rpi.contrast": {
				"ce_enable": 0,
				"gamma_curve": [
					0,
					0,
					512,
					2304,
					1024,

with a straight (linear) curve.

Using such a modified tuning file, libcamera should deliver at it’s “main” end point data which is pretty similar to the raw values the sensor is seeing - only that the dynamical range would be limited to 8-bit per color channel.

But of course, the image would look visually aweful - certainly no point in saving that image.

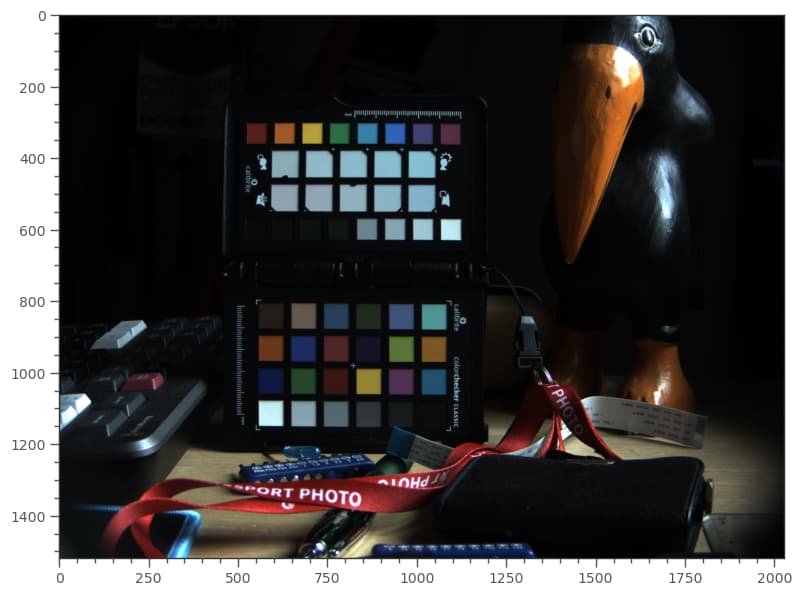
Here’s what you could expect with such a tuning file (again: only simulated at this point in time - one would need to check whether this is really the case with libcamera + modified tuning file):

Since the contrast curve is not applied, the shadow areas are all rather dark.

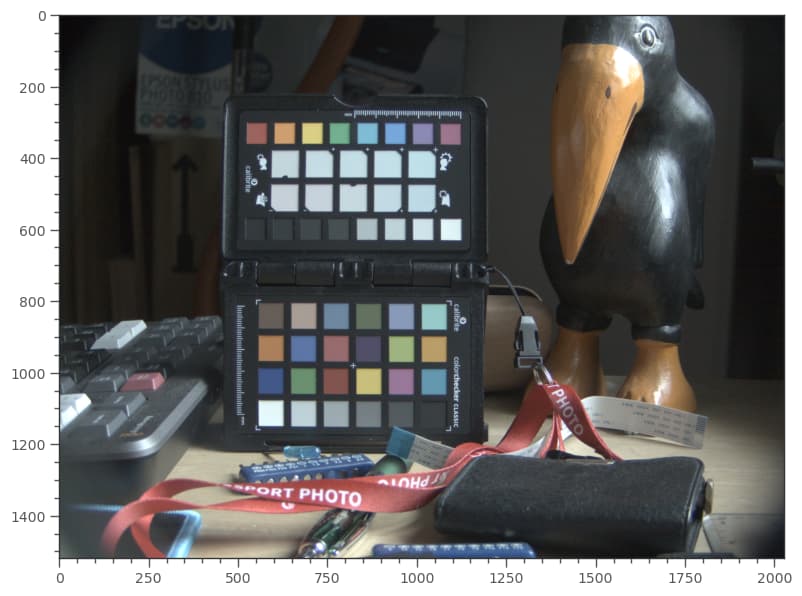
If you keep the rec709-contrast curve in the tuning file, something like this here


is to be expected. Visually better, but of course the colors are all wrong and the values remapped - since the complete color science is missing. So maybe a modified tuning file were the complete set of color matrices is replaced by a single unit-matrix, leaving the contrast curve in place might do the trick.

For reference, here are the color channels of the image with rec709 contrast curve:


showing that no clipping is occurring, as desired.

Personally, I think such an approach would only be interesting if the data obtained is to act as a base for a histogram. Not sure whether I would take such an image as the base of film captures (that is: color grading), as the colors are not correct - for certain.
But: in your modified camera setup (change of IR-blockfilter), the color matrices in the tuning file are anyway only approximations, so that might be something for you to look into.

(To be a little bit more precise: the images shown above are basically the debayered raw data (a greenish image, compare this thread here) with the appropriate white balance applied, plus an additional rec709 contrast curve to brighten up the shadow areas.)

EDIT: there is a tuning file available in the RP-distribution which is called “uncalibrated.json”. This is used in camera calibration tasks and it uses the following color matrix:

"rpi.ccm":
            {
                "ccms": [
                    {
                        "ct": 4000,
                        "ccm":
                        [
                            2.0, -1.0, 0.0,
                            -0.5, 2.0, -0.5,
                            0, -1.0, 2.0
                        ]
                    }
                ]
            }

Which is not the unity matrix I proposed above. So I might be wrong that a unity matrix is the appropriate thing to use here. It might be a little bit more complicated than I remember. Well, I would need to look into this in more detail to give a definite hint. @PM490: If you do some experiments - let us know the outcome!

EDIT2: it’s been a long time since I did that color stuff, and I guess I forgot quite a bit. So what I have written above is not totally correct. See post below for a more detailed discussion.
1 Like

For a final/delivery image, I agree. But if we’re talking about initial capture, it’s nice to keep some headroom for correction. If you’re already clipping during capture, you’ve lost some information.
(It looks like we were both composing our replies at the same time; you’ve said a few similar things as I have, below.) :sweat_smile:

My experiments over the last few months (which I’m hoping to write-up at some point) use a very different workflow than anything described here but I just ran into a near-identical situation to this one that took a while to work out what was going wrong.

This is a frame from one of the most challenging scenes I’ve scanned so far. I believe the camera/film was incorrectly set to an indoor color temperature (the indoor footage immediately preceding and following it are a lot less blue!) and the exposure is clearly set for the background.

Those are the linear values straight from the sensor. If you assign the color profile I measured from my sensor/lighting setup and then export as sRGB, you can at least see a little more than silhouette:

This is where it gets interesting. The best I was able to do manually with the original was this:

graded

Which, all things considered, I’m happy with. (That there is any skin tone able to be recovered is a bit of a miracle.) That was manual tinkering in Photoshop using a combination of their automatic correction tools and some manual tweaking. Everything was pretty straightforward and I didn’t run into any trouble.

Since then, my experiments have veered into unusual territory involving mosaiced thumbnails, HALD LUTs, and command-line tools like ImageMagick to do some pre-processing.

When I was running these same images through that process, I ran into a new problem I hadn’t seen the first time, which presents itself as the same kind of distortion at the bottom end of the red channel.

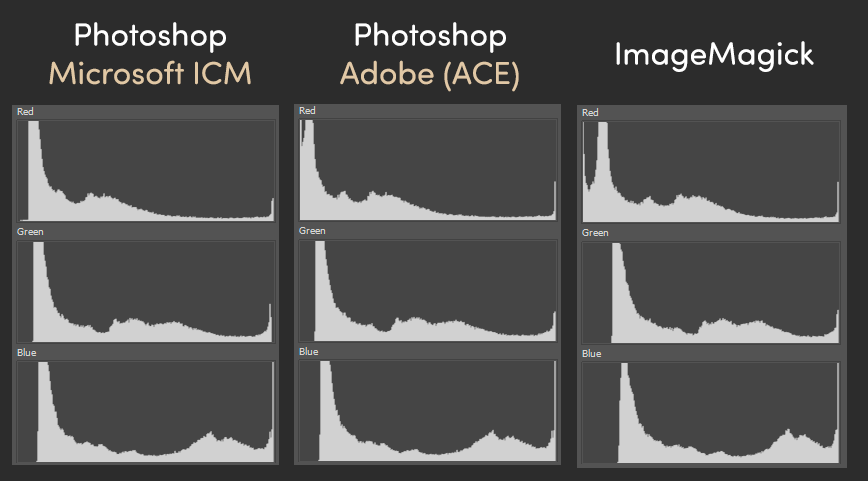
The first two steps in all of the following are “assign ReelSlow8 color profile” followed by “convert to image P3 color profile”. But depending on who you ask, you get very different histograms! Photoshop gives you a choice of which color engine–theirs or Microsoft’s–you’d like to use when doing conversions:

Check out those red channels! (EDIT: Er, the ImageMagick version also has a bonus 1.3 gamma bump applied. That’s why things are shifted a little vs. the other two.)

It’s worth emphasizing that all three of these started from the same image and were converted using the same ICC color profiles with the same options (Relative Colorimetric intent with Black Point Compensation).

What I’ve been able to gather is that there are some out-of-gamut regions in the image and the (soft) clipping behavior of all three engines is different.

(I only discovered these color conversion engine differences when the automatic tools were failing to give good results when I was tinkering with the ImageMagick-converted versions of the images.)

Maybe a wider intermediate gamut than P3 would solve the problem?

Even Rec.2020 (zoomed in here quite a bit) still gives a little clipping hiccup:

rec2020

I didn’t like the idea of working in ProPhoto RGB (because the primaries are imaginary/impossible colors), but presumably this is a little like working in DaVinci Wide Gamut for intermediate steps. All three color conversion engines show no problems when working in ProPhoto RGB:

ProPhotoRGB

No clipping at the bottom end, automatic correction tools work well again, and everything is reasonable. (It’s hard to believe just how wide a gamut this camera sensor acquires!)

Continuing to experiment in DaVinci, I like that they retain the negative values (instead of clipping) throughout the whole process. That seems like a great way to avoid a lot of this sort of trouble. The more I use Resolve, the more it seems like more of my process should go through it…

Well, picking up the topic of how to get libcamera to push all colors recorded by the HQ sensor into a 8-bit per channel image - without clipping. The general idea sketched above is kind of valid, but requires more work than I initially thought/remembered.

Let’s try to clarify the approach I think might work. Normally, libcamera gets the information about how to transform the whitebalanced camera RGB values into a valid color space by a set of transformation matrices contained in the tuning file. First, based on the red and blue color gains, a color temperature is evaluated, than two ccm-Matrices with color temps close by are used to interpolate a matrix for the current color temperature estimate. In case of the example image used here,

the relevant data in the tuning file should be these two matrices:

{
    "ct": 6100,
    "ccm": [
        2.07614502865529,
        -1.088477232362022,
        0.012332203706731894,
        -0.15418897211374789,
        1.6342455711780935,
        -0.4800565990643456,
        0.0239434491549935,
        -0.5149943280271241,
        1.4910508788721305
    ]
},
{
    "ct": 6600,
    "ccm": [
        2.1036466281367636,
        -1.1141823990079103,
        0.01053577087114708,
        -0.1435470445623364,
        1.6388235916780796,
        -0.49527654711574317,
        0.015303751680993905,
        -0.4877029399422509,
        1.472399188261257
    ]
},

The compromise color matrix (ccm) which is actually used is computed via interpolation out of this data. A new matrix is computed (I have to look this part up again, forgot it somehow) which is used to map from the whitebalanced camera RGB space into, say rec709. This matrix is in fact also stored in the .dng-file, as Color Matrix 1:

Color Matrix 1                  : 0.483  -0.0976  -0.0379 
                                 -0.3158  1.0853   0.1973 
                                  0.0149  0.1226   0.4623

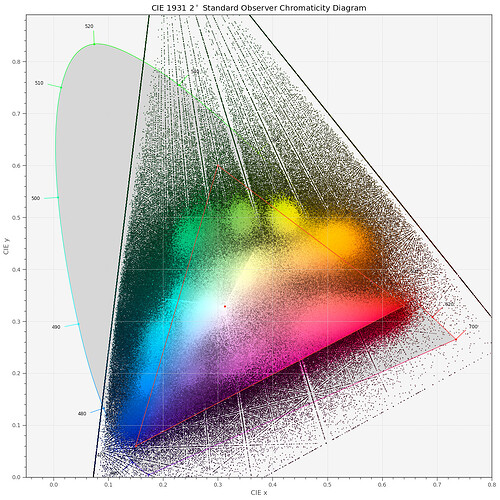
This matrix ensures that most color patches the camera saw are mapped correctly in a way very similar to how our human visual system would have perceived the scene. The issue we are discussing here is that occationally, colors end up way outside of the destination color space. One can see this here in this diagram for our test image:


This would be the end result within the libcamera main path as well as the end result with any other raw development software using the camera’s profile (or, in the case of libcamera, the ccm-data contained in the tuning file).

Now, the idea I proposed above is - if we are interested not in good colors, but in getting all the sensor’s data as an end result - to change the ccm matrices in the tuning file to get a better mapping here. It is possible, but simply much more involved than I initially thought.

If we do not use in the raw development the above Color Matrix 1, but this one:

array([[ 3.24045484, -1.53713885, -0.49853155],
       [-0.96926639,  1.87601093,  0.04155608],
       [ 0.05564342, -0.20402585,  1.05722516]])

we get the following developed image:


That is, no color values are clipped at all. Indeed, the corresponding mapping turns out to be fully contained within the rec709 color gamut:

So we have achieved half of our task - the only thing which still needs to be resolved is which values the ccm-matrices in the tuning file will need to have for libcamera to perform like this.

Note, of course, not a single one of the colors in this squatched image is close to their true color values. But: by using your color grading tools, you could manually push back the colors to the places they should be. Basically, by increasing saturation, by the way.

So the idea of Pablo (@PM490) to have the full range of colors available via libcamera should be realizable - we ‘just’ need to modify the ccm-matrices in the tuning file accordingly. That was the idea proposed above - only that it is slightly more challenging than replacing the existing ccm-matrices with a simple unit-matrix.

1 Like

Thanks a lot @cpixip @npiegdon for sharing your insight and experience.

The walkthrough of the color processing was very helpful, since it is a steep learning curve that I have yet to start climbing. Reading the steps I had a better understanding -although still basic- of the why the dng is affected.

After reading it again, this brought NTSC flashbacks and the 75% vs 100% chroma…

The issue is saturation. And one alternative to address it is to change saturation in the camera controls. When left unspecified, Saturation = 1.0
I use the same setup, adding

"Saturation":0.6,

to the camera controls, and the red strange encounter is no more. As explained by Rolf @cpixip, the color vector points in the same direction, but reducing the saturation keeps all colors within the gamut.

A screenshot of the waveform baseline setup (saturation at 1.0)

A screenshot of the reduced saturation (saturation at 0.6)

Captures also uploaded.

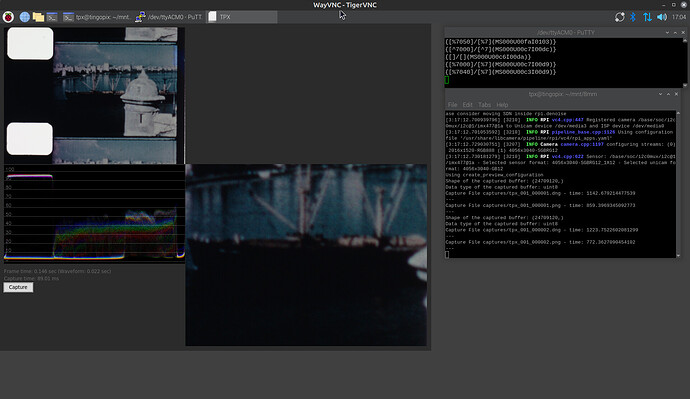
I also coded a scope of the raw, and think is worth the effort to explore a bit more of the multi-exposure-raw results (for unusually challenging films). In the screenshot a push of the red.


Thanks again for the very helpful guidance.

1 Like

16 bit raw tiff, individual channel capture… definitely out of the scope of this post, apologies @cpixip for polluting your post.

To close the experiment, I prototyped the raw waveform monitor and manual 16 bit channel individual capture.

Certainly these are not going to win an award for color. But starting with virtually no color at the film source, I am trilled with the results.


To summarize, capture_array of each channel exposed with best light for each color, merge into a 16bit tiff, import from resolve, export as 16bit tiff. For posting the resolve output was converted to 8bit png. The 16bit capture and 16bit resolve output are uploaded here.

Again, thanks to both for sharing your insight, which was invaluable in getting this level of progress.

1 Like