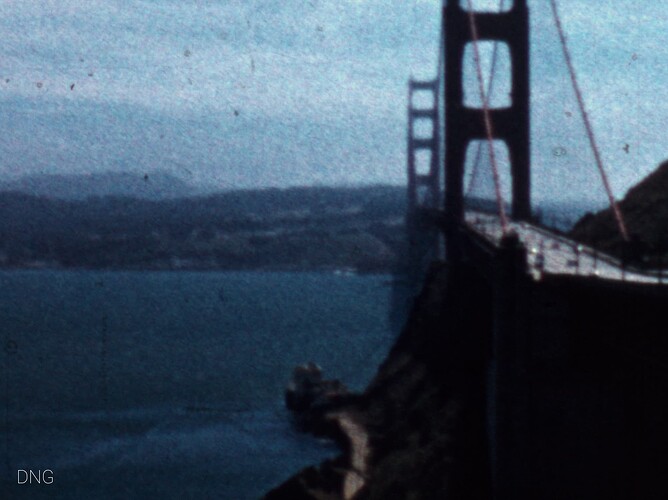
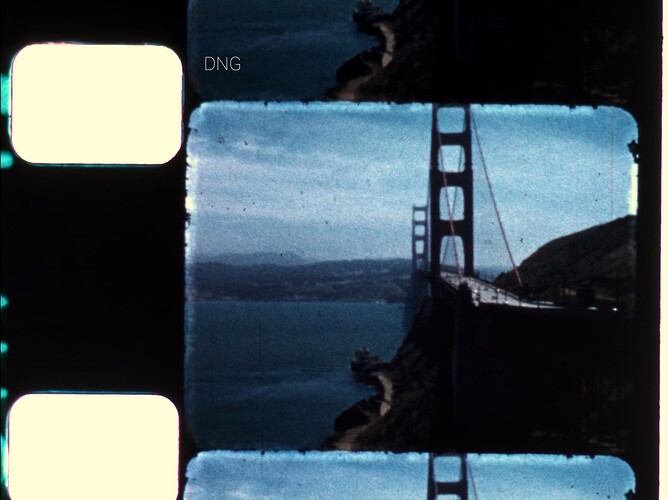
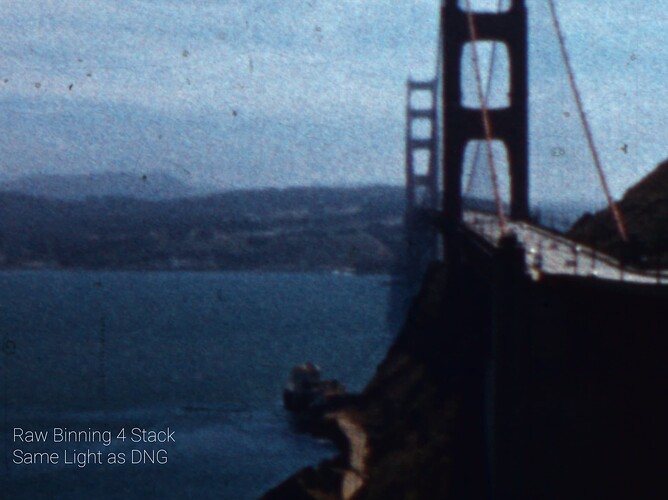
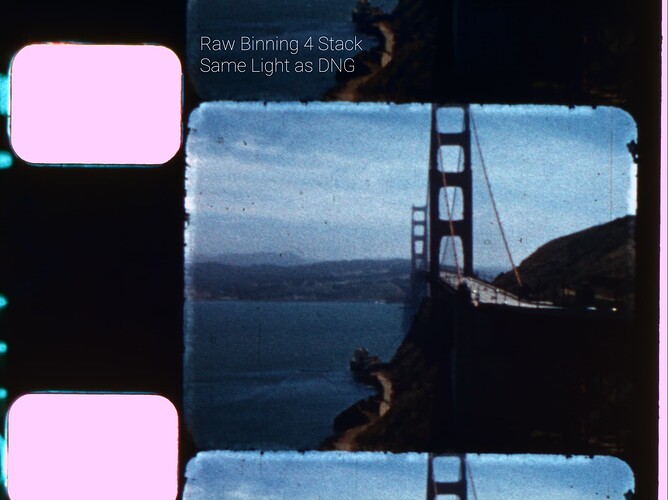
@verlakasalt I would like to try to replicate the banding. Can you share the camera settings?
This type of noise banding apparently isn’t all too unusual in underexposed areas and depends on the sensor.
It’s a 4000K white-light LED, yes. I’ll see how this noise comes out when I’ve done some noise reduction on the moving images. Maybe it’s not too bad in the end.
The way I’m choosing exposure is by letting out a histogram for one of the frames and checking which areas are over or underexposed (during picamera2 preview I save the dng as png, turn it into grayscale, then look for brightest and darkest areas. Then I take the colored image and highlight those areas, so I can quickly see whether exposure is alright). I thought it served me well. But trying to answer your questions I noticed something:
When I open the image in Camera Raw and sRGB, clipping inside the image area happens at +0.6 exposure (but not at the sprocket area*), so it looks like I’m in a good range for exposure.
When I change color space to ProPhoto RGB, I have to crank up exposure to +1.70, and then the first clipping that happens is at the sprocket hole area! The bright areas of the image look like they’re losing detail, but I guess that’s because my monitor can’t actually display all the colors. How frustrating!
So, in the end it looks like I can/should up exposure a bit, but I’d always rather have underexposed areas than overexposed ones…
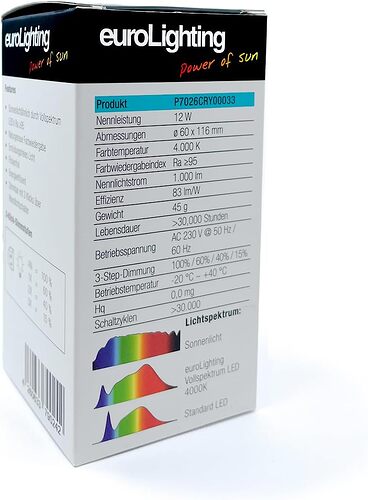
@PM490: I think you just have to capture a frame with a dark/shadowy area and underexpose by about 1 stop, then adjust exposure accordingly in whatever RAW software? The image in question was taken at exposure 2500, f5.6, analogue gain 1.0, red/blue 2.8/1.9, raw format SRGGB12, and using the scientific tuning file. The LED (bulb) has 12W and is supposedly around 1000 lumens.
…Off to testing different exposures…
Edit: Tested now with five different exposures (1/54, 1/125, 1/250, 1/320, 1/400) and 1/250 - or 4000 in picamera2 terms - and f4.7 (no idea why I was at f5.6) seems to be the sweet spot for my setup. I was hesitant to expose longer because I had issues with wobbliness before. But that seems to be gone now. I won’t complain…
Bottom line: My image is underexposed. ![]()
But if there are adequate ways to mitigate that type of noise in DaVinci, please tell!
Your exposure speed is correct when you max out the sensor’s dynamic range. That is quite different from what you seem to describe, namely adjusting exposure in the raw converter. Again, what I am talking about is the sensor’s exposure time, or, alternatively, your light source’s intensity pushing the whites towards the boundary limit of the sensor. They are set ok if the brightest image areas just do not burn out. This is very different from capturing an under-exposed raw image and pushing up “exposure” in your raw converter. That’s what you seem to do.
This is another one of those places where simple frame averaging–assuming your machine can hold the image steady across multiple exposures–can clean that up completely. By taking advantage of the temporal dimension we have access to (because we can make our subject sit perfectly still as long as we like), the “how noisy is the sensor” camera characteristic doesn’t impact us much.
You’d asked about noise in a different context back in August and the same links I replied with then apply to this situation, too.
I settled around averaging 8 exposures for my “high quality” scanning preset. That was used for that challenging “silhouette” shot above, where you can bring the exposure up several stops without getting any of that digital-looking noise.
The only trade-off is that it makes the machine a little slower, but that feels like a small price to pay for the extra quality…
Your exposure speed is correct when you max out the sensor’s dynamic range.
Hm. I’m mainly going by my experience with DSLR photography, where you can usually tweak exposure by a bit without perceptibly losing quality or introducing too much noise. I expected the same to apply to the HQ sensor - although to a lesser extent.
Anyway, I need to educate myself on this. I’ve never thought about it more deeply.
I settled around averaging 8 exposures for my “high quality” scanning preset.
Ohh! I couldn’t figure out what exactly you were doing to arrive at that (astounding) final image - I thought it was only about capturing the three channels individually. Argh. Guys, I just want to be done with scanning at some point, not learn about an “even better way” each week. ![]()
Edit:
65535 in the case you use the RP5
Is the value I see in the metadata the maximum possible value for my file format or is it actually referring to the pixels I’ve captured? How do I know I’ve maxed out white levels? Sorry, if you’ve answered that somewhere else before. I’m looking at things with a slightly updated brain now…
Ok, here’s the attempt of a short summary. In traditional analog photography, your reference point of exposure of normal (negative) film were the shadows. In contrast to this, with color-reversal film, you would set your exposure to image the brightest areas of your scene correctly, ignoring the shadows.
Now, with a digital sensor, you work like in the old days with color-reversal film. The simple reason - anything overexposed is lost forever. In the shadows, you can raise intensity levels digitally a little bit without too much compromises with respect to noise.
If you are doing automatic exposure with your DSLR (as a profi, you don’t), it is a good idea to underexpose the full frame a little bit - this makes sure that you have some headroom in the very bright image areas. But again, the professional way of exposure in the case of digital sensors is to choose an exposure time which brings the brightest image areas very close to the upper limit of the sensor (the whitelevel tag in your .dng). Because the bright areas are just below that limit, they certainly contain structure, that is, they are not burned-out. This maximal exposure also raises a little bit the shadow areas above the noise floor. So all good there too.
Any raw development program can only work with what the sensor did record, so you want to optimize the situation right at the sensor as best as possible. That is: you want the largest dynamic range you can possibly obtain. Since in the case of a film scanner the setup is fixed, as compared to usual DSLR photography, you can tune your exposure very precisely. That’s what you should do. The occasional advise with DSLRs to underexpose is just a little safety net to make sure the highlights do not burn out on an exposure based on image averages. This is not what you need or should employ in the case of film scanners.
The horizontal noise stripes mostly in the red channel have been discussed before. When spatio-temporal averaging is employed, these artifacts are also substantially reduced. Averaging 8 or more exposures is one option, another would be to employ denoising techniques similar to the ones discussed in the " Comparison Scan 2020 vs Scan 2024"-thread. But: try first to get your exposure in the right ballpark. In this respect:
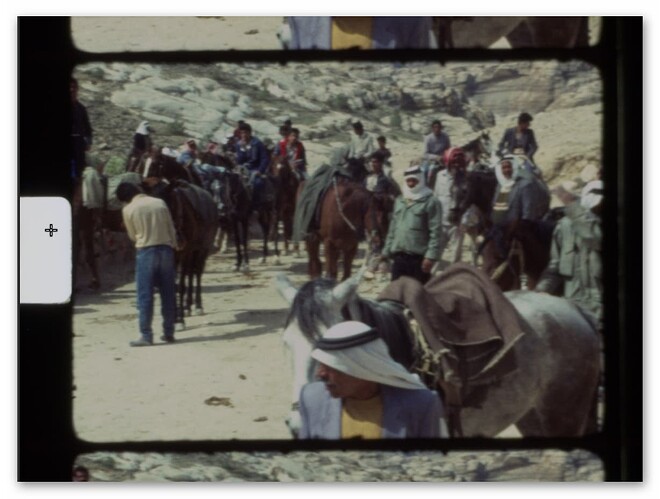
Well, standard software like RawTherapee can give you some hints. If you just load the raw image into the program and leave the exposure slider on its default value, you should be able to use the histograph graph for an analysis. Let’s assume this capture
which is underexposed. The cursor is placed into the sprocket area. In this case, the histogram
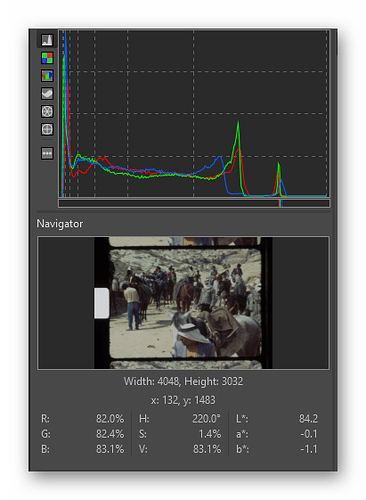
shows us the following:
The tiny colored lines in the bar shows us the values of the current pixel - which is clearly only placed at a fraction of the range available. Indeed, as the value panel below indicates, the brightest area in the image is only a little bit above 80% of the full range. Bad exposure…
Here’s a simple Python program you could use as well:
import numpy as np

import rawpy

path = r'G:\xp24_full.dng'

inputFile = input("Set raw file to analyse ['%s'] > "%path)
inputFile = inputFile or path

# opening the raw image file
rawfile = rawpy.imread(inputFile)

# get the raw bayer
bayer_raw = rawfile.raw_image_visible

# quick-and-dirty debayer
if rawfile.raw_pattern[0][0]==2:

    # this is for the HQ camera
    red    =  bayer_raw[1::2, 1::2].astype(np.float32)                                 # Red
    green1 =  bayer_raw[0::2, 1::2].astype(np.float32)                                 # Gr/Green1
    green2 =  bayer_raw[1::2, 0::2].astype(np.float32)                                 # Gb/Green2
    blue   =  bayer_raw[0::2, 0::2].astype(np.float32)                                 # Blue

elif rawfile.raw_pattern[0][0]==0:

    # ... and this one for the Canon 70D, IXUS 110 IS, Canon EOS 1100D, Nikon D850
    red    =  bayer_raw[0::2, 0::2].astype(np.float32)                                 # Red
    green1 =  bayer_raw[0::2, 1::2].astype(np.float32)                                 # Gr/Green1
    green2 =  bayer_raw[1::2, 0::2].astype(np.float32)                                 # Gb/Green2
    blue   =  bayer_raw[1::2, 1::2].astype(np.float32)                                 # Blue

elif rawfile.raw_pattern[0][0]==1:

    # ... and this one for the Sony
    red    =  bayer_raw[0::2, 1::2].astype(np.float32)                                 # red
    green1 =  bayer_raw[0::2, 0::2].astype(np.float32)                                 # Gr/Green1
    green2 =  bayer_raw[1::2, 1::2].astype(np.float32)                                 # Gb/Green2
    blue   =  bayer_raw[1::2, 0::2].astype(np.float32)                                 # blue

else:
    print('Unknown filter array encountered!!')

# creating the raw RGB
camera_raw_RGB = np.dstack( [red,(green1+green2)/2,blue] )

# getting the black- and whitelevels
blacklevel   = np.average(rawfile.black_level_per_channel)
whitelevel   = float(rawfile.white_level)

# info
print()
print('Image: ',inputFile)
print()

print('Camera Levels')
print('_______________')
print('             Black Level   : ',blacklevel)
print('             White Level   : ',whitelevel)

print()
print('Full Frame Data')
print('_______________')
print('             Minimum red   : ',camera_raw_RGB[:,:,0].min())
print('             Maximum red   : ',camera_raw_RGB[:,:,0].max())
print()
print('             Minimum green : ',camera_raw_RGB[:,:,1].min())
print('             Maximum green : ',camera_raw_RGB[:,:,1].max())
print()
print('             Minimum blue  : ',camera_raw_RGB[:,:,2].min())
print('             Maximum blue  : ',camera_raw_RGB[:,:,2].max())

dy,dx,dz = camera_raw_RGB.shape

dx //=3
dy //=3

print()
print('Center Data')
print('_______________')
print('             Minimum red   : ',camera_raw_RGB[dy:2*dy,dx:2*dx,0].min())
print('             Maximum red   : ',camera_raw_RGB[dy:2*dy,dx:2*dx,0].max())
print()
print('             Minimum green : ',camera_raw_RGB[dy:2*dy,dx:2*dx,1].min())
print('             Maximum green : ',camera_raw_RGB[dy:2*dy,dx:2*dx,1].max())
print()
print('             Minimum blue  : ',camera_raw_RGB[dy:2*dy,dx:2*dx,2].min())
print('             Maximum blue  : ',camera_raw_RGB[dy:2*dy,dx:2*dx,2].max())
If you run it, the following output would be created by it:
Set raw file to analyse ['G:\xp24_full.dng'] > g:\Scan_00002934.dng

Image:  g:\Scan_00002934.dng

Camera Levels
_______________
             Black Level   :  256.0
             White Level   :  4095.0

Full Frame Data
_______________
             Minimum red   :  249.0
             Maximum red   :  1202.0

             Minimum green :  248.5
             Maximum green :  2839.0

             Minimum blue  :  245.0
             Maximum blue  :  1533.0

Center Data
_______________
             Minimum red   :  254.0
             Maximum red   :  892.0

             Minimum green :  264.0
             Maximum green :  1946.0

             Minimum blue  :  256.0
             Maximum blue  :  1096.0
First, it lists the black and white levels encoded the raw file. Ideally, these correspond to true black and maximum white - in reality, they not always are correct. This image was captured with a RP4, so the values are the original ones of the HQ sensor. A black level of 254 and white level of 4095 (=2**12-1).
The next section lists the minimal and maximal values found by analysing the full frame. Not surprisingly, the maximal value encountered is 2839 (in the green channel), much less than the maximal possible value 4095. (The minimal values found are slightly less than the black level reported by the sensor, but that is quite usual.)
The next section spits out the same information, but only for the central region of the image (without the sprocket region). Here, the maximum value found is even lower, at 1946 units. So again, this example raw is severly underexposed.
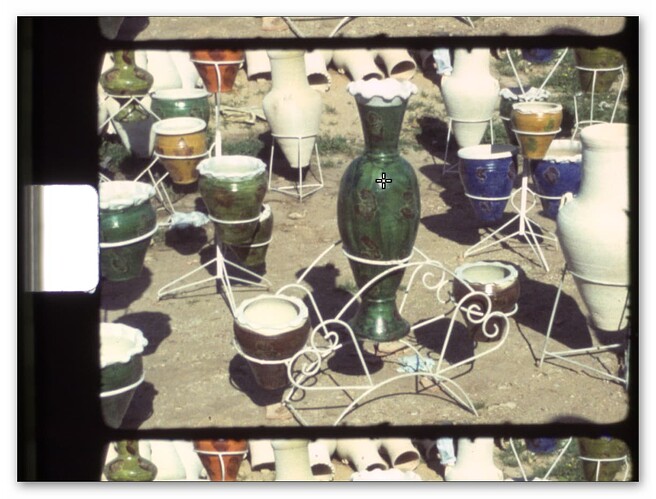
Here’s another example:
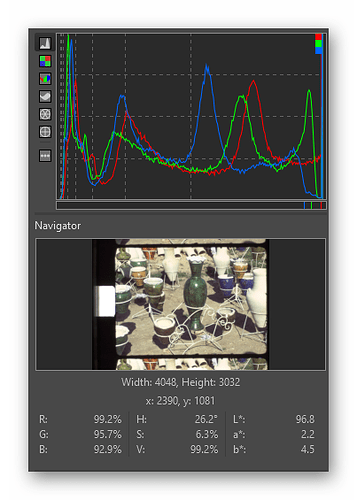
The testcursor is placed directly onto a highlight within the frame. The exposure value here is certainly less than the exposure value recorded in the sprocket hole. Simply because even the clearest film base eats away some light. Looking again at the histogram display:
we indeed get for our test point RGB-values very close to 100%, but slightly below. This is an example of a perfectly exposed film capture.
Running the above listed python script yields the following output:
Set raw file to analyse ['G:\xp24_full.dng'] > g:\RAW_00403.dng

Image:  g:\RAW_00403.dng

Camera Levels
_______________
             Black Level   :  4096.0
             White Level   :  65535.0

Full Frame Data
_______________
             Minimum red   :  4000.0
             Maximum red   :  36896.0

             Minimum green :  4088.0
             Maximum green :  65520.0

             Minimum blue  :  3936.0
             Maximum blue  :  49152.0

Center Data
_______________
             Minimum red   :  4384.0
             Maximum red   :  26208.0

             Minimum green :  4936.0
             Maximum green :  63136.0

             Minimum blue  :  4384.0
             Maximum blue  :  32384.0
We see that the black level now sits at 4096 units and the white level at 65535. The image was captured with the HQ sensor as well, but processed and created by a RP5 - and the RP5 rescales the levels to the full 16-bit range.
Anyway. The “Full Frame Data” (which includes the sprocket hole) indicates that indeed we end up very close to the maximum value (65520 vs. 65535 in the green channel). Even in the central image area we reach 63136, which is very close to the maximal possible value, 65535. This is an example of a correctly exposed film scanner image.
Hope this clarifies a little bit what I am talking about. Again - the discussion concerns only the intensity values the HQ sensor is sensing. And it is our goal to optimize that range as good as possible. These values have nothing to do with any funny exposure adjustments your raw converter might throw upon the raw data. That is a secondary story.
Thanks for the info.
I have some underexposed film and will try to find out more about the banding noise.
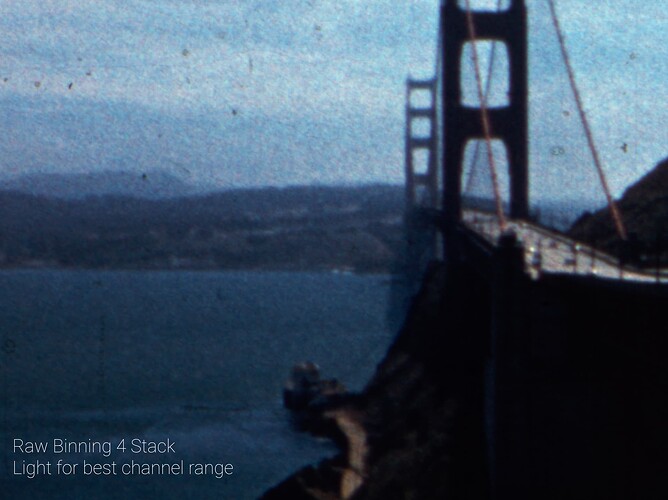
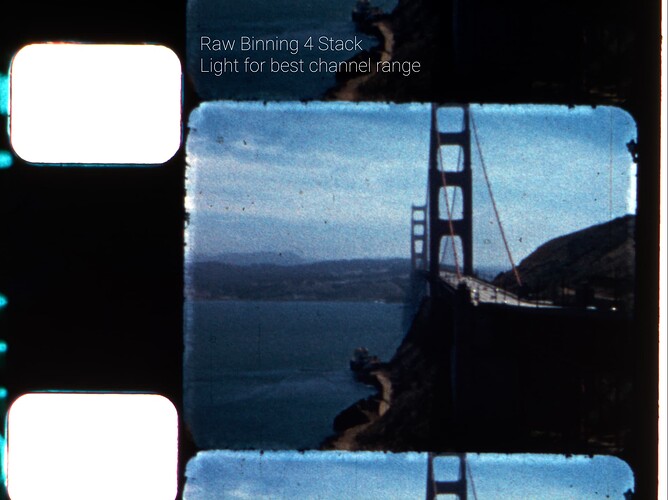
I could not resist testing the suggestion by @npiegdon in the context of raw capture-binning-individual channel exposure.
Davinci Resolve Timeline set to 2032x1520.
The capture is done using capture_raw, and the raw array is used for the stacking. Capturing, and stacking, and then debayering/binning the result takes about 900 milliseconds, compared to capturing without stacking at about 200 milliseconds.
Many thanks @cpixip for the elaborate reply. I’ll be looking into it as soon as I have more time.
I think I might’ve been doing it “right” all along. I did the exposure compensation in the RAW developer to check how far off I was from the ideal exposure. The capture from above is at 98% in the sprocket hole area, so I’m only slightly off. 1/250 meanwhile is too bright in some areas, but it does mitigate the dark area sensor noise a bit. Strangely, it doesn’t appear in every low-light area - I need to do a few more comparisons to tell whether this particular type of noise is predictable.
There’s probably not much else one can do without merging multiple images or single channel exposures, so I hope I’ll find an acceptable way to deal with it in post.
How do you deal with that type of noise since you’ve also switched to single dng capture?
Mentioned that above (see: " Comparison Scan 2020 vs Scan 2024"-thread), in addition, search the forum for the “degrain” keyword.
The first discussion about the noticable noise floor especially of the red channel was actually already here.
However, up to my knowledge, no one did so far some experiments into that specific topic.
My suspicion is that it is caused by the rather large gain multiplier of the red and blue color channels, compared to the green channel. My current operating point is redGain = 2.89 and blueGain = 2.1 - this gives me the correct color balance (whitepoint) on my scanner. Your own gain values, redGain = 2.8 and blueGain = 1.9 are not too far off from this.
The gain values necessary to map “white” of your footage to “white” on your raw capture depend on the characteristics of the light source you are using. In case you are using a whitelight LED illumination, you have no chance of fiddling around with that. Except you capture three consecutive raws, each optimized for each color channel, red, green and blue. That will triple your capture time. In addition, you end up with a scan where the color science needs more work during postprocessing, as “white” is not “white”, initially.
The other approach with respect to illumination (and I used to work with that) is what @PM490 is doing: using individual color LEDs for the red, green and blue channels. With such a setup, you can adjust each color channel optimally in terms of the dynamic range. However, proper color science becomes even more challenging as you sample the full spectrum of your source media only at very narrow bands. If you are unlucky, the sampling positions of your red, green and blue LED do not match well with the color response curves of your media, leading to color shifts - how strong that effect might be is currently unknown to me. There are professional scanners out there which use this approach and it is even recommended by some papers for severly faded material - I for my part switched from single LEDs to whitelight LEDs some time ago because I did not want to put too much work in postprocessing.
Let’s approach this from another perspective. The dynamic range of color-reversal film certainly exceeds the maximal dynamic range the HQ sensor can deliver. The HQ sensor works with 12 bit raw capture (if you select the correct mode), and old film stock can require up to 14-15 bits of dynamic range, depending on the type of film stock and the scene recorded. On average however, you normally encounter scenes requiring dynamic ranges in the order of 11 bit at most - so on the average, one should be fine with the HQ sensor.
Given, the rather large gain multipliers for the red and blue channel introduce additional noise in the capture. But this noise is present only in rather dark image areas. And most of the time, you would not want to push these image areas way out of the shadows. So these image areas will end up rather dark anyway in your final grade, resulting in noise which is not too annoying.
There are two postprocessing approaches here worth to be discussed. One is the “the grain is the picture” approach, striving to capture the dancing film grain as good as possible. The other one is the “content is the picture” where you would employ temporal degraining techniques to reduce film grain and recover image detail which is otherwise invisible in the footage.
Now, in case you are in the “grain is the picture” fraction: note that especially in S8 footage the film grain will be much larger (noisier) in dark shadow areas than areas which are feature a medium or even rather bright exposure. In the end, the film grain in the shadow areas will cover up the sensor noise in the red and blue channels by a large margin.
Well, in case you are employing any grain reduction process (“get rid of the grain, recover hidden image information”): this will of course also treat the sensor’s noise as well. So not only the film grain is gone, but also the sensor noise in the image.
So… - do we really need to care about the noise? Most probably not for most use cases.
I can only see a few scenarious were one would want to optimize the signal path to obtain better results:
- Recovering severly underexposed footage. One example I have is a pan from the
Griffith observatory in LA in the middle of the night - it’s basically black, with a few city lights shining through the blackness. The nice pattern of streets with cars I thought I was recording is not visible at all. But frankly, in a 2024 version of that film, I would simply throw out that scene… - Working with severly faded film. Well, I do not have such footage. But here, you have no chance at all to even come close to a sensible color science. So in this case, I would certainly opt for a LED illumination with carefully chosen narrowband LEDs, each adjustable independently for the film stock at hand. So a single capture should do. Simply for time reasons, I would not opt for averaging several raws or for capturing three independent exposures, each optimized for a single color channel. For me, that would only be an option if I did not have an adjustable illumination.
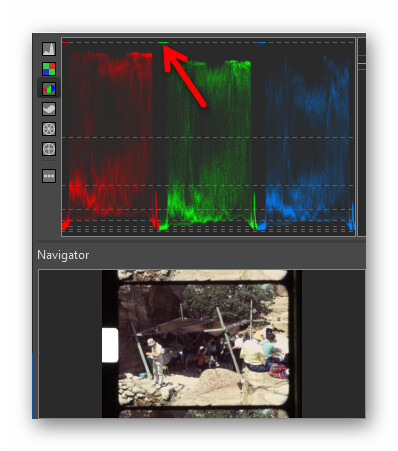
Finishing this post, I want again promote that you chose your exposure time wisely. Note that with the HQ sensor (and libcamera/picamera2), you are not limited by the usual exposure times your DSLR is using. My standard exposure time is for example 3594 us, which translates into `1/278’. Also, do not use the sprocket area for setting the exposure. Even in burned-out areas of the footage, the “clear” film base eats away some light. Here’s a quick visualization from RawTherapee:
I marked the intensities of the sprocket hole in the green channel with an arrow. As one can see, the sprocket hole is at 100% intensity. But: even the brightest image areas are way below the 100% line. In other words, I could have increased the exposure time in this capture even further without compromising the highlight areas.
Thanks for the lines of code. It confirmed that I’m at a good spot with exposure.
I also found out that slightly “overexposing” doesn’t pronounce the HQ cameras noise as much while the highlights can be entirely recovered.
I’m in fact rather in the “grain is the picture” camp, which makes the camera’s sensor noise all the more annoying. I can pretty much reveal it in any frame when I increase expousre and look at the film borders.
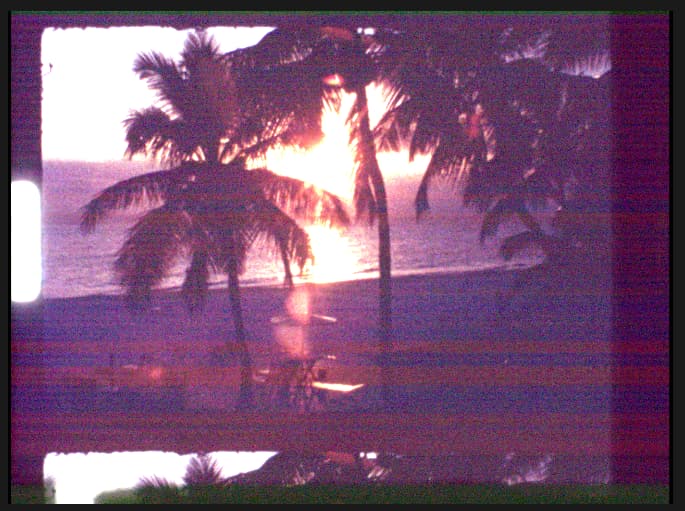
However, it gets much harsher if the image was slightly underexposed (or, if I go by sprocket hole brightness, correctly exposed):
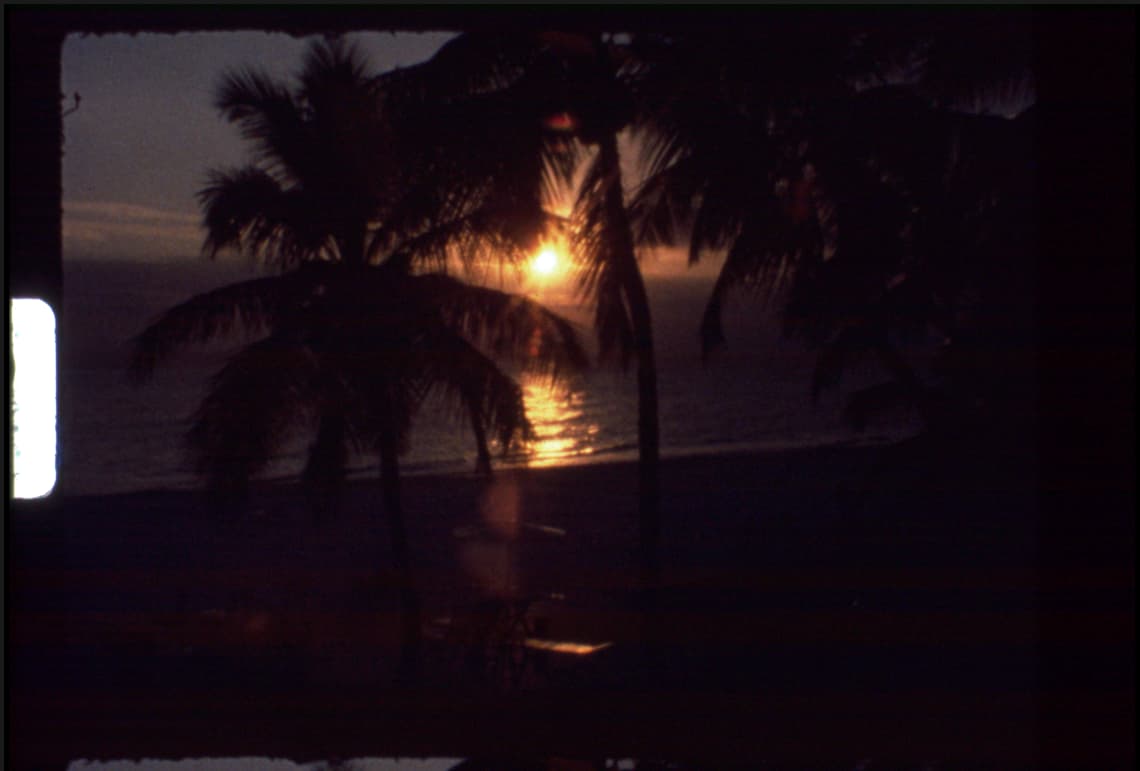
As long as the scene itself isn’t too dark, I think it won’t be an issue. But if it’s a really dark scene like this sunset:
It gets kind of bothersome, because you can see it even if you dial exposure down to the initial values. Each frame has a different pattern and it keeps jumping around.
My suspicion is that it is caused by the rather large gain multiplier of the red and blue color channels, compared to the green channel.
Has anyone tried using a warmer lamp, so that both channels roughly have the same gain? Or would that negatively affect the representation of the film’s original colors?
I vaguely remember a technique from astrophotography, in which you take one or more long-exposure images with the lens cap on, so you receive a noise profile that you can then somehow subtract from the actual image. Maybe there’s a way to create a kind of “noise stack” to oppose the Pi HQ camera’s sensor noise…? I’d need to re-check how that’s done exactly…
No. The noise is not static. That’s the reason why you can get rid of it by frame-averaging. The method you are thinking of helps in the case of fixed-pattern noise. Such noise is no issue here.
Besides, your example sunset shows in my opinion that you are chasing ghosts. The correct image is clearly the darker one, not the one where the shadows are pushed up way too bright. And your film grain will overwhelm the sensor’ s noise in the dark areas. If that’s bothers you, you can change your light source (not recommended) or take multiple captures from each frame (will increase scanning time). Or: use a better camera sensor than the HQ sensor.
your example sunset shows in my opinion that you are chasing ghosts. The correct image is clearly the darker one, not the one where the shadows are pushed up way too bright.
I know. I added it because you can see the noise pattern even in the correctly exposed one and it’s dancing around during playback. Finding the right amount of overexposure and then lowering exposure digitally, mitigates it a bit.
And your film grain will overwhelm the sensor’ s noise in the dark areas.
It doesn’t in this case because the digital noise is horizontal blue/red “stripes”.
@cpixip maybe I didn’t explain myself well in the exchange… I do not have color LEDs, only white LED. The captures therefore do capture the full spectrum as filtered by the bayer bands.
The individual exposure for each channel in the experiments is done by capturing each channel separately, each capture with a white LED intensity that would produce the range at each. Note that the camera exposure settings do not change in any of the alternatives.
Presently it is done manually, since the purpose is to determine the tradeoffs of each methode. Here is the sequence…
- Set camera exposure, it will not change.
- Set White LED intensity for best range of blue, capture raw array and stack, debayer/binning storing only blue.
- Set White LED intensity for best range of green, capture raw array and stack, debayer/binning storing only green.
- Set White LED intensity for best range of red, capture raw array and stack, debayer/binning storing only green.
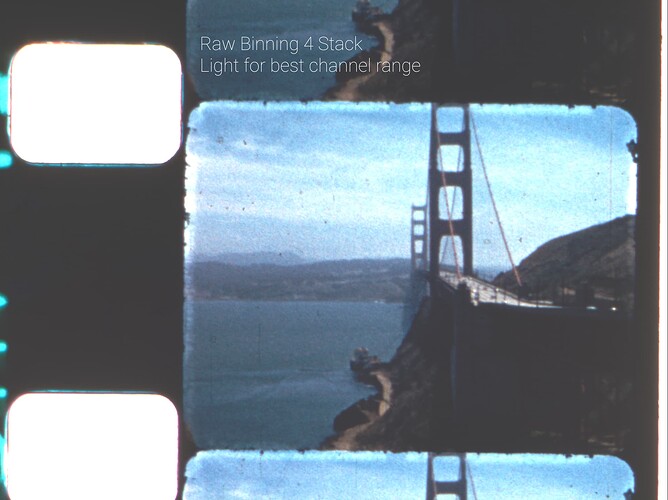
- Save 16-bit TIFF (12 bits for red/blue, 13 bits for green). This is the “light for best channel range”.
- Set White LED intensity for best level without clipping image at any channel. Capture raw array and stack, debayer/binning of all RGB channels and store.
- Save 16-bit TIFF (12 bits for red/blue, 13 bits for green). This is the “Raw Binning 4 Stack”
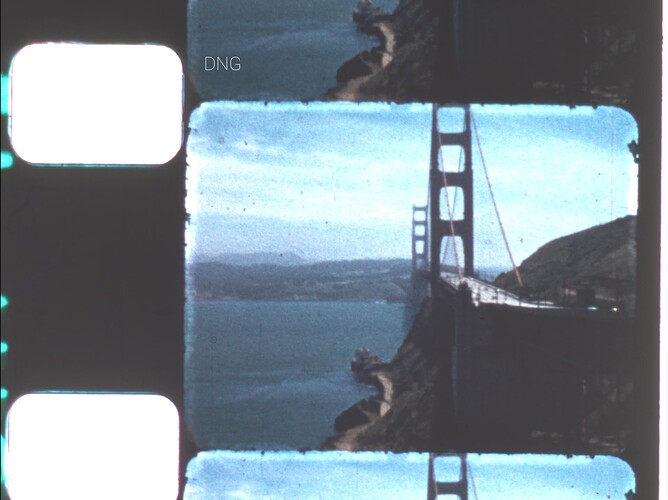
Capture/Save DNG with the same light settings as the prior capture.
I have not seen that level of banding noise.
How stable and well-regulated is the current source of your lamp?
Interesting question.
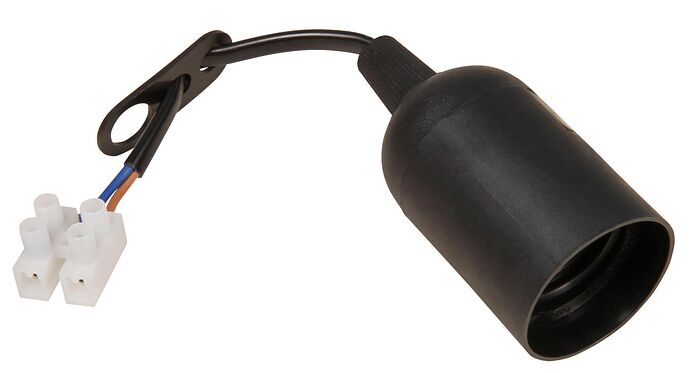
Lamp: euroLighting LED Bulb Plastic 12 W 4000 K E27 Full Spectrum and 3 Levels Dimming : Amazon.de: Lighting
Screwed into one of these.
Can’t say much else due to lack of knowledge.
The box indicates 3 step dimming, not sure what that is… but it appears that -to achieve the different dimming settings- there is something switching the LED.
It may be worth confirming that is not the source of the banding by testing with a different light source, best if it works from DC voltage. An LED flashlight -if you have one- can be a quick way to test.
– Pablo, that is an interesting idea. Especially together with
which in English translates to something like “3 levels of dimming”. And technically probably to something which is using something like PWM - which is not a good thing happening in a film scanner.
But: that might not be the real cause of the banding. First, it is clearly aligned with the horizontal direction of the sensor. Secondly, I did notice that banding in my scanner as well - and here the LEDs are driven by constant current sources.
How’s about your captures, being driven by optimized illumination per color channel - I would assume that the noise stripes are substantially reduced? What are your red and blue gain values? Theoretically, they could just be 1.0, so the noise characteristics of red and blue should be comparable to the green channel (neglecting that we actually have two green channels which end up averaged somehow in the RGB image).
If you quickly turn the lamp off and on again, it dims down. Always turns on brightest first if it was off for a while. I’m using the brightest setting.
The lines are always horizontal. Could it also be my pi camera cable connection…?
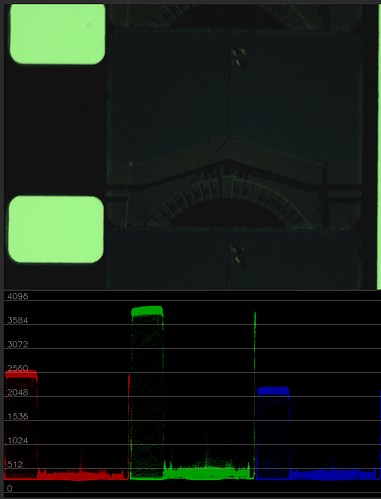
Stripes/banding: I have not seen any. I do see a somewhat noisier red -compared to other channels. When 4 images stacking is done, noise is reduced substantially, and with 8 images stacking the blacks become flatline (not shown).
See same source files as above increasing offset in resolve to better show blacks.
In early work with LEDs I did see some light-noise-banding issues, but nothing as dramatic as above. I suspect that the banding may be affected by the exposure setting and how the raw offset is removed. Have not yet tested with the exposure values provided by @verlakasalt. Will try to replicate the banding at a later time.
Settings:
- ExposureTime: 20000
- ColourGains: 1.62 Red 1.9 Blue
You are correct, these do not affect the raw values, only the DNG preview.
When the raw R and B are light-adjusted (individually captured), it is closer to a color balanced image. When all raw are captured with the same light setting, green is substantial higher.
Needless to say, one can also see how underexposed is some of the material I am experimenting with.
How bright ist your LED? ![]()
Edit: Never mind. Camera brain turned it into an absurdly 1/20000…
